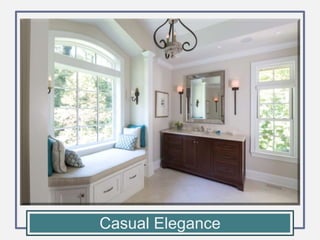
Casual Elegance - Master Bath Remodel
•Download as PPTX, PDF•
1 like•333 views

A before and after look at a master bath remodel done by Handcrafted Homes, Inc.

Recommended
More Related Content
What's hot
What's hot (18)
Viewers also liked
Viewers also liked (14)
Similar to Casual Elegance - Master Bath Remodel
Similar to Casual Elegance - Master Bath Remodel (20)
Recently uploaded
Recently uploaded (20)
Casual Elegance - Master Bath Remodel
- 2. Introduction/Project Description Our clients asked us to create an elegant Master Bath that felt warm and comfortable. We knew that too elegant would be stiff, but too relaxed could lose the sophistication. The home was built in the 1920’s and our team strived to keep the style of the early details and comfort of the home. We opted for elegant materials but balanced this look with a charming window seat. It’s a practical addition, too, as a place for storage and dressing. In order to add the window seat, we canceled the tub which was located between the commode on the right and the shower on the left. It was under an ugly window with the blind pulled down at all times. Also, we vaulted the ceiling over the window seat and the main bath to add drama. Our clients requested new vanity spaces as they had been sharing a small vanity cabinet. If possible, they each wanted their own vanity. They also hoped that their shower could be big enough for two, with multiple shower heads and a steam unit. The shower is situated exactly opposite from the window seat with the angled element matching the window seat. They also requested that we improve their closet space. When we redesigned the bath space, we took the old closet and used that additional square footage for the shower and the commode. An adjoining extra bedroom was made into the new closet with a doorway added on the master bathroom hall side. This beautiful redesign allows the client to have their wishes in a warm and elegant setting.
- 3. Bath Before This single vanity for two was inadequate for our clients (her toiletry items kept getting on his side). Note the reflection of the tub and commode in the mirror.
- 4. Window Seat The window seat is welcoming and it still emphasizes the elegance of this bath by the symmetry of the columns, the sconces, and the chandelier. Note the antique ridge beam. It complements the character of the home.
- 5. Design Changes Please note some of the design changes we made in the pictures below. The main bath ceiling was vaulted. After the tub was removed, the ceiling of the window seat was vaulted, too, and a new window with an arched transom was installed. The small window that was existing in the old shower (see left) was removed. The window that was near the commode (see right) was moved to make room for the new vanity.
- 6. The Tub Becomes a Window Seat The old bath had the tub crammed between the shower and commode. The new window seat is a comfortable location to get dressed and doubles as a storage area. Before
- 7. Feature The blinds over the old tub were never opened because of the difficulty of standing in the tub to open and close them. The blinds are now remotely controlled and can be opened, closed, or semi-closed. Note: the trim between the transom and the window contains a hidden pocket to hide the mechanism of the blinds. The arch transom is always uncovered.
- 8. Vanity The old commode was totally exposed to anyone entering the bath. The window next to the commode was moved to the right to make room for the new vanity. Note the soffits have speakers and additional lighting. All light fixtures are dark iron, which adds an important accent to this setting. Before
- 9. Vanity The vanities are equipped with receptacles, interior pullouts, and a hamper door that, for symmetry, was designed to appear to be drawers. Before
- 10. Vanities His and her vanities each have a Botticino slab top, mahogany cabinets, iron sconces, and a mirror framed with antique mirror. There is a sound system with speakers in the ceiling. His vanity conveniently has a TV over the door.
- 11. Shower The shower sits directly opposite the window seat, symmetrically situated between two doors. The door to the left opens to the commode and the door to the right to the entry hall. The floors are 24 inch by 24 inch tiles of Botticino marble with a heated floor system. The shower tile matches the bath floor. Shower details are made from matching marble slabs, i.e. the top of the bench seat.
- 12. Shower This spacious Botticino marble steam shower is large enough for two and has individual volume controls and multiple shower heads. His and her niches are positioned near the bench. Before
- 13. Commode The toilet is no longer one of the first things you see when you enter the bath. It is privately tucked within its own space. Before
- 14. Feature Note our special installation detail. We created flush floor registers made from the same Botticino marble used on the floor.
- 15. Hall The before picture shows the closet door entering into the bath entry hall, facing the master bedroom. As one can see, the door has been replaced by a piece of art and the new closet door is to the right. The entry into the bath is to the left. Before
- 16. Bath Entry Hall This illustrates the left side of the bath hall. It shows how one enters the bath from the bedroom. Note: the tile floor is flush with the hardwood floor. In the before picture of the master bedroom one can see the tub in the background.
- 17. Closet The additional bedroom that was adjacent to the master bedroom and bath was transformed into a large closet. The closet in the before picture below is now a part of the shower and commode space. Before
- 18. Challenges See above: where the old shower was located there was significant rot of the subfloor. Note to the right: the rotten joists. Many areas were discovered to be rotten from shower leaks and roof leaks.
- 19. Challenges Rotten ceiling joists and rotten siding shingles that were left from a previous renovation are pictured below. We had to move the plumbing vent pictured above and then repair the slate roof. Note the new framing at the shower.
- 20. Challenges When we moved the plumbing vent, we found that the plywood was rotten under the slate. Repairs to the slate roof were required.
- 21. Challenges The walls from the previous renovation were framed in a piecemeal manner. Very little was structurally sound. Additionally, the wiring was old and basically everything had to be rewired. Before After Note: the same wall, after reframing and insulation. This picture shows the old window in the shower was removed.
- 22. Challenges We found that, as a result of numerous renovations, the floor levels were not the same. A significant amount of work was required to reframe the entire floor system. There was not only rot, but we needed to structure the floor so that the new marble floor would be flush with the existing hardwood floor in the hall and bedroom. Note the extent of the mechanicals that had to be reconfigured underneath the floor system.
- 23. Success at last – our goals are realized!
Editor's Notes
- masterpiece