SlideShare ist ein Scribd-Unternehmen logo
1 von 49
1
MOBILE APPLICATION DEVELOPMENT
UNIT-I
1.J2ME Overview:
Inside J2ME
J2ME made its debut at the Java One Developers Conference in mid-1999 and is targeted to
developers of intelligent wireless devices and small computing devices who need to incorporate
cross-platform functionality in their products.
Consumers of mobile and small computing devices have high performance expectations for these
devices. They demand quick response time, compatibility with companion services, and full-
featured applications in a small computing device. Consumers expect the same software and
capabilities found on their desktop and laptop computers to be available on their cell phones and
personal digital assistants.
To meet these expectations, developers have to rethink the way they build computer systems.
Developers need to harness the power of existing front-end and back-end software found on
business computers and transfer this power onto small, mobile, and wireless computing devices.
Developers seeking to build applications that run on cell phones, personal digital assistants, and
various consumer and industrial appliances must strike a balance between a thick client and a
thin client. A thick client is front-end software that contains the logic to handle a sizable amount
of data processing for the system .
LimitedProcessing Heavyprocessing
2
Heavy processing Limited processing
How J2ME Is Organized
Traditional computing devices use fairly standard hardware configurations such as a display,
keyboard, mouse, and large amounts of memory and permanent storage. However, the new breed
of computing devices lacks hardware configuration continuity among devices. Some devices
don’t have a display, permanent storage, keyboard, or mouse. And memory availability is
inconsistent among small computing devices.
The lack of uniform hardware configuration among the small computing devices poses
a formidable challenge for the Java Community Process Program, which is charged with
developing standards for the JVM and the J2ME for small computing devices.
J2ME Configurations
There are two configurations for J2ME as of this writing. These are Connected Limited Device
Configuration (CLDC) and the Connected Device Configuration (CDC). The CLDC is designed
for 16-bit or 32-bit small computing devices with limited amounts of memory. CLDC devices
usually have between 160KB and 512KB of available memory and are battery powered. They
also use an inconsistent, small-bandwidth network wireless connection and may not have a user
interface.
J2ME Profiles
A profile consists of Java classes that enable implementation of features for either a particular
small computing device or for a class of small computing devices. Small computing technology
continues to evolve, and with that, there is an ongoing process of defining J2ME profiles. Seven
profiles have been defined as of this writing. These are the Foundation Profile, Game Profile,
Mobile Information Device Profile, PDA Profile, Personal Profile, Personal Basis Profile, and
RMI Profile.
 The Foundation Profile is used with the CDC configuration and is the core for nearly all
other profiles used with the CDC configuration because the Foundation Profile contains
core Java classes.
 The Game Profile is also used with the CDC configuration and contains the necessary
classes for developing game applications for any small computing device that uses the
CDC configuration.
3
 The Mobile Information Device Profile (MIDP) is used with the CLDC configuration
and contains classes that provide local storage, a user interface, and networking
capabilities to an application that runs on a mobile computing device such as Palm OS
devices. MIDP is used with wireless Java applications.
J2ME and Wireless Devices
Developers, mobile communications device manufacturers, and mobile network providers are
anxious to fill this need, but there is a serious hurdle: mobile communications devices utilize a
number of different application platforms and operating systems. Without tweaking the code, an
application written for one device cannot run on another device. Mobile communications devices
lack a standard application platform and operating system, which has made developing
applications for mobile communications devices a risky economic venture for developers.
The Wireless Application Protocol (WAP) forum became the initial industry group that set out to
create standards for wireless technology. Ericsson, Motorola, Nokia, and Unwired Planet formed
theWAP forum in 1997, and it has since grown to include nearly all mobile device
manufacturers, mobile network providers, and developers. The WAP forum created mobile
communications device standards referred to as the WAP standard. The WAP standard is an
enhancement of HTML, XML, and TCP/IP. One element of this standard is the Wireless Markup
Language specification, which consists of a blend o HTML and XML and is used by developers
to create documents that can be displayed by a microbrowser. A microbrowser is a diminutive
web browser that operates on a mobile communications device.
What J2ME Isn’t
Although J2ME is J2SE without some classes, developers shouldn’t assume that existing Java
applications would run in the J2ME environment without requiring modification to the code. The
write-once-run-anywhere philosophy of Java is a bit overstated when it comes to J2ME because
of resource constraints imposed by small computing devices.
Some J2SE applications require classes that are not available in J2ME. Likewise, resources
required by the J2SE application may not be available on the small computing device. This
means that developers must expect to test existing J2SE applications in the J2ME environment
and probably pare down the application to run using limited resources. Another misconception
about J2ME is the Java Virtual Machine implementation on the small computing device.
Other Java Platforms for Small Computing Devices
J2ME isn’t the only Java platform designed for small computing devices. Other Java platforms—
EmbeddedJava, JavaCard, and PersonalJava—predate J2ME. EmbeddedJava is the Java platform
used for small computing devices that are dedicated to one purpose and have a 32-bit processor
and 512KB of ROM and RAM. EmbeddedJava is based on JDK 1.1 and is being replaced by the
CDLC configuration. For more information about EmbeddedJava, visit
java.sun.com/products/embeddedjava. JavaCard is the Java platform used for smart cards, the
smallest computing device that supports Java. The JavaCard VM runs on small computing
devices that have 16KB of nonvolatile memory and 512 bytes of volatile memory. However,
unlike the Embedded Java platform, there isn’t any movement to replace JavaCard with J2ME
because of the resource constraints of the current generation of smart cards. Future smart card
generations will probably have great resources available and be compatible with the CDLC
configuration. You can find more information about JavaCard in java.sun.com/
products/javacard.
4
1.2 Small Computing Technology
1.2.1Wireless Technology
Wireless technology that is used in small computing devices and mobile communications
devices is the same radio technology Guglielmo Marconi used to provide an alternative
communication means to the telegraph and the telephone.
Moving a knife up and down in water causes the formation of a wave.
Aptitude
Waves are measured by wave height and wave frequency
The frequency of a wave causes the wave to take on specific characteristics. For example, a low-
frequency wave called a sound wave produces a frequency that can be heard by humans. Sound
waves travel a short distance through air. A higher-frequency wave called a radio wave cannot be
heard but can travel long distances in all directions and through solid objects. And even higher
frequencies called light waves take on other characteristics. Light waves can be seen, travel a
long distance in a limited direction, and cannot penetrate solid objects.
Waves are grouped according to frequencies that have similar characteristics in the
electromagnetic spectrum . there is an audio spectrum, a radio spectrum, and a light spectrum.
There are also subgroups within each spectrum, each of which has a variation of the
characteristics of the spectrum. The radio spectrum has divisions for television, microwave, and
X-ray frequencies. The light spectrum has divisions for infrared light, visible light, and
ultraviolet light.
1.2.2Radio Transmission
Radio transmission consists of two components. These are a transmitter and a receiver, both of
which must be tuned to the same frequency. A transmitter broadcasts a steady wave called a
carrier signal that does not contain any information .
Conceptually, you can think of a telephone dial tone as a carrier signal. A carrier signal has two
purposes. First, the carrier signal establishes a communications channel with the receiver . The
receiver knows the channel is open when the carrier signal is detected. The carrier signal also
serves as the wave that is encoded with information during transmission.
A radio transmitter encodes patterns of sound waves detected by a microphone by modifying the
carrier signal wave . The receiver decodes the pattern from the carrier wave and translates the
pattern into electrical current that directs a speaker to regenerate the sound waves captured by the
microphone attached to the transmitter.
5
1.2.3Limitations of Radio Transmissions
The distance a radio signal travels is based on the amount of energy used to transmit the radio
wave. This is similar to the energy used to plunge the knife into the dishpan of water. Using a
relatively small amount of energy causes the wave to barely reach the side of the dishpan.
However, plunging the knife into the dishpan with force causes the wave to overflow the sides of
the dishpan.
A carrier signal is a broadcast wave that does not contain any information
A carrier signal is used to establish a communications channel
Radio waves are measured in watts. Aradio signal transmitted at 50 megawatts travels twice the
distance a 25-megawatt radio signal travels. A radio signal gradually loses power the farther it
travels away from the transmitter. Radio engineers extend the range of transmission by using a
repeater. A repeater is both a radio receiver and radio transmitter, also known as a transceiver.
A repeater receives a radio signal and then retransmits the signal, thereby increasing the distance
the signal travels. Retransmission introduces new energy to power the signal for longer
distances.
Sound waves detected by a microphone modify the carrier signal
6
1.2.2 Radio Data Networks
Radio transmissions are commonly used to broadcast analog voice information on radio waves
that travel 360 degrees over the air and through many physical obstructions. However, radio
technology is also used to transmit digital information on those same waves.
Information is traditionally encoded as variations of an aspect of the wave. Encoding is achieved
by modifying the amplitude of the wave, known as amplitude modulation (AM), or modifying
the frequency of the wave, called frequency modulation (FM). Encoding uses many values to
represent information using AM and FM.
Hundreds of thousands of radio waves are simultaneously and independently transmitted.
Sometimes a radio receiver picks up an erroneous radio signal while tuned to its primary
frequency. The erroneous radio signal is known as interference and can disrupt the accurate
decoding of the transmitted information.
Today information is digitally encoded using binary values to represent information transmitted
on radio waves. Digitizing information enables receivers to accurately decode transmitted
information because the degree of uncertainty in the encoded information is far less than
experienced in analog encoded information.
Radio transmitters, repeaters, and receivers are organized to form a radio network that extends
transmissions over great distances. Radio networks are scalable because repeaters are placed in
the network to increase the distance that the original transmission travels.
Data Packets
Radio transmitters send one message at a time over a communications channel. This is
similar to sending one telephone call at a time over a telephone line. Each telephone
call is placed in a queue while waiting for the current telephone call to end. As you can
imagine, telephone calls could easily back up whenever there are more calls than there
are empty telephone lines.
Digital radio networks use packet switching technology to transmit multiple messages
simultaneously over a communications channel. Each message is divided into small pieces and
placed in an electronic envelope called a packet . Apacket contains information that identifies the
sender and the receiver, a digitized portion of the message, the sequence number of the packet,
and error-checking information.
Originator address Information
Destination address Sequence code Error checking
A message is divided into small pieces that are placed in an electronic
envelope called a packet
1.2.3 Microwave Technology
Microwave is a subspectrum of the radio spectrum and has many characteristics of radio waves
discussed previously in this chapter. However, microwaves travel in one unobstructed direction.
Any obstruction, such as a mountain or building, disrupts microwave transmission.
There are two kinds of microwave networks: terrestrial and satellites. Terrestrial microwave
networks transmit a microwave signal over a terrain, such as buildings in an office complex.
Satellite microwave networks transmit a microwave signal between a ground station and orbiting
7
satellites and among orbiting satellites Earth-to-satellite transmissions are slower than terrestrial
microwave transmissions, which causes unnatural pauses to occur in the transmission. This is
noticeable during a live international television broadcast when a pause occurs between the time
a television news anchor questions a reporter and the reporter’s response. Therefore, satellite
microwave transmission may not be suitable for real-time two-way communications where
nearly instantaneous transmission is expected.
Satellite Networks
A satellite is an orbiting repeater that receives a microwave transmission from an earth station or
from other satellites, then retransmits the signal to a microwave receiver located on the ground or
in another satellite. The first generation of satellites used for the military were stationed in
geosynchronous orbit at a fixed location 22,300 miles above the surface of the earth. However,
the geosynchronous orbit hampers real-time transmission because of the signal delay between
earth and the satellite, which makes geosynchronous orbiting satellites unacceptable for
commercial two-way real-time communication.
A newer breed of satellite technology, called Low Earth Orbiting Satellite (LEOS),overcame the
communications delay by positioning satellites lower than geosynchronous orbit—between 435
miles and 1,500 miles above the earth. LEOS eliminated delays in communication, but
introduced two new problems. First, LEOS covers a smaller area of the earth, and therefore more
satellites are required to cover the same ground area as covered by geosynchronous satellites.
In an effort to compromise between LEOS and geosynchronous satellites, another breed of
satellites called the Middle Earth Orbit (MEO) was developed. MEO orbits between LEOS and
geosynchronous satellites—6,000 to 13,000 miles—and thus has less delay than geosynchronous
satellites and poses less difficulty than LEOS for ground stations to locate.
1.2.4 Mobile Radio Networks
The infrastructure of cellular telephone technology is the backbone of wireless small computing
mobile communications and enables these devices to connect to traditional communications
systems. The forerunner of cellular telephone technology is a private radio technology. Service
and trucking companies and government agencies use private radio technology to communicate
with employees over frequencies isolated from other radio frequencies. For example, package
carriers like Federal Express use privat radio networks to track packages. Private radio
transmitted analog information when first introduced but later expanded into digital
communication as the need for paging and messaging services materialized.
Cellular Telephone Networks
A cellular telephone network comprises mobile transceivers, called cellular telephones, and a
network of fixed transceivers, called base stations, that are strategically positioned along the
terrain. Base stations are used to connect cellular telephones to the ground-based telephone
system.
There are two kinds of cellular networks: analog and digital. Cellular telephones began in the
1970s with the expansion of AT&T into the mobile telephone service market. Cellular
telephones used analog technology at that time. This changed in mid-1995 when IBM developed
technology that digitized information transmitted over the cellular telephone network. Cellular
telephone networks then became capable of transmitting both voice and data.
The transmission range of a cellular telephone is determined by the strength of the
battery powering the phone and the location of the nearest base station. Transmission range
drops as power is drained from the cellular telephone and the telephone is taken farther from a
base station.
8
Cellular Digital Packet Data
IBM pioneered digital cellular telephone networks with the introduction of their Cellular Digital
Packet Data (CDPD) protocol, commonly known as IP wireless. IP wireless requires that an
Internet protocol (IP) address be assigned to each cellular transceiver in the cellular telephone
network. An IP address uniquely identifies each device within the cellular telephone network and
is used to reestablish a connection if communication is lost during a hand-off.
Base stations have multiple entry points called ports, each of which is identified by a unique port
number. A transceiver is assigned to a base station port in the cellular telephone network.
Atransceiver continues to transmit to the port number until a handoff occurs, at which time the
transceiver is assigned another port number associated with the next base station.
Digital Wireless Transmissions
A digital cellular telephone network can transmit both voice and data simultaneously using
multiplex transmission. There are three multiplex transmission methods used on a digital cellular
telephone network: Code Division Multiple Access (CDMA), Time Division Multiple Access
(TDMA), and a third-generation wireless standard called 3G. CDMAuses spread-spectrum
transmission to use multiple communications channels for transmission, which dramatically
increases data throughput over the network. The cellular telephone temporarily uses on-board
memory in transceivers to store data to keep transmissions flowing during a hand-off. This is
called a soft hand-off. TDMA uses one communications channel shared among transmissions by
using time slots. Transmission time is divided into time slots, and then each packet is assigned to
a time slot. The 3G multiplexing technique uses either CDMA or TDMA to increase the
throughput to 56 kilobits per second.
Cell Phones and Text Input
Traditional cellular telephones have a keypad that contains numbers and letters. (European
traditional cellular telephones have only numbers.) Letters were designed to identify telephone
exchanges—local switching stations that serviced a group of customers. Each switching station
was referred to by a name that implied the location of the switching station. For example, there
was a switching station called Murray Hill that covered the Murray Hill section of New York
City.
The first two letters of the name of the switching station were used to replace the first two digits
of a seven-digit phone number. Let’s say a customer was assigned Murray Hill 5 1000 as a
telephone number. A caller dials MU 5 1000. Today the person would call 685-1000 since the
switching station naming convention was dropped decades ago. Today customers expect to be
able to enter textual information using the cellular telephone keypad. However, there are two
problems with the keypad. First, the keypad doesn’t contain the letters Q or Z. And each numeric
key, except for the first key, contains three letters.
Bluetooth Wireless Network
Many small computing devices such as those used in consumer appliances communicate with
each other by using a low-power radio network that uses Bluetooth technology. Bluetooth
technology broadcasts within a 400-foot radius, which is expected to extend to nearly 4,000 feet,
and so is perfect for a wireless network in an office.
Transmission consists of short data packets to maximize throughput to one megabit per second.
The short size of a packet reduces retransmission time when errors are detected and packets must
be resent. Security is provided through frequency hopping that occurs at 1,600 hops per second,
practically eliminating the risk that the signal will be intercepted. Data is also encrypted before
being broadcast.
9
1.2.5 Messaging
One of the first popular wireless mobile communications devices was a pager. A pager displays
any series of numbers that were sent by a caller. Technically, the series of numbers represented
the caller’s telephone number and implied that the call be returned. Practically, the series of
numbers could represent anything to which the caller and the receiver agree on. For example, it
was common for systems administrators to have their system send a 911 call to a pager whenever
there was a systems problem. Some systems administrators even devised a code that was sent
indicating which system transmitted the call and the nature of the problem. Drug dealers were
also notorious for using pagers to send encoded messages of drug deliveries. Abuyer would call
the pager and send a series of numbers that told the dealer the type of drug, quantity, and
delivery location for the buy.
Today’s wireless mobile communications devices offer text messaging services that enable short
textual messages to be sent to the device from any device that has access to the service. Cellular
telephone companies offer three types of messaging services: Short Message Service (SMS),
Cell Broadcast Service (CBS), and Unstructured Supplementary Services Data (USSD). SMS
type of messaging is capable of sending a maximum of 160 characters on the
control channel of a cellular telephone network. A control channel is a communications channel
used to manage cellular telephone calls. Messages sent using SMS are sent and received during a
cellular telephone call because the telephone call and the message use different communications
channels for transmission. However, there may be a slight delay between transmission of a
message and when the message is received because SMS messaging uses store-forwarding
technology, where the message is temporarily stored in a mailbox before being delivered to the
receiver.
The CBS type of messaging broadcasts a maximum of 15 pages of 93 characters per page to
every device on the network. Everyone on the network receives the same message, which is why
CBS messaging has had limited success in the market.
1.2.6 Personal Digital Assistants
A personal digital assistant (PDA) is probably the most commonly used small mobile
computing device next to a cellular telephone. PDAs are lightweight and small enough to
fit in a pocket, and they run essential applications. PDA is a generic name that applies
to a simple digital telephone directory and to more elaborate mobile computing devices
that run a spreadsheet, word processor, email, and a variety of customized programs.
All PDAs are small computing devices that contain an operating system, processor,
memory, and a port to connect the PDA to peripherals and external computing
devices. There are three commonly used operating systems on a PDA: EPOC, Palm OS,
and Windows CE. EPOC is used in the Psion product line, Palm OS in the Palm PDAs, and
Windows CE on various pocket PC devices.
Mobile Power
Power is the primary challenge facing the mobile small computing industry. Consumer
expectations are high for mobile small computing devices. They want desktop performance
anytime and anywhere they power up. Unfortunately, improvements in power storage technology
haven’t kept pace with mobile computing technology.
Every mobile small computing device is powered by one or more batteries that have
a limited life span after which there is no electricity to operate the device. Engineers reduce
power consumption by removing power-hungry components and impose powersaving techniques
such as deactivating components when a component is not in use. The length of time a mobile
10
small computing device is operational depends on how well and how long a battery holds its
electrical charge. For example, a PDAmight operate steadily for 20 hours, while a cellular
telephone remains operational for 10 hours. Th actual time a battery remains charged depends
on a number of factors. These include the type of battery in use, the condition of the battery, and
the power consumption of each operation. For example, standby operation for a cellular
telephone consumes less power than transmitting a signal.
Set-Top Boxes
With the onset of cable television and satellite television came a demand for another type of
small computing device called a set-top box. A set-top box is the device that connects a
television to a cable signal or satellite signal received from a service provider. Set-top box
technology has evolved with the increasing demand by consumers for television and related
services such as email and video on demand. The first-generation set-top box had a simple
function: it received a scrambled analog television transmission from the service provider,
unscrambled the signal, and sent the unscrambled signal to the television.
Inside Look at a Set-Top Box
All modern set-top boxes perform five common operations. These are to decode a digital signal
received from the service provider, authenticate access rights, transmit a signal to a television,
transmit audio information to create surround sound, and provide interactive services such as
access to the Internet and email. Multiple signals are received by the set-top box from the service
provider, each of which is transmitted over its own communications channel. The tuner circuit
within the set-top box filters all communications channels except the channel selected by the
consumer. The signal from the selected channel is sent to the demodulator circuit. The
demodulator circuit is a chip that converts the signal into binary data before sending the binary
signal to the demultiplexer chip.
Smart Cards
Asmart card is a mobile small computing device that is used to store secured information Smart
cards are replacing magnetic strip cards such as credit cards. Typically, a smart card has an 8-bit
CPU and 64KB of EEPROM along with a modest amount of memory. And similar to set-top
boxes, there are many operating systems used in smart cards. The more commonly used smart
card operating systems include Java Card from Sun, MultOS from MasterCard, Smart Card for
Windows from Microsoft, and Visa Open Platform. Smart cards are used to provide real-time,
interactive access to secured data stored in the memory of the smart card. Asecurity plan protects
this information from unauthorized access and manipulation of information stored in memory.
11
UNIT-II
J2ME Architecture and Development Environment :
2.1 J2ME Architecture
The modular design of the J2ME architecture enables an application to be scaled based on
constraints of a small computing device. J2ME architecture doesn’t replace the operating system
of a small computing device. Instead, J2ME architecture consists of layers located above the
native operating system, collectively referred to as the Connected Limited Device Configuration
(CLDC). The CLDC, which is installed on top of the operating system, forms the run-time
environment for small computing devices.
The J2ME architecture comprises three software layers . The first layer is the configuration layer
that includes the Java Virtual Machine (JVM), which directly interacts with the native operating
system. The configuration layer also handles interactions between the profile and the JVM. The
second layer is the profile layer, which consists of the minimum set of application programming
interfaces (APIs) for the small computing device. The third layer is the Mobile Information
Device Profile (MIDP). The MIDP layer contains Java APIs for user network connections,
persistence storage, and the user interface. It also has access to CLDC libraries and MIDP
libraries.
Layers of the J2ME architecture
OEM
apps MIDP
J2ME APs
OEM Configuration
classes Java virtual Machine
Operating system
A small computing device has two components supplied by the original equipment manufacturer
(OEM). These are classes and applications. OEM classes are used by the MIDP to access device-
specific features such as sending and receiving messages and accessing device-specific persistent
data. OEM applications are programs provided by the OEM, such as an address book. OEM
applications can be accessed by the MIDP.
2.2 Small Computing Device Requirements
There are minimum resource requirements for a small computing device to run a J2ME
application. First the device must have a minimum of 96 × 54 pixel display that can handle
bitmapped graphics and have a way for users to input information, such as a keypad, keyboard,
or touch screen. At least 128 kilobytes (KB) of nonvolatile memory I necessary to run Mobile
Information Device (MID), and 8KB of nonvolatile memory I needed for storage of persistent
application data. To run JVM, 32KB of volatile memory must be available. The device must also
provide two-way network connectivity. Besides minimal hardware requirements, there are also
minimal requirements for the native operating system. The native operating system must
implement exception handling, process interrupts, be able to run the JVM, and provide schedule
capabilities. Furthermore, all user input to the operating system must be forwarded to the JVM,
otherwise the device cannot run a J2ME application. Although the native operating system
doesn’t need to implement a file system to run a J2ME application, it must be able to write and
read persistent data (data retained when the device is powered down) to nonvolatile memory.
12
2.3 Run-Time Environment
A MIDlet is a J2ME application designed to operate on an MIDP small computing device. A
MIDlet is defined with at least a single class that is derived from the javax .micro edition. Midlet
.MIDlet abstract class. Developers commonly bundle related MIDlets into a MIDlet suite, which
is contained within the same package and implemented simultaneously on a small computing
device. All MIDlets within a MIDlet suite ar considered a group and must be installed and
uninstalled as a group . Members of a MIDlet suite share resources of the host environment and
share the same instances of Java classes and run within the same JVM. This means if three
MIDlets from the same MIDlet suite run the same class, only one instance of the class is created
at a time in the Java Virtual Machine. A key benefit of the relationship among MIDlet suite
members is that they share the same data, including data in persistent storage such as user
preferences.
MIDlet suite small computing device
MIDlet 1
MIDlet 1 MIDlet 1
MIDlet 2
MIDlet2 MIDlet 2
MIDlet 3
MIDlet 4
Package MIDlet 4 Load MIDlet 4
MIDlets are packaged into MIDlet suites,which are loaded in a small computing device.
Sharing data among MIDlets exposes each MIDlet to data errors caused by concurrent
read/write access to data. This risk is reduced by synchronization primitives on the MIDlet suite
level that restrict access to volatile data and persistent data. However, if a MIDlet uses multi-
threading, the MIDlet is responsible for coordinated access to the record store.
Data cannot be shared between MIDlets that are not from the same MIDlet suite because the
MIDlet suite name is used to identify data associated with the suite. A MIDlet from a different
MIDlet suite is considered an unreliable source.
Inside the Java Archive File
All the files necessary to implement a MIDlet suite must be contained within a production
package called a Java archive (JAR) file. These files include MIDlet classes, graphic images (if
required by a MIDlet), and the manifest file. The manifest file contains a list of attributes and
related definitions that are used by the application manager to install the files contained in the
JAR file onto the small computing device. Nine attributes are defined in the manifest file; all but
six of these attributes are optional.
Manifest File Attribute Description
MIDlet-Name MIDlet suite name.
MIDlet-Version MIDlet version number.
MIDlet-Vendor Name of the vendorwho supplied the MIDlet.
MIDlet-n Attribute per MIDlet. Values are MIDlet name,optional icon, and MIDlet class name.
MicroEdition-Profile Identifies the J2ME profile that is necessary to run the MIDlet.
MIDlet-Icon Icon associated with MIDlet, must be in PNGimage format (optional).
MIDlet-Description Description of MIDlet (optional).
MIDlet-Info-URL URL containing more information about the MIDlet.
13
Inside the Java Application Descriptor File
You may include a Java application descriptor (JAD) file within the JAR file of a MIDlet suite as
a way to pass parameters to a MIDlet without modifying the JAR file . A JAD file is also used to
provide the application manager with additional content information about the JAR file to
determine whether the MIDlet suite can be implemented on the device.
AJAD file is similar to a manifest in that both contain attributes that are name:value pairs.
Name:value pairs can appear in any order within the JAD file. There are five required system
attributes for a JAD file:
MIDlet-Name
MIDlet-Version
MIDlet-Vendor
MIDlet-n
MIDlet-Jar-URL
A system attribute is an attribute that is defined in the J2ME specification.contains a complete
list of system attributes. Listing 3-2 illustrates a typical JAD file. All JAD files must have the.jad
extension.
JAD File Attribute Description
MIDlet-Name MIDlet suite name.
MIDlet-Version MIDlet version number.
MIDlet-Vendor Name of the vendor who supplied the MIDlet.
MIDlet-n Attribute per MIDlet. Values are MIDlet name,
optional icon, and MIDlet class name.
MIDlet-Jar-URL Location of the JAR file.
MIDlet-Jar-Size Size of the JAR file in bytes (optional).
MIDlet-Data-Size Minimum size (in bytes)for persistent data
storage (optional).
MIDlet-Description Description of MIDlet (optional).
MIDlet-Delete - Confirm Confirmation required before removing the
MIDlet suite (optional).
MIDlet-Install-Notify Send installation status to given URL (optional).
2.4 MIDlet Programming
Programming a MIDlet is similar to creating a J2SE application in that you define a class and
related methods. However, a MIDlet is less robust than a J2SE application because of the
restrictions imposed by the small computing device. The following overview gives you a glimpse
of how a MIDlet is created. You’ll learn the details of building your own MIDlet in the “Hello
World J2ME Style” section later in this chapter.
A MIDlet is a class that extends the MIDlet class and is the interface between application
statements and the run-time environment, which is controlled by the application manager. A
MIDlet class must contain three abstract methods that are called by the application manager to
manage the life cycle of the MIDlet. These abstract methods are startApp(), pauseApp(), and
destroyApp().
The startApp() method is called by the application manager when the MIDlet is started and
contains statements that are executed each time the application begins executio. The pauseApp()
method is called before the application manager temporarily stops the MIDlet. The application
manager restarts the MIDlet by recalling the startApp() method.
14
public class BasicMIDletShell extends MIDlet
{
public void startApp()
{
}
public void pauseApp()
{
}
public void destroyApp( boolean unconditional)
{
}
}
Both the startApp() and pauseApp() methods are public and have no return value nor parameter
list. The destroyApp() method is also a public method without a return value. However, the
destroyApp() method has a boolean parameter that is set to true if the termination of the MIDlet
is unconditional, and false if the MIDlet can throw a MIDletStateChangeException telling the
application manager that the MIDlet does not want to be destroyed just yet.
Event Handling
AMIDlet is an event-based application. All routines executed in the MIDlet are invoke in
response to an event reported to the MIDlet by the application manager. The initial event that
occurs is when the MIDlet is started and the application manager invokes th startApp() method.
The startApp() method in a typical MIDlet contains a statement that displays a screen of data and
prompts the user to enter a selection from among one or more options. The nature and number
of options is MIDlet and screen dependent. A Command object is used to present a user with a
selection of options to choose from when a screen is displayed. Each screen must have a
CommandListener.
User Interfaces
The design of a user interface for a MIDlet depends on the restrictions of a small computing
device. Some small computing devices contain resources that provide a rich user interface, while
other more resource-constrained devices offer a modest user interface. A rich user interface
contains the following elements, and a device with a minimal user interface has some subset of
these elements as determined by the profile used for the device.
A Form is the most commonly invoked user interface element found in a MIDlet and is used to
contain other user interface elements. Text is placed on a form as a StringItem, a List, a
ChoiceGroup, and a Ticker.
Device Data
Small computing devices don’t have the resources necessary to run an onboard database
management system (DBMS). In fact some of these devices lack a file system. Therefore, a
MIDlet must read and write persistent data without the advantage of a DBMS or file system.
Start MIDlet1
Pause MIDlet1
Start MIDlet1
Terminate MIDlet1
Start App()
Pause App()
DestroyApp()
15
A MIDlet can use an MIDP class—RecordStore—and two MIDP interfaces—
RecordComparator and RecordFilter—to write and read persistent data. A RecordStore class
contains methods used to write and read persistent data in the form of a record Persistent data is
read from a RecordStore by using either the RecordComparato interface or the RecordFilter
interface. You’ll learn how to use RecordStore, RecordComparator, and RecordFilter later in this
book.
2.5 Java Language for J2ME
Floating-point math is probably the most notable missing feature of J2ME. Floatingpoint math
requires special processing hardware to perform floating-point calculations. However, most
small computing devices lack such hardware and therefore are unable to process floating-point
calculations. This means that your MIDlet cannot use any floating-point data types or
calculations.
The second most notable difference between the Java language used in J2SE and J2ME is the
absence of support for the finalize() method. The finalize() method in J2SE is automatically
called before an instance of a class terminates and typically contains statements that free
previously allocated resources. However, resources in a small computing device are too scarce to
process the finalize() method.
Changes were also made in the Java Virtual Machine that runs on a small computing device
because of resource constraints. One such change occurs with the class loader. JVM for small
computing devices requires a custom class loader that is supplied by the device manufacturer and
cannot be replaced or modified.
System Classes
java.lang.Class java.lang.Runtime java.lang.System
java.lang. Object java.lang.String java.lang.Thread
java.lang.Runnable java.lang.StringBuffer java.lang.Throwable
Data Type Classes
java.lang.Boolean java.lang.Character java.lang.Long
java.lang.Byte java.lang.Integer java.lang.Short
Collection Classes
java.util.Enumeration java.util.Stack
java.util.Hashtable java.util.Vector
2.6 J2ME Software Development Kits
AMIDlet is built using free software packages that are downloadable from the java.sun .com web
site, although you can purchase third-party development products such a Borland JBuilder
Mobile Set, Sun One Studio 4 (formerly Forte for Java), and WebGain VisualCafe Enterprise
Suite. Three software packages need to be downloaded from java.sun.com. These are the Java
Development Kit (1.3 or greater) (java.sun.com/ j2se/downloads.html), Connected Limited
Device Configuration (CLDC) (java.sun. com/products/cldc/), and the Mobile Information
Device Profile (MIDP) (java.sun.com/ products/midp/). You’ll also need the J2ME Wireless
Toolkit to develop MIDlets for handheld devices
(java.sun.com/products/j2mewtoolkit/download.html).
Hello World J2ME Style
You can create your first MIDlet once the Java development kit, Connected Limited Device
Configuration (CLDC), and Mobile Information Device Profile (MIDP) are installed. And
keeping tradition alive, let’s begin by creating a directory structure within which you can create
and run MIDlets. Here are the directories that are used for examples in this chapter:
16
 j2me
■ j2mesrc
■ j2mesrcgreeting
■ j2metmp_classes
■ j2memidlets
which will illustrate the basic concept of making and running a J2ME application. The first
MIDlet is called HelloWorld and the otherMIDlet is GoodbyeWorld. The HelloWorld MIDlet
shows how to create a simple MIDlet that can be invoked directly from the class and from a Java
archive file. Later in this section you’ll learn how to create a MIDlet suite that contains two
MIDlets. These are HelloWorld and GoodbyeWorld.
package greeting;
import javax.microedition.midlet.*;
import javax.microedition.lcdui.*;
public class HelloWorld extends MIDlet implements CommandListener
{
private Display display ;
private TextBox textBox ;
private Command quitCommand;
public void startApp()
{
display = Display.getDisplay(this);
quitCommand = new Command("Quit", Command.SCREEN, 1);
textBox = new TextBox("Hello World", "My first MIDlet", 40, 0);
textBox .addCommand(quitCommand);
textBox .setCommandListener(this);
display .setCurrent(textBox );
}
public void pauseApp()
{
}
public void destroyApp(boolean unconditional)
{
}
public void commandAction(Command choice, Displayable displayable)
{
if (choice == quitCommand)
{
destroyApp(false);
notifyDestroyed();
}
}
}
Compiling Hello World
The Hello World source code files should be saved in the new j2mesrcgreeting directory as
HelloWorld.java. Next, you’ll need to compile the HelloWorld MIDlet. Compiling a MIDlet is a
two-step process. The first step is to use the Java compiler to transform the source file into a
class file. The second step is to preverify the class file, as described previously in this chapter.
The preverification generates a modified class file Make j2mesrcgreeting the current directory,
and then enter the following command at the command line. The d: drive is used in this example.
You can replace the d: with the drive letter that is appropriate for your file structure.
javac -d d:j2metmp_classes -target 1.1 -bootclasspath
d:j2memidp1.0.3fcsclasses HelloWorld.java
17
Running Hello World
A MIDlet should be tested in an emulator before being downloaded to a small computing device.
An emulator is software that simulates how a MIDlet will run in a small computing device. Once
you’re satisfied that a MIDlet is operating properly, you can deploy the MIDlet as part of a
MIDlet suite, which you’ll learn to do a little later in the chapter.
There are two ways to run a MIDlet. These are either by invoking the MIDlet class or by creating
a JAR file, then running the MIDlet from the JAR file. Let’s begin by running the MIDlet class
without the need of a JAR file. Make sure that j2mesrc greeting is the current directory, and
then enter the following command. Figure 3- illustrates how the MIDlet appears in the emulator.
Click the right telephone handse icon to close the MIDlet.
midp -classpath d:j2meclasses greeting.HelloWorld
Deploying Hello World
A MIDlet should be placed in a MIDlet suite after testing is completed. The MIDlet suite is then
packaged into a JAR file along with other related files for downloading to a small computing
device. This process is commonly referred to as packaging. In the HelloWorld example, the
MIDlet suite contains one MIDlet, which is the HelloWorld.class. Before packaging the MIDlet
into a JAR file, you’ll need to use an editor to create the manifest file shown in Listing 3-5. The
manifest describes the JAR file. The manifest file should be saved as manifest.txt in the
j2mesrcgreeting directory. Notice that the MIDlet description within the manifest file contains a
graphic call, /greeting/mylogo.png, that is associated with the HelloWorld MIDlet.
MIDlet-1: HelloWorld, , greeting.HelloWorld
MIDlet-Name: Hello World
MIDlet-Version: 1.0
MIDlet-Vendor: Jim
MIDlet-1: HelloWorld, /greeting/myLogo.png, greeting.HelloWorld
MicroEdition-Configuration: CLDC-1.0
MicroEdition-Profile: MIDP-1.0
2.7 Multiple MIDlets in a MIDlet Suite
In the real world, multiple MIDlets are distributed in a single MIDlet suite. The application
manager then displays each MIDlet as a menu option, enabling the user to run one of the
MIDlets. Let’s create another MIDlet to illustrate how to deploy a multiple MIDlet suite.
The new MIDlet is called GoodbyeWorld and is shown in Listing 3-7. Enter this code into a text
editor and save the file as GoodbyeWorld.java in the j2mesrcgreeting directory. Make the
j2mesrcgreeting directory the current directory. Compile both the HelloWorld.java and
GoodbyeWorld.java files by entering the following command at the command line:
javac -d d:j2metmp_classes -target 1.1 -bootclasspath
d:j2memidp1.0.3fcsclasses *.java
preverify -d d:j2meclasses -classpath d:j2memidp1.0.3fcsclasses
d:j2metmp_classes
package greeting;
import javax.microedition.midlet.*;
import javax.microedition.lcdui.*;
public class GoodbyeWorld extends MIDlet implements CommandListener
{
private Display display ;
private TextBox textBox ;
private Command quitCommand;
public void startApp()
{
display = Display.getDisplay(this);
quitCommand = new Command("Quit", Command.SCREEN, 1);
18
textBox = new TextBox("Goodbye World", "My second MIDlet", 40, 0);
textBox .addCommand(quitCommand);
textBox .setCommandListener(this);
display .setCurrent(textBox );
}
public void pauseApp()
{
}
public void destroyApp(boolean unconditional)
{
}
public void commandAction(Command choice, Displayable displayable )
{
if (choice == quitCommand)
{
destroyApp(false);
notifyDestroyed();
}
}
}
28 J2ME Wireless Toolkit
Building and running a J2ME application at the command line is cumbersome, to say the least,
when you are creating a robust application consisting of several MIDlets Creating your
application within an integrated development environment is more productive than developing
applications by entering commands at the command line.
There are a number of popular integrated development environments on the market designed for
developing J2ME applications. These include Borland’s JBuilder and Sun Microsystems’ Forte.
Another integrated development environment is the J2MEWireless Toolkit that is downloadable
from java.sun.com/products/j2mewtoolkit/download.html.
The J2MEWireless Toolkit is used to develop and test J2ME applications by selecting a few
buttons from a toolbar. However, the J2MEWireless Toolkit is a stripped-down integrated
development environment in that it does not include an editor, a full debugger, and other
amenities found in a third-party integrated development environment.
Building and Running a Project
Download the J2ME Wireless Toolkit from the Sun web site. The Toolkit file is a selfextracting
executable file. Run this executable after downloading the file, and the installation program
creates all the directories required to run the Toolkit. The installed J2MEWireless Toolkit is
placed in the WTK104 directory, although the directory might have a variation of this name
depending on the version of the Toolkit that you download. Let’s create a new project by
selecting the New Project button from the toolbar. You’ll be prompted to enter a project name
and class name . Enter Hello World as the project name and greeting.HelloWorld as the class
name, which is the name of the first MIDlet that is associated with the project.
Hello World Project
Let’s re-create the HelloWorld and GoodbyeWorld application that you created previously in this
chapter. Create a new project called Hello World following the directions in the “Hello World
J2ME Style” section. Next, create a greeting directory beneath the src directory. Copy the
HelloWorld.java file and GoodbyeWorld.java file that you created previously, and place those
files into the project’s srcgreeting subdirectory, which is Hello Worldsrcgreeting if you named
your project Hello World.
MIDlets on the Internet
The Wireless Toolkit can run MIDlets that access Internet resources by configuring the emulator
to interact with a proxy server and let you monitor activities between the MIDlet and the Internet
19
for debugging purposes. You configure the emulator for the Internet by selecting Edit |
Preferences. The Network Configuration tab is used to set the port number and server name of
the proxy server. The Trace tab is used to set preferences for monitoring the interactions between
the MIDlet and the Internet. There are four options that you can set by selecting the appropriate
check boxes .
UNIT-III
Commands, Items and Event Processing :
3.1 J2ME User Interfaces
A user interface is a set of routines that displays information on the screen, prompts the user to
perform a task, and then processes the task. For example, a J2ME email application might
display a list of menu options, such as Inbox, Compose, and Exit, and then prompt the user to
make a selection by moving the cursor keys and pressing a key on the small computing device.
A developer can use one of three kinds of user interfaces for an application. These are a
command, form, or canvas. A command-based user interface consists of instances of the
Command class. An instance of the Command class is a button that the user presses on the
device to enact a specific task. For example, Exit is an instance of the Comman class associated
with an Exit button on the keypad to terminate the application. The Help button is also an
instance of the Command class that is linked to the Help key on the device, which is used
whenever the user requires assistance.
A form-based user interface consists of an instance of the Form class that contains instances
derived from the Item class such as text boxes, radio buttons, check boxes, lists,and other
conventions used to display information on the screen and to collect input from the user. A form
is similar to an HTML form.
3.2 Display Class
Before learning how to incorporate instances of the Command class and the Item class into your
application, let’s take a moment to explore how your application interacts with the small
computing device’s screen. The device’s screen is referred to as the display, and you interact
with the display by obtaining a reference to an instance of the MIDlet’s Display class. Each
MIDlet has one and only one instance of the Display class. Every J2ME MIDlet tha displays
anything on the screen must obtain a reference to its Display instance.This instance I used to
show instances of Displayable class on the screen.
The Displayable class has two subclasses. These are the Screen class and the Canvas class. The
Screen class contains a subclass called the Item class, which has its own subclasses used to
display information or collect information from a user (such as forms,check boxes, radio
buttons). The Screen class and its derived classes are referred to as high-level user interface
components.
The Canvas class is used to display graphical images such as those used for games.Displays
created using the Canvas class are considered a low-level user interface and are used whenever
you need to display a customized screen.
Instances of classes derived from the Displayable class are placed on the screen by calling the
setCurrent() method of the Display class. The object that is to be displayed is passed to the
setCurrent() method as a parameter. It is important to note that instances of derived classes of the
Item class are not directly displayable and must be containe within an instance of a Form class.
MIDlet-Name: CheckColor
MIDlet-Version: 1.0
20
MIDlet-Vendor: MyCompany
MIDlet-Jar-URL: CheckColor.jar
MIDlet-1: CheckColor, CheckColor.png, CheckColor
MicroEdition-Configuration: CLDC-1.0
MicroEdition-Profile: MIDP-1.0
MIDlet-JAR-SIZE: 100
import javax.microedition.midlet.*;
import javax.microedition.lcdui.*;
public class CheckColor extends MIDlet implements CommandListener
private Display display;
private Form form;
private TextBox textbox;
private Command exit;
public CheckColor()
{
display = Display.getDisplay(this);
exit = new Command("Exit", Command.SCREEN, 1);
String message=null;
if (display.isColor())
{
message="Color display.";
}
else
{
message="No color display";
}
textbox = new TextBox("Check Colors", message, 17, 0);
textbox.addCommand(exit);
textbox.setCommandListener(this);
}
public void startApp()
{
display.setCurrent(textbox);
}
public void pauseApp()
{
}
public void destroyApp(boolean unconditional)
{
}
public void commandAction(Command command,
Displayable displayable)
{
if (command == exit)
{
destroyApp(true);
notifyDestroyed();
}
}
}
The MIDlet is called CheckColor and begins by creating references for instances used in the
MIDlet. These instances are for the Display class, Form class, TextBox class, and Command
class. You’ll learn about the Form class, TextBox class, and Command class later in this chapter.
For now it is sufficient to understand that the instance of the Display class displays a form that
contains a text box and the Exit command. The color statu appears in the text box, and the Exit
command terminates the MIDlet.
21
3.3 The Palm OS Emulator
Before you can run the Palm OS emulator in the J2ME Wireless Toolkit, you’ll need to
download Palm OS ROM files from the Palm web site (www.palmos.com/dev). The ROM file
contains the Palm OS required for the emulator to properly perform like a Palm PDA. You’ll
also need to join the Palm OS Developer Program (free) and agree to the online license (free) for
ROM files before you are permitted to download them. Be prepared to spend a few minutes
downloading since ROM files are fairly large, even when compressed into a zip file.
Several ROM files are available for download, each representing a different version of the
Palm OS and each suited for a particular Palm product. Always choose the latest version of the
Palm OS for downloading unless you are designing a MIDlet to run on particular type of Palm
device. If your MIDlet is Palm device specific, you’ll need to download the ROM file that
corresponds to the Palm OS that runs on that Palm device.
Command Class
You create an instance of the Command class by using the Command class constructor within
your J2ME application. The Command class constructor requires three parameters. These are the
command label, the command type, and the command priority. The Command class constructor
returns an instance of the Command class.
The following example illustrates a cancel command. The first parameter of the command
declaration is Cancel. Any text can be placed here and will appear on the screen as the label for
the command. The second parameter is the predefined command types. lists all the predefined
command types. The last parameter is the priority, which is set to 1. The command created by
this declaration is assigned to cancel.
cancel = new Command("Cancel", Command.CANCEL, 1);
Command Type Description
BACK Move to the previous screen
CANCEL Cancel the current operation
EXIT Terminate the application
HELP Display help information
ITEM Map the command to an item on the screen
OK Positive acknowledgment
SCREEN No direct key mapping available on device; command
will be mapped to object on a form or canvas
STOP Stop the current operation
Your selection of command type is a request and not a directive to the small computing
device to map the command to a particular keypad key. The device always has the option
to ignore your request and map the command in any way it wishes.
CommandListener
Every J2ME application that creates an instance of the Command class must also create an
instance that implements the CommandListener interface. The CommandListener is notified
whenever the user interacts with a command by way of the commandAction() method. Classes
that implement the CommandListener must implement the commandAction() method, which
accepts two parameters. The first parameter is a reference to an instance of the Command class,
and the other parameter is a reference to the instance of the Displayable class .
22
public void commandAction(Command command, Displayable displayable)
{
if (command == cancel)
{
destroyApp(false);
notifyDestroyed();
}
}
Online Help Example
Providing online help is a routine common to nearly every well-written J2ME application.
Online help instructs users on interacting with the application. Instructions are displayed in a text
box that the application displays when the user selects the Help command
The user returns to the previous screen by selecting the Back command . The Back command
removes the Help text box from the screen and returns the user to the original screen. The last
command that is found in all J2ME applications is the Exit command. The Exit command
terminates the application.
3.5 Item Class
The Item class is derived from the Form class, and that gives an instance of the Form class
character and functionality by implementing text fields, images, date fields, radio buttons, check
boxes, and other features common to most graphical user interfaces. The Item class has
derivative classes that create those features.
In many ways, the Item class has similarities to the Command class in that instances of both
classes must be declared and then added to the form. Likewise, a listener processes instances of
both the Item class and the Command class.
Creating an Item Class
Listed here are the steps required for creating an Item class.
1. Declare references.
2. Declare an instance of the Display class.
3. Create an instance of the ChoiceGroup class.
4. Associate options with the instance of the ChoiceGroup class.
5. Set the default choice.
6. Create an Exit command.
7. Create an instance of the Form class.
8. Associate the instance of the ChoiceGroup class to the instance
of the Form class.
9. Associate the Exit command with the form.
10. Associate a CommandListener with the form.
11. Associate an ItemStateListener with the form.
12. Display the form.
13. Evaluate the command entered by the user.
14. If the command is the Exit command, terminate the MIDlet.
15. If an instance of the Item class changes state,read the selection
from the instances of the ChoiceGroup class.
16. Display the selection on the screen.
Item Listener
Each MIDlet that utilizes instances of the Item class within a form must have an
itemStateChanged() method to handle state changes in these instances. The itemStateChanged()
method , contains one parameter, which is an instance of the Item class. The instance passed to
the itemStateChanged() method is the instance whose state was changed by the user.
23
public void itemStateChanged(Item item)
{
if (item == selection)
{
StringItem msg = new StringItem("Your color is ",
radioButtons.getString(radioButtons.getSelectedIndex()));
form.append(msg);
}
3.6 Exception Handling
The small computing device’s application manager oversees the operation of a MIDlet. The
application manager calls the startApp(), pauseApp(), and destroyApp() methods whenever the
user or the device requires a MIDlet to begin, pause, or terminate. However, there are times
when the disruption of processing by complying with the application manager’s request might
cause irreparable harm. For example, a MIDlet might be in the middle of a communication
session or saving persistent data when the destroyApp() method is called by the device’s
application manager. Complying with the request would break off communications or corrupt
data.
Throwing a MIDletStateChangeException
a MIDletStateChangeException from within the destroyApp() method. Remember that a
MIDletStateChangeException can also be thrown from the startApp() method using an approach
similar
MIDlet-Name: ThrowException
MIDlet-Version: 1.0
MIDlet-Vendor: MyCompany
MIDlet-Jar-URL: ThrowException.jar
MIDlet-1: ThrowException, ThrowException.png, ThrowException
MicroEdition-Configuration: CLDC-1.0
MicroEdition-Profile: MIDP-1.0
MIDlet-JAR-SIZE: 100
import javax.microedition.midlet.*;
import javax.microedition.lcdui.*;
public class ThrowException extends MIDlet
implements CommandListener
{
private Display display;
private Form form;
private Command exit;
private boolean isSafeToQuit;
public ThrowException()
{
isSafeToQuit = false;
display = Display.getDisplay(this);
exit = new Command("Exit", Command.SCREEN, 1);
form = new Form("Throw Exception");
form.addCommand(exit);
form.setCommandListener(this);
}
public void startApp()
{
display.setCurrent(form);
}
public void pauseApp()
{
}
public void destroyApp(boolean unconditional)
throws MIDletStateChangeException
{
24
if (unconditional == false)
{
throw new MIDletStateChangeException();
}
}
public void commandAction(Command command,
Displayable displayable)
{
if (command == exit)
{
try
{
if (exitFlag == false)
{
StringItem msg = new StringItem (
"Busy", "Please try again.");
form.append(msg);
destroyApp(false);
}
else
{
destroyApp(true);
notifyDestroyed();
}
}
catch (MIDletStateChangeException exception)
{
isSafeToQuit = true;
}
}
}
}
Quick Reference Guide
This quick reference guide provides a brief overview of classes used by J2ME for the Display
class, Command class, and Item class. Full details of these classes and all Java classes and
interfaces are available at java.sun.com.
javax.microedition.lcdui.Display Class
Method Description
static Display getDisplay(MIDlet midlet) Retrieve an instance of the Display class
Displayable getCurrent() Retrieve the current instance of
Displayable class
void setCurrent(Alert alert, Displayable Display the specified instance of the alert
dialog box and then the specified instance of the
Displayable class displayable)
boolean isColor() Determine whether the device supports color
25
UNIT-IV
High-Level Display:Screens:
The display is a crucial component of every J2ME application since it contains objects used to
present information to the person using the application and in many cases prompts the person to
enter information that is processed by the application. You were introduced to the basic concepts
of the J2ME display in the previous chapter and shown how to create a simple graphical user
interface for your application. To say the least, this user interface is wanting and lacks
sophistication that most of us expect from a J2ME application.
The J2ME Display class is the parent of Displayable, which you’ll recall from the previous
chapter. The Displayable class has two subclasses of its own: Screen and Canvas. The Screen
class is used to create high-level J2ME displays in which the methods of its subclasses handle
details of drawing objects such as radio buttons and check boxes. In contrast, the Canvas class
and its subclasses are used to create low-leve J2ME displays. The methods give you pixel-level
control of the display, enabling you to draw your own images and text such as those used to
create games.
4.1.1 Screen Class
These classes contain methods that generate radio buttons, check boxes, lists, and other familiar
objects that users expect to find on the screen when interacting with your application. The
following illustrates the Display class hierarchy, which helps you learn the inheritance structure
of the Screen class ADisplayable object is any object that can be displayed on the small
computing device’s screen.
public class Display
public abstract class Displayable
public abstract class Screen extends Displayable
public class Alert extends Screen
public class Form extends Screen
public class List extends Screen implements Choice
public abstract class Item
public class ChoiceGroup extends Item implements Choice
public class DateField extends Item
public class TextField extends Item
public class Gauge extends Item
public class ImageItem extends Item
public class StringItem extends Item
public class TextBox extends Screen
public class Command
public class Ticker
public class Graphics
public interface Choice
public abstract class Canvas extends Displayable
public class Graphics
4.1.2 Alert Class
An alert is a dialog box displayed by your program to warn a user of a potential error such as a
break in communication with a remote computer. An alert can also be used to display any kind of
message on the screen, even if the message is not related to an error. For example, an alert is an
ideal way of displaying a reminder on the screen. You implement an alert by creating an instance
of the Alert class in your program using the following statement. Once created, the instance is
passed to the setCurrent() method o the Display object to display the alert dialog box on the
screen.
alert = new Alert("Failure", "Lost communication link!", null, null);
display.setCurrent(alert);
26
Type Description
ALARM Your request has been received.
CONFIRMATION An event or processing is completed.
ERROR An error is detected.
INFO A nonerror alert occurred.
WARNING A potential error could occur.
The value passed to the setTimeout() method determines whether an alert dialog box is a modal
dialog box or a timed dialog box. The setTimeout() method has one parameter, which is the
default timeout value. Use Alert.FOREVER as the default timeout value for a modal alert dialog
box, or pass a time value in milliseconds indicating time to terminate the alert dialog box.
alert = new Alert("Failure", "Lost communication link!", null, null);
alert.setTimeout(Alert.FOREVER);
display.setCurrent(alert);
Creating an Alert Dialog Box
Listed here are the steps required to create an alert dialog box:
1. Declare references.
2. Set default value for the exit flag to false.
3. Obtain a reference to the instance of the Display class.
4. Create an instance of a Command class to exit the MIDlet.
5. Create an instance of the Form class.
6. Associate the instance of the Command class to the instance of the Form class.
7. Associate a CommandListener with the instance of the Form class.
8. Display the instance of the Form class on the screen.
9. Evaluate the command selected by the user.
10. If the Exit command is selected,determine whether conditions are safe to terminate the MIDlet.
11. If conditions are not safe to terminate the MIDlet, create a modal instance
of the Alert class with the message “Busy” “Please try again.”
12. Display the instance of the Alert class on the screen.
Alert Sound
Each AlertType has an associated sound that automatically plays whenever the alert dialog box
appears on the screen. The sound, which is different for each AlertType, is used as an audio cue
to indicate that an event is about to occur. Users of your MIDlet will learn to identify events by
sound cue over time and will become less dependent on the visual cue presented by the alert
dialog box.
An audio cue can be sounded without having to display the alert dialog box. You do this by
calling the playSound() method and passing it reference to the instance of the Display class, as
illustrated in the following code segment. This is a modification of the if statement . The sound
associated with the AlertType WARNING is heard when the playSound() method is called.
if (exitFlag == false)
{
AlertType.WARNING.playSound(display);
destroyApp(false);
}
27
4.1.3 Form Class
The Form class is a container for other displayable objects that appear on the screen
simultaneously. Any derived class of the Item class can be placed within an instance of the Form
class. For example, instances of the StringItem class can be displayed by inserting those
instances within the instance of the Form class, then showing the instance of the Form class.
Small computing device screens vary in size, so you can expect that some instances within the
instance of the Form class won’t fit on the screen. However, devices typically implement
scrolling, which allows the user to bring instances out of view onto the screen. An instance is
placed with the instance of the Form class by calling one of two methods These are insert()
method and append() method. The insert() method places the instance in a particular position on
the form as specified by parameters passed to the insert() method. The append() method places
the instance after the last object on the form.
private Form form;
private StringItem message;
form = new Form("My Form");
message = new StringItem("Welcome, ", "glad you could come.");
form.append(message);
The same Form instance and StringItem instance as in the previous example are created and
assigned to the proper reference. However, a second StringItem instance is also created. Notice
that the index number of the first message appended to the Form instance is stored in the index1
variable. The index1 variable is passed as the first parameter to the insert() method to place the
second message on the form before the first message.
private Form form;
private StringItem message1, message2;
private int index1;
form = new Form("My Form");
message1 = new StringItem("Welcome, ", "glad you could come.");
message2 = new StringItem("Hello, ", "Mary.");
index1 = form.append(message1);
form.insert(index1,message2);
Creating an Instance of the Form Class
Listed here are the steps required to create an instance of the Form class:
1. Declare references.
2. Obtain a reference to the instance of the Display class.
3. Create an instance of a Command class to exit the MIDlet.
4. Create two instances of the StringItem class.
5. Assign each instance of the StringItem class to an array element.
6. Create an instance of the Form class.
7. Associate the instance of the Command class to the instance of the Form class.
8. Associate a CommandListener with the instance of the Form class.
9. Display the instance of the Form class on the screen.
10. Evaluate the command selected by the user.
11. If the Exit command is selected,terminate the MIDlet.
4.1.4 Item Class
An Item class is a base class for a number of derived classes that can be contained within a Form
class. These derived classes are ChoiceGroup, DateField, Gauge, ImageItem, StringItem, and
TextField, each of which is discussed in detail later in this chapter. Some classes derived from
28
the Item class, such as ChoiceGroup, DateField, and TextField, are used for data entry. The
ChoiceGroup class is used to create check boxes or radio buttons on a form, and the DateField
class and TextField class are used to capture date and freeform text from the user of the MIDlet.
The state of an instance of a class derived from the Item class changes whenever a user enters
data into the instance, such as when a check box is selected. You can capture this change by
associating an ItemStateListener with an instance of a class derived from an Item class
(ChoiceGroup, for example). An ItemStateListener monitors events durin the life of the MIDlet
and traps events that represent changes in the state of any Item class contained in a form on the
screen.
private Form form;
private ChoiceGroup choiceGroup;
….
choiceGroup = new ChoiceGroup("Pick One", Choice.EXCLUSIVE);
form.append(choiceGroup);
form.setItemStateListener(this);
….
public void itemStateChanged(Item item)
{
if (item == choiceGroup)
{
// do some processing
}
}
4.1.5 List Class
The List class is used to display a list of items on the screen from which the user can select one
or multiple items. There are three formats for the List class: radio buttons, check boxes, and an
implicit list that does not use a radio button or check box icon . As you can probably gather from
the description of a List class, it is functionally similar to the ChoiceGroup class discussed
previously in this chapter. This is because both the List class and the ChoiceGroup class
implement the Choic interface. The Choice interface defines methods to retrieve a selection and
remove a selection, among other maintenance functionality.
A List class differs from the ChoiceGroup class by the way events of each instance are handled
by a MIDlet. As you recall from the discussion about the ChoiceGroup class, an
ItemStateListener is used to listen to events generated by an instance of a ChoiceGroup class.
Those events are then passed along to the itemStateChanged() method for processing. Likewise,
a commandAction() method is used to process command events, as described in the “Item Class”
Creating an Instance of a List Class
The listings in this section illustrate how to implement the three formats of a List class in your
MIDlet. the JAD file which creates an instanc of an implicit List class. contains the JAD file for
which creates a check box instance of a List class is the JAD file for which creates a radio
button instance of a List class.
Passing two parameters to the constructor of the List object creates the instance of the List class.
The first parameter is the title of the instance, “Menu:”, and the other parameter is the List object
format type IMPLICIT.
Creating an Instance of an Implicit List Class
Listed here are the steps required to create an instance of an implicit List class:
1. Declare references.
2. Obtain a reference to the instance of the Display class.
3. Create an instance of a Command class to exit the MIDlet.
4. Create an instance of the List class using the IMPLICIT type.
5. Append items to the instance of the List class.
29
6. Associate the instance of the Command class to the instance of the List class.
7. Associate a CommandListener with the instance of the List class.
8. Display the instance of the List class on the screen.
9. Evaluate the command selected by the user.
10. If the Exit command is selected,terminate the MIDlet.
11. If an item from the instance of the List class is selected,display the text of
the item in an alert dialog box.
MIDlet-Name: ListImplicit
MIDlet-Version: 1.0
MIDlet-Vendor: MyCompany
MIDlet-Jar-URL: ListImplicit.jar
MIDlet-1: ListImplicit, , ListImplicit
MicroEdition-Configuration: CLDC-1.0
MicroEdition-Profile: MIDP-1.0
MIDlet-JAR-SIZE: 100
4.1.6 TextBox Class
The TextBox class and TextField class differ in that the TextBox class is derived from the
Screen class, while the TextField class is derived from the Item class. This means that an
instance of the Form class cannot contain an instance of the TextBox class, whil an instance of a
TextField class must be contained within an instance of the Form class.
Another important difference between the TextBox class and the TextField class I that the
TextBox class uses a CommandListener and cannot use an ItemStateListener. An
ItemStateListener is used with an instance of the TextField class, although many times the
content of an instance of the TextField class is retrieved and processed when the user selects a
command associated with a form that contains the text field.
Creating an Instance of a TextBox Class
When the Submit command is selected, it is processed by the commandAction() method (see
“Item Class,” earlier in this chapter). The name is copied from the text box and used to form a
greeting, which then replaces the first name on the screen the TextBoxCapture constructor,
which are then assigned to those variables. You’ll notice that an instance of a TextBox clas is
created with the title “First Name:”. The instance does not contain any text when first displayed
on the screen. The instance can receive any characters based on the ANYconstraint, and a
request is made to limit the number of characters that can be contained in the instance to 30
characters.
Listed here are the steps required to create an instance of a TextBox class:
1. Declare references.
2. Obtain a reference to the instance of the Display class.
3. Create an instance of a Command class to submit the instance of the List
class for processing.
4. Create an instance of a Command class to exit the MIDlet.
5. Create an instance of a TextBox class and accept any characters.
6. Associate instances ofthe Command class to the instance of the TextBox class.
7. Associate a CommandListener with the instance of the TextBox class.
8. Display the instance of the TextBox class on the screen.
9. Evaluate the command selected by the user.
10. If the Exit command is selected,terminate the MIDlet.
11. If the Submit command is selected, process the instance of the TextBox class.
12. Retrieve the text of the instance of the TextBox class.
13. Concatenate the text to the greeting “Hello,”.
30
4.1.7 Ticker Class
The Ticker class is used to scroll text horizontally on the screen much like a stock ticker
scrolls stock prices across the screen. An instance of the Ticker class can be associated with
any class derived from the Screen class and be shared among screens. An instance of
a Ticker object is created by passing the constructor of the Ticker class a string containing
the text that is to be scrolled across the screen. You cannot control the location on the
screen where scrolling occurs. Likewise, there is no control over the speed of the scrolling.
The device that runs the MIDlet controls both location and speed.
Creating an Instance of a Ticker Class
Listed here are the steps required to create an instance of a Ticker class:
1. Declare references.
2. Obtain a reference to the instance of the Display class.
3. Create an instance of a Command class to exit the MIDlet.
4. Create an instance of a Command class to begin processing.
5. Create an instance of the Ticker class and initialize text of the instance.
6. Create an instance of the List class.
7. Append items to the instance of the List class.
8. Associate instances ofthe Command class to the instance of the List class.
9. Associate a CommandListener with the instance of the List class.
10. Associate the instance of the Ticker class with the instance of the List class.
11. Display the instance of the List class on the screen.
12. Evaluate the command selected by the user.
13. If the Exit command is selected,terminate the MIDlet.
14. If the Submit command is selected, process the selection.
15. Change the text of the instance of the Ticker class to reflect the selection.
MIDlet-Version: 1.0
MIDlet-Vendor: MyCompany
MIDlet-Jar-URL: TickerList.jar
MIDlet-1: TickerList, , TickerList
MicroEdition-Configuration: CLDC-1.0
MicroEdition-Profile: MIDP-1.0
MIDlet-JAR-SIZE: 100
import javax.microedition.midlet.*;
import javax.microedition.lcdui.*;
public class TickerList extends MIDlet implements CommandListener
{
private Display display;
private List list;
private final String tech;
private final String entertain;
private Ticker ticker;
private Command exit;
private Command submit;
public TickerList()
{
display = Display.getDisplay(this);
tech = new String ("IBM 55 MSFT 32 SUN 52 CISCO 87");
entertain = new String ("CBS 75 ABC 455 NBC 243 GE 21");
exit = new Command("Exit", Command.SCREEN, 1);
submit = new Command("Submit", Command.SCREEN, 1);
ticker = new Ticker(tech);
list = new List("Stock Ticker", Choice.EXCLUSIVE);
list.append("Technology", null);
list.append("Entertainment", null);
list.addCommand(exit);
list.addCommand(submit);
list.setCommandListener(this);
31
list.setTicker(ticker);
}
public void startApp()
{
display.setCurrent(list);
}
public void pauseApp()
{
}
public void destroyApp(boolean unconditional)
{
}
public void commandAction(Command command, Displayable display)
{
if (command == exit)
{
destroyApp(true);
notifyDestroyed();
}
else if (command == submit)
{
if (list.getSelectedIndex() == 0)
{
ticker.setString (tech);
}
else
{
ticker.setString(entertain);
}
}
}
}
Low-Level Display: Canvas :
Small computing devices are still in their formative years as they evolve into Star Trek–like
devices that handle our mundane, and some not so mundane, tasks—at any time and anywhere.
However, many of these devices have already grown to a level of sophistication that is necessary
for implementing a wide range of applications. Practically any application you can imagine can
be designed to operate within the confines of a small computing device.
4.2.1The Canvas
MIDlet has one instance of the Display class, and the Display class has one derived class called
the Displayable class. Everything a MIDlet displays on the screen is created by an instance of a
class that is derived from the Displayable class.
public class Display
public abstract class Displayable
public abstract class Screen extends Displayable
public abstract class Canvas extends Displayable
public class Graphics
The Displayable class has two subclasses: Screen and Canvas. The Screen class and
its derivatives are used to create high-level components that you learned about in the
previous chapter. The Canvas class and its derivatives are used to gain low-level access to
the display, which is necessary for graphic- and animation-based applications. Agraphic
is used with a canvas.
32
The Layout of a Canvas
The canvas is divided into a virtual grid in which each cell represents one pixel.Coordinates
mark the column and row of a cell within the grid . The x coordinate represents the column, and
the y coordinate represents the cell’s row. The first cell located in the upper-left corner of the
grid has the coordinate location of 0, 0, where the first zero is the x coordinate and the other zero
is the y coordinate.
the size of the canvas is device dependent since canvas size and the screen size are the same.
The screen size of a mobile telephone might be different from the screen size of a PDA, and yet
both devices are capable of running the sam MIDlet. Your MIDlet should determine the canvas
size of the device that implements your graphic application before drawing on the screen. The
canvas size is measured in pixels.
X
0 1 2 3
0
1
Y 2
3
Coordinates mark the column and row of a cell within a grid
Proportional Coordinates
The values (in pixels) returned by the getWidth() and getHeight() methods can be used to draw
an image at a given location that is proportional to the size of the canvas by using relative
coordinates rather than exact coordinates on the canvas. Let’s say that the first element of the
image you want drawn on the canvas is located in the center of the canvas.
Here’s what you need to do. Assume the size of the canvas is 200 pixels wide (columns) and 200
pixels high (rows). The coordinate of the center of the canvas is 99, 99 (remember that
coordinates are zero based), calculated as:
x = getWidth()/2
y = getHeight()/2
Now assume the same MIDlet is running on a small computing device with a canvas size of 400
pixels wide by 400 pixels high. The same calculation determines the center coordinate as 199,
199. Therefore, the MIDlet can use the calculation to determine the center coordinate of any size
canvas, which means that the image will appear in the same canvas location when the MIDlet
runs on any device.
The Pen
An image is drawn on a canvas using a virtual pen. Using a virtual pen is very similar to using a
real pen to draw an image on paper. That is, the pen is dropped on the canvas at a specified
coordinate, filling the cell with the color of ink used in the pen. Cells change from their present
color to the color of the ink as the pen is repositioned on the canvas. For example, a horizontal
33
line forms on the canvas when the virtual pen is dragged horizontally across the canvas.
Likewise, dragging the virtual pen vertically down the canvas draws a vertical line.
A virtual pen is used by instances of the Graphics class to draw rectangles, arcs, and other
graphical image components on the canvas. You don’t directly create and use
a virtual pen.
Painting
Graphical components used to create an image on a canvas are drawn on the canvas when the
paint() method of the Displayable class is called. This is referred to as painting. The paint()
method is an abstract method that is used both by instances and derivatives of the Screen class
and Canvas class.
Java specifications require that a concrete class provide implementation for any abstract
methods defined in its parent class. Therefore, an instance of the Screen class and Canvas class
must define a paint() method. The contents of the paint() method ar statements that draw images
on the screen.
Derivatives from the Screen class have two predefined methods used to paint the screen. Images
painted by derivatives of the Screen class (Textbox, List, Alert, and Form) are radio buttons,
check boxes, list, text, and other constructs that you find in a graphical user interface, which you
learned about in the previous chapter. The first predefine method is paint(), which contains
instructions that set parameters for drawing an image, such as defining the virtual pen.
protected void paint(Graphics graphics)
{
graphics.drawRect(12, 6, 40, 20));
}
The paint() and repaint() Methods
the paint() method is called automatically by the setCurrent() method when the MIDlet is started.
You call the repaint() whenever the canvas or a portion of the canvas must be refreshed Let’s say
that you want to draw text on a canvas that is already displayed on the screen. First, you create
the text using a graphic, which you’ll learn how to do later I this chapter. Next, you call the
repaint() method to have the entire canvas redrawn, which includes text and images that
currently exist on the screen and the new text, unless you’v removed existing text or images.
showNotify() and hideNotify()
The device’s application manager calls the showNotify() method immediately before the
application manager displays the canvas. You define the showNotify() method with statements
that prepare the canvas for display, such as initializing resources by beginning threads or
assigning values to variables as required by your application.
The hideNotify() method is called by the application manager after the canvas is removed from
the screen. You define the hideNotify() method with statements that free resources that were
allocated when the showNotify() method was called. This include deactivating threads and
resetting values assigned to variables as necessary.
4.2.2User Interactions
One of two techniques can be used to receive user input into your low-level J2ME application.
The first technique is to create one or more instances of the Command class, which you learned
about in the previous chapter. Once an instance of a command is created, the instance is
associated with the instance of the Canvas class by calling the addCommand() method . If you
34
associate a command with canvas, you’ll also need to associate a CommandListener to the
canvas in order to monitor command events generated by the user selecting a command.
Likewise, you’ll need to define a commandAction() method that is called by the device’
application manager to process the command event.
 A key code is a numerical value sent by the small computing device when the userof your application
selects a particular key. Each key on the device’s keypad is identified by a unique key code.
■ A game action is a keystroke that a person uses to play a game on the small computing device. MIDP
defines a set of constants that represent keystrokes common to game controllers.
■ A pointerevent is input received from a pointer device attached to the small
computing device, such as a touch screen or mouse.
Working with Key Codes
Each key on an ITU-T keypad, which is used on cellular telephones, is mapped to a standard set
of key codes . J2ME associates key code values with constants; however, use the constant
instead of the constant value. You’ll find that using constants within your code clarifies the
reference to a key because the name of th constant contains the name of the key associated with
the key code.
All small computing devices that use the ITU-T keypad adhere to these key codes. Some of
these devices also have other keys on the keypad, each of which is also assigned
a key code. The manufacturer’s specification for the device usually lists key codes used by the
device for keys outside of those on the standard ITU-T keypad.
Constant Value
KEY_NUM0 48
KEY_NUM1 49
KEY_NUM2 50
KEY_NUM3 51
KEY_NUM4 52
KEY_NUM5 53
KEY_NUM6 54
KEY_NUM7 55
KEY_NUM8 56
KEY_NUM9 57
KEY_STAR 42
KEY_POUND 35
Detecting and Processing Key Codes
Listed here are the steps for detecting and processing key codes:
1. Declare references to classes.
2. Create instances of classes and assign those instances to references.
3. Display the instance of the Canvas class whenever the MIDlet is started.
4. Terminate the MIDlet when the Exit command is selected.
5. Define a class derived from the Canvas class that implements
a CommandListener.
6. Within the derived class,declare references.
7. Within the derived class,define a constructorthat initializes text
to be displayed on the canvas.
8. Within the derived class,create an instance of the Command class.
9. Within the derived class,associate the instance of the Command class
with the canvas.
10. Within the derived class, associate the CommandListener with the canvas
35
4.2.3 Graphics
the low-level user interface is a canvas, which is an instance of the Canvas class. The canvas is
organized into a grid I which each cell of the grid is a pixel. Coordinates, as explained in the
previous sections, identify each cell. An image is drawn on the canvas by using a virtual
graphical device called a graphic context, such as the rectangle and line. A graphic context is an
instance of the Graphics class.
A mutable image, as you’ll remember, is an image that can be altered by your MIDlet. You’ve
seen how to create a graphic context in previous listings that defined the paint() method.
Reference to the graphic context passed to a paint() method exists for the duration of the paint(
method. Once the MIDlet leaves the paint() method, the graphic context goes out of scope. The
graphic context can no longer be used to draw on the canvas, even if reference to the graphic
context is retained.
Stroke Style and Color
Every graphic context has two characteristics you can control from within the MIDlet.These are
stroke style and color. Stroke style defines the appearance of lines used to draw an image on the
canvas, and color specifies the background and foreground color of the image.
Skipping pixels along the lines of the image creates the dotted stroke. The small computing
device determines the number of pixels skipped. You cannot modify the appearance of the dotted
stroke, and you might discover that skipped pixels may affect the appearance of the image. For
example, a pixel at the corner of a rectangle might be missing and therefore ruin the illusion of a
square-cornered rectangle.
Colors
You’ve already seen how combining degrees of red, green, and blue creates the foreground and
background color of a graphic context. The degree of each color is specified as an integer value
within the range of 0 to 255. Zero produces the darkest possible value of the color, and 255
produces the lightest possible value. For example, color values 0, 0, 0 (red, green, blue) produce
black, and color values 255, 255, 255 produce white. Values between these extremes produce
shades of various colors. All integers in Java are 32 bits Of those 32 bits, 8 bits are used to
represent red, blue, and green. All color values are stored in one integer. The 8 highest order bits
are not used.
You can determine whether a device supports color and the number of colors or shades of gray
that are supported by calling the appropriate Display class method within your MIDlet. The
isColor() method returns a boolean value that is true if color is supported; otherwise a false value
is returned, indicating that the device supports the gray scale instead of color. The numColors()
method returns an integer representing the number of colors or shades of gray supported by the
device.
Background Colors
Technically there isn’t any way to distinguish between foreground and background colors
because the concept of background colors is not supported in J2ME. All colors are foreground
colors. However, you can work around this limitation by drawing a filledrectangle over the
complete canvas before drawing other images on the canvas.
graphics.setColor(255, 255, 255);
graphics.fillRect(0, 0, getWidth(), getHeight());
setColor((50 << 16) | (200 << 8) | 150);
36
Red 50 00110010
Green 200 11001000
Blue 150 10010110
When these values are combined into one 32-bit value they appear as:
00000000001100101100100010010110
Lines
Lines are drawn on the canvas by calling the drawLine() method .The drawLine() method creates
a line from a starting coordinate to an ending coordinate. Four parameters are required by the
drawLine() method. The first two parameters are integers representing the starting x, y
coordinate of the line. The other two parameters are integers representing the ending x, y
coordinate of the line. The color of the line is determined by the color setting of the graphic
context used to draw the line. You can set the color of the line by calling the setColor() method
befor invoking the drawLine() method. The setColor() method is discussed in the previous
section of this chapter. Remember, the setColor() method determines the foreground color of the
line.
Rectangles
Arectangle is an area of the canvas defined by four corners, just like a rectangle that you can
draw using paper and pencil. You define a rectangle’s dimensions by identifying coordinates for
the upper-left corner and the lower-right corner. Four types of rectangles can be drawn on a
canvas. These are an outlined rectangle, filled rectangle, outlined rectangle with rounded corners,
and a filled rectangle with rounded corners. An outlined rectangle is one where only line
segments connecting the corners are drawn. The inside of the rectangle remains the same color as
the outside of the rectangle.
Arcs
An arc is a curved line segment that is used to draw circles, ovals, and other curved images. As
you’ll soon discover, drawing an arc is a bit tricky because you must define the area of the
canvas that will be covered by the arc and the angle used to draw the arc. The first step in
drawing an arc is to decide the area of the canvas that will be covered by the arc. The area is
defined as a rectangle rather than the circumference of the arc. Think of thi as defining a box
within which the angle is drawn. A rectangle is defined by specifying two sets of coordinates.
The first set of coordinates (x1, y1) set the upper-left corner of the rectangle. The other set of
coordinates (x2, y2) set the lower-right corner of the rectangle
Drawing an Arc
Listed here are the steps for drawing an arc:
1. Declare references to classes.
2. Create instances of classes and assign those instances to references.
3. Display the instance of the Canvas class whenever the MIDlet is started.
4. Terminate the MIDlet when the Exit command is selected.
5. Define a class derived from the Canvas class that implements
a CommandListener.
6. Within the derived class,declare references.
7. Within the derived class,create an instance of the Command class.
8. Within the derived class,associate the instance of the Command
class with the canvas.
9. Within the derived class,associate the CommandListener with the canvas.
Text
Displaying text using the low-level user interface differs from displaying text with the high-level
user interface discussed in the previous chapter. The difference is based on who controls the
details used to display the text. Using the high-level user interface, text is displayed by calling
37
one of several methods and passing the text as a parameter t those methods. Each method
determines how to display the text without requiring any direction from you. This is not the
situation when displaying text using the low-level user interface because you control the details
of how text is displayed.
Aligning Text
Aligning text is probably the trickiest routine that you’ll encounter when drawing text on
the canvas because you’ll need to know measurements of text that is already on the canvas
as well as measurements of text being drawn. Text is drawn within a virtual bounding
box, which is an invisible box that defines the boundaries of the text. First you specify
a position on the screen by setting coordinates. Let’s call them x, y. Next, you specify
an anchor point that identifies the relationship of the coordinate to the bounding box.
Images
An image is an instance of an Image object that has been previously created either by your
MIDlet using a graphic context (discussed earlier in this chapter), or by graphics software. Recall
from the previous chapter, there are two kinds of images: a mutable image can be modified by
your MIDlet, and an immutable image cannot be modified by your MIDlet.
Image image = Image.createImage(“/myImage.png”);
4.2.4 Clipping Regions
The drawImage() method used in previous listings in this chapter draws an image on the canvas
based on a clipping region. Aclipping region is a rectangular piece of an image defined by two
sets of coordinates. The first set identifies the upper-left corner of th clipping region, and the
second set is the width and height of the clipping region. Onl the portion of the image that
appears within the clipping region is drawn on the canvas. Other portions of the image still exist
within the image but are not drawn. The entir canvas is the default clipping region and is used to
draw the complete image whenever the drawImage() method is called.
Creating a Clipping Region
Listed here are the steps for creating a clipping region:
1. Declare references to classes.
2. Create instances of classes and assign those instances to references.
3. Display the instance of the Canvas class whenever the MIDlet is started.
4. Terminate the MIDlet when the Exit command is selected.
5. Define a class derived from the Canvas class that implements
a CommandListener.
6. Within the derived class,declare references.
7. Within the derived class,create an instance of the Command class.
8. Within the derived class,associate the instance of the Command class with
the canvas.
9. Within the derived class,associate the CommandListener with the canvas.
import javax.microedition.midlet.*;
import javax.microedition.lcdui.*;
public class ClippingRegion extends MIDlet
{
private Display display;
private MyCanvas canvas;
public ClippingRegion()
{
display = Display.getDisplay(this);
canvas = new MyCanvas(this);
}
protected void startApp()
Mobile application development

Weitere ähnliche Inhalte

Was ist angesagt?

Introduction to Mobile programming(J2ME)
Introduction to Mobile programming(J2ME)Introduction to Mobile programming(J2ME)
Introduction to Mobile programming(J2ME)Wambua Wambua
 
Mobile Application Development MAD J2ME UNIT 2
Mobile Application Development  MAD J2ME UNIT 2Mobile Application Development  MAD J2ME UNIT 2
Mobile Application Development MAD J2ME UNIT 2Pallepati Vasavi
 
MOBILE APPs DEVELOPMENT PLATFORMS
MOBILE APPs DEVELOPMENT PLATFORMSMOBILE APPs DEVELOPMENT PLATFORMS
MOBILE APPs DEVELOPMENT PLATFORMSSenthil Kanth
 
Introduction to j2me
Introduction to j2meIntroduction to j2me
Introduction to j2meFae Kaal
 
889448 634356855122132416
889448 634356855122132416889448 634356855122132416
889448 634356855122132416zxdrtyu
 
Presenting Cloud Computing
Presenting Cloud ComputingPresenting Cloud Computing
Presenting Cloud ComputingNaveen Karn
 
Java ME - 01 - Overview
Java ME - 01 - OverviewJava ME - 01 - Overview
Java ME - 01 - OverviewAndreas Jakl
 
Module 2 3
Module 2 3Module 2 3
Module 2 3ryanette
 
Blackberry Development Environment
Blackberry Development EnvironmentBlackberry Development Environment
Blackberry Development EnvironmentPredhin Sapru
 
Introduction to Java Micro Edition (ME) 8
Introduction to Java Micro Edition (ME) 8Introduction to Java Micro Edition (ME) 8
Introduction to Java Micro Edition (ME) 8terrencebarr
 
Android internals
Android internalsAndroid internals
Android internalsrabah3
 
Connected World in android - Local data sharing and service discovery
Connected World in android - Local data sharing and service discoveryConnected World in android - Local data sharing and service discovery
Connected World in android - Local data sharing and service discoveryTalentica Software
 

Was ist angesagt? (20)

J2ME GUI Programming
J2ME GUI ProgrammingJ2ME GUI Programming
J2ME GUI Programming
 
Introduction to Mobile programming(J2ME)
Introduction to Mobile programming(J2ME)Introduction to Mobile programming(J2ME)
Introduction to Mobile programming(J2ME)
 
J2ME
J2MEJ2ME
J2ME
 
Mobile Application Development MAD J2ME UNIT 2
Mobile Application Development  MAD J2ME UNIT 2Mobile Application Development  MAD J2ME UNIT 2
Mobile Application Development MAD J2ME UNIT 2
 
MOBILE APPs DEVELOPMENT PLATFORMS
MOBILE APPs DEVELOPMENT PLATFORMSMOBILE APPs DEVELOPMENT PLATFORMS
MOBILE APPs DEVELOPMENT PLATFORMS
 
J2 me 1
J2 me 1J2 me 1
J2 me 1
 
Introduction to j2me
Introduction to j2meIntroduction to j2me
Introduction to j2me
 
889448 634356855122132416
889448 634356855122132416889448 634356855122132416
889448 634356855122132416
 
Android
AndroidAndroid
Android
 
Presenting Cloud Computing
Presenting Cloud ComputingPresenting Cloud Computing
Presenting Cloud Computing
 
J2me Platform
J2me PlatformJ2me Platform
J2me Platform
 
08 Midlet Basic
08 Midlet Basic08 Midlet Basic
08 Midlet Basic
 
Mobile Operating System
Mobile Operating SystemMobile Operating System
Mobile Operating System
 
Java ME - 01 - Overview
Java ME - 01 - OverviewJava ME - 01 - Overview
Java ME - 01 - Overview
 
Module 2 3
Module 2 3Module 2 3
Module 2 3
 
Blackberry Development Environment
Blackberry Development EnvironmentBlackberry Development Environment
Blackberry Development Environment
 
Introduction to Java Micro Edition (ME) 8
Introduction to Java Micro Edition (ME) 8Introduction to Java Micro Edition (ME) 8
Introduction to Java Micro Edition (ME) 8
 
Android internals
Android internalsAndroid internals
Android internals
 
Connected World in android - Local data sharing and service discovery
Connected World in android - Local data sharing and service discoveryConnected World in android - Local data sharing and service discovery
Connected World in android - Local data sharing and service discovery
 
Android
AndroidAndroid
Android
 

Ähnlich wie Mobile application development

Introduction to Networks and Programming Language
Introduction to Networks and Programming LanguageIntroduction to Networks and Programming Language
Introduction to Networks and Programming LanguageMark John Lado, MIT
 
PROJECTS FROM SHPINE TECHNOLOGIES
PROJECTS FROM SHPINE TECHNOLOGIESPROJECTS FROM SHPINE TECHNOLOGIES
PROJECTS FROM SHPINE TECHNOLOGIESSHPINE TECHNOLOGIES
 
A SOFTWARE DEFINED RADIO BASED
A SOFTWARE DEFINED RADIO BASEDA SOFTWARE DEFINED RADIO BASED
A SOFTWARE DEFINED RADIO BASEDANGELIN JOHN
 
Performance of Web Services on Smart Phone Platforms
Performance of Web Services on Smart Phone PlatformsPerformance of Web Services on Smart Phone Platforms
Performance of Web Services on Smart Phone PlatformsIOSR Journals
 
Improving university education in nigeria through mobile academic directory
Improving university education in nigeria through mobile academic directoryImproving university education in nigeria through mobile academic directory
Improving university education in nigeria through mobile academic directoryAnthonyOtuonye
 
01 java 2 micro edition
01 java 2 micro edition01 java 2 micro edition
01 java 2 micro editioncorneliuskoo
 
Open Programmable Architecture for Java-enabled Network Devices
Open Programmable Architecture for Java-enabled Network DevicesOpen Programmable Architecture for Java-enabled Network Devices
Open Programmable Architecture for Java-enabled Network DevicesTal Lavian Ph.D.
 
The common challenges of mobile internet for up coming generation
The common challenges of mobile internet for up coming generationThe common challenges of mobile internet for up coming generation
The common challenges of mobile internet for up coming generationeSAT Publishing House
 
The common challenges of mobile internet for up coming generation
The common challenges of mobile internet for up coming generationThe common challenges of mobile internet for up coming generation
The common challenges of mobile internet for up coming generationeSAT Journals
 
HACKING THE WIRELESS WORD WITH SOFTWARE DEFINED RADIO
HACKING THE WIRELESS WORD WITH SOFTWARE DEFINED RADIOHACKING THE WIRELESS WORD WITH SOFTWARE DEFINED RADIO
HACKING THE WIRELESS WORD WITH SOFTWARE DEFINED RADIOchandanpatelvns1947
 
DockerCon - The missing piece : when Docker networking unleashes software arc...
DockerCon - The missing piece : when Docker networking unleashes software arc...DockerCon - The missing piece : when Docker networking unleashes software arc...
DockerCon - The missing piece : when Docker networking unleashes software arc...Laurent Grangeau
 
The missing piece : when Docker networking and services finally unleashes so...
 The missing piece : when Docker networking and services finally unleashes so... The missing piece : when Docker networking and services finally unleashes so...
The missing piece : when Docker networking and services finally unleashes so...Adrien Blind
 
A project report on wireless energy meter reading using x bee
A project report on wireless energy meter reading using x beeA project report on wireless energy meter reading using x bee
A project report on wireless energy meter reading using x beeRobo India
 
wireless notice board
 wireless notice board wireless notice board
wireless notice boardAnmol Purohit
 

Ähnlich wie Mobile application development (20)

Introduction to Networks and Programming Language
Introduction to Networks and Programming LanguageIntroduction to Networks and Programming Language
Introduction to Networks and Programming Language
 
PROJECTS FROM SHPINE TECHNOLOGIES
PROJECTS FROM SHPINE TECHNOLOGIESPROJECTS FROM SHPINE TECHNOLOGIES
PROJECTS FROM SHPINE TECHNOLOGIES
 
A SOFTWARE DEFINED RADIO BASED
A SOFTWARE DEFINED RADIO BASEDA SOFTWARE DEFINED RADIO BASED
A SOFTWARE DEFINED RADIO BASED
 
Wirelss LAN
Wirelss LANWirelss LAN
Wirelss LAN
 
Final2
Final2Final2
Final2
 
J2 Me
J2 MeJ2 Me
J2 Me
 
Wireless microservers
Wireless microserversWireless microservers
Wireless microservers
 
Syslog Technologies
 Syslog Technologies Syslog Technologies
Syslog Technologies
 
proj (2)
proj (2)proj (2)
proj (2)
 
Performance of Web Services on Smart Phone Platforms
Performance of Web Services on Smart Phone PlatformsPerformance of Web Services on Smart Phone Platforms
Performance of Web Services on Smart Phone Platforms
 
Improving university education in nigeria through mobile academic directory
Improving university education in nigeria through mobile academic directoryImproving university education in nigeria through mobile academic directory
Improving university education in nigeria through mobile academic directory
 
01 java 2 micro edition
01 java 2 micro edition01 java 2 micro edition
01 java 2 micro edition
 
Open Programmable Architecture for Java-enabled Network Devices
Open Programmable Architecture for Java-enabled Network DevicesOpen Programmable Architecture for Java-enabled Network Devices
Open Programmable Architecture for Java-enabled Network Devices
 
The common challenges of mobile internet for up coming generation
The common challenges of mobile internet for up coming generationThe common challenges of mobile internet for up coming generation
The common challenges of mobile internet for up coming generation
 
The common challenges of mobile internet for up coming generation
The common challenges of mobile internet for up coming generationThe common challenges of mobile internet for up coming generation
The common challenges of mobile internet for up coming generation
 
HACKING THE WIRELESS WORD WITH SOFTWARE DEFINED RADIO
HACKING THE WIRELESS WORD WITH SOFTWARE DEFINED RADIOHACKING THE WIRELESS WORD WITH SOFTWARE DEFINED RADIO
HACKING THE WIRELESS WORD WITH SOFTWARE DEFINED RADIO
 
DockerCon - The missing piece : when Docker networking unleashes software arc...
DockerCon - The missing piece : when Docker networking unleashes software arc...DockerCon - The missing piece : when Docker networking unleashes software arc...
DockerCon - The missing piece : when Docker networking unleashes software arc...
 
The missing piece : when Docker networking and services finally unleashes so...
 The missing piece : when Docker networking and services finally unleashes so... The missing piece : when Docker networking and services finally unleashes so...
The missing piece : when Docker networking and services finally unleashes so...
 
A project report on wireless energy meter reading using x bee
A project report on wireless energy meter reading using x beeA project report on wireless energy meter reading using x bee
A project report on wireless energy meter reading using x bee
 
wireless notice board
 wireless notice board wireless notice board
wireless notice board
 

Kürzlich hochgeladen

Sachpazis Costas: Geotechnical Engineering: A student's Perspective Introduction
Sachpazis Costas: Geotechnical Engineering: A student's Perspective IntroductionSachpazis Costas: Geotechnical Engineering: A student's Perspective Introduction
Sachpazis Costas: Geotechnical Engineering: A student's Perspective IntroductionDr.Costas Sachpazis
 
Industrial Safety Unit-IV workplace health and safety.ppt
Industrial Safety Unit-IV workplace health and safety.pptIndustrial Safety Unit-IV workplace health and safety.ppt
Industrial Safety Unit-IV workplace health and safety.pptNarmatha D
 
IVE Industry Focused Event - Defence Sector 2024
IVE Industry Focused Event - Defence Sector 2024IVE Industry Focused Event - Defence Sector 2024
IVE Industry Focused Event - Defence Sector 2024Mark Billinghurst
 
multiple access in wireless communication
multiple access in wireless communicationmultiple access in wireless communication
multiple access in wireless communicationpanditadesh123
 
Transport layer issues and challenges - Guide
Transport layer issues and challenges - GuideTransport layer issues and challenges - Guide
Transport layer issues and challenges - GuideGOPINATHS437943
 
Virtual memory management in Operating System
Virtual memory management in Operating SystemVirtual memory management in Operating System
Virtual memory management in Operating SystemRashmi Bhat
 
Internet of things -Arshdeep Bahga .pptx
Internet of things -Arshdeep Bahga .pptxInternet of things -Arshdeep Bahga .pptx
Internet of things -Arshdeep Bahga .pptxVelmuruganTECE
 
Risk Management in Engineering Construction Project
Risk Management in Engineering Construction ProjectRisk Management in Engineering Construction Project
Risk Management in Engineering Construction ProjectErbil Polytechnic University
 
Main Memory Management in Operating System
Main Memory Management in Operating SystemMain Memory Management in Operating System
Main Memory Management in Operating SystemRashmi Bhat
 
Work Experience-Dalton Park.pptxfvvvvvvv
Work Experience-Dalton Park.pptxfvvvvvvvWork Experience-Dalton Park.pptxfvvvvvvv
Work Experience-Dalton Park.pptxfvvvvvvvLewisJB
 
Correctly Loading Incremental Data at Scale
Correctly Loading Incremental Data at ScaleCorrectly Loading Incremental Data at Scale
Correctly Loading Incremental Data at ScaleAlluxio, Inc.
 
BSNL Internship Training presentation.pptx
BSNL Internship Training presentation.pptxBSNL Internship Training presentation.pptx
BSNL Internship Training presentation.pptxNiranjanYadav41
 
Past, Present and Future of Generative AI
Past, Present and Future of Generative AIPast, Present and Future of Generative AI
Past, Present and Future of Generative AIabhishek36461
 
US Department of Education FAFSA Week of Action
US Department of Education FAFSA Week of ActionUS Department of Education FAFSA Week of Action
US Department of Education FAFSA Week of ActionMebane Rash
 
Katarzyna Lipka-Sidor - BIM School Course
Katarzyna Lipka-Sidor - BIM School CourseKatarzyna Lipka-Sidor - BIM School Course
Katarzyna Lipka-Sidor - BIM School Coursebim.edu.pl
 
Ch10-Global Supply Chain - Cadena de Suministro.pdf
Ch10-Global Supply Chain - Cadena de Suministro.pdfCh10-Global Supply Chain - Cadena de Suministro.pdf
Ch10-Global Supply Chain - Cadena de Suministro.pdfChristianCDAM
 
UNIT III ANALOG ELECTRONICS (BASIC ELECTRONICS)
UNIT III ANALOG ELECTRONICS (BASIC ELECTRONICS)UNIT III ANALOG ELECTRONICS (BASIC ELECTRONICS)
UNIT III ANALOG ELECTRONICS (BASIC ELECTRONICS)Dr SOUNDIRARAJ N
 
Configuration of IoT devices - Systems managament
Configuration of IoT devices - Systems managamentConfiguration of IoT devices - Systems managament
Configuration of IoT devices - Systems managamentBharaniDharan195623
 

Kürzlich hochgeladen (20)

Sachpazis Costas: Geotechnical Engineering: A student's Perspective Introduction
Sachpazis Costas: Geotechnical Engineering: A student's Perspective IntroductionSachpazis Costas: Geotechnical Engineering: A student's Perspective Introduction
Sachpazis Costas: Geotechnical Engineering: A student's Perspective Introduction
 
Industrial Safety Unit-IV workplace health and safety.ppt
Industrial Safety Unit-IV workplace health and safety.pptIndustrial Safety Unit-IV workplace health and safety.ppt
Industrial Safety Unit-IV workplace health and safety.ppt
 
IVE Industry Focused Event - Defence Sector 2024
IVE Industry Focused Event - Defence Sector 2024IVE Industry Focused Event - Defence Sector 2024
IVE Industry Focused Event - Defence Sector 2024
 
multiple access in wireless communication
multiple access in wireless communicationmultiple access in wireless communication
multiple access in wireless communication
 
Transport layer issues and challenges - Guide
Transport layer issues and challenges - GuideTransport layer issues and challenges - Guide
Transport layer issues and challenges - Guide
 
Virtual memory management in Operating System
Virtual memory management in Operating SystemVirtual memory management in Operating System
Virtual memory management in Operating System
 
Internet of things -Arshdeep Bahga .pptx
Internet of things -Arshdeep Bahga .pptxInternet of things -Arshdeep Bahga .pptx
Internet of things -Arshdeep Bahga .pptx
 
Designing pile caps according to ACI 318-19.pptx
Designing pile caps according to ACI 318-19.pptxDesigning pile caps according to ACI 318-19.pptx
Designing pile caps according to ACI 318-19.pptx
 
Risk Management in Engineering Construction Project
Risk Management in Engineering Construction ProjectRisk Management in Engineering Construction Project
Risk Management in Engineering Construction Project
 
Main Memory Management in Operating System
Main Memory Management in Operating SystemMain Memory Management in Operating System
Main Memory Management in Operating System
 
Work Experience-Dalton Park.pptxfvvvvvvv
Work Experience-Dalton Park.pptxfvvvvvvvWork Experience-Dalton Park.pptxfvvvvvvv
Work Experience-Dalton Park.pptxfvvvvvvv
 
Correctly Loading Incremental Data at Scale
Correctly Loading Incremental Data at ScaleCorrectly Loading Incremental Data at Scale
Correctly Loading Incremental Data at Scale
 
POWER SYSTEMS-1 Complete notes examples
POWER SYSTEMS-1 Complete notes  examplesPOWER SYSTEMS-1 Complete notes  examples
POWER SYSTEMS-1 Complete notes examples
 
BSNL Internship Training presentation.pptx
BSNL Internship Training presentation.pptxBSNL Internship Training presentation.pptx
BSNL Internship Training presentation.pptx
 
Past, Present and Future of Generative AI
Past, Present and Future of Generative AIPast, Present and Future of Generative AI
Past, Present and Future of Generative AI
 
US Department of Education FAFSA Week of Action
US Department of Education FAFSA Week of ActionUS Department of Education FAFSA Week of Action
US Department of Education FAFSA Week of Action
 
Katarzyna Lipka-Sidor - BIM School Course
Katarzyna Lipka-Sidor - BIM School CourseKatarzyna Lipka-Sidor - BIM School Course
Katarzyna Lipka-Sidor - BIM School Course
 
Ch10-Global Supply Chain - Cadena de Suministro.pdf
Ch10-Global Supply Chain - Cadena de Suministro.pdfCh10-Global Supply Chain - Cadena de Suministro.pdf
Ch10-Global Supply Chain - Cadena de Suministro.pdf
 
UNIT III ANALOG ELECTRONICS (BASIC ELECTRONICS)
UNIT III ANALOG ELECTRONICS (BASIC ELECTRONICS)UNIT III ANALOG ELECTRONICS (BASIC ELECTRONICS)
UNIT III ANALOG ELECTRONICS (BASIC ELECTRONICS)
 
Configuration of IoT devices - Systems managament
Configuration of IoT devices - Systems managamentConfiguration of IoT devices - Systems managament
Configuration of IoT devices - Systems managament
 

Mobile application development

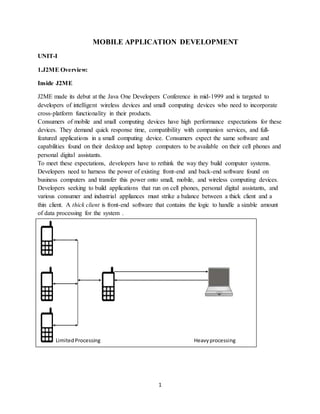
  • 1. 1 MOBILE APPLICATION DEVELOPMENT UNIT-I 1.J2ME Overview: Inside J2ME J2ME made its debut at the Java One Developers Conference in mid-1999 and is targeted to developers of intelligent wireless devices and small computing devices who need to incorporate cross-platform functionality in their products. Consumers of mobile and small computing devices have high performance expectations for these devices. They demand quick response time, compatibility with companion services, and full- featured applications in a small computing device. Consumers expect the same software and capabilities found on their desktop and laptop computers to be available on their cell phones and personal digital assistants. To meet these expectations, developers have to rethink the way they build computer systems. Developers need to harness the power of existing front-end and back-end software found on business computers and transfer this power onto small, mobile, and wireless computing devices. Developers seeking to build applications that run on cell phones, personal digital assistants, and various consumer and industrial appliances must strike a balance between a thick client and a thin client. A thick client is front-end software that contains the logic to handle a sizable amount of data processing for the system . LimitedProcessing Heavyprocessing
  • 2. 2 Heavy processing Limited processing How J2ME Is Organized Traditional computing devices use fairly standard hardware configurations such as a display, keyboard, mouse, and large amounts of memory and permanent storage. However, the new breed of computing devices lacks hardware configuration continuity among devices. Some devices don’t have a display, permanent storage, keyboard, or mouse. And memory availability is inconsistent among small computing devices. The lack of uniform hardware configuration among the small computing devices poses a formidable challenge for the Java Community Process Program, which is charged with developing standards for the JVM and the J2ME for small computing devices. J2ME Configurations There are two configurations for J2ME as of this writing. These are Connected Limited Device Configuration (CLDC) and the Connected Device Configuration (CDC). The CLDC is designed for 16-bit or 32-bit small computing devices with limited amounts of memory. CLDC devices usually have between 160KB and 512KB of available memory and are battery powered. They also use an inconsistent, small-bandwidth network wireless connection and may not have a user interface. J2ME Profiles A profile consists of Java classes that enable implementation of features for either a particular small computing device or for a class of small computing devices. Small computing technology continues to evolve, and with that, there is an ongoing process of defining J2ME profiles. Seven profiles have been defined as of this writing. These are the Foundation Profile, Game Profile, Mobile Information Device Profile, PDA Profile, Personal Profile, Personal Basis Profile, and RMI Profile.  The Foundation Profile is used with the CDC configuration and is the core for nearly all other profiles used with the CDC configuration because the Foundation Profile contains core Java classes.  The Game Profile is also used with the CDC configuration and contains the necessary classes for developing game applications for any small computing device that uses the CDC configuration.
  • 3. 3  The Mobile Information Device Profile (MIDP) is used with the CLDC configuration and contains classes that provide local storage, a user interface, and networking capabilities to an application that runs on a mobile computing device such as Palm OS devices. MIDP is used with wireless Java applications. J2ME and Wireless Devices Developers, mobile communications device manufacturers, and mobile network providers are anxious to fill this need, but there is a serious hurdle: mobile communications devices utilize a number of different application platforms and operating systems. Without tweaking the code, an application written for one device cannot run on another device. Mobile communications devices lack a standard application platform and operating system, which has made developing applications for mobile communications devices a risky economic venture for developers. The Wireless Application Protocol (WAP) forum became the initial industry group that set out to create standards for wireless technology. Ericsson, Motorola, Nokia, and Unwired Planet formed theWAP forum in 1997, and it has since grown to include nearly all mobile device manufacturers, mobile network providers, and developers. The WAP forum created mobile communications device standards referred to as the WAP standard. The WAP standard is an enhancement of HTML, XML, and TCP/IP. One element of this standard is the Wireless Markup Language specification, which consists of a blend o HTML and XML and is used by developers to create documents that can be displayed by a microbrowser. A microbrowser is a diminutive web browser that operates on a mobile communications device. What J2ME Isn’t Although J2ME is J2SE without some classes, developers shouldn’t assume that existing Java applications would run in the J2ME environment without requiring modification to the code. The write-once-run-anywhere philosophy of Java is a bit overstated when it comes to J2ME because of resource constraints imposed by small computing devices. Some J2SE applications require classes that are not available in J2ME. Likewise, resources required by the J2SE application may not be available on the small computing device. This means that developers must expect to test existing J2SE applications in the J2ME environment and probably pare down the application to run using limited resources. Another misconception about J2ME is the Java Virtual Machine implementation on the small computing device. Other Java Platforms for Small Computing Devices J2ME isn’t the only Java platform designed for small computing devices. Other Java platforms— EmbeddedJava, JavaCard, and PersonalJava—predate J2ME. EmbeddedJava is the Java platform used for small computing devices that are dedicated to one purpose and have a 32-bit processor and 512KB of ROM and RAM. EmbeddedJava is based on JDK 1.1 and is being replaced by the CDLC configuration. For more information about EmbeddedJava, visit java.sun.com/products/embeddedjava. JavaCard is the Java platform used for smart cards, the smallest computing device that supports Java. The JavaCard VM runs on small computing devices that have 16KB of nonvolatile memory and 512 bytes of volatile memory. However, unlike the Embedded Java platform, there isn’t any movement to replace JavaCard with J2ME because of the resource constraints of the current generation of smart cards. Future smart card generations will probably have great resources available and be compatible with the CDLC configuration. You can find more information about JavaCard in java.sun.com/ products/javacard.
  • 4. 4 1.2 Small Computing Technology 1.2.1Wireless Technology Wireless technology that is used in small computing devices and mobile communications devices is the same radio technology Guglielmo Marconi used to provide an alternative communication means to the telegraph and the telephone. Moving a knife up and down in water causes the formation of a wave. Aptitude Waves are measured by wave height and wave frequency The frequency of a wave causes the wave to take on specific characteristics. For example, a low- frequency wave called a sound wave produces a frequency that can be heard by humans. Sound waves travel a short distance through air. A higher-frequency wave called a radio wave cannot be heard but can travel long distances in all directions and through solid objects. And even higher frequencies called light waves take on other characteristics. Light waves can be seen, travel a long distance in a limited direction, and cannot penetrate solid objects. Waves are grouped according to frequencies that have similar characteristics in the electromagnetic spectrum . there is an audio spectrum, a radio spectrum, and a light spectrum. There are also subgroups within each spectrum, each of which has a variation of the characteristics of the spectrum. The radio spectrum has divisions for television, microwave, and X-ray frequencies. The light spectrum has divisions for infrared light, visible light, and ultraviolet light. 1.2.2Radio Transmission Radio transmission consists of two components. These are a transmitter and a receiver, both of which must be tuned to the same frequency. A transmitter broadcasts a steady wave called a carrier signal that does not contain any information . Conceptually, you can think of a telephone dial tone as a carrier signal. A carrier signal has two purposes. First, the carrier signal establishes a communications channel with the receiver . The receiver knows the channel is open when the carrier signal is detected. The carrier signal also serves as the wave that is encoded with information during transmission. A radio transmitter encodes patterns of sound waves detected by a microphone by modifying the carrier signal wave . The receiver decodes the pattern from the carrier wave and translates the pattern into electrical current that directs a speaker to regenerate the sound waves captured by the microphone attached to the transmitter.
  • 5. 5 1.2.3Limitations of Radio Transmissions The distance a radio signal travels is based on the amount of energy used to transmit the radio wave. This is similar to the energy used to plunge the knife into the dishpan of water. Using a relatively small amount of energy causes the wave to barely reach the side of the dishpan. However, plunging the knife into the dishpan with force causes the wave to overflow the sides of the dishpan. A carrier signal is a broadcast wave that does not contain any information A carrier signal is used to establish a communications channel Radio waves are measured in watts. Aradio signal transmitted at 50 megawatts travels twice the distance a 25-megawatt radio signal travels. A radio signal gradually loses power the farther it travels away from the transmitter. Radio engineers extend the range of transmission by using a repeater. A repeater is both a radio receiver and radio transmitter, also known as a transceiver. A repeater receives a radio signal and then retransmits the signal, thereby increasing the distance the signal travels. Retransmission introduces new energy to power the signal for longer distances. Sound waves detected by a microphone modify the carrier signal
  • 6. 6 1.2.2 Radio Data Networks Radio transmissions are commonly used to broadcast analog voice information on radio waves that travel 360 degrees over the air and through many physical obstructions. However, radio technology is also used to transmit digital information on those same waves. Information is traditionally encoded as variations of an aspect of the wave. Encoding is achieved by modifying the amplitude of the wave, known as amplitude modulation (AM), or modifying the frequency of the wave, called frequency modulation (FM). Encoding uses many values to represent information using AM and FM. Hundreds of thousands of radio waves are simultaneously and independently transmitted. Sometimes a radio receiver picks up an erroneous radio signal while tuned to its primary frequency. The erroneous radio signal is known as interference and can disrupt the accurate decoding of the transmitted information. Today information is digitally encoded using binary values to represent information transmitted on radio waves. Digitizing information enables receivers to accurately decode transmitted information because the degree of uncertainty in the encoded information is far less than experienced in analog encoded information. Radio transmitters, repeaters, and receivers are organized to form a radio network that extends transmissions over great distances. Radio networks are scalable because repeaters are placed in the network to increase the distance that the original transmission travels. Data Packets Radio transmitters send one message at a time over a communications channel. This is similar to sending one telephone call at a time over a telephone line. Each telephone call is placed in a queue while waiting for the current telephone call to end. As you can imagine, telephone calls could easily back up whenever there are more calls than there are empty telephone lines. Digital radio networks use packet switching technology to transmit multiple messages simultaneously over a communications channel. Each message is divided into small pieces and placed in an electronic envelope called a packet . Apacket contains information that identifies the sender and the receiver, a digitized portion of the message, the sequence number of the packet, and error-checking information. Originator address Information Destination address Sequence code Error checking A message is divided into small pieces that are placed in an electronic envelope called a packet 1.2.3 Microwave Technology Microwave is a subspectrum of the radio spectrum and has many characteristics of radio waves discussed previously in this chapter. However, microwaves travel in one unobstructed direction. Any obstruction, such as a mountain or building, disrupts microwave transmission. There are two kinds of microwave networks: terrestrial and satellites. Terrestrial microwave networks transmit a microwave signal over a terrain, such as buildings in an office complex. Satellite microwave networks transmit a microwave signal between a ground station and orbiting
  • 7. 7 satellites and among orbiting satellites Earth-to-satellite transmissions are slower than terrestrial microwave transmissions, which causes unnatural pauses to occur in the transmission. This is noticeable during a live international television broadcast when a pause occurs between the time a television news anchor questions a reporter and the reporter’s response. Therefore, satellite microwave transmission may not be suitable for real-time two-way communications where nearly instantaneous transmission is expected. Satellite Networks A satellite is an orbiting repeater that receives a microwave transmission from an earth station or from other satellites, then retransmits the signal to a microwave receiver located on the ground or in another satellite. The first generation of satellites used for the military were stationed in geosynchronous orbit at a fixed location 22,300 miles above the surface of the earth. However, the geosynchronous orbit hampers real-time transmission because of the signal delay between earth and the satellite, which makes geosynchronous orbiting satellites unacceptable for commercial two-way real-time communication. A newer breed of satellite technology, called Low Earth Orbiting Satellite (LEOS),overcame the communications delay by positioning satellites lower than geosynchronous orbit—between 435 miles and 1,500 miles above the earth. LEOS eliminated delays in communication, but introduced two new problems. First, LEOS covers a smaller area of the earth, and therefore more satellites are required to cover the same ground area as covered by geosynchronous satellites. In an effort to compromise between LEOS and geosynchronous satellites, another breed of satellites called the Middle Earth Orbit (MEO) was developed. MEO orbits between LEOS and geosynchronous satellites—6,000 to 13,000 miles—and thus has less delay than geosynchronous satellites and poses less difficulty than LEOS for ground stations to locate. 1.2.4 Mobile Radio Networks The infrastructure of cellular telephone technology is the backbone of wireless small computing mobile communications and enables these devices to connect to traditional communications systems. The forerunner of cellular telephone technology is a private radio technology. Service and trucking companies and government agencies use private radio technology to communicate with employees over frequencies isolated from other radio frequencies. For example, package carriers like Federal Express use privat radio networks to track packages. Private radio transmitted analog information when first introduced but later expanded into digital communication as the need for paging and messaging services materialized. Cellular Telephone Networks A cellular telephone network comprises mobile transceivers, called cellular telephones, and a network of fixed transceivers, called base stations, that are strategically positioned along the terrain. Base stations are used to connect cellular telephones to the ground-based telephone system. There are two kinds of cellular networks: analog and digital. Cellular telephones began in the 1970s with the expansion of AT&T into the mobile telephone service market. Cellular telephones used analog technology at that time. This changed in mid-1995 when IBM developed technology that digitized information transmitted over the cellular telephone network. Cellular telephone networks then became capable of transmitting both voice and data. The transmission range of a cellular telephone is determined by the strength of the battery powering the phone and the location of the nearest base station. Transmission range drops as power is drained from the cellular telephone and the telephone is taken farther from a base station.
  • 8. 8 Cellular Digital Packet Data IBM pioneered digital cellular telephone networks with the introduction of their Cellular Digital Packet Data (CDPD) protocol, commonly known as IP wireless. IP wireless requires that an Internet protocol (IP) address be assigned to each cellular transceiver in the cellular telephone network. An IP address uniquely identifies each device within the cellular telephone network and is used to reestablish a connection if communication is lost during a hand-off. Base stations have multiple entry points called ports, each of which is identified by a unique port number. A transceiver is assigned to a base station port in the cellular telephone network. Atransceiver continues to transmit to the port number until a handoff occurs, at which time the transceiver is assigned another port number associated with the next base station. Digital Wireless Transmissions A digital cellular telephone network can transmit both voice and data simultaneously using multiplex transmission. There are three multiplex transmission methods used on a digital cellular telephone network: Code Division Multiple Access (CDMA), Time Division Multiple Access (TDMA), and a third-generation wireless standard called 3G. CDMAuses spread-spectrum transmission to use multiple communications channels for transmission, which dramatically increases data throughput over the network. The cellular telephone temporarily uses on-board memory in transceivers to store data to keep transmissions flowing during a hand-off. This is called a soft hand-off. TDMA uses one communications channel shared among transmissions by using time slots. Transmission time is divided into time slots, and then each packet is assigned to a time slot. The 3G multiplexing technique uses either CDMA or TDMA to increase the throughput to 56 kilobits per second. Cell Phones and Text Input Traditional cellular telephones have a keypad that contains numbers and letters. (European traditional cellular telephones have only numbers.) Letters were designed to identify telephone exchanges—local switching stations that serviced a group of customers. Each switching station was referred to by a name that implied the location of the switching station. For example, there was a switching station called Murray Hill that covered the Murray Hill section of New York City. The first two letters of the name of the switching station were used to replace the first two digits of a seven-digit phone number. Let’s say a customer was assigned Murray Hill 5 1000 as a telephone number. A caller dials MU 5 1000. Today the person would call 685-1000 since the switching station naming convention was dropped decades ago. Today customers expect to be able to enter textual information using the cellular telephone keypad. However, there are two problems with the keypad. First, the keypad doesn’t contain the letters Q or Z. And each numeric key, except for the first key, contains three letters. Bluetooth Wireless Network Many small computing devices such as those used in consumer appliances communicate with each other by using a low-power radio network that uses Bluetooth technology. Bluetooth technology broadcasts within a 400-foot radius, which is expected to extend to nearly 4,000 feet, and so is perfect for a wireless network in an office. Transmission consists of short data packets to maximize throughput to one megabit per second. The short size of a packet reduces retransmission time when errors are detected and packets must be resent. Security is provided through frequency hopping that occurs at 1,600 hops per second, practically eliminating the risk that the signal will be intercepted. Data is also encrypted before being broadcast.
  • 9. 9 1.2.5 Messaging One of the first popular wireless mobile communications devices was a pager. A pager displays any series of numbers that were sent by a caller. Technically, the series of numbers represented the caller’s telephone number and implied that the call be returned. Practically, the series of numbers could represent anything to which the caller and the receiver agree on. For example, it was common for systems administrators to have their system send a 911 call to a pager whenever there was a systems problem. Some systems administrators even devised a code that was sent indicating which system transmitted the call and the nature of the problem. Drug dealers were also notorious for using pagers to send encoded messages of drug deliveries. Abuyer would call the pager and send a series of numbers that told the dealer the type of drug, quantity, and delivery location for the buy. Today’s wireless mobile communications devices offer text messaging services that enable short textual messages to be sent to the device from any device that has access to the service. Cellular telephone companies offer three types of messaging services: Short Message Service (SMS), Cell Broadcast Service (CBS), and Unstructured Supplementary Services Data (USSD). SMS type of messaging is capable of sending a maximum of 160 characters on the control channel of a cellular telephone network. A control channel is a communications channel used to manage cellular telephone calls. Messages sent using SMS are sent and received during a cellular telephone call because the telephone call and the message use different communications channels for transmission. However, there may be a slight delay between transmission of a message and when the message is received because SMS messaging uses store-forwarding technology, where the message is temporarily stored in a mailbox before being delivered to the receiver. The CBS type of messaging broadcasts a maximum of 15 pages of 93 characters per page to every device on the network. Everyone on the network receives the same message, which is why CBS messaging has had limited success in the market. 1.2.6 Personal Digital Assistants A personal digital assistant (PDA) is probably the most commonly used small mobile computing device next to a cellular telephone. PDAs are lightweight and small enough to fit in a pocket, and they run essential applications. PDA is a generic name that applies to a simple digital telephone directory and to more elaborate mobile computing devices that run a spreadsheet, word processor, email, and a variety of customized programs. All PDAs are small computing devices that contain an operating system, processor, memory, and a port to connect the PDA to peripherals and external computing devices. There are three commonly used operating systems on a PDA: EPOC, Palm OS, and Windows CE. EPOC is used in the Psion product line, Palm OS in the Palm PDAs, and Windows CE on various pocket PC devices. Mobile Power Power is the primary challenge facing the mobile small computing industry. Consumer expectations are high for mobile small computing devices. They want desktop performance anytime and anywhere they power up. Unfortunately, improvements in power storage technology haven’t kept pace with mobile computing technology. Every mobile small computing device is powered by one or more batteries that have a limited life span after which there is no electricity to operate the device. Engineers reduce power consumption by removing power-hungry components and impose powersaving techniques such as deactivating components when a component is not in use. The length of time a mobile
  • 10. 10 small computing device is operational depends on how well and how long a battery holds its electrical charge. For example, a PDAmight operate steadily for 20 hours, while a cellular telephone remains operational for 10 hours. Th actual time a battery remains charged depends on a number of factors. These include the type of battery in use, the condition of the battery, and the power consumption of each operation. For example, standby operation for a cellular telephone consumes less power than transmitting a signal. Set-Top Boxes With the onset of cable television and satellite television came a demand for another type of small computing device called a set-top box. A set-top box is the device that connects a television to a cable signal or satellite signal received from a service provider. Set-top box technology has evolved with the increasing demand by consumers for television and related services such as email and video on demand. The first-generation set-top box had a simple function: it received a scrambled analog television transmission from the service provider, unscrambled the signal, and sent the unscrambled signal to the television. Inside Look at a Set-Top Box All modern set-top boxes perform five common operations. These are to decode a digital signal received from the service provider, authenticate access rights, transmit a signal to a television, transmit audio information to create surround sound, and provide interactive services such as access to the Internet and email. Multiple signals are received by the set-top box from the service provider, each of which is transmitted over its own communications channel. The tuner circuit within the set-top box filters all communications channels except the channel selected by the consumer. The signal from the selected channel is sent to the demodulator circuit. The demodulator circuit is a chip that converts the signal into binary data before sending the binary signal to the demultiplexer chip. Smart Cards Asmart card is a mobile small computing device that is used to store secured information Smart cards are replacing magnetic strip cards such as credit cards. Typically, a smart card has an 8-bit CPU and 64KB of EEPROM along with a modest amount of memory. And similar to set-top boxes, there are many operating systems used in smart cards. The more commonly used smart card operating systems include Java Card from Sun, MultOS from MasterCard, Smart Card for Windows from Microsoft, and Visa Open Platform. Smart cards are used to provide real-time, interactive access to secured data stored in the memory of the smart card. Asecurity plan protects this information from unauthorized access and manipulation of information stored in memory.
  • 11. 11 UNIT-II J2ME Architecture and Development Environment : 2.1 J2ME Architecture The modular design of the J2ME architecture enables an application to be scaled based on constraints of a small computing device. J2ME architecture doesn’t replace the operating system of a small computing device. Instead, J2ME architecture consists of layers located above the native operating system, collectively referred to as the Connected Limited Device Configuration (CLDC). The CLDC, which is installed on top of the operating system, forms the run-time environment for small computing devices. The J2ME architecture comprises three software layers . The first layer is the configuration layer that includes the Java Virtual Machine (JVM), which directly interacts with the native operating system. The configuration layer also handles interactions between the profile and the JVM. The second layer is the profile layer, which consists of the minimum set of application programming interfaces (APIs) for the small computing device. The third layer is the Mobile Information Device Profile (MIDP). The MIDP layer contains Java APIs for user network connections, persistence storage, and the user interface. It also has access to CLDC libraries and MIDP libraries. Layers of the J2ME architecture OEM apps MIDP J2ME APs OEM Configuration classes Java virtual Machine Operating system A small computing device has two components supplied by the original equipment manufacturer (OEM). These are classes and applications. OEM classes are used by the MIDP to access device- specific features such as sending and receiving messages and accessing device-specific persistent data. OEM applications are programs provided by the OEM, such as an address book. OEM applications can be accessed by the MIDP. 2.2 Small Computing Device Requirements There are minimum resource requirements for a small computing device to run a J2ME application. First the device must have a minimum of 96 × 54 pixel display that can handle bitmapped graphics and have a way for users to input information, such as a keypad, keyboard, or touch screen. At least 128 kilobytes (KB) of nonvolatile memory I necessary to run Mobile Information Device (MID), and 8KB of nonvolatile memory I needed for storage of persistent application data. To run JVM, 32KB of volatile memory must be available. The device must also provide two-way network connectivity. Besides minimal hardware requirements, there are also minimal requirements for the native operating system. The native operating system must implement exception handling, process interrupts, be able to run the JVM, and provide schedule capabilities. Furthermore, all user input to the operating system must be forwarded to the JVM, otherwise the device cannot run a J2ME application. Although the native operating system doesn’t need to implement a file system to run a J2ME application, it must be able to write and read persistent data (data retained when the device is powered down) to nonvolatile memory.
  • 12. 12 2.3 Run-Time Environment A MIDlet is a J2ME application designed to operate on an MIDP small computing device. A MIDlet is defined with at least a single class that is derived from the javax .micro edition. Midlet .MIDlet abstract class. Developers commonly bundle related MIDlets into a MIDlet suite, which is contained within the same package and implemented simultaneously on a small computing device. All MIDlets within a MIDlet suite ar considered a group and must be installed and uninstalled as a group . Members of a MIDlet suite share resources of the host environment and share the same instances of Java classes and run within the same JVM. This means if three MIDlets from the same MIDlet suite run the same class, only one instance of the class is created at a time in the Java Virtual Machine. A key benefit of the relationship among MIDlet suite members is that they share the same data, including data in persistent storage such as user preferences. MIDlet suite small computing device MIDlet 1 MIDlet 1 MIDlet 1 MIDlet 2 MIDlet2 MIDlet 2 MIDlet 3 MIDlet 4 Package MIDlet 4 Load MIDlet 4 MIDlets are packaged into MIDlet suites,which are loaded in a small computing device. Sharing data among MIDlets exposes each MIDlet to data errors caused by concurrent read/write access to data. This risk is reduced by synchronization primitives on the MIDlet suite level that restrict access to volatile data and persistent data. However, if a MIDlet uses multi- threading, the MIDlet is responsible for coordinated access to the record store. Data cannot be shared between MIDlets that are not from the same MIDlet suite because the MIDlet suite name is used to identify data associated with the suite. A MIDlet from a different MIDlet suite is considered an unreliable source. Inside the Java Archive File All the files necessary to implement a MIDlet suite must be contained within a production package called a Java archive (JAR) file. These files include MIDlet classes, graphic images (if required by a MIDlet), and the manifest file. The manifest file contains a list of attributes and related definitions that are used by the application manager to install the files contained in the JAR file onto the small computing device. Nine attributes are defined in the manifest file; all but six of these attributes are optional. Manifest File Attribute Description MIDlet-Name MIDlet suite name. MIDlet-Version MIDlet version number. MIDlet-Vendor Name of the vendorwho supplied the MIDlet. MIDlet-n Attribute per MIDlet. Values are MIDlet name,optional icon, and MIDlet class name. MicroEdition-Profile Identifies the J2ME profile that is necessary to run the MIDlet. MIDlet-Icon Icon associated with MIDlet, must be in PNGimage format (optional). MIDlet-Description Description of MIDlet (optional). MIDlet-Info-URL URL containing more information about the MIDlet.
  • 13. 13 Inside the Java Application Descriptor File You may include a Java application descriptor (JAD) file within the JAR file of a MIDlet suite as a way to pass parameters to a MIDlet without modifying the JAR file . A JAD file is also used to provide the application manager with additional content information about the JAR file to determine whether the MIDlet suite can be implemented on the device. AJAD file is similar to a manifest in that both contain attributes that are name:value pairs. Name:value pairs can appear in any order within the JAD file. There are five required system attributes for a JAD file: MIDlet-Name MIDlet-Version MIDlet-Vendor MIDlet-n MIDlet-Jar-URL A system attribute is an attribute that is defined in the J2ME specification.contains a complete list of system attributes. Listing 3-2 illustrates a typical JAD file. All JAD files must have the.jad extension. JAD File Attribute Description MIDlet-Name MIDlet suite name. MIDlet-Version MIDlet version number. MIDlet-Vendor Name of the vendor who supplied the MIDlet. MIDlet-n Attribute per MIDlet. Values are MIDlet name, optional icon, and MIDlet class name. MIDlet-Jar-URL Location of the JAR file. MIDlet-Jar-Size Size of the JAR file in bytes (optional). MIDlet-Data-Size Minimum size (in bytes)for persistent data storage (optional). MIDlet-Description Description of MIDlet (optional). MIDlet-Delete - Confirm Confirmation required before removing the MIDlet suite (optional). MIDlet-Install-Notify Send installation status to given URL (optional). 2.4 MIDlet Programming Programming a MIDlet is similar to creating a J2SE application in that you define a class and related methods. However, a MIDlet is less robust than a J2SE application because of the restrictions imposed by the small computing device. The following overview gives you a glimpse of how a MIDlet is created. You’ll learn the details of building your own MIDlet in the “Hello World J2ME Style” section later in this chapter. A MIDlet is a class that extends the MIDlet class and is the interface between application statements and the run-time environment, which is controlled by the application manager. A MIDlet class must contain three abstract methods that are called by the application manager to manage the life cycle of the MIDlet. These abstract methods are startApp(), pauseApp(), and destroyApp(). The startApp() method is called by the application manager when the MIDlet is started and contains statements that are executed each time the application begins executio. The pauseApp() method is called before the application manager temporarily stops the MIDlet. The application manager restarts the MIDlet by recalling the startApp() method.
  • 14. 14 public class BasicMIDletShell extends MIDlet { public void startApp() { } public void pauseApp() { } public void destroyApp( boolean unconditional) { } } Both the startApp() and pauseApp() methods are public and have no return value nor parameter list. The destroyApp() method is also a public method without a return value. However, the destroyApp() method has a boolean parameter that is set to true if the termination of the MIDlet is unconditional, and false if the MIDlet can throw a MIDletStateChangeException telling the application manager that the MIDlet does not want to be destroyed just yet. Event Handling AMIDlet is an event-based application. All routines executed in the MIDlet are invoke in response to an event reported to the MIDlet by the application manager. The initial event that occurs is when the MIDlet is started and the application manager invokes th startApp() method. The startApp() method in a typical MIDlet contains a statement that displays a screen of data and prompts the user to enter a selection from among one or more options. The nature and number of options is MIDlet and screen dependent. A Command object is used to present a user with a selection of options to choose from when a screen is displayed. Each screen must have a CommandListener. User Interfaces The design of a user interface for a MIDlet depends on the restrictions of a small computing device. Some small computing devices contain resources that provide a rich user interface, while other more resource-constrained devices offer a modest user interface. A rich user interface contains the following elements, and a device with a minimal user interface has some subset of these elements as determined by the profile used for the device. A Form is the most commonly invoked user interface element found in a MIDlet and is used to contain other user interface elements. Text is placed on a form as a StringItem, a List, a ChoiceGroup, and a Ticker. Device Data Small computing devices don’t have the resources necessary to run an onboard database management system (DBMS). In fact some of these devices lack a file system. Therefore, a MIDlet must read and write persistent data without the advantage of a DBMS or file system. Start MIDlet1 Pause MIDlet1 Start MIDlet1 Terminate MIDlet1 Start App() Pause App() DestroyApp()
  • 15. 15 A MIDlet can use an MIDP class—RecordStore—and two MIDP interfaces— RecordComparator and RecordFilter—to write and read persistent data. A RecordStore class contains methods used to write and read persistent data in the form of a record Persistent data is read from a RecordStore by using either the RecordComparato interface or the RecordFilter interface. You’ll learn how to use RecordStore, RecordComparator, and RecordFilter later in this book. 2.5 Java Language for J2ME Floating-point math is probably the most notable missing feature of J2ME. Floatingpoint math requires special processing hardware to perform floating-point calculations. However, most small computing devices lack such hardware and therefore are unable to process floating-point calculations. This means that your MIDlet cannot use any floating-point data types or calculations. The second most notable difference between the Java language used in J2SE and J2ME is the absence of support for the finalize() method. The finalize() method in J2SE is automatically called before an instance of a class terminates and typically contains statements that free previously allocated resources. However, resources in a small computing device are too scarce to process the finalize() method. Changes were also made in the Java Virtual Machine that runs on a small computing device because of resource constraints. One such change occurs with the class loader. JVM for small computing devices requires a custom class loader that is supplied by the device manufacturer and cannot be replaced or modified. System Classes java.lang.Class java.lang.Runtime java.lang.System java.lang. Object java.lang.String java.lang.Thread java.lang.Runnable java.lang.StringBuffer java.lang.Throwable Data Type Classes java.lang.Boolean java.lang.Character java.lang.Long java.lang.Byte java.lang.Integer java.lang.Short Collection Classes java.util.Enumeration java.util.Stack java.util.Hashtable java.util.Vector 2.6 J2ME Software Development Kits AMIDlet is built using free software packages that are downloadable from the java.sun .com web site, although you can purchase third-party development products such a Borland JBuilder Mobile Set, Sun One Studio 4 (formerly Forte for Java), and WebGain VisualCafe Enterprise Suite. Three software packages need to be downloaded from java.sun.com. These are the Java Development Kit (1.3 or greater) (java.sun.com/ j2se/downloads.html), Connected Limited Device Configuration (CLDC) (java.sun. com/products/cldc/), and the Mobile Information Device Profile (MIDP) (java.sun.com/ products/midp/). You’ll also need the J2ME Wireless Toolkit to develop MIDlets for handheld devices (java.sun.com/products/j2mewtoolkit/download.html). Hello World J2ME Style You can create your first MIDlet once the Java development kit, Connected Limited Device Configuration (CLDC), and Mobile Information Device Profile (MIDP) are installed. And keeping tradition alive, let’s begin by creating a directory structure within which you can create and run MIDlets. Here are the directories that are used for examples in this chapter:
  • 16. 16  j2me ■ j2mesrc ■ j2mesrcgreeting ■ j2metmp_classes ■ j2memidlets which will illustrate the basic concept of making and running a J2ME application. The first MIDlet is called HelloWorld and the otherMIDlet is GoodbyeWorld. The HelloWorld MIDlet shows how to create a simple MIDlet that can be invoked directly from the class and from a Java archive file. Later in this section you’ll learn how to create a MIDlet suite that contains two MIDlets. These are HelloWorld and GoodbyeWorld. package greeting; import javax.microedition.midlet.*; import javax.microedition.lcdui.*; public class HelloWorld extends MIDlet implements CommandListener { private Display display ; private TextBox textBox ; private Command quitCommand; public void startApp() { display = Display.getDisplay(this); quitCommand = new Command("Quit", Command.SCREEN, 1); textBox = new TextBox("Hello World", "My first MIDlet", 40, 0); textBox .addCommand(quitCommand); textBox .setCommandListener(this); display .setCurrent(textBox ); } public void pauseApp() { } public void destroyApp(boolean unconditional) { } public void commandAction(Command choice, Displayable displayable) { if (choice == quitCommand) { destroyApp(false); notifyDestroyed(); } } } Compiling Hello World The Hello World source code files should be saved in the new j2mesrcgreeting directory as HelloWorld.java. Next, you’ll need to compile the HelloWorld MIDlet. Compiling a MIDlet is a two-step process. The first step is to use the Java compiler to transform the source file into a class file. The second step is to preverify the class file, as described previously in this chapter. The preverification generates a modified class file Make j2mesrcgreeting the current directory, and then enter the following command at the command line. The d: drive is used in this example. You can replace the d: with the drive letter that is appropriate for your file structure. javac -d d:j2metmp_classes -target 1.1 -bootclasspath d:j2memidp1.0.3fcsclasses HelloWorld.java
  • 17. 17 Running Hello World A MIDlet should be tested in an emulator before being downloaded to a small computing device. An emulator is software that simulates how a MIDlet will run in a small computing device. Once you’re satisfied that a MIDlet is operating properly, you can deploy the MIDlet as part of a MIDlet suite, which you’ll learn to do a little later in the chapter. There are two ways to run a MIDlet. These are either by invoking the MIDlet class or by creating a JAR file, then running the MIDlet from the JAR file. Let’s begin by running the MIDlet class without the need of a JAR file. Make sure that j2mesrc greeting is the current directory, and then enter the following command. Figure 3- illustrates how the MIDlet appears in the emulator. Click the right telephone handse icon to close the MIDlet. midp -classpath d:j2meclasses greeting.HelloWorld Deploying Hello World A MIDlet should be placed in a MIDlet suite after testing is completed. The MIDlet suite is then packaged into a JAR file along with other related files for downloading to a small computing device. This process is commonly referred to as packaging. In the HelloWorld example, the MIDlet suite contains one MIDlet, which is the HelloWorld.class. Before packaging the MIDlet into a JAR file, you’ll need to use an editor to create the manifest file shown in Listing 3-5. The manifest describes the JAR file. The manifest file should be saved as manifest.txt in the j2mesrcgreeting directory. Notice that the MIDlet description within the manifest file contains a graphic call, /greeting/mylogo.png, that is associated with the HelloWorld MIDlet. MIDlet-1: HelloWorld, , greeting.HelloWorld MIDlet-Name: Hello World MIDlet-Version: 1.0 MIDlet-Vendor: Jim MIDlet-1: HelloWorld, /greeting/myLogo.png, greeting.HelloWorld MicroEdition-Configuration: CLDC-1.0 MicroEdition-Profile: MIDP-1.0 2.7 Multiple MIDlets in a MIDlet Suite In the real world, multiple MIDlets are distributed in a single MIDlet suite. The application manager then displays each MIDlet as a menu option, enabling the user to run one of the MIDlets. Let’s create another MIDlet to illustrate how to deploy a multiple MIDlet suite. The new MIDlet is called GoodbyeWorld and is shown in Listing 3-7. Enter this code into a text editor and save the file as GoodbyeWorld.java in the j2mesrcgreeting directory. Make the j2mesrcgreeting directory the current directory. Compile both the HelloWorld.java and GoodbyeWorld.java files by entering the following command at the command line: javac -d d:j2metmp_classes -target 1.1 -bootclasspath d:j2memidp1.0.3fcsclasses *.java preverify -d d:j2meclasses -classpath d:j2memidp1.0.3fcsclasses d:j2metmp_classes package greeting; import javax.microedition.midlet.*; import javax.microedition.lcdui.*; public class GoodbyeWorld extends MIDlet implements CommandListener { private Display display ; private TextBox textBox ; private Command quitCommand; public void startApp() { display = Display.getDisplay(this); quitCommand = new Command("Quit", Command.SCREEN, 1);
  • 18. 18 textBox = new TextBox("Goodbye World", "My second MIDlet", 40, 0); textBox .addCommand(quitCommand); textBox .setCommandListener(this); display .setCurrent(textBox ); } public void pauseApp() { } public void destroyApp(boolean unconditional) { } public void commandAction(Command choice, Displayable displayable ) { if (choice == quitCommand) { destroyApp(false); notifyDestroyed(); } } } 28 J2ME Wireless Toolkit Building and running a J2ME application at the command line is cumbersome, to say the least, when you are creating a robust application consisting of several MIDlets Creating your application within an integrated development environment is more productive than developing applications by entering commands at the command line. There are a number of popular integrated development environments on the market designed for developing J2ME applications. These include Borland’s JBuilder and Sun Microsystems’ Forte. Another integrated development environment is the J2MEWireless Toolkit that is downloadable from java.sun.com/products/j2mewtoolkit/download.html. The J2MEWireless Toolkit is used to develop and test J2ME applications by selecting a few buttons from a toolbar. However, the J2MEWireless Toolkit is a stripped-down integrated development environment in that it does not include an editor, a full debugger, and other amenities found in a third-party integrated development environment. Building and Running a Project Download the J2ME Wireless Toolkit from the Sun web site. The Toolkit file is a selfextracting executable file. Run this executable after downloading the file, and the installation program creates all the directories required to run the Toolkit. The installed J2MEWireless Toolkit is placed in the WTK104 directory, although the directory might have a variation of this name depending on the version of the Toolkit that you download. Let’s create a new project by selecting the New Project button from the toolbar. You’ll be prompted to enter a project name and class name . Enter Hello World as the project name and greeting.HelloWorld as the class name, which is the name of the first MIDlet that is associated with the project. Hello World Project Let’s re-create the HelloWorld and GoodbyeWorld application that you created previously in this chapter. Create a new project called Hello World following the directions in the “Hello World J2ME Style” section. Next, create a greeting directory beneath the src directory. Copy the HelloWorld.java file and GoodbyeWorld.java file that you created previously, and place those files into the project’s srcgreeting subdirectory, which is Hello Worldsrcgreeting if you named your project Hello World. MIDlets on the Internet The Wireless Toolkit can run MIDlets that access Internet resources by configuring the emulator to interact with a proxy server and let you monitor activities between the MIDlet and the Internet
  • 19. 19 for debugging purposes. You configure the emulator for the Internet by selecting Edit | Preferences. The Network Configuration tab is used to set the port number and server name of the proxy server. The Trace tab is used to set preferences for monitoring the interactions between the MIDlet and the Internet. There are four options that you can set by selecting the appropriate check boxes . UNIT-III Commands, Items and Event Processing : 3.1 J2ME User Interfaces A user interface is a set of routines that displays information on the screen, prompts the user to perform a task, and then processes the task. For example, a J2ME email application might display a list of menu options, such as Inbox, Compose, and Exit, and then prompt the user to make a selection by moving the cursor keys and pressing a key on the small computing device. A developer can use one of three kinds of user interfaces for an application. These are a command, form, or canvas. A command-based user interface consists of instances of the Command class. An instance of the Command class is a button that the user presses on the device to enact a specific task. For example, Exit is an instance of the Comman class associated with an Exit button on the keypad to terminate the application. The Help button is also an instance of the Command class that is linked to the Help key on the device, which is used whenever the user requires assistance. A form-based user interface consists of an instance of the Form class that contains instances derived from the Item class such as text boxes, radio buttons, check boxes, lists,and other conventions used to display information on the screen and to collect input from the user. A form is similar to an HTML form. 3.2 Display Class Before learning how to incorporate instances of the Command class and the Item class into your application, let’s take a moment to explore how your application interacts with the small computing device’s screen. The device’s screen is referred to as the display, and you interact with the display by obtaining a reference to an instance of the MIDlet’s Display class. Each MIDlet has one and only one instance of the Display class. Every J2ME MIDlet tha displays anything on the screen must obtain a reference to its Display instance.This instance I used to show instances of Displayable class on the screen. The Displayable class has two subclasses. These are the Screen class and the Canvas class. The Screen class contains a subclass called the Item class, which has its own subclasses used to display information or collect information from a user (such as forms,check boxes, radio buttons). The Screen class and its derived classes are referred to as high-level user interface components. The Canvas class is used to display graphical images such as those used for games.Displays created using the Canvas class are considered a low-level user interface and are used whenever you need to display a customized screen. Instances of classes derived from the Displayable class are placed on the screen by calling the setCurrent() method of the Display class. The object that is to be displayed is passed to the setCurrent() method as a parameter. It is important to note that instances of derived classes of the Item class are not directly displayable and must be containe within an instance of a Form class. MIDlet-Name: CheckColor MIDlet-Version: 1.0
  • 20. 20 MIDlet-Vendor: MyCompany MIDlet-Jar-URL: CheckColor.jar MIDlet-1: CheckColor, CheckColor.png, CheckColor MicroEdition-Configuration: CLDC-1.0 MicroEdition-Profile: MIDP-1.0 MIDlet-JAR-SIZE: 100 import javax.microedition.midlet.*; import javax.microedition.lcdui.*; public class CheckColor extends MIDlet implements CommandListener private Display display; private Form form; private TextBox textbox; private Command exit; public CheckColor() { display = Display.getDisplay(this); exit = new Command("Exit", Command.SCREEN, 1); String message=null; if (display.isColor()) { message="Color display."; } else { message="No color display"; } textbox = new TextBox("Check Colors", message, 17, 0); textbox.addCommand(exit); textbox.setCommandListener(this); } public void startApp() { display.setCurrent(textbox); } public void pauseApp() { } public void destroyApp(boolean unconditional) { } public void commandAction(Command command, Displayable displayable) { if (command == exit) { destroyApp(true); notifyDestroyed(); } } } The MIDlet is called CheckColor and begins by creating references for instances used in the MIDlet. These instances are for the Display class, Form class, TextBox class, and Command class. You’ll learn about the Form class, TextBox class, and Command class later in this chapter. For now it is sufficient to understand that the instance of the Display class displays a form that contains a text box and the Exit command. The color statu appears in the text box, and the Exit command terminates the MIDlet.
  • 21. 21 3.3 The Palm OS Emulator Before you can run the Palm OS emulator in the J2ME Wireless Toolkit, you’ll need to download Palm OS ROM files from the Palm web site (www.palmos.com/dev). The ROM file contains the Palm OS required for the emulator to properly perform like a Palm PDA. You’ll also need to join the Palm OS Developer Program (free) and agree to the online license (free) for ROM files before you are permitted to download them. Be prepared to spend a few minutes downloading since ROM files are fairly large, even when compressed into a zip file. Several ROM files are available for download, each representing a different version of the Palm OS and each suited for a particular Palm product. Always choose the latest version of the Palm OS for downloading unless you are designing a MIDlet to run on particular type of Palm device. If your MIDlet is Palm device specific, you’ll need to download the ROM file that corresponds to the Palm OS that runs on that Palm device. Command Class You create an instance of the Command class by using the Command class constructor within your J2ME application. The Command class constructor requires three parameters. These are the command label, the command type, and the command priority. The Command class constructor returns an instance of the Command class. The following example illustrates a cancel command. The first parameter of the command declaration is Cancel. Any text can be placed here and will appear on the screen as the label for the command. The second parameter is the predefined command types. lists all the predefined command types. The last parameter is the priority, which is set to 1. The command created by this declaration is assigned to cancel. cancel = new Command("Cancel", Command.CANCEL, 1); Command Type Description BACK Move to the previous screen CANCEL Cancel the current operation EXIT Terminate the application HELP Display help information ITEM Map the command to an item on the screen OK Positive acknowledgment SCREEN No direct key mapping available on device; command will be mapped to object on a form or canvas STOP Stop the current operation Your selection of command type is a request and not a directive to the small computing device to map the command to a particular keypad key. The device always has the option to ignore your request and map the command in any way it wishes. CommandListener Every J2ME application that creates an instance of the Command class must also create an instance that implements the CommandListener interface. The CommandListener is notified whenever the user interacts with a command by way of the commandAction() method. Classes that implement the CommandListener must implement the commandAction() method, which accepts two parameters. The first parameter is a reference to an instance of the Command class, and the other parameter is a reference to the instance of the Displayable class .
  • 22. 22 public void commandAction(Command command, Displayable displayable) { if (command == cancel) { destroyApp(false); notifyDestroyed(); } } Online Help Example Providing online help is a routine common to nearly every well-written J2ME application. Online help instructs users on interacting with the application. Instructions are displayed in a text box that the application displays when the user selects the Help command The user returns to the previous screen by selecting the Back command . The Back command removes the Help text box from the screen and returns the user to the original screen. The last command that is found in all J2ME applications is the Exit command. The Exit command terminates the application. 3.5 Item Class The Item class is derived from the Form class, and that gives an instance of the Form class character and functionality by implementing text fields, images, date fields, radio buttons, check boxes, and other features common to most graphical user interfaces. The Item class has derivative classes that create those features. In many ways, the Item class has similarities to the Command class in that instances of both classes must be declared and then added to the form. Likewise, a listener processes instances of both the Item class and the Command class. Creating an Item Class Listed here are the steps required for creating an Item class. 1. Declare references. 2. Declare an instance of the Display class. 3. Create an instance of the ChoiceGroup class. 4. Associate options with the instance of the ChoiceGroup class. 5. Set the default choice. 6. Create an Exit command. 7. Create an instance of the Form class. 8. Associate the instance of the ChoiceGroup class to the instance of the Form class. 9. Associate the Exit command with the form. 10. Associate a CommandListener with the form. 11. Associate an ItemStateListener with the form. 12. Display the form. 13. Evaluate the command entered by the user. 14. If the command is the Exit command, terminate the MIDlet. 15. If an instance of the Item class changes state,read the selection from the instances of the ChoiceGroup class. 16. Display the selection on the screen. Item Listener Each MIDlet that utilizes instances of the Item class within a form must have an itemStateChanged() method to handle state changes in these instances. The itemStateChanged() method , contains one parameter, which is an instance of the Item class. The instance passed to the itemStateChanged() method is the instance whose state was changed by the user.
  • 23. 23 public void itemStateChanged(Item item) { if (item == selection) { StringItem msg = new StringItem("Your color is ", radioButtons.getString(radioButtons.getSelectedIndex())); form.append(msg); } 3.6 Exception Handling The small computing device’s application manager oversees the operation of a MIDlet. The application manager calls the startApp(), pauseApp(), and destroyApp() methods whenever the user or the device requires a MIDlet to begin, pause, or terminate. However, there are times when the disruption of processing by complying with the application manager’s request might cause irreparable harm. For example, a MIDlet might be in the middle of a communication session or saving persistent data when the destroyApp() method is called by the device’s application manager. Complying with the request would break off communications or corrupt data. Throwing a MIDletStateChangeException a MIDletStateChangeException from within the destroyApp() method. Remember that a MIDletStateChangeException can also be thrown from the startApp() method using an approach similar MIDlet-Name: ThrowException MIDlet-Version: 1.0 MIDlet-Vendor: MyCompany MIDlet-Jar-URL: ThrowException.jar MIDlet-1: ThrowException, ThrowException.png, ThrowException MicroEdition-Configuration: CLDC-1.0 MicroEdition-Profile: MIDP-1.0 MIDlet-JAR-SIZE: 100 import javax.microedition.midlet.*; import javax.microedition.lcdui.*; public class ThrowException extends MIDlet implements CommandListener { private Display display; private Form form; private Command exit; private boolean isSafeToQuit; public ThrowException() { isSafeToQuit = false; display = Display.getDisplay(this); exit = new Command("Exit", Command.SCREEN, 1); form = new Form("Throw Exception"); form.addCommand(exit); form.setCommandListener(this); } public void startApp() { display.setCurrent(form); } public void pauseApp() { } public void destroyApp(boolean unconditional) throws MIDletStateChangeException {
  • 24. 24 if (unconditional == false) { throw new MIDletStateChangeException(); } } public void commandAction(Command command, Displayable displayable) { if (command == exit) { try { if (exitFlag == false) { StringItem msg = new StringItem ( "Busy", "Please try again."); form.append(msg); destroyApp(false); } else { destroyApp(true); notifyDestroyed(); } } catch (MIDletStateChangeException exception) { isSafeToQuit = true; } } } } Quick Reference Guide This quick reference guide provides a brief overview of classes used by J2ME for the Display class, Command class, and Item class. Full details of these classes and all Java classes and interfaces are available at java.sun.com. javax.microedition.lcdui.Display Class Method Description static Display getDisplay(MIDlet midlet) Retrieve an instance of the Display class Displayable getCurrent() Retrieve the current instance of Displayable class void setCurrent(Alert alert, Displayable Display the specified instance of the alert dialog box and then the specified instance of the Displayable class displayable) boolean isColor() Determine whether the device supports color
  • 25. 25 UNIT-IV High-Level Display:Screens: The display is a crucial component of every J2ME application since it contains objects used to present information to the person using the application and in many cases prompts the person to enter information that is processed by the application. You were introduced to the basic concepts of the J2ME display in the previous chapter and shown how to create a simple graphical user interface for your application. To say the least, this user interface is wanting and lacks sophistication that most of us expect from a J2ME application. The J2ME Display class is the parent of Displayable, which you’ll recall from the previous chapter. The Displayable class has two subclasses of its own: Screen and Canvas. The Screen class is used to create high-level J2ME displays in which the methods of its subclasses handle details of drawing objects such as radio buttons and check boxes. In contrast, the Canvas class and its subclasses are used to create low-leve J2ME displays. The methods give you pixel-level control of the display, enabling you to draw your own images and text such as those used to create games. 4.1.1 Screen Class These classes contain methods that generate radio buttons, check boxes, lists, and other familiar objects that users expect to find on the screen when interacting with your application. The following illustrates the Display class hierarchy, which helps you learn the inheritance structure of the Screen class ADisplayable object is any object that can be displayed on the small computing device’s screen. public class Display public abstract class Displayable public abstract class Screen extends Displayable public class Alert extends Screen public class Form extends Screen public class List extends Screen implements Choice public abstract class Item public class ChoiceGroup extends Item implements Choice public class DateField extends Item public class TextField extends Item public class Gauge extends Item public class ImageItem extends Item public class StringItem extends Item public class TextBox extends Screen public class Command public class Ticker public class Graphics public interface Choice public abstract class Canvas extends Displayable public class Graphics 4.1.2 Alert Class An alert is a dialog box displayed by your program to warn a user of a potential error such as a break in communication with a remote computer. An alert can also be used to display any kind of message on the screen, even if the message is not related to an error. For example, an alert is an ideal way of displaying a reminder on the screen. You implement an alert by creating an instance of the Alert class in your program using the following statement. Once created, the instance is passed to the setCurrent() method o the Display object to display the alert dialog box on the screen. alert = new Alert("Failure", "Lost communication link!", null, null); display.setCurrent(alert);
  • 26. 26 Type Description ALARM Your request has been received. CONFIRMATION An event or processing is completed. ERROR An error is detected. INFO A nonerror alert occurred. WARNING A potential error could occur. The value passed to the setTimeout() method determines whether an alert dialog box is a modal dialog box or a timed dialog box. The setTimeout() method has one parameter, which is the default timeout value. Use Alert.FOREVER as the default timeout value for a modal alert dialog box, or pass a time value in milliseconds indicating time to terminate the alert dialog box. alert = new Alert("Failure", "Lost communication link!", null, null); alert.setTimeout(Alert.FOREVER); display.setCurrent(alert); Creating an Alert Dialog Box Listed here are the steps required to create an alert dialog box: 1. Declare references. 2. Set default value for the exit flag to false. 3. Obtain a reference to the instance of the Display class. 4. Create an instance of a Command class to exit the MIDlet. 5. Create an instance of the Form class. 6. Associate the instance of the Command class to the instance of the Form class. 7. Associate a CommandListener with the instance of the Form class. 8. Display the instance of the Form class on the screen. 9. Evaluate the command selected by the user. 10. If the Exit command is selected,determine whether conditions are safe to terminate the MIDlet. 11. If conditions are not safe to terminate the MIDlet, create a modal instance of the Alert class with the message “Busy” “Please try again.” 12. Display the instance of the Alert class on the screen. Alert Sound Each AlertType has an associated sound that automatically plays whenever the alert dialog box appears on the screen. The sound, which is different for each AlertType, is used as an audio cue to indicate that an event is about to occur. Users of your MIDlet will learn to identify events by sound cue over time and will become less dependent on the visual cue presented by the alert dialog box. An audio cue can be sounded without having to display the alert dialog box. You do this by calling the playSound() method and passing it reference to the instance of the Display class, as illustrated in the following code segment. This is a modification of the if statement . The sound associated with the AlertType WARNING is heard when the playSound() method is called. if (exitFlag == false) { AlertType.WARNING.playSound(display); destroyApp(false); }
  • 27. 27 4.1.3 Form Class The Form class is a container for other displayable objects that appear on the screen simultaneously. Any derived class of the Item class can be placed within an instance of the Form class. For example, instances of the StringItem class can be displayed by inserting those instances within the instance of the Form class, then showing the instance of the Form class. Small computing device screens vary in size, so you can expect that some instances within the instance of the Form class won’t fit on the screen. However, devices typically implement scrolling, which allows the user to bring instances out of view onto the screen. An instance is placed with the instance of the Form class by calling one of two methods These are insert() method and append() method. The insert() method places the instance in a particular position on the form as specified by parameters passed to the insert() method. The append() method places the instance after the last object on the form. private Form form; private StringItem message; form = new Form("My Form"); message = new StringItem("Welcome, ", "glad you could come."); form.append(message); The same Form instance and StringItem instance as in the previous example are created and assigned to the proper reference. However, a second StringItem instance is also created. Notice that the index number of the first message appended to the Form instance is stored in the index1 variable. The index1 variable is passed as the first parameter to the insert() method to place the second message on the form before the first message. private Form form; private StringItem message1, message2; private int index1; form = new Form("My Form"); message1 = new StringItem("Welcome, ", "glad you could come."); message2 = new StringItem("Hello, ", "Mary."); index1 = form.append(message1); form.insert(index1,message2); Creating an Instance of the Form Class Listed here are the steps required to create an instance of the Form class: 1. Declare references. 2. Obtain a reference to the instance of the Display class. 3. Create an instance of a Command class to exit the MIDlet. 4. Create two instances of the StringItem class. 5. Assign each instance of the StringItem class to an array element. 6. Create an instance of the Form class. 7. Associate the instance of the Command class to the instance of the Form class. 8. Associate a CommandListener with the instance of the Form class. 9. Display the instance of the Form class on the screen. 10. Evaluate the command selected by the user. 11. If the Exit command is selected,terminate the MIDlet. 4.1.4 Item Class An Item class is a base class for a number of derived classes that can be contained within a Form class. These derived classes are ChoiceGroup, DateField, Gauge, ImageItem, StringItem, and TextField, each of which is discussed in detail later in this chapter. Some classes derived from
  • 28. 28 the Item class, such as ChoiceGroup, DateField, and TextField, are used for data entry. The ChoiceGroup class is used to create check boxes or radio buttons on a form, and the DateField class and TextField class are used to capture date and freeform text from the user of the MIDlet. The state of an instance of a class derived from the Item class changes whenever a user enters data into the instance, such as when a check box is selected. You can capture this change by associating an ItemStateListener with an instance of a class derived from an Item class (ChoiceGroup, for example). An ItemStateListener monitors events durin the life of the MIDlet and traps events that represent changes in the state of any Item class contained in a form on the screen. private Form form; private ChoiceGroup choiceGroup; …. choiceGroup = new ChoiceGroup("Pick One", Choice.EXCLUSIVE); form.append(choiceGroup); form.setItemStateListener(this); …. public void itemStateChanged(Item item) { if (item == choiceGroup) { // do some processing } } 4.1.5 List Class The List class is used to display a list of items on the screen from which the user can select one or multiple items. There are three formats for the List class: radio buttons, check boxes, and an implicit list that does not use a radio button or check box icon . As you can probably gather from the description of a List class, it is functionally similar to the ChoiceGroup class discussed previously in this chapter. This is because both the List class and the ChoiceGroup class implement the Choic interface. The Choice interface defines methods to retrieve a selection and remove a selection, among other maintenance functionality. A List class differs from the ChoiceGroup class by the way events of each instance are handled by a MIDlet. As you recall from the discussion about the ChoiceGroup class, an ItemStateListener is used to listen to events generated by an instance of a ChoiceGroup class. Those events are then passed along to the itemStateChanged() method for processing. Likewise, a commandAction() method is used to process command events, as described in the “Item Class” Creating an Instance of a List Class The listings in this section illustrate how to implement the three formats of a List class in your MIDlet. the JAD file which creates an instanc of an implicit List class. contains the JAD file for which creates a check box instance of a List class is the JAD file for which creates a radio button instance of a List class. Passing two parameters to the constructor of the List object creates the instance of the List class. The first parameter is the title of the instance, “Menu:”, and the other parameter is the List object format type IMPLICIT. Creating an Instance of an Implicit List Class Listed here are the steps required to create an instance of an implicit List class: 1. Declare references. 2. Obtain a reference to the instance of the Display class. 3. Create an instance of a Command class to exit the MIDlet. 4. Create an instance of the List class using the IMPLICIT type. 5. Append items to the instance of the List class.
  • 29. 29 6. Associate the instance of the Command class to the instance of the List class. 7. Associate a CommandListener with the instance of the List class. 8. Display the instance of the List class on the screen. 9. Evaluate the command selected by the user. 10. If the Exit command is selected,terminate the MIDlet. 11. If an item from the instance of the List class is selected,display the text of the item in an alert dialog box. MIDlet-Name: ListImplicit MIDlet-Version: 1.0 MIDlet-Vendor: MyCompany MIDlet-Jar-URL: ListImplicit.jar MIDlet-1: ListImplicit, , ListImplicit MicroEdition-Configuration: CLDC-1.0 MicroEdition-Profile: MIDP-1.0 MIDlet-JAR-SIZE: 100 4.1.6 TextBox Class The TextBox class and TextField class differ in that the TextBox class is derived from the Screen class, while the TextField class is derived from the Item class. This means that an instance of the Form class cannot contain an instance of the TextBox class, whil an instance of a TextField class must be contained within an instance of the Form class. Another important difference between the TextBox class and the TextField class I that the TextBox class uses a CommandListener and cannot use an ItemStateListener. An ItemStateListener is used with an instance of the TextField class, although many times the content of an instance of the TextField class is retrieved and processed when the user selects a command associated with a form that contains the text field. Creating an Instance of a TextBox Class When the Submit command is selected, it is processed by the commandAction() method (see “Item Class,” earlier in this chapter). The name is copied from the text box and used to form a greeting, which then replaces the first name on the screen the TextBoxCapture constructor, which are then assigned to those variables. You’ll notice that an instance of a TextBox clas is created with the title “First Name:”. The instance does not contain any text when first displayed on the screen. The instance can receive any characters based on the ANYconstraint, and a request is made to limit the number of characters that can be contained in the instance to 30 characters. Listed here are the steps required to create an instance of a TextBox class: 1. Declare references. 2. Obtain a reference to the instance of the Display class. 3. Create an instance of a Command class to submit the instance of the List class for processing. 4. Create an instance of a Command class to exit the MIDlet. 5. Create an instance of a TextBox class and accept any characters. 6. Associate instances ofthe Command class to the instance of the TextBox class. 7. Associate a CommandListener with the instance of the TextBox class. 8. Display the instance of the TextBox class on the screen. 9. Evaluate the command selected by the user. 10. If the Exit command is selected,terminate the MIDlet. 11. If the Submit command is selected, process the instance of the TextBox class. 12. Retrieve the text of the instance of the TextBox class. 13. Concatenate the text to the greeting “Hello,”.
  • 30. 30 4.1.7 Ticker Class The Ticker class is used to scroll text horizontally on the screen much like a stock ticker scrolls stock prices across the screen. An instance of the Ticker class can be associated with any class derived from the Screen class and be shared among screens. An instance of a Ticker object is created by passing the constructor of the Ticker class a string containing the text that is to be scrolled across the screen. You cannot control the location on the screen where scrolling occurs. Likewise, there is no control over the speed of the scrolling. The device that runs the MIDlet controls both location and speed. Creating an Instance of a Ticker Class Listed here are the steps required to create an instance of a Ticker class: 1. Declare references. 2. Obtain a reference to the instance of the Display class. 3. Create an instance of a Command class to exit the MIDlet. 4. Create an instance of a Command class to begin processing. 5. Create an instance of the Ticker class and initialize text of the instance. 6. Create an instance of the List class. 7. Append items to the instance of the List class. 8. Associate instances ofthe Command class to the instance of the List class. 9. Associate a CommandListener with the instance of the List class. 10. Associate the instance of the Ticker class with the instance of the List class. 11. Display the instance of the List class on the screen. 12. Evaluate the command selected by the user. 13. If the Exit command is selected,terminate the MIDlet. 14. If the Submit command is selected, process the selection. 15. Change the text of the instance of the Ticker class to reflect the selection. MIDlet-Version: 1.0 MIDlet-Vendor: MyCompany MIDlet-Jar-URL: TickerList.jar MIDlet-1: TickerList, , TickerList MicroEdition-Configuration: CLDC-1.0 MicroEdition-Profile: MIDP-1.0 MIDlet-JAR-SIZE: 100 import javax.microedition.midlet.*; import javax.microedition.lcdui.*; public class TickerList extends MIDlet implements CommandListener { private Display display; private List list; private final String tech; private final String entertain; private Ticker ticker; private Command exit; private Command submit; public TickerList() { display = Display.getDisplay(this); tech = new String ("IBM 55 MSFT 32 SUN 52 CISCO 87"); entertain = new String ("CBS 75 ABC 455 NBC 243 GE 21"); exit = new Command("Exit", Command.SCREEN, 1); submit = new Command("Submit", Command.SCREEN, 1); ticker = new Ticker(tech); list = new List("Stock Ticker", Choice.EXCLUSIVE); list.append("Technology", null); list.append("Entertainment", null); list.addCommand(exit); list.addCommand(submit); list.setCommandListener(this);
  • 31. 31 list.setTicker(ticker); } public void startApp() { display.setCurrent(list); } public void pauseApp() { } public void destroyApp(boolean unconditional) { } public void commandAction(Command command, Displayable display) { if (command == exit) { destroyApp(true); notifyDestroyed(); } else if (command == submit) { if (list.getSelectedIndex() == 0) { ticker.setString (tech); } else { ticker.setString(entertain); } } } } Low-Level Display: Canvas : Small computing devices are still in their formative years as they evolve into Star Trek–like devices that handle our mundane, and some not so mundane, tasks—at any time and anywhere. However, many of these devices have already grown to a level of sophistication that is necessary for implementing a wide range of applications. Practically any application you can imagine can be designed to operate within the confines of a small computing device. 4.2.1The Canvas MIDlet has one instance of the Display class, and the Display class has one derived class called the Displayable class. Everything a MIDlet displays on the screen is created by an instance of a class that is derived from the Displayable class. public class Display public abstract class Displayable public abstract class Screen extends Displayable public abstract class Canvas extends Displayable public class Graphics The Displayable class has two subclasses: Screen and Canvas. The Screen class and its derivatives are used to create high-level components that you learned about in the previous chapter. The Canvas class and its derivatives are used to gain low-level access to the display, which is necessary for graphic- and animation-based applications. Agraphic is used with a canvas.
  • 32. 32 The Layout of a Canvas The canvas is divided into a virtual grid in which each cell represents one pixel.Coordinates mark the column and row of a cell within the grid . The x coordinate represents the column, and the y coordinate represents the cell’s row. The first cell located in the upper-left corner of the grid has the coordinate location of 0, 0, where the first zero is the x coordinate and the other zero is the y coordinate. the size of the canvas is device dependent since canvas size and the screen size are the same. The screen size of a mobile telephone might be different from the screen size of a PDA, and yet both devices are capable of running the sam MIDlet. Your MIDlet should determine the canvas size of the device that implements your graphic application before drawing on the screen. The canvas size is measured in pixels. X 0 1 2 3 0 1 Y 2 3 Coordinates mark the column and row of a cell within a grid Proportional Coordinates The values (in pixels) returned by the getWidth() and getHeight() methods can be used to draw an image at a given location that is proportional to the size of the canvas by using relative coordinates rather than exact coordinates on the canvas. Let’s say that the first element of the image you want drawn on the canvas is located in the center of the canvas. Here’s what you need to do. Assume the size of the canvas is 200 pixels wide (columns) and 200 pixels high (rows). The coordinate of the center of the canvas is 99, 99 (remember that coordinates are zero based), calculated as: x = getWidth()/2 y = getHeight()/2 Now assume the same MIDlet is running on a small computing device with a canvas size of 400 pixels wide by 400 pixels high. The same calculation determines the center coordinate as 199, 199. Therefore, the MIDlet can use the calculation to determine the center coordinate of any size canvas, which means that the image will appear in the same canvas location when the MIDlet runs on any device. The Pen An image is drawn on a canvas using a virtual pen. Using a virtual pen is very similar to using a real pen to draw an image on paper. That is, the pen is dropped on the canvas at a specified coordinate, filling the cell with the color of ink used in the pen. Cells change from their present color to the color of the ink as the pen is repositioned on the canvas. For example, a horizontal
  • 33. 33 line forms on the canvas when the virtual pen is dragged horizontally across the canvas. Likewise, dragging the virtual pen vertically down the canvas draws a vertical line. A virtual pen is used by instances of the Graphics class to draw rectangles, arcs, and other graphical image components on the canvas. You don’t directly create and use a virtual pen. Painting Graphical components used to create an image on a canvas are drawn on the canvas when the paint() method of the Displayable class is called. This is referred to as painting. The paint() method is an abstract method that is used both by instances and derivatives of the Screen class and Canvas class. Java specifications require that a concrete class provide implementation for any abstract methods defined in its parent class. Therefore, an instance of the Screen class and Canvas class must define a paint() method. The contents of the paint() method ar statements that draw images on the screen. Derivatives from the Screen class have two predefined methods used to paint the screen. Images painted by derivatives of the Screen class (Textbox, List, Alert, and Form) are radio buttons, check boxes, list, text, and other constructs that you find in a graphical user interface, which you learned about in the previous chapter. The first predefine method is paint(), which contains instructions that set parameters for drawing an image, such as defining the virtual pen. protected void paint(Graphics graphics) { graphics.drawRect(12, 6, 40, 20)); } The paint() and repaint() Methods the paint() method is called automatically by the setCurrent() method when the MIDlet is started. You call the repaint() whenever the canvas or a portion of the canvas must be refreshed Let’s say that you want to draw text on a canvas that is already displayed on the screen. First, you create the text using a graphic, which you’ll learn how to do later I this chapter. Next, you call the repaint() method to have the entire canvas redrawn, which includes text and images that currently exist on the screen and the new text, unless you’v removed existing text or images. showNotify() and hideNotify() The device’s application manager calls the showNotify() method immediately before the application manager displays the canvas. You define the showNotify() method with statements that prepare the canvas for display, such as initializing resources by beginning threads or assigning values to variables as required by your application. The hideNotify() method is called by the application manager after the canvas is removed from the screen. You define the hideNotify() method with statements that free resources that were allocated when the showNotify() method was called. This include deactivating threads and resetting values assigned to variables as necessary. 4.2.2User Interactions One of two techniques can be used to receive user input into your low-level J2ME application. The first technique is to create one or more instances of the Command class, which you learned about in the previous chapter. Once an instance of a command is created, the instance is associated with the instance of the Canvas class by calling the addCommand() method . If you
  • 34. 34 associate a command with canvas, you’ll also need to associate a CommandListener to the canvas in order to monitor command events generated by the user selecting a command. Likewise, you’ll need to define a commandAction() method that is called by the device’ application manager to process the command event.  A key code is a numerical value sent by the small computing device when the userof your application selects a particular key. Each key on the device’s keypad is identified by a unique key code. ■ A game action is a keystroke that a person uses to play a game on the small computing device. MIDP defines a set of constants that represent keystrokes common to game controllers. ■ A pointerevent is input received from a pointer device attached to the small computing device, such as a touch screen or mouse. Working with Key Codes Each key on an ITU-T keypad, which is used on cellular telephones, is mapped to a standard set of key codes . J2ME associates key code values with constants; however, use the constant instead of the constant value. You’ll find that using constants within your code clarifies the reference to a key because the name of th constant contains the name of the key associated with the key code. All small computing devices that use the ITU-T keypad adhere to these key codes. Some of these devices also have other keys on the keypad, each of which is also assigned a key code. The manufacturer’s specification for the device usually lists key codes used by the device for keys outside of those on the standard ITU-T keypad. Constant Value KEY_NUM0 48 KEY_NUM1 49 KEY_NUM2 50 KEY_NUM3 51 KEY_NUM4 52 KEY_NUM5 53 KEY_NUM6 54 KEY_NUM7 55 KEY_NUM8 56 KEY_NUM9 57 KEY_STAR 42 KEY_POUND 35 Detecting and Processing Key Codes Listed here are the steps for detecting and processing key codes: 1. Declare references to classes. 2. Create instances of classes and assign those instances to references. 3. Display the instance of the Canvas class whenever the MIDlet is started. 4. Terminate the MIDlet when the Exit command is selected. 5. Define a class derived from the Canvas class that implements a CommandListener. 6. Within the derived class,declare references. 7. Within the derived class,define a constructorthat initializes text to be displayed on the canvas. 8. Within the derived class,create an instance of the Command class. 9. Within the derived class,associate the instance of the Command class with the canvas. 10. Within the derived class, associate the CommandListener with the canvas
  • 35. 35 4.2.3 Graphics the low-level user interface is a canvas, which is an instance of the Canvas class. The canvas is organized into a grid I which each cell of the grid is a pixel. Coordinates, as explained in the previous sections, identify each cell. An image is drawn on the canvas by using a virtual graphical device called a graphic context, such as the rectangle and line. A graphic context is an instance of the Graphics class. A mutable image, as you’ll remember, is an image that can be altered by your MIDlet. You’ve seen how to create a graphic context in previous listings that defined the paint() method. Reference to the graphic context passed to a paint() method exists for the duration of the paint( method. Once the MIDlet leaves the paint() method, the graphic context goes out of scope. The graphic context can no longer be used to draw on the canvas, even if reference to the graphic context is retained. Stroke Style and Color Every graphic context has two characteristics you can control from within the MIDlet.These are stroke style and color. Stroke style defines the appearance of lines used to draw an image on the canvas, and color specifies the background and foreground color of the image. Skipping pixels along the lines of the image creates the dotted stroke. The small computing device determines the number of pixels skipped. You cannot modify the appearance of the dotted stroke, and you might discover that skipped pixels may affect the appearance of the image. For example, a pixel at the corner of a rectangle might be missing and therefore ruin the illusion of a square-cornered rectangle. Colors You’ve already seen how combining degrees of red, green, and blue creates the foreground and background color of a graphic context. The degree of each color is specified as an integer value within the range of 0 to 255. Zero produces the darkest possible value of the color, and 255 produces the lightest possible value. For example, color values 0, 0, 0 (red, green, blue) produce black, and color values 255, 255, 255 produce white. Values between these extremes produce shades of various colors. All integers in Java are 32 bits Of those 32 bits, 8 bits are used to represent red, blue, and green. All color values are stored in one integer. The 8 highest order bits are not used. You can determine whether a device supports color and the number of colors or shades of gray that are supported by calling the appropriate Display class method within your MIDlet. The isColor() method returns a boolean value that is true if color is supported; otherwise a false value is returned, indicating that the device supports the gray scale instead of color. The numColors() method returns an integer representing the number of colors or shades of gray supported by the device. Background Colors Technically there isn’t any way to distinguish between foreground and background colors because the concept of background colors is not supported in J2ME. All colors are foreground colors. However, you can work around this limitation by drawing a filledrectangle over the complete canvas before drawing other images on the canvas. graphics.setColor(255, 255, 255); graphics.fillRect(0, 0, getWidth(), getHeight()); setColor((50 << 16) | (200 << 8) | 150);
  • 36. 36 Red 50 00110010 Green 200 11001000 Blue 150 10010110 When these values are combined into one 32-bit value they appear as: 00000000001100101100100010010110 Lines Lines are drawn on the canvas by calling the drawLine() method .The drawLine() method creates a line from a starting coordinate to an ending coordinate. Four parameters are required by the drawLine() method. The first two parameters are integers representing the starting x, y coordinate of the line. The other two parameters are integers representing the ending x, y coordinate of the line. The color of the line is determined by the color setting of the graphic context used to draw the line. You can set the color of the line by calling the setColor() method befor invoking the drawLine() method. The setColor() method is discussed in the previous section of this chapter. Remember, the setColor() method determines the foreground color of the line. Rectangles Arectangle is an area of the canvas defined by four corners, just like a rectangle that you can draw using paper and pencil. You define a rectangle’s dimensions by identifying coordinates for the upper-left corner and the lower-right corner. Four types of rectangles can be drawn on a canvas. These are an outlined rectangle, filled rectangle, outlined rectangle with rounded corners, and a filled rectangle with rounded corners. An outlined rectangle is one where only line segments connecting the corners are drawn. The inside of the rectangle remains the same color as the outside of the rectangle. Arcs An arc is a curved line segment that is used to draw circles, ovals, and other curved images. As you’ll soon discover, drawing an arc is a bit tricky because you must define the area of the canvas that will be covered by the arc and the angle used to draw the arc. The first step in drawing an arc is to decide the area of the canvas that will be covered by the arc. The area is defined as a rectangle rather than the circumference of the arc. Think of thi as defining a box within which the angle is drawn. A rectangle is defined by specifying two sets of coordinates. The first set of coordinates (x1, y1) set the upper-left corner of the rectangle. The other set of coordinates (x2, y2) set the lower-right corner of the rectangle Drawing an Arc Listed here are the steps for drawing an arc: 1. Declare references to classes. 2. Create instances of classes and assign those instances to references. 3. Display the instance of the Canvas class whenever the MIDlet is started. 4. Terminate the MIDlet when the Exit command is selected. 5. Define a class derived from the Canvas class that implements a CommandListener. 6. Within the derived class,declare references. 7. Within the derived class,create an instance of the Command class. 8. Within the derived class,associate the instance of the Command class with the canvas. 9. Within the derived class,associate the CommandListener with the canvas. Text Displaying text using the low-level user interface differs from displaying text with the high-level user interface discussed in the previous chapter. The difference is based on who controls the details used to display the text. Using the high-level user interface, text is displayed by calling
  • 37. 37 one of several methods and passing the text as a parameter t those methods. Each method determines how to display the text without requiring any direction from you. This is not the situation when displaying text using the low-level user interface because you control the details of how text is displayed. Aligning Text Aligning text is probably the trickiest routine that you’ll encounter when drawing text on the canvas because you’ll need to know measurements of text that is already on the canvas as well as measurements of text being drawn. Text is drawn within a virtual bounding box, which is an invisible box that defines the boundaries of the text. First you specify a position on the screen by setting coordinates. Let’s call them x, y. Next, you specify an anchor point that identifies the relationship of the coordinate to the bounding box. Images An image is an instance of an Image object that has been previously created either by your MIDlet using a graphic context (discussed earlier in this chapter), or by graphics software. Recall from the previous chapter, there are two kinds of images: a mutable image can be modified by your MIDlet, and an immutable image cannot be modified by your MIDlet. Image image = Image.createImage(“/myImage.png”); 4.2.4 Clipping Regions The drawImage() method used in previous listings in this chapter draws an image on the canvas based on a clipping region. Aclipping region is a rectangular piece of an image defined by two sets of coordinates. The first set identifies the upper-left corner of th clipping region, and the second set is the width and height of the clipping region. Onl the portion of the image that appears within the clipping region is drawn on the canvas. Other portions of the image still exist within the image but are not drawn. The entir canvas is the default clipping region and is used to draw the complete image whenever the drawImage() method is called. Creating a Clipping Region Listed here are the steps for creating a clipping region: 1. Declare references to classes. 2. Create instances of classes and assign those instances to references. 3. Display the instance of the Canvas class whenever the MIDlet is started. 4. Terminate the MIDlet when the Exit command is selected. 5. Define a class derived from the Canvas class that implements a CommandListener. 6. Within the derived class,declare references. 7. Within the derived class,create an instance of the Command class. 8. Within the derived class,associate the instance of the Command class with the canvas. 9. Within the derived class,associate the CommandListener with the canvas. import javax.microedition.midlet.*; import javax.microedition.lcdui.*; public class ClippingRegion extends MIDlet { private Display display; private MyCanvas canvas; public ClippingRegion() { display = Display.getDisplay(this); canvas = new MyCanvas(this); } protected void startApp()