
Recommended
Recommended
More Related Content
Viewers also liked
Viewers also liked (10)
Recently uploaded
Recently uploaded (20)
The Optimizer Module blog
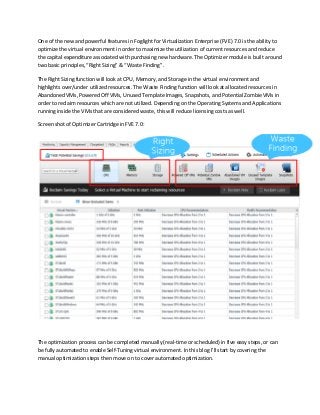
- 1. One of the new and powerful features in Foglight for Virtualization Enterprise (FVE) 7.0 is the ability to optimize the virtual environment in order to maximize the utilization of current resources and reduce the capital expenditure associated with purchasing new hardware. The Optimizer module is built around two basic principles, “Right Sizing” & “Waste Finding”. The Right Sizing function will look at CPU, Memory, and Storage in the virtual environment and highlights over/under utilized resources. The Waste Finding function will look at allocated resources in Abandoned VMs, Powered Off VMs, Unused Template Images, Snapshots, and Potential Zombie VMs in order to reclaim resources which are not utilized. Depending on the Operating Systems and Applications running inside the VMs that are considered waste, this will reduce licensing costs as well. Screen shot of Optimizer Cartridge in FVE 7.0: The optimization process can be completed manually (real-time or scheduled) in five easy steps, or can be fully automated to enable Self-Tuning virtual environment. In this blog I’ll start by covering the manual optimization steps then move on to cover automated optimization.
- 2. Step 1: Click on the “Settings” hyperlink to define the range of data sampling to be used by the Optimizer to determine the Right Size & Waste of your environment. Screenshot of “Rightsizer” Settings: Screenshot of “Wastefinder” Settings:
- 3. Step 2: Click on any “Right Sizing” or “Waste Finding” button, such as: CPU, Memory, Storage, Powered OFF VMs, etc. to see the Utilization and Recommendation for the selected item. The analytics used in the Optimizer cartridge will quickly evaluate the sampling data (provided in the “Settings”) to analyze and recommend the corrective action, tailored for the environment. Screenshot of identified “memory”:
- 4. Step 3: At this point you have the choice to either accept the Optimizer’s recommended corrective action, or adjust the recommendation based on your knowledge of the environment (this can be done by clicking on the recommendation hyperlink). Screenshot of the field to modify Optimizer recommendation:
- 5. Step 4 When you are happy with the Recommended value, you can either chose to make the modification in Real-Time by clicking on the “Reclaim Now” button, or schedule it for a later time by clicking on the “Reclaim Later” button. Please note some changes require the VM to be off-line. Screenshot of Reclaim Later Button: Note: The following VMware privileges are required for the Optimizer to execute the modifications and effectively implement the changes: Change CPU Count Power Off Power On Change Resource Change Memory Allocation Remove Snapshot Remove File Step 5: Once the scheduled job is executed a notification is sent via email.
- 6. Automated Optimization The “Automated” function in the Optimizer cartridge provides a full Self-Tuning mechanism that will analyze, advice, and automate the entire optimization process without having to require user intervention, once is setup. Considering the ever growing demands from System/Virtual Administrators, automating such repetitive tasks goes a long way in managing the workload. Miscellaneous The Optimizer module provides number of other functions to complement the core capabilities: Total Potential Savings – This feature shows how much money could be saved if you were to implement recommended modifications. Search for a Virtual Machine – You can use this feature if you are interested in seeing the optimization information for a specific Virtual Machine. Excluded VMs – This feature provides the ability to exclude Virtual Machines which should not be considered as part of optimization exercise. History – Provides an audit trail of modifications done in the past. Reports – The ability to print Custom report, or any of the canned Optimizer reports such as: o Abandoned VM Images o Changes History Report o CPU Report o Memory Report o Potential Zombie VMs o Powered Off VMs o etc.