CETS 2013, Kate Leifheit, handout for Building a Flash Card Interaction with Articulate Storyline
•
1 like•489 views


Recommended
More Related Content
What's hot
What's hot (16)
Viewers also liked
Viewers also liked (20)
Similar to CETS 2013, Kate Leifheit, handout for Building a Flash Card Interaction with Articulate Storyline
Similar to CETS 2013, Kate Leifheit, handout for Building a Flash Card Interaction with Articulate Storyline (20)
More from Chicago eLearning & Technology Showcase
More from Chicago eLearning & Technology Showcase (12)
Recently uploaded
Recently uploaded (20)
CETS 2013, Kate Leifheit, handout for Building a Flash Card Interaction with Articulate Storyline
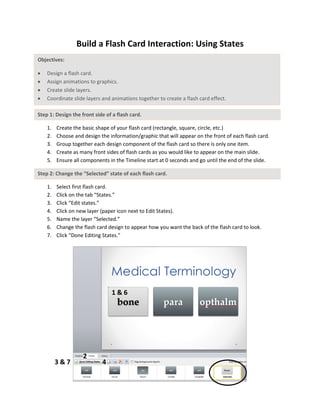
- 1. Build a Flash Card Interaction: Using States Objectives: Design a flash card. Assign animations to graphics. Create slide layers. Coordinate slide layers and animations together to create a flash card effect. Step 1: Design the front side of a flash card. 1. Create the basic shape of your flash card (rectangle, square, circle, etc.) 2. Choose and design the information/graphic that will appear on the front of each flash card. 3. Group together each design component of the flash card so there is only one item. 4. Create as many front sides of flash cards as you would like to appear on the main slide. 5. Ensure all components in the Timeline start at 0 seconds and go until the end of the slide. Step 2: Change the “Selected” state of each flash card. 1. Select first flash card. 2. Click on the tab “States.” 3. Click “Edit states.” 4. Click on new layer (paper icon next to Edit States). 5. Name the layer “Selected.” 6. Change the flash card design to appear how you want the back of the flash card to look. 7. Click “Done Editing States.” 3 & 7 4 1 & 6 2
- 2. Build a Flash Card Interaction: Using Layers Objectives: Design a flash card. Assign animations to graphics. Create slide layers. Coordinate slide layers and animations together to create a flash card effect. Step 1: Design the front side of a flash card. 1. Create the basic shape of your flash card (rectangle, square, circle, etc.) 2. Choose and design the information/graphic that will appear on the front of each flash card. 3. Group together each design component of the flash card so there is only one item. 4. Create as many front sides of flash cards as you would like to appear on the main slide. 5. Ensure all components in the “Timeline” start at 0 seconds and go until the end of the slide. Step 2: Design the back side of a flash card. 1. Create a new slide layer for each individual flash card and right click on the slide layer in the “Slide Layers” pane to rename this slide layer the appropriate title for each flash card. (e.g., ost 1, para 1, and opthalm 1.) 2. Uncheck “Dim non-selected layers” on the “Slide Layers” pane.
- 3. 3. Copy and paste the front of the flash card to its matching new slide layer. This shape size can be larger and take up the center of the screen. 4. Include all the information and images you would like on the back side of the flash card. 5. Group all images and text together so that it is one item. Ensure on the timeline that all items start at 0 and stay present until the end of the slide. a. Select the group and apply the following (You may choose any animation that you would like to use to have the flash card appear): i. Animation: Fade in (All at once) ii. Speed: Slow iii. Enter From: Current 6. Right click on each of the flash cards slide layer 1 layer in the “Slide Layers” pane. Click on properties. Apply the following properties: a. Check “Hide other slide layers” b. Check “Hide objects on base layer” (optional: if you want the other flash cards to appear in the background, uncheck this box.) c. Uncheck “Hide slide layers when timeline finished” d. Allow seeking: Automatically decide e. Base Layer: Uncheck all items. f. Revisits: Reset to initial state.
- 4. Step 3: Coordinate slide layers and animations together to create a flash card effect. 1. Create a second slide layer for each flash card (e.g., ost 2, para 2, and opthalm 2.) 2. Right click on the slide layer in the “Slide Layers” pane to rename this slide layer to match the name of the back side of the flash card, but add a number 2. 3. Copy and paste the image of the back of the flash card, then change the contents to make it look like the original front of the flash card. (Copy and pasting the back of the flash card ensures the size of the image is the same size and location that the “back side of the flash card” appears on the first slide layer.) a. Select the group and apply the following: optional
- 5. i. If you copied and pasted from the back side of the flash card, ensure the animation is “None” for Entrance. ii. Add exit animation: Shrink (All at Once) iii. Speed: Slow iv. Exit From: Current v. Ensure on the timeline that all items start at 0 and stay present until the end of the slide. The end of the slide should be at the 2 second mark. 4. Select the group again. In the “Triggers” pane click a “New Trigger”. a. Trigger Wizard i. Action: Hide layer ii. Layer: This layer iii. When: User clicks iv. Object: Flash Card Cover v. Click “OK” 5. Copy and paste the “back side of the flash card” image to the new slide layer. Ensure the image is exactly on top of the cover of the flash card you just created. a. Select the group and apply the following: i. Animation: Fade Out (All at Once) ii. Speed: Slow iii. Enter From: Current iv. Ensure on the timeline that the group appears at 0, but stops after 1.25 seconds of a second) before the slide ends (2 seconds). 6. Select the group again. In the “Triggers” pane click a “New Trigger”. a. Trigger Wizard i. Action: Hide layer ii. Layer: This layer iii. When: User clicks
- 6. iv. Object: Group v. Click “OK” 7. Right click on the slide layer in the “Slide Layers” pane. Click on properties. Apply the following properties: a. Check “Hide other slide layers” b. Uncheck “Hide objects on base layer” c. Uncheck “Hide slide layers when timeline finished d. Allow seeking: Automatically decide e. Base Layer: Uncheck all items. f. Revisits: Reset to initial state. Step 4: Link the main slide to the appropriate flash cards. 1. Return to the main slide with all the fronts of the flash cards. 2. Link the appropriate cover of the flash card with the slide layer that matches its corresponding information for the back side. a. Click on the image of the front of the flash card. b. In the “Triggers” pane click a “New Trigger”. i. Trigger Wizard 1. Action: Show layer 2. Layer: Flash card name 3. When: User clicks 4. Object: Name of flash card 1 5. Click “OK” 3. Click on each “flash card 1” layer. a. Select the group again. In the “Triggers” pane click a “New Trigger”. b. In the “Triggers” pane click a “new Trigger”. i. Trigger Wizard 1. Action: Show layer 2. Layer: Flash card name 2 3. When: User clicks 4. Object: Name of flash card 5. Click “OK”