1. Slotting in SAP Extended Warehouse Management(SAP EWM) is the process ofputting goods in a warehouse in a
way that ensures the mostappropriate storage and picking ofgoods.Slotting uses a variety of data to determine
suitable optimal putawaycontrol parameters.These parameters describe the storage section in which the productis
to be stored,the properties thatthe storage bin is to have, and the putaway strategy that is to be used.These
parameters are listed below:
Product master
Storage requirementdata
Packaging data
Demand forecastdata – If EWM is connected to APO, the demand forecastdata from APO can update EWM product
master data.
Slotting helps in determining the mostoptimal putawayparameters thatensure placementofgoods in suitable bins in
the warehouse.Itdetermines suitable putawayparameters such as storage type,storage section,and bin type for
placementofgoods.
Slotting is a program for updating putaway ctrl indicator, storage type searchsequence, section indicator,
bin type det ctrl ind, and removal indicator.
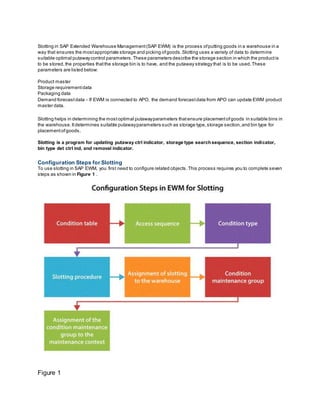
Configuration Steps for Slotting
To use slotting in SAP EWM, you first need to configure related objects.This process requires you to complete seven
steps as shown in Figure 1 .
Figure 1
2. Configuration steps in SAP Extended Warehouse Management (EWM)
Step 1. Create a Condition Table
Condition tables are used for different applications,for example,packaging specification determination,printing
warehouse orders,and slotting.In this article I explain how to create a condition table for slotting.
In a condition table you specify the combination offields thatshould form the individual condition record.The number
of fields used for a condition table is limited to 10. In the example discussed in this article,I have selected two fields,
Warehouse Number and Warehouse ProductGroup,to form condition records.These fields are used later in the
article for Condition Record Maintenance.
To create a new condition table in SAP EWM execute transaction code SPRO and follow menu path Extended
Warehouse Management > Good Receipt Process > Slotting > Condition Technique > Condition Table > Edit
Condition Table for Putaway Control Indicator.
In the screen that appears,enter the name of the Condition Table (ZCON_TAB) and a Description (Condition Table
for Putaway Control).Select the CONLG_NUM and CON_MATGNR fields from the listof available fields and move
them to the right by clicking the arrow button highlighted in yellow as shown in Figure 2 .
Here conditiontablesare maintainedfor updating putaway ctrl indicator, storage type searchsequence,
section indicator, bin type det ctrl ind, and removal indicator
Plannedptwy ctrl indicatorwill be updated by thisslotting prog.
Figure 2
The main screen of the condition table
(Note: The condition table can contain as manyfields as needed.For my example,selectfields for Warehouse
Number and Warehouse ProductGroup.)
In the same screen,you can see both the fields are now available on the right side ( Figure 3 ). Save and activate the
table by clicking the activate icon and then clicking the save icon.
3. Figure 3
Activate the condition table
After activation, at the bottom of the same screen you can see that green logs are generated and the status of table
changes to Active as shown in Figure 4 .
Figure 4
Condition table activated
Note:Conditiontablesare differentforputawayctrl ind,storage sec,storage bintype.
4. Warehouse product group groups all that products that require similarkind of slottingprocess.
Step 2. Create an Access Sequence
An access sequence is used to specify the sequence in which the system processes the condition tables when
searching for specific condition records.This setting is made specific to the condition type using an access sequence.
Each condition table contains a specific combination offields thatthe system should look for in the condition records.
In the above step, the condition table contains two fields,Warehouse Number and Warehouse ProductGroup.When
the slotting process is executed,the access sequence is used to read the linked condition table (ZCON_TAB). The
match is successful ifthe condition table fields match the inputparameters.
To create a new access sequence in SAP EWM execute transaction code SPROand follow menu path Extended
Warehouse Management> Good ReceiptProcess > Slotting > Condition Technique > Access Sequence > Edit
Access Sequence for Putaway Control Indicator.
In the next screen (not shown),click the New Entries button, which takes you to Figure 5 . Enter the name of the
Access Sequence (ZAS) and a Description (Access Sequence).Click the Accesses folder.
Figure 5
The access sequence header
In the same screen,enter 1 in the Access field. The value in the Access field is a sequence number.If you define
more than one condition table you could enter it as sequence 2.In my example,you define only one condition table,
so enter 1 here.Enter the name of the table created in step 1 (ZCON_TAB) and then selectthe E check box. Click
the save icon to save your entries as shown in Figure 6 .
5. Figure 6
Access sequence details
(Note: The E indicator stands for exclusive indicator.That means thatthe system does notsearch for a further record
after the first access from a record to a condition type in an access sequence has been successful.)
Step 3. Create a Condition Type
A condition type is used to specify the attributes,field combinations,and business meaning ofcondition records.For
example,it can be used to create various condition types for packaging specification determination in warehouse
order creation.
To create a new access condition type in SAP EWM execute transaction code SPROand follow menu path:
Extended Warehouse Management > Good Receipt Process > Slotting > Condition Technique > Condition
Type > Edit Condition Types for Putaway Control Indicator.
In the screen that appears,click the New Entries button, which takes you to Figure 7 . Enter the name of the
condition type (e.g., ZPC#) and the Access Seq. (access sequence) thatyou created in step 2 (ZAS). Other details
are proposed bydefaultand are not changed.Click the save icon to save your data.
6. Figure 7
Condition type details
Step 4. Create the Slotting Procedure
A slotting procedure is used to define which condition types are to be considered and in which order.The system
automaticallydetermines which procedure is valid for a business transaction and takes into accountthe condition
types contained within it, one after another.
To create a new slotting procedure in SAP EWM execute transaction code SPRO and follow menu path Extended
Warehouse Management> Good ReceiptProcess > Slotting > Condition Technique > Determination Procedure >
Edit Determination Procedure for Putaway Control Indicator.In the screen the system displays,click the New Entries
button, which takes you to Figure 8 .
Figure 8
The slotting procedure header
Enter the name of the Procedure as ZSP and the Short text as Slotting procedure.Click the Elements of
Determination Procedure folder.
In the field under the LvNo (level number column) enter the 1. In the field under the Ctr (counter) column,enter 1, and
in the field under the Condition Type column,enter ZPC# ( Figure 9 ). You created the ZPC# condition type in step 3.
7. Click the save icon. The level and counter denote the sequence for the determination procedure.For exampl e,there
can be several counters within one level.
Figure 9
Slotting procedure details
Thisdocumentiswithonlyprocedure atstorage type,we have proceduresatthree level,storage type,
storage sec,and bintype.
Step 5. Assign the Slotting Procedure to a Warehouse Number
Before assigning the slotting procedure created in step 4 to a warehouse number,you need to create a warehouse.
To create a new warehouse number,execute transaction SPRO and follow menu path Extended Warehouse
Management> Master Data > Define Warehouse Number.In the screen the system displays,click the New Entries
button, which takes you to Figure 10 .
Figure 10
Warehouse created and saved
Enter the number ofthe warehouse (ZEW2) in the Warehouse No.field and a Description (Enterprise Warehouse 2).
Click the save icon.
Now to assign the slotting procedure to the new warehouse you justcreated, follow menu path:
8. Extended Warehouse Management > Good Receipt Process > Slotting > Condition Technique >
Determination Procedure > Assign Determination Procedure.
In the new screen,click the New Entries button, which takes you to Figure 11 .
Figure 11
Assignment step complete
Enter the usage as PU (Warehouse Parameter Determination),the warehouse number ZEW2 you created, and the
slotting procedure as ZSP, which was created in step 4. Click the save icon.
Step 6. Create a Condition Maintenance Group
A condition maintenance group is used to bundle condition tables and types for condition maintenance together.
Note: Maintain three condition maintenance group if you are maintain the slotting at three levels:
Also note application is same,but usage is different for three levels.
To create a new condition maintenance group in SAP EWM execute transaction code SPRO and follow menu path
Extended Warehouse Management> Good ReceiptProcess > Slotting > Condition Technique > Settings for User
Interface > Create Condition Maintenance Group.In the screen that appears,click the New Entries button, which
takes you to Figure 12 .
Figure 12
The condition maintenance header
Enter the name of the maintenance group (Z_SLOT) and a description (SlotCondition).Click the Condition
Maintenance Group: Detail folder. This action displays the screen shown in Figure 13 .
9. Figure 13
Condition maintenance details
In Figure 13 , enter the Counter (1), Usages (PU),Condition Table (ZCON_TAB), Condition Type (ZPC#), and
Description (Condition Maint.Group). Click the save icon to save your data.
After you click the save icon,the system generates the logs showing thatall the configuration steps are successfully
completed,as shown in Figure 14 . Click the enter icon (the green checkmark).
Figure 14
Condition maintenance success logs
Step 7. Assign the Condition Maintenance Group to the Maintenance Context
After defining the condition maintenance group,you need to specify condition maintenance groups for a context.
Context defines the situation or circumstance under which the condition maintenance group is used.For my example,
assign a general condition maintenance (GCM) context to the condition maintenance group (Z_SLOT).
(Note: SAP provides other contexts, such as TAX_ENGINE, that are used under business scenarios related to
finance.For basic condition records and condition maintenance group,the context GCM is used.)
10. To register the condition maintenance group in SAP EWM, execute transaction code SPROand follow menu path
Extended Warehouse Management> Good ReceiptProcess > Slotting > Condition Technique > Settings for User
Interface > Register Condition Maintenance Group.
In the screen that appears,enter the maintenance contextGCM and click the enter icon as shown in Figure 15 .
Figure 15
The maintenance context header
In the next screen (not shown),click the New Entries button to go to Figure 16 . Enter the name of the Group
(Z_SLOT) and a Description (SlotCondition).Click the save icon to save your entries.
Figure 16
Condition maintenance context details
Define warehouse productgroup:
ExtendedWarehouseManagement MasterData Warehouse productgroup.
Condition Record Maintenance
After the configuration shown in the above section is complete,you need to maintain the condition records.Condition
records are where specific values for the condition table are maintained.In step 1 in the “Configuration Steps for
Slotting” section,the condition table contained two fields,Warehouse ProductNumber and Warehouse Product
Group. You need to maintain the values for these two condition records.The condition record is the place in whi ch
you maintain the values for materials or services to calculate in the business process or whose values are involved in
the data process ofthe business.Execute transaction code /SCWM/GCMC to displaythe screen shown in Figure 17
11. . Enter the name ofthe maintenance group (Z_SLOT) and then click the execute icon. This action displays the screen
shown in Figure 18 .
Figure 17
The condition record entry screen
In Figure 18 , enter the condition type (ZPC#) and then press the Enter key.
Figure 18
The condition record header
After you press Enter,additional columns are populated as shown in Figure 19 .
Figure 19
Condition record with additional columns
Fill in the details for other columns as shown in Figure 20 and then click the check icon highlighted in yellow.For my
example,enter values in the fields under the WhN (warehouse number) column (ZEW2) and WhsProdGroup
12. (warehouse productgroup) column (001,ZBIG, and 002). Note these two fields are the condition records that you
maintained in the condition table (ZCON_TAB) in the screen shown in Figure 3 .
Figure 20
Condition record data entry check
For my example,you also populate the fields under the PACI (putaway control indicator) column for three warehouse
productgroups as 0010,0050,and P150.Note that the Status column displays red symbols for the rows in which you
have entered data as the system has notyet checked these values.After clicking the check icon (highlighted in
yellow), this status changes to green.
In the refreshed screen ( Figure 21 ), all rows are now active and are showing as green.So basically,the rows in
Figure 21 indicate that if the warehouse productgroup is 0001,the system should getthe PACI as 0010,if it is ZBIG,
it should be 0050,and if it is 0002 then it should be P150.(In Figure 21 , PACtrInd stands for putaway control
indicator.In other screens in the SAP system,the abbreviation PACI is used for putaway control indicator.)
Figure 21
Active condition records
Master Data Update
In the above section,I defined three warehouse productgroups (0001,ZBIG, and 0002) to be used during
assignmentofthe PACI. These three warehouse productgroups have three differentPACIs defined,so when the
slotting process is executed,each PACI is assigned to the correct warehouse productgroup.Now I assign these
three warehouse productgroups to three product masters.This helps in ensuring thatwhen the slotting process is
executed, the system should determine the suitable PACIto get the correct bin proposal.
Note that in Figure 21 , you created three rows and all three warehouse productgroups are assigned to the same
warehouse (ZEW2).Under warehouse ZEW2,you define three warehous e products,and each of these three
warehouse producthas one warehouse productgroup assigned to it. Therefore, when slotting is executed, the
system assigns the PACI assigned to each warehouse productgroup as per the settings in Figure 21 to the
corresponding warehouse productto which these warehouse productgroups are assigned.
13. To maintain the warehouse product,execute transaction /SCWM/MAT1. In the screen that appears ( Figure 22 ),
enter the productnumber (T-EW10), the Warehouse No.(ZEW2), and Party Entitled to Dispose (ZEWM). Click the
Change button.
Figure 22
The warehouse product header
This action displays the screen shown in Figure 23 . Under the Storage Tab, enter the Warehouse ProductGroup
(0001) and then click the save icon.For my example,you have assigned ProductGroup 0001 to product T-EW10.
Figure 23
Assign Warehouse Product Group 001 to product T-EW10
Follow similar steps to assign the Warehouse ProductGroup 0002 to productT-EW11 and Warehouse product
Group ZBIG to product T-EW12 as shown in Figures 24 and 25 , respectively.
14. Figure 24
Assign Warehouse Product Group 002 to product T-EW11
Figure 25
Assign Warehouse Product Group ZBIG to product T-EW12
Slotting Execution and Results Interpretation
Next, I show you how to run the slotting process.To execute slotting,execute transaction /SCWM/SLOT. In the
screen the system displays,click the rightarrow (highlighted in Figure 26 ) to enter all the productnames.
Figure 26
The initial Slotting screen
15. In the Select Single Values tab of the pop-up screen ( Figure 27 ), enter the name ofthe assigned products (e.g.,T-
EW10, T-EW11, and T-EW12).
Figure 27
Product entry for slotting
Click the execute icon to displaythe Slotting screen ( Figure 28 ).
Figure 28
Slotting parameters
In the Slotting screen,enter the warehouse number (ZEW2) and click the execute icon to displaythe screen shown in
Figure 29 . Figure 29 lists all three products and the corresponding warehouse numbers.Selectall three rows and
then click the execute icon to perform the slotting process.
16. Figure 29
Products and warehouse numbers listed
At the bottom of the same screen ( Figure 30 ), logs are generated for all three rows.
Figure 30
Slotting results logs
Click any of the rows to displaythe corresponding log details ( Figure 31 ).
Figure 31
Slotting logs details
In Figure 31 , the screen lists logs with green blocks,indicating thatslotting was successful.
Note that this is justsimulation ofthe slotting process.To update the results,click the Mode button on top of the
screen as shown in Figure 32 .
Figure 32
Slotting update
17. In the pop-up screen ( Figure 33 ) selectthe radio button option Status Grn/Yellw. Selecting Status Grn/Yellw
instructs the system to selectand process all rows thathave an exception status color of green or yellow. Click the
OK button.
Figure 33
Slotting results rows selection
After you click the OK button in Figure 33 , the system displays the screen shown in Figure 34 . Note that in the
fields under the Status column,the save icon appears in each of the three productrows of the product.Click the save
icon at the top of the screen and then close the screen.
Figure 34
Slotting results saved
Results Interpretation
After executing the slotting process,you can view the results by executing transaction code /SCWM/MAT1. In the
screen the system displays ( Figure 35 ), enter data in the Product Number (T-EW10), Warehouse No.(ZEW2), and
the Party Entitled to Dispose (ZEWM) fields.Click the Displaybutton.
Figure 35
The warehouse product master initial screen for product T-EW10
In the next screen,under the Whse Data tab, you can see that Planned PutawayCtrl Ind. has been updated to 0010.
This is because productT-EW10 had the Warehouse ProductGroup assigned as 0001 and the sequence was
18. maintained in the condition record.If the Warehouse ProductGroup is 0001,the system should getthe PACI as
0010,which is what is presentin Figure 36 .
Figure 36
Planned PACI updated for product T-EW10
Similarly,the PACI is updated as P150 for productT-EW11 and 0050 for product T-EW12 as shown in Figures 37
and 38 , respectively.
Figure 37
Planned PACI updated for product T-EW11
19. Figure 38
Planned PACI updated for product T-EW12
Note that in Figures 36 to 38 , the PACI is updated in the Planned PutawayCtrl Ind. field in the productmaster.This
is because slotting was notyet activated for any of the productmasters.To activate the slotting,execute transaction
/SCWM/SLOT and selectany one of the rows.For example,selectthe third row and click the activate icon as shown
in Figure 39 .
Figure 39
Slotting activated for one product
This action displays the screen shown in Figure 40 .
Figure 40
Slotting is active
In Figure 40 , you can see that the activate icon is presentagainstthe third row, meaning thatslotting is active for
productT-EW12.
To see the results ofthis activation, execute transaction /SCWM/MAT1. In the screen the system displays ( Figure 41
), populate the Product Number (T-EW12), Warehouse No.(ZEW2), and the Party Entitled to Dispose (ZEWM) fields.
20. Figure 41
The warehouse product master initial screen for product T-EW12
Click the Displaybutton to displaythe screen shown in Figure 42 .
Figure 42
PACI updated for the product master
Select the Whse Data tab in the screen shown in Figure 42 . Note that the Putaway Control Ind. field has been
updated to 0050.
Common Issues in Use of Slotting in SAP EWM and Resolution
Slotting is one of the key concepts in SAP EWM for optimal storage bin determination.Here is a listof frequentissues
encountered during its configuration and use:
Deletion of productstorage types. Sometimes when slotting is used for mass processing ofproducts,the storage
types of the product are deleted, which is incorrectbehavior. For example,slotting is executed collectively for two
productmaster PROD-A and PROD-B – and activation of slotting is done initiallyfor productPROD-A followed by
PROD-B. In the ProductMaster, the storage type of the firstproduct (PROD-A) may be deleted.
Reason and solution.The reason for this is a bug in standard program behavior.Global variables are not refreshed,
which results in this erratic behavior. To correct this activate Business Add-In (BAdI)
/SCWM/EX_SLOT_UPD_STORGE_TY.
21. Values in the productmaster are erased on slotting activation.When slotting is run via transaction /SCWM/SLOT and
activation is done via transaction /SCWM/SLOTACT, the values in the product master are erased.This error occurs
when system logging for slotting is enabled.
Reason and solution.The reason for this is that the slotting log and the slotting user selection parameters were not
considered during activation.To correct this,you need to modify the standard ABAP object
/SCWM/CL_CONCEPTING_CORE ACTIVATE_MATERIAL. SAP has also provided a solution for this issue via SAP
Note 1545916.
Performance issues in the slotting run. When slotting is executed for a large number ofproducts via transaction
/SCWM/SLOT, the system takes a lot of time to execute and update the results.
Reason and solution.SAP has provided multiple improvements in the system in general and for slotting in particular.
Ensure that SAP EWM is upgraded to the latestenhancementpack and also thatSAP Note 1459635 is implemented
in the system.
Another point to remember when using slotting in SAP EWM is that when you use transaction code /SCWM/MON,
the Warehouse ManagementMonitor is a good central place to give a high-level overview of the warehouse situation
( Figure 43 ). It also contains alertmonitoring capabilities.Ithelps in resolving manyconsistencycheck issues.For
example,before starting SAP ERP Central Component(SAP ECC) and SAP EWM processing,you can use this
transaction to check the stock of the material in the required batch and storage bin.
.
He has more than six years of experience in IT and ERP consulting and in supply chain management
(SCM). He has worked on various SAP Advanced Planning and Optimization (SAP APO) modules such
as Demand Planning (DP), Production Planning/Detailed Scheduling (PP/DS), Supply Network Planning
(SNP), and Core Interface (CIF) at various stages of the project lifecycle.