Judging the Relevance and worth of ideas part 2.pptx
Grade 4 computer module 4th quarter even no. pages
1. 1. To start MS Publisher, click on the Start button and then click All Programs. Select MS
Office 2013 and then click Microsoft Publisher.
2. Double click the Microsoft Publisher icon on the desktop.
In opening an existing publication or
template, you can quickly create a
publication. You can start with a publication
by the list of features options.
Starting Office Publisher 2013 is the
program that helps you create, design, and
publish professional materials. You can
create materials for print, e-mail, and the
Web.
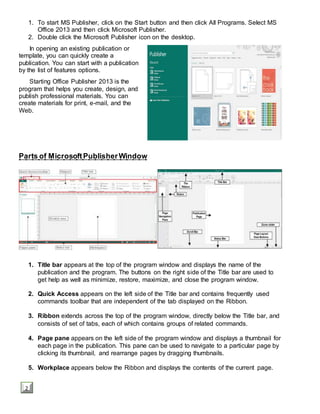
Parts of MicrosoftPublisherWindow
1. Title bar appears at the top of the program window and displays the name of the
publication and the program. The buttons on the right side of the Title bar are used to
get help as well as minimize, restore, maximize, and close the program window.
2. Quick Access appears on the left side of the Title bar and contains frequently used
commands toolbar that are independent of the tab displayed on the Ribbon.
3. Ribbon extends across the top of the program window, directly below the Title bar, and
consists of set of tabs, each of which contains groups of related commands.
4. Page pane appears on the left side of the program window and displays a thumbnail for
each page in the publication. This pane can be used to navigate to a particular page by
clicking its thumbnail, and rearrange pages by dragging thumbnails.
5. Workplace appears below the Ribbon and displays the contents of the current page.
2
2. A B
_____1. Contains group of related commands.
_____2. Displays the contents of the current
page
_____3. Appears at the bottom of the program
window and displays information
about the publication
_____4. The gray area surrounding the current
page
_____5. Appears at the top of the program
window
_____6. Contains commands related to changing
the view
_____7. Contains the most frequently used
commands
_____8. Contains commands related to all the items
you can insert into a publication
_____9. Contains commands related to proofing
a publication
_____10. Appears on the left side of the program
window
Create a New Publication in Publisher
1. To create a new publication
when you are opening Publisher.
Click the type of publication that
you can want to create within the
list of available templates that
appears at the right side of the
startup screen.
2. To create a new publication with
Publisher open, click the File tab
within the Ribbon and then select
the New command at the left side
of backstage view.
3. In the listing of available
templates that appears to the right in the backstage view, you can choose to start a new
publication from one of the many templates available.
4. Click either the Create or Download buttons that appear to create a new publication
based on the selected template.
5. To create a new, blank publication that is a standard page size, select the Blank 8.5 x
11 icon from the templates listing.
A. Home Tab
B. Insert Tab
C. Page Pane
D. Review Pane
E. Ribbon
F. Scratch Area
G. Status Bar
H. Title Bar
I. View tab
J. Window
K. Workspace
4
3. Clean it Up
Clean it up the earth,
So it could be a sparkling clean place for us all!
Clean up the earth,
So we can see the gorgeous blue and green on our planet.
The blue and green will shine in our eyes if we clean it up.
So clean it up,
So that we don’t see any garbage
Anytime or any day,
Clean it up
And live in a world of happiness.
The world we live in is a world of happiness.
The world we live in can be cleaned up and we can be happy.
a. Type the poem
b. Save it from time to time. Filename: Mother Earth
c. Format the text
Font – Monotype Corsiva
Font Size – 16
Font Color – Dark Green
Alignment – Center
d. Save your work.
e. Open print preview
f. Print your work.
Creating Publication
Create a Publication based on a Template
1. Click the File tab, and then click New. The
New page of the backstage view opens
displaying thumbnails of available
templates.
2. In the right pane, click the thumbnail of the
templates that you want to use. A preview
windows open displaying the large image of
the selected template and additional
information.
3. Click the Create button, Publisher creates a new publication based on the selected
templates and opens it in a new window.
6
4. To change the font scheme
On the Page tab, in the Schemes group, click the Fonts button, and select the desired
font scheme from the list.
Changingthe Page Layout
After creating a publication, you may decide to change the page layout. You can use the
commands in the page Setup group on the Page Design tab of the Ribbon to change margins,
orientation, and size.
To change the Page Margins
On the Page Design tab in the Page Setup group,
click the Margins button, and select the desired margin
setting.
To change the page size
On the Page Design tab, in the Page Setup group,
click the Size button, and select the desired page size.
To change the Page Orientation
On the Page Design tab, in the
Page Setup group, click the
Orientation button, and then click
Portrait or Landscape.
To Add Text
On the Home tab, in the
Objects group, click the
Draw Text Box.
In the publication, point to where you want one
corner of the test box to appear, drag diagonally
until you have the desired text box cursor appears
in the text box. Type or text that you want to add.
Formatting a Publication
Take Time
Take time to think; It is the source of power,
Take time to play, it is the secret of perpetual youth,
Take time to read; it is the fountain of wisdom,
8
5. To apply special text effect
1. Select the text that you want to format.
2. Under Text Box Tools, on the Format tab, in the WordArt Styles group, do one of the
following:
- To apply WordArt Styles, go to WordArt Styles gallery.
- To apply text effect, click the Text Effect button.
To change the direction of text
1. Select the text that you want to format.
2. Under Text Box Tools, on the Format tab, click Direction button in the Text group.
To format a Text box
1. Click in the box to select it.
2. Under Drawing Tools, on the Format tab, in the Shape Styles group, do one of the
following:
- To change the fill or outline color, click the Shape Fill or Shape Outline arrow and
select the desired color from the color palette.
- To apply shape effect, click Shape Effect button, point to the desired effect and
select the desired option from the option submenu.
- To apply a predefined shape style, select the desired style from Shape Styles
gallery.
To insert a picture
1. On the Insert tab, in the Illustrations group, click the Picture button.
2. In the Insert Picture dialog box, locate and select the picture that you want to insert,
and then click the Insert button.
When a picture is selected, the Picture Tools Format tab becomes available on the Ribbon.
The tools on this tab can be used to modify the picture and enhance its appearance.
To crop a picture
1. Click and select the picture that you want to crop.
2. Under Picture Tools, on the Format tab, In the Crop group, click Crop button.
3. Drag the cropping handles (found at the corner on the side of the picture) until the
picture shows only the part you want to keep.
4. When you are finished, click outside the picture or press the Esc.
To resize a text box
1. Click in the box to select it. Sizing handles appears in the corners and on the sides of
the text.
2. Drag any of the sizing handles toward the center of the text box to make it smaller or
away from the center to enlarge it.
To resize a picture
1. Click the picture to select it. Sizing handles appear in the corners and on the sides of
the picture.
2. Drag any of the sizing handles toward the center of the picture to make it smaller, or
away from the away from the center to enlarge it.
10
6. 9. _______________________________________
10. _______________________________________
Crop Numbering ParagraphSpacing
Picture Ungroup Wrap text
Spacing button Character Spacing Bullets button
Font color
Creating More Publication
Creating a Bannerand a Poster
A banner is a rectangular flag or a piece of cloth bearing a symbol, logo, slogan, or
message.
To create a Banner
1. Click File – New and chose Built-in to use one of the
templates installed in publisher.
2. Select the Banners category and then click the
banner design that you want.
3. Under Customize and Option, select any
option you want.
4. Click Create.
5. Click Insert tab ang Picture to bring in your
company’s logo or design or a clip art
picture.
6. Click the right button of your mouse where
you want the box to start the banner.
7. Click File Tab and Print Preview to view
your creation.
12
7. Creating Greeting Cards
Using Microsoft Publisher, you can assemble
exactly the greeting card that you want. It
professionally refined designs allow you to create a
general holiday theme such as Christmas and New
Year. You can add personal touches in the form of
verses, messages, pictures, and company logos.
1. Pick a template
2. Start Publisher. Click Built-in – Christmas
Cards
3. Scroll through predesigned greeting card
publications. When you find one that you
like, click it to see a larger image preview.
4. Click Create.
Creating a Bannerand a Poster
A calling card also known as a business card is made up of a small card about 3.5
inches long and 2 inches high.
No matter how you choose to print your business cards, remember to include these
basic elements.
Your company name and logo
Your name and title
Your mailing address and phone and fax numbers
Your email address
Your Web site address (URL)
Create a one – sided Business Card.
1. Click File – New and choose Built-in to
use one of the templates installed in
Publisher.
2. In the Business Cards catalog, under
Installed Templates, click the design
that you want.
3. Under Customize, do the following:
Select a Color scheme and
Font scheme.
Click the drop-down menu under Business information and click Create new.
In the Create New Business Information Set dialog box, enter your information in
the field, including Business Information set name.
If you have a Logo, click Add Logo.
Click Save
14