
Empfohlen
Weitere ähnliche Inhalte
Was ist angesagt?
Was ist angesagt? (20)
Ähnlich wie Tri-Wheel Mechanism Design for Moving Shopping Carts Up Stairs
Ähnlich wie Tri-Wheel Mechanism Design for Moving Shopping Carts Up Stairs (20)
Tri-Wheel Mechanism Design for Moving Shopping Carts Up Stairs
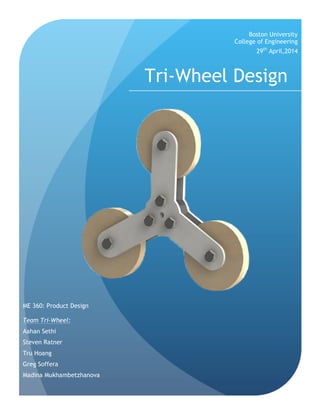
- 1. Tri-Wheel Design Boston University College of Engineering ME 360: Product Design Team Tri-Wheel: Aahan Sethi Steven Ratner Tru Hoang Greg Soffera Madina Mukhambetzhanova 29th April,2014
- 2. 2 Abstract Team Tri wheel set out to modify an existing product that would be easy to assemble and use. The design primarily involved processes like brainstorming, creating conceptual sketches, making Morphological and Pugh Charts, CAD modeling and rendering. With a combination of all these processes a working prototype was created and was tested. The data collected from the prototype was used to compare it with the results from a single wheel dolly design. After all the analysis was done, manufacturing proposal to mass product the tri wheel was created. This project highlights each of these steps in details.
- 3. 3 Table of Contents Abstract……………………………………………………………………………………………………………………....2 Introduction………………………………………………………………………………………………….……………..3 Design Process……………………………………………………………………………………………………………..5 • Conceptual Designs…………………………………………………………………………………..5 • Conceptual Sketches……………………………………………………………………………..…6 • Functional Decomposition………………………………………………………………………..7 • Morphological Chart…………………………………………………………………………..…….8 • Pugh Chart……………………………………………………………………………………………....9 Preliminary Design……………………………………………………………………………………………….…….10 Learning Experience……………………………………………………………………………………………………11 Force Analysis……………………………………………………………………………………………………………..13 • Engineering Analysis………………………………………………………………………………..13 • Single Wheel Design………………………………………………………………………………..14 • Tri-Wheel Design…………………………………………..………………………………………..15 • Analytical Results…………………………………………………………………………………….17 • Discussion………………………………………………………………………………………………..17 • Experimental Analysis…………………………………………………………………………….18 • Data Collection……………………………………………………………………………………….20 • Finite Element Analysis………………………………………………………………………….22 Detailed Design…………………………………………………………………………………………………………..26 Assembly………………………………………………………………………………………………………………………28 Manufacturing Strategy……………………….………………………………………………………………………30 CAD Rendering…………………………..………………………………………………………………………………..32 Conclusion…………………………………………………………………………………………………………………..34 Appendix……..……………………………………………………………………………………………………………..35 • Bill of Materials….………………………………………………………………………………..35 • Drawings……………….………………………………………………………………………………36
- 4. 4 As a team we were asked to design a product, with the goal of providing a functional 3D prototype of our design. We began by extensively researching for any niches in the market for a new product. We finally concluded that we would modify an existing product. We wanted our design to be easy to use and assemble, solve a problem faced by a large number of people, to be economical and be easily available. This initial brainstorming process gave us a good starting point for our design goals. The initial conceptual sketches helped us create a better understanding of the components and complexities involved in the project. Before we began creating any SolidWorks drawings, we first worked out the math of the project. This involved the dimensions and tolerance analysis, to create an optimum design of our prototype. The focus of the project shifted from designing an entire shopping dolly to just designing a product that would help move the dolly easily up stairs. Once the entire math was complete, we focused on the design aspects of the prototype. We wanted it to be a working prototype that would be visually appealing, easy to assemble and show the rotational motion. Finally with the help of morphological charts, pugh charts, CAD modeling and rendering a functional prototype was created and ready for testing. Based on the first set of calculations and the resources available, the design and the drawings were updated. This report includes a detailed description of all the design processes, including: charts, sketches, finite element analysis (FEA), CAD drawings, a review of the prototype, and CAD renderings. The report also highlights a suggested manufacturing strategy with the inclusion of materials, processes and cost analysis for mass production. ‘Create and design an easy to build mechanism that will help transport shopping dollies up stairs smoothly for the price conscious customers’ - Problem Statement Introduction
- 5. 5 The idea behind our design was to create an entirely new modular shopping dolly that would incorporate a tri wheel design. We wanted to stick with the principles that we established and wanted our prototype to fulfill all those requirements. After the preliminary research was conducted by each of the members and a professor, we concluded that it would be ideally to shift the focus of the project from redesigning the dolly to just design a mechanism to help it move up stairs easily. Based on the research we conducted, we sketched a number of different mechanisms that would satisfy our problem statement. Refer to Figures 1 to 5 below for initial design sketches Design Processes 1.Conceptual Design Figure 1: Shows the conceptual Design Figure 2: Shows the conceptual Design
- 6. 6 2.Conceptual Sketches Once we identified that we would focus just on the mechanism, we started sketching different designs. Various shopping and delivery carts used by firms such as Shaws, Peapod and Whole Foods inspired these designs. After a thorough research, we learned that there are some designs that already existed in the market. We decided to refocus our design and decided to optimize the design and create a product that would be used in all conditions while keeping it cost efficient and easy to assemble. Based on all these criteria, we created a tri-wheel design capable of climbing stairs by reducing the force input and making it easier to move a cart up stairs. To make this design realistic, we decided to make a working prototype and test the ease with which it moves up stairs and whether it requires less force than a single wheel design. The aesthetics, final design and choice of material were chosen and developed using functional decomposition, Pugh and Figure 3: Shows the conceptual sketch Figure 4: Shows the conceptual sketch Figure 5: Shows the conceptual sketch
- 7. 7 3. Functional Decomposition Our team identified a niche in the market, that there exists a difficulty pulling shopping carts up the stairs. An innovation in wheel design was required to solve this problem. The prototype of the tri-wheel presented in lieu with this report solves that problem by sufficiently decreasing the force required to pull the cart up the stairs. A functional decomposition resolved the design process into its fundamental constituents. Each of these constituents was explored individually with the purpose of obtaining a variety of designs and solutions. The selection process was based on compliance with requirements stated in the following functional decomposition: Mechanical Motion Tri-Wheel Design Material Selection Reduced Costs Easy Availability Beautify Prototype Mechanical Component Optimize Motion Economize Value Simple Replacements Effortless Aseembly Easy Movement Figure 6: Shows the Functional Decomposition
- 8. 8 4. Morphological Chart The morphological chart is a design tool that helped satisfy each design criteria from the functional decomposition. The choices that were selected for the design process are highlighted in the chart below. The results were further examined for the best performance and the maximum compliance with requirements. The morphological chart below summarizes our thoughts for the best combination of characteristics: Functional requirements Possible solutions Vertical Motion Tri-Wheel Design Tri-Wheel Treaded Rollers - Horizontal Motion Tri-Wheel Design Wheels Treads - Replaceable Parts Metal clamps Nut and bolts Rack and Pinion Screws Collapsible Design Nut and bolts Screws Metal clamps - Adjustable Pieces Gears Nut and bolts Metal Pins - Inexpensive Materials Aluminum Plastics Stainless Steel Wood Table 1: This Represent the Morphological Chart
- 9. 9 5. Pugh Chart A Pugh chart effectively weighs the pros and cons of different ways to move the dolly up stairs and also comparing different materials and their values. Each solution was evaluated with respect to certain criteria. In the end the design with the highest score was selected and used to build the prototype. The following Pugh Charts presented bellowed helped in the design process: Baseline Alternatives Criteria Weight Tri Wheel Tri Wheel Treaded Rollers Cost 2 0 1 1 Manufacturability 2 0 1 1 Ease of use 2 0 0 -1 Durability 1 0 0 -1 Replaceability 2 0 -2 -1 Total 0 0 -1 Baseline Alternatives Criteria Weight Nuts and Bolts Screws Metal Clamp Cost 2 0 0 -1 Manufacturability 2 0 0 -1 Ease of use 2 0 0 0 Durability 1 0 0 1 Replaceability 2 0 0 0 Feasibility 2 0 0 0 Total 0 0 -1 Table 2: This Represent the Pugh Chart Table 3: This Represent the Pugh Chart
- 10. 10 Preliminary Designs Once the final products and materials were selected with the help of the Pugh and Morphological charts, a final hand drawn sketch was developed and this was converted into a SolidWorks design. The preliminary design was made keeping the following data in consideration: Parameter Dimension (in) Vertical Stair Surface (Rise) 7 Horizontal Stair Surface (Run) 11 Wheel Diameter 5 Table 4: This Represent the Dimensions The initial designs made on SolidWorks were converted in tangible products. There were a few issues with the initial prototype. The hole sizes were not correct and the parts were not correctly aligned. The spacers were not of the same thickness and the type of nuts and bolts used were wrong. There were a lot of changes to be made, which will explained in the detailed design steps. The first prototype consisted of the following: Part Material Wheels Wood Spacer Acrylic Main Hubs ABS plastic Table 5: This Represent the Materials Figure 7: Shows the Preliminary Design Sketch
- 11. 11 Learning Experiences Apart from the knowledge related to the class material itself this 4 weeks+ design project has thought a number of things, that could not been learned otherwise. First of all idea generation point is the critical one that frames the pool of possible solutions. Therefore, listening to and accepting any idea generated during the brainstorming process is important. Secondly, any idea should be backed with diligent mechanical calculations. Disregarding the math behind any mechanism can lead to devastating results and loss of time. Even though the team had performed elementary Newtonian calculations before starting the CAD design and machining, there was a lack of the in-depth calculations. That was fulfilled during the prototype testing process, where the data collected answered the questions about the decrease in force required to pull the cart upstairs. Another crucial moment in project accomplishment process was the communication between team-members and of team-members with Professor. From the very first point the workload was divided between all five members, and since all parts of the project were related to each other, clear and timely communication was determining factor of the on-time successful completion of the project. Luckily, the team comprised of responsible diligent students who collaborated throughout all steps of the project. One more lesson learned during the tri-wheel prototyping process was that the material selection process should always start from checking for available resources first. The team had first planned to buy the tri-wheel components, such as wheels, screws and bolts from Macmaster Carr website. However, is was later found out that EPIC lab has a vast supply of left over materials/parts that can be reused for other purposes. So, the wheels (six of them) were custom made in the university lab that saved time and money. The screws and bolts of required parameters were also found in the EPIC lab. The next time we are to make a prototype, we will start from searching the available materials from the university labs.
- 12. 12 The EPIC lab was valuable for us not only as a supplier of materials but also with the CAD machinery professionals who consulted the team on the right process to be used for machining. Their guidance has tremendously helped us to learn which machining processes area better fit for what we need, and also about how to use the machines in the lab. In short, it can be concluded that: • Any kind of Brainstorming is good • Should perform in-depth calculations first • It is important to communicate effectively • Should first check for available resources • Better look to experts for their knowledge and guidance Figure 8: Highlights some of the Outcomes from the learning experiences
- 13. 13 Force Analysis 1.Engineering Analysis The purpose of the force analysis was to determine whether the tri-wheel design would improve the force users would have to apply to the cart to pull it up multiple steps. This section focuses on the analysis of the static forces involved during the transition stage of the single wheel and of the tri-wheel from the bottom step to the top step. The analysis assumed no friction force on the wheels for simplicity.
- 14. 14 1.i. Single Wheel Analysis • 𝑊 is the total weight of the cart • 𝐹!"## is the pulling force of the user • 𝐹! is the normal force of the bottom step • 𝐹!"#$% is the horizontal force of the riser • 𝑅 is the radius of the wheel • 𝐻 is the riser height • θ is the pulling angle Figure 9: Shows the Forces on the wheel The sums of forces in the 𝑥- and 𝑦-axes yield ∑ 𝐹! = 𝐹!"## cos 𝜃 −𝐹!"#$% = 0 (1) ∑ 𝐹! = 𝐹! − 𝑊 − 𝐹!"## sin 𝜃 = 0 (2) And the sum of moments about the point where 𝐹!"#$% acts is ∑ 𝑀 = 𝑊 ∙ 𝑅 − 𝐹! ∙ 𝑅−𝐹!"## sin 𝜃 ∙ 𝑅 = 0 (3) The equations show that the system is statically indeterminate. However, by employing virtual work principle, the normal force can be approximated to zero. Thus, the expression of 𝐹!"## is 𝐹!"## = ! !"# ! (4)
- 15. 15 1.ii. Tri-Wheel Analysis Figure 10: Shows the Forces on the Tri-Wheel • 𝑊 is the total weight of the cart, • 𝐹!"## is the pulling force of the user • 𝐹!" is the normal force of the bottom step • 𝐹!" is the normal force of the top step • 𝐹!"#$% is the horizontal force of the riser • 𝐻 is the riser height • 𝑆 is the length between the axle of the wheel to the center bore • Ω is the pulling angle • 𝛼 is the angle of the equilateral triangle • 𝜃 is the angle from the horizontal to the line connecting the two wheels axles together and A is the center of wheel 1.
- 16. 16 The sums of forces in the 𝑥- and 𝑦-axes yield ∑ 𝐹! = 𝐹!"## cos Ω −𝐹!"#$% = 0 (5) ∑ 𝐹! = 𝐹!"## sin Ω + 𝐹!" + 𝐹!" − 𝑊 = 0 (6) The sum of moments about point A is ∑ 𝑀! = 𝐹!"## sin Ω ∙ 𝑆 sin 𝛽 − 𝐹!!"" cos Ω ∙ 𝑆 cos 𝛽 −𝑊 ∙ 𝑆 sin 𝛽 + 𝐹!"[𝑆 cos(𝜃 − 𝛼) + 𝑆 sin 𝛽] = 0 (7) Because 𝐹!" and 𝐹!" are not equal, a constitutive equation is required. This equation has the expression 𝐹!"## sin Ω − 𝑊 = 𝐴 ∙ 𝐹!" + 𝐵 ∙ 𝐹!" (8) where 𝐴 and 𝐵 are the weights based on the geometry of the tri-wheel for the scenario considered. 𝐴 and 𝐵 are expressed as 𝐴 = ! !"#(!!!) ! !"#(!!!)!! !"# ! 𝐵 = ! !"# ! ! !"#(!!!)!! !"# ! (9) The angle 𝜃 is not constant. It is dependent on the orientation of the tri-wheel on the steps. Therefore, 𝜃 can be written as 𝜃 = sin!! ! !! !"# ! (10) Solving for 𝐹!" from the constitutive equation gives 𝐹!" = !!"## !"# !!!!!∙!!" ! (11) Using Equations 6, 7, and 10, the expression of 𝐹!"## is 𝐹!"## = 𝑊 !"# !! !!! !!! (!"#(!!!)!!"# !) !"# ! !"# !!!"#! !"# !!!"# ! !!! !!! (!"#(!!!)!!"# !) (12)
- 17. 17 1.iii. Analytical Results Using the obtained expressions for 𝐹!"## in previous sections, a value of 𝐹!"##can be obtained to compare the two cases. The values used are listed below. Sample Values: 𝛼 = 60° 𝑚 = 5 kg 𝐻 = 7 in. 1Ω = 48.5° 𝑆 = 7 in. One Wheel: 𝐹!"## = 65.43 N Tri-Wheel: 𝐹!"## = 65.43 N 1.iii. Discussion Because the pulling force of the tri-wheel is not dependent on the length 𝑆, the value obtained matches that of the pulling force of the one wheel case. It can be argued that the angle 𝜃 is dependent on length 𝑆, thus 𝑆 still influences the force. But, considering that the change in 𝜃 is small for reasonable 𝑆, the difference is too small to account. Also, the equation for 𝜃 limits what value 𝑆 can have. For the function sin!! 𝑥, 𝑥 cannot be less than 1. Thus, 𝑆 ≥ 𝐻. This analysis only considered static forces acting on the wheels at a specific point of the wheels’ motion, thus, it is inconclusive if the tri-wheel design decreases the pulling force at all. Further analysis can be made to study the trajectory of the center of the wheel axle to determine if it affects the pulling force.
- 18. 18 Force Analysis 2.Experimental Analysis Experimental analysis was performed on the shopping dolly in two waves. First, taking the shopping dolly with the regular wheels; Second, on the shopping dolly with the Tri-Wheels. In each scenario, 4 main pieces of equipment were utilized to test both wheel types: force gauge, 14lb weighted backpack, 15lb shopping dolly, and stairs with 7 inch rise by 11 inch run. The experimental method was performed as follows. First, the desired wheel type was securely fastened on the shopping dolly. The dolly was brought to bottom of the stairs, and the weighted backpack was placed inside of it as shown in Figure 11. Next, the force gauge was securely fastened to the handle of the shopping dolly as shown in Figure 12. 5 participants of different heights, constituting to different force angles, each pulled the cart up the stairs at a constant velocity. It was of highest importance that a constant velocity and angle was maintained as the cart was pulled up the stairs. Therefore, the participants were timed as they scaled the steps; if they deviated from an average time by over half a second, the data was thrown out. As the participants scaled each step, they kept an eye on the force gauge and recorded the maximum amount of force experienced per step as shown in Figure 13. Each participant gathered 10 values per step, all of which are listed below in Table 6. For a total visualization of the experimental setup, refer to Figure 14.
- 19. 19 Figure 11: Weighted Backpack inside the Dolly Figure 12: Force Applied on Dolly Figure 13: Taking force Measurements Figure 14: Experimental Setup
- 20. 20 # Participant's name Height, ft Angle of pull, degrees Load experienced (lb) Average Load (lb) 1 Greg 6'0'' 70 Old Design 36 37 35 35 34 36 38 36 37 36 36 New Design 26 26 24 27 25 28 27 26 28 25 26.2 2 Steve 6'1'' 75 Old Design 34 36 37 36 35 35 36 38 36 34 35.7 New Design 24 26 25 26 27 27 26 28 27 27 26.3 3 Aahan 5'8'' 72 Old Design 36 38 35 36 36 34 37 35 36 36 35.9 New Design 26 26 28 27 25 27 28 26 25 26 26.4 4 Tru 5'7.5'' 70 Old Design 37 39 34 38 33 36 35 37 36 38 36.3 New Design 25 26 25 24 25 25 26 27 26 26 25.5 5 Madina 5'2'' 78 Old Design 36 35 38 33 34 36 38 35 37 36 35.8 New Design 26 25 24 27 28 26 28 25 26 28 26.3 2.i. Data Collection Table 6: Experimental Data Once all of the data was recorded, the average force required to pull the cart up for each participant was calculated as shown in Table 6. Next, the total uncertainty for each wheel was calculated for 50 values of each wheel design within a 95% interval of the standard deviation. The final experimental result along with uncertainty is shown in Table 7.
- 21. 21 Total load experienced (lb) Total Uncertainty (+/- lb) Old Design 35.9 0.55 New Design 26.1 0.45 Table 7: Calculated Results with Uncertainties From the calculated results in Table 7, the percentage of force saved by the Tri-Wheel from the regular wheel can be shown below. !1 − !".!±!.!"!" !".!±!.!!!" ! ∗ 100 = 27.3 ± 2.4% Reduction in Force It must be noted, the uncertainty accounted for is only in relation to the precision uncertainty 50 force values measured for each wheel design. Bias uncertainty in force gauge is not accounted for, and uncertainty due to human error is not accounted for. Therefore, the total uncertainty values given are an underestimate of the actual uncertainty laden within the experimental setup. However, due to the fact this experiment was conducted for a rough estimate of force reduction, no further uncertainty analysis will be undertaken.
- 22. 22 Force Analysis 3.Finite Element Analysis Finite element analysis was performed on both the Tri-Wheel as well as the regular wheel to obtain analytical results. First, the path that each wheel traveled was ascertained as to provide an enlightening visual. Refer to Figures 15 and 16 below to see the path that the axle traveled as it climbed the stairs. In reference to Figure 15, it is clear to see the path that the Tri-Wheel takes is much smoother than the path that the regular wheel takes in Figure 16. The regular wheel’s path contains sections of completely vertical assent, meaning the full force of the weight will be completely converted to the force experienced by the user pulling the wheel up the steps. The Tri-Wheel’s path contains a more consistent trajectory, with the force being displaced evenly up the stairs. The lack of sharp angles in the Tri- Wheel’s path indicates a smoother ride, and the lack of completely vertical sections indicates less force needed to pull the wheel up the steps.
- 23. 23 Figure 15: Tri-Wheel Projected Path Figure 16: Single Wheel Projected Path
- 24. 24 To begin finite element analysis, proper conditions were set up to allow for consistent measurements. First, gravity was turned on to simulate a constant downward force on all materials as found within a real world environment. Then, a down force was applied to the axle of both wheels to simulate the weight of the shopping cart on the wheel. Another force was applied to the handle to simulate force of the user pulling the cart up the stairs. Lastly, a spring was placed between the handle and axle so the reaction force experienced by the spring could be measured. Refer to Figures 17 and 18 below for a visualization of forces and springs applied to the wheels. Figure 17: Forces and spring applied to Tri-Wheel Figure 18: Forces and spring applied to Single Wheel
- 25. 25 From the finite element calculations performed by SolidWorks on both wheels, Figure 19, shown below, was calculated. 0.0 1.0 2.0 3.0 4.0 5.0 6.0 7.0 0 0.2 0.4 0.6 0.8 1 1.2 1.4 1.6 1.8 ReactionForce(lbf) Time (Sec) Reaction Force vs Time for Tri-Wheel and Regular Wheel Tri-Wheel Force Regular Wheel Force Figure 19: Reaction Forces v/s Time for both wheels Using a maximum experienced force of 5lbf for the Tri-Wheel and a maximum experienced force of 7lbf for the regular wheel, a rough estimate of force reduction can be calculated below. !1 − !!"# !!"# ! ∗ 100 = 28.6% Reduction in Force The value calculated above by finite element analysis falls close to the value calculated by experimental analysis. However, the importance of a strong conclusion that the Tri-Wheel uses less force to climb stairs is the major take away point from these experiments.
- 26. 26 Detailed Design From the initial design and processes, the prototype needed a few more parts to work properly. Therefore one the initial design concerns were observed and tested, it can concluded that the prototype required an additional component and a few of the existing components needed to be changed. The prototype required washers as an additional component and the regular nuts and bolts were changed to a more specific shoulder screw and hexagonal bolts. The Actual Prototyping period took less time than estimated. Within two days the prototype was ready. The chassis was re used from an existing shopping cart. The main hub was carved on the Mill. On the second day the rest of the parts (hub spacer and the wheels) were cut (Figure 20). Figure 20: Group Members working on the final Prototype
- 27. 27 The hub spacer was cut from an acrylic block of 3-inch diameter. The wheels were milled out of wood panel found among the supplies of the EPIC lab. The new shoulder screws, washers and hexagonal nuts were aligned correctly and holes were drilled to the exact size. Once the bolts and screws that would fit into the design were found among available supplies in EPIC the holes were drilled through all parts – main hub, hub spacer, wheels. So, the physical cutting/milling/drilling process took less time than allocated in the original prototyping strategy. In total, two main hubs, two hub spacers, six wheels were made (Figure 21). Figure 21: Represents the Prototype
- 28. 28 Assembly Step 1 Step 2 Step 3 Step 4
- 29. 29 Step 5 Step 6 Step 7 Step 8
- 30. 30 Manufacturing Strategy The tri-wheel cart design, the components would be injection molded which would provide an inexpensive way to produce very large quantities. The initial estimated number of carts that would be produced factored out to roughly 50,000 units, which means that the design would incorporate four main hubs and two center hubs per cart. This equates to 200,000 main hubs and 100,000 center hubs to meet our 50,000-unit goal. Both components will be made out of Acrylonitrile Butadiene Styrene (ABS) molded plastic, for its low price ($1.29/lb) and low density (0.0379 lb/in2 ) which will keep the total weight of the cart down as much as possible. For the cart body and the wheels we will be teaming up with a cart producing company, Winnie Wagon, who will supply us the other components needed to assemble the cart. In the production and assembly of the cart, an important characteristic that we made sure to implement was end-of-life design, and that’s evident in the material choice and way the tri- wheels are assembled. ECO U.S.A. (www.absrecycling.net) is a leading company in recycling ABS plastic and they can help to remove scrap from our production lines. By using the same material for both the main and center hub, it will reduce the amount of extra and unwanted material in the plant, therefore improving production times. The components are also assembled through fasteners, there will be no glue or permanent materials needed, which is important in assembly times and allows for a finger-release if needed. Using (www.custompart.net), the tables on the next page, The costs could be calculated based on certain dimensions and complexity of the parts.
- 31. 31 Using ABS, Molded for the Main Hub Quantity 10,000 50,000 100,000 200,000 Material Cost ($) 6,616 33,080 59,552 119,104 Production Cost ($) 9,002 43,775 63,017 125,594 Tooling Cost ($) 28,745 28,745 50,284 54,983 Total ($) 44,363 105,600 172,853 299,681 Table 8: The cost break up using ABS Plastic Using ABS, Molded for the Center Hub Quantity 5,000 10,000 50,000 100,000 Material Cost ($) 917 1,834 7,287 14,573 Production Cost ($) 3,945 7,626 18,744 37,223 Tooling Cost ($) 15,977 15,977 27,686 27,686 Total ($) 20,839 25,436 53,716 79,482 Per part Cost ($) 4.168 2.544 1.074 0.795 Below is the total cost per cart that would be produced. The price cost factors in four main hubs and two center hubs that would appear on the purchased cart, and does not include the price for wheels, the cart or the nuts and bolts to assemble. Quantity 2,500 12,500 25,000 50,000 Total Cost per cart $26.08 $13.54 $9.06 $7.58 Table 9: The cost break up using ABS Plastic Table 10: The cost break up using ABS Plastic
- 32. 32 CAD Rendering Figure 22: Represents a rendered model in the living room
- 33. 33 Figure 22: Represents a rendered model on the stairs
- 34. 34 Conclusion As a group we have learned a lot through this project. The key aspects to take away from the project are that it is important to work within the constraints that are provided and to make the most of the resources that are available. The project teaches us the importance of the design process and its application every step along the way. It is important to follow every step along the design process and we hope to accomplish everything that we have set out to achieve and push forward towards the next steps. Currently the group has highlighted certain important aspects that have to be addressed for the future of this project. First working on a better and more conclusive mathematical analysis so that the design can be optimized further. Through this process the tri-wheel setup will be used across all surfaces. Secondly working on some flaws of the initial prototype and the improvement in terms of design. The prototype did not move smoothly across the lateral surface and at the same time it did not move fluidly from left to right. The next steps would involve improve this design and make the design unobtrusive. We will also collect data from a lot more people and perform conclusive surveys to help us improve the product. The team will also work on ways to find durable and more cost efficient materials to build the final product. The last change would be to improve the products aesthetics and increase its application from more than just shopping dollies. A great deal was learned from the first iteration and we hope to push forward with further, more advanced models. The dream is to see this tri-wheel design mass produced and used by a large number of people.
- 35. 35 Appendix Refer to Figure 23 and 24 for labeled exploded views of the Tri-Wheel assembly. The numbers on the exploded views correspond to the numbers on the bill of materials below in Table 11. Part Number Part Name Quantity Per Tri-Wheel Total Quantity Material Dimensions 1 Main Hub 2 4 ABS Plastic On Drawing 2 Hub Spacer 1 2 Acrylic On Drawing 3 Wheel 3 6 Plywood On Drawing 4 Socket Shoulder Screw 6 12 Steel Thread Size: 1/4" - 20 Shoulder Length: 1.3" Thread Length: 1.4" 5 Hex Nut 6 12 Steel Thread Size: 1/4" - 20 Width: 0.22" 6 Washer 6 12 Steel Inner Diameter: 0.28" Outer Diameter: 0.62" Thickness: 0.065" Table 11: Bill of Material
- 36. 36 Figure 22: The Exploded view of the Tri Wheel Figure 23: The Exploded view of the Tri Wheel
- 37. 37 Figure 24: SolidWorks representation of the Hub
- 38. 38 Figure 25: SolidWorks representation of the Spacer
- 39. 39 Figure 26: SolidWorks representation of the Wheel
- 40. 40 Prototyping Strategy Timeline Objective Time Order parts required for Prototype 1 week Parts when physically manufactured Time Parts when 3-D printed Time Collect parts and bring to machine shop to analyze means of production 2 days Analyze Cad results 2 days Machine material into desired components 1 week 3-D print components 2 days Assembly 1 day Assembly 1 day TOTAL 2.5 - 3 weeks 2-2.5 weeks Table 12: Prototyping Timeline
- 41. 41 Figure 28: Exploded view of the Assembly Figure 27: Exploded view of the Assembly
- 42. 42
- 43. Team Tri-Wheel © Boston University College of Engineering 29th April, 2014