Account Groups Management Guide
•
0 gefällt mir•698 views

ebook launched Account Groups to allow advertisers to group together and access multiple Facebook Ads accounts simultaneously. To learn more, please see our How-to Guide

Empfohlen
Empfohlen
Weitere ähnliche Inhalte
Ähnlich wie Account Groups Management Guide
Ähnlich wie Account Groups Management Guide (20)
Mehr von Vinalink Media JSC
Mehr von Vinalink Media JSC (20)
Account Groups Management Guide
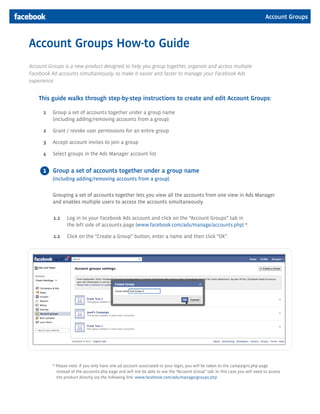
- 1. Account Groups Account Groups How-to Guide Account Groups is a new product designed to help you group together, organize and access multiple Facebook Ad accounts simultaneously, to make it easier and faster to manage your Facebook Ads experience. This guide walks through step-by-step instructions to create and edit Account Groups: 1 Group a set of accounts together under a group name (including adding/removing accounts from a group) 2 Grant / revoke user permissions for an entire group 3 Accept account invites to join a group 4 Select groups in the Ads Manager account list 1 Group a set of accounts together under a group name (including adding/removing accounts from a group) Grouping a set of accounts together lets you view all the accounts from one view in Ads Manager and enables multiple users to access the accounts simultaneously. 1.1 Log in to your Facebook Ads account and click on the “Account Groups” tab in the left side of accounts page (www.facebook.com/ads/manage/accounts.php) *. 1.2 Click on the “Create a Group” button, enter a name and then click “Ok”. * Please note: If you only have one ad account associated to your login, you will be taken to the campaigns.php page instead of the accounts.php page and will not be able to see the “Account Group” tab. In this case you will need to access the product directly via the following link: www.facebook.com/ads/manage/groups.php
- 2. Account Groups 1.3 To ad an account to the group, select your existing managed accounts from the “My account” drop down tab and/or enter the account IDs directly into the “Add Account” field and then click “Add Account”. 1.4 To grant permission to another user, type the name of a friend and/or an email address into the “User Permissions” field and click “Add User”. If the email address is associated with that person’s user profile, it will grant that profile permission. If the email is not associated with that person’s user profile or business account, you should contact your Facebook rep, so they can create a new business account for this email address. 1.5 To save the changes click on the “Back to group settings” button in the top right hand corner of the Page.
- 3. Account Groups 2 Grant / revoke user permissions for an existing group 2.1 Log in to your Facebook Ads account and click on the “Account Groups” tab on your accounts page (www.facebook.com/ads/manage/accounts.php). 2.2 Select the Group which you would like to edit. 2.3 To grant permission to another user, type the name of a friend and/or an email address into the “User Permissions” field and click “Add User”. If the email address is associated with that person’s user profile, it will grant that profile permission. If the email is not associated with that person’s user profile or business account, you should contact your Facebook rep, so they can create a new business account for this email address. 2.4 To remove a user from the group click on the cross next to the user. 3 Accept account invites to join a group 3.1 As the admin of the group, add the Account ID you wish to invite to the group in the “Add Account” field. 3.2 Once invited, the account will be in “pending” status and will be inaccessible until the owner of the account approves the group invite.
- 4. Account Groups 3.3 The owner of the account being invited logs in and accesses the ‘Account Groups’ tab through the lef-hand nav. 3.4 The owner will see a notification that the account has been invited to join the group, and the owner can choose to confirm or ignore the invite. 3.5 Once the invite is confirmed, the account will be accessible to anyone who has access to that particular group. 4 Select groups in the Ads Manager account list 4.1 Log in to your Facebook Ads account and navigate to the accounts page (www.facebook.com/ads/manage/accounts.php). 4.2 Click on the “All accounts” drop down menu to see a list of groups and accounts you have access to. 4.3 Click on a group from the drop down menu to view all the accounts associated to that group selected.