
Empfohlen
Empfohlen
Weitere ähnliche Inhalte
Was ist angesagt?
Was ist angesagt? (20)
Ähnlich wie Vss 101 and design considerations in v mware environment
Ähnlich wie Vss 101 and design considerations in v mware environment (20)
Kürzlich hochgeladen
Kürzlich hochgeladen (20)
Vss 101 and design considerations in v mware environment
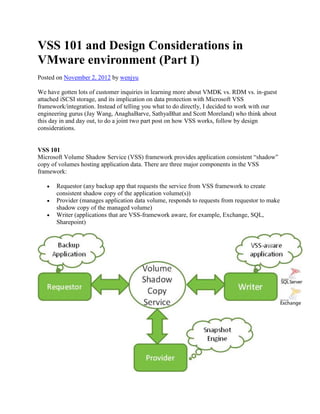
- 1. VSS 101 and Design Considerations in VMware environment (Part I) Posted on November 2, 2012 by wenjyu We have gotten lots of customer inquiries in learning more about VMDK vs. RDM vs. in-guest attached iSCSI storage, and its implication on data protection with Microsoft VSS framework/integration. Instead of telling you what to do directly, I decided to work with our engineering gurus (Jay Wang, AnaghaBarve, SathyaBhat and Scott Moreland) who think about this day in and day out, to do a joint two part post on how VSS works, follow by design considerations. VSS 101 Microsoft Volume Shadow Service (VSS) framework provides application consistent ―shadow‖ copy of volumes hosting application data. There are three major components in the VSS framework: Requestor (any backup app that requests the service from VSS framework to create consistent shadow copy of the application volume(s)) Provider (manages application data volume, responds to requests from requestor to make shadow copy of the managed volume) Writer (applications that are VSS-framework aware, for example, Exchange, SQL, Sharepoint)
- 2. When it comes to ―Provider‖, there are three main types: 1. Software-based Provider ->shadow copy of the volume is created in software, at a layer above NTFS filesystem 2. System-based Provider -> like #1 above, the provider is supplied by the Operating System itself. System-based provider typically creates a copy-on-write shadow copy, and does not leverage the capabilities of the underlying hardware storage device. Third party backup vendors typically supplied their own software based Provider that is optimized for their own backup application or storage hardware. 3. Hardware-based Provider -> the work of creating the shadow copy is performed by the storage controller (array)
- 3. So how does it work? Below is an over-simplified diagram along with explanation: 1. Requestor asks VSS to create a shadow copy of a specific volume 2. VSS instructs the Writer to prepare data for shadow copy (i.e., completing all pending transactions). When finished, the writer will inform VSS that it‘s done prepping the volume for an application consistent shadow copy 3. VSS, upon confirmation that all pending transactions have been completed, instructs Writer to hold all new write requests (reads could still be served), for up to 60 seconds 4. Upon acknowledgement from Writer that the application has been quiesced, all buffer cache is flushed to disk from NTFS filesystem 5. VSS now directs Provider to create a shadow copy of the volume (it has 10 seconds to finish the job) 6. Provider creates a shadow copy of the volume 7. After Provider informs VSS that the shadow copy creation is done, VSS informs the writer to ‗un-quiesce‘ the new writes(NOT shown in diagram above); lastly, VSS will inform the requestor that the shadow copy request is completed NOTE the above steps are greatly simplified – keep in mind that VSS does check back with the Writer to make sure step 4 is completed successfully, meaning the new writes are properly quiesced/paused. If not, it simply simply fails the operation and falls back to step 1 again. Now let‘s dive a bit more in the CLI ―vssadmin‖ In the Windows Command Prompt, you can use ―vssadmin‖ command to find out some native info about the system providers, writers as well as volumes available for shadow copy vssadmin list providers (this will only list the system provider)
- 4. What about the software providers then? Typically, they are registered as a service that runs in the OS. For example, VMware Tools provides a VSS requestor and provider, the provider service can be found in the Services: This service is stopped by default – it will only get started when the tools VSS requestor is attempting to make a shadow copy call to VSS. If/when VMware snapshot is invoked, the service will start, and you will notice the ―Volume Shadow Copy‖ service getting stopped. That is to be expected, as we are not leveraging the System Provider to do the job for us. vssadmin list volumes (this command returns the list of volumes that are available for app queisced shadow copy)
- 5. Above is the output from my SQL 2008 VM with three VMDKs, C: for OS, E: for database files, F: for transaction logs. NOTE: if you created your Win2k8 VM prior to vSphere 4.1, then there‘s an extra step you need to do to take, to enable the UUID for the VM to register with the guest (more info can be found here). vssadmin list writers (this command lists all the applications that are VSS-aware; its core functions is to listen to the VSS service for shadow copy service, so it could flash data from memory buffer, commit pending transaction logs, and freeze new writes). This is command is also a good tool for quick spot check on whether the previous application quiescing was successful. If you need to dig deeper on failures, VMware KB 1037376 and KB 1007696 have list of instructions for tools log, vss trace, in addition to this command. Below is the output from my SQL2008 VM: Don‘t bother with the ―vssadmin list shadows command‖, unless you are leveraging the built-in system providers (in most cases, you will NOT be using those).
- 6. Here‘s a workflow diagram of application quiesced snapshot workflow with VMware tools VSS provider, working in conjunction with Nimble Storage volume collection with ―vCenter Sync‖ snapshot schedule. At this point, you might be curious to see what the workflow looks like when hardware VSS provider is used – let‘s use MS Exchange application for our example:
- 7. 1. NPM schedule triggers snapshot process; NMP agent request for shadow copy through VSS 2. VSS tells Exchange to ―quiesce‖ mail stores 3. Exchange ―quiesce‖ mail stores and alerts VSS upon completion 4. VSS tells NTFS to flush buffer cache. 5. VSS tells Nimble array to take a snapshot of volume(s) – either in-guest mounted or RDM in passthru mode (since VMware ESX ignores all RDM in PT-mode during vmware snapshot creation task) 6. Nimble array captures snapshots of all volumes in collection; the hardware provider also truncates the Exchange logs (as an app consistent, quiesced copy of the data is now captured) That‘s all there is to VSS! And this wraps up our part I of the post for data protection with VSS. Stay tuned for part II – we will take a deep dive into design considerations based on various disk connection methods (think RDM, direct attach/in-guest mounted, regular VMDK).
- 8. VSS 101 and Design Considerations in VMware environment (Part II) Posted on November 29, 2012 by wenjyu Nimble engineers(Jay Wang, AnaghaBarve, SathyaBhat, Scott Moreland) and tech marketing strike again with part II of VSS. Now that you have basic understanding of how VSS framework and VMware quiesced snapshot integration work (if you haven’t read the first post, click here). Now let’s jump into the subject of design considerations – for those of you that read my blog regularly, you know this is my favorite subject – highlighting areas of that you should watch out for, when designing your virtualization infrastructure. Here we go, for each disk attachment method available in ESX environment: RDM(Physical Compatibility Mode) for application disks, VMDK for OS disk In this case, VMware will simply ignore the RDM disk during snapshot operation, meaning ESX will only create a VMware snapshot for the O/S VMDK. As for the application disk that is running as RDM, the Nimble VSS hardware provider will be used for snapshots. Therefore, it is imperative to ensure the Volume Collection containing the RDM volume has “Microsoft VSS” synchronization selected. NOTE
- 9. 1) With “Microsoft VSS” synchronization, there would be NO VMware snapshot taken by ESX servers. The Nimble VSS hardware provider will be leverage for taking the snapshot, after the VSS writer has successfully freeze incoming I/O requests 2) The Nimble Windows Toolkit (Nimble Protection Manager/NMP) needs to be installed on the VM that has RDM storage attached VMDK for both application and OS disks With this configuration, keep in mind that ALL VMsn a given VMFS volume need to be quiesced + VMware snapshot taken before the array takes a volume level snapshot. It is a wise idea to limit the number of virtual machines you have in a given VMFS volume. For example, if you have VMs that are running file share/print/web services, then you are basically wasting the time for taking a ‘quiesced’ snapshot, as the application is stateless in nature. Simply create another volume to host such VMs, and ensure the volume collection contains only VMs that require VSS quiesced snapshot (with appropriate VSS writer).
- 10. NOTE The current VMware implementation of the software provider does NOT truncate logs for Exchange. If you have an integrated backup application such as Commvault that could be invoked to truncate the logs, be sure to leverage that. If not, you could 1)enable circular logging in Exchange 2)consider inguest/RDM mounted storage 3)build custom script to invoke during backup to truncate the Exchange logs. Direct attached/in-guest mounted storage for application data, VMDK for OS disk With this configuration, the in-guest mounted storage will bypass the ESX VMkernel storage stack, and simply appear as network traffic to ESX. Customers typically use this configuration for 1)MSCS on iSCSI protocol 2)get beyond the 2TB VMDK size limitation. Just like any other method, there are design considerations/tradeoffs. NOTE
- 11. 1) The “gotcha” with this configuration is SRM (Site Recovery Manager) and other upper level solution (i.e., vCloud Director) interoperability. Let’s start with SRM – it does NOT know about in-guest mounted storage as storage/vmdk, therefore, you’d have to add extra steps to mount these volumes for each VM that uses this type of storage. Refer to my previous post on SRM “gotchas” for further details. For vCloud Director, you will NOT be able to package the VM as a vApp template and deploy without manual intervention to mount the in-guest storage. Additionally, in terms of performance monitoring, esxtop will not display disk level stats for the in-guest storage – you’d have to reply on the network stats (press ‘N’). vCenter Operations will not interpret the in-guest attached storage stats as ‘storage’ info. It will get treated as network traffic 2) The Nimble Windows Toolkit(Nimble Protection Manager/NMP) needs to be installed on the VM that has RDM storage attached Last but not least, with all three virtual machine storage connectivity methods above, the following “gotcha” applies: *ONLY a scheduled snapshot operation in a Volume Collection would invoke VSS quiescing, a manual snapshot that you take from vCenter Server Nimble plugin and/or Nimble UI would NOT trigger the VSS requestor to request for application quiescing* In Summary, here’s a quick table reference on all three connectivity options and considerations/caveats for each: Connectivity Method Snapshot Synchronization NPM Installation Raw Device Mapping(RDM) Microsoft VSS Inside the guest OS (NPM requestor & provider used for snapshot) No VMware snapshot taken VMDK vCenter None (VMware VSS requestor/provider used for snapshot) No Log truncation for MS Exchange Inside the guest OS (NPM requestor & provider used for snapshot) Manual work needed for SRM/vCD Direct Attached (In-guest mounted) Microsoft VSS Considerations Avoid too many VMs in the same datastore No disk level stats from esxtop/vC Ops NPM requestor
- 12. &provider used for quiescing That’s it for now – happy backing up your VMs! Oh, don’t forget to restore them once in a while – what good is backup when you can’t restore from it, right?
- 13. “KISS RAS” = Software Defined Storage – Come see Nimble Storage‟s tech previews @ VMworld next week! Posted onAugust 21, 2013bywenjyu If you are in the virtualization space, you must have heard of the term ―Software Defined Storage‖ – probably more so from storage vendors than VMware. Why? Because it is a hot marketing theme to promote storage technologies. More and more customers & partners are asking what is Nimble‘s take on ―Software Defined Storage‖. Here‘s my unofficial response – ―K.I.S.S – R.A.S = Software Defined Storage‖: Keep It Simple Storage Reliability Availability Supportability I personally hope all storage vendors could focus more on these aspects in their solution/offerings so customers could benefit from this ‗software defined‘ era. Seriously, having REST-APIs in your product release does not make it ‗software defined storage‘ – what good do they do if the customer has to get a field engineer to upgrade the software to the next version? Now let‘s expand further on the KISS RAS aspects, and what we will showcase in our tech preview station @ VMworld next week! K.I.S.S (Keep It Simple Storage) VMware has three key storage integration points to keep things simple for end users: 1)vCenter plugin (extensibility in vCenter to allow storage vendor to provide a plugin for storage operations such as datastore provisioning, snapshotting, cloning, expansion) Here‘s a sneak peak @ our new enhanced vCenter plugin:
- 14. 2)vVOL (a.k.a virtual volume) (simply put, VMware providing metadata to storage vendor to further offload storage operations such as provisioning, cloning, snapshotting, replication. Up leveling that a bit, it is the platform that enables people to have true policy based management for storage) – my good friend Cormac published a very nice blog on this topic in case you haven‘t seen it (http://blogs.vmware.com/vsphere/2012/10/virtual-volumes-vvols-tech-previewwith-video.html) Here‘s a sneak peak @ our vVOL demo:
- 15. 3) PSA (Pluggable Storage Architecture): this integration point allows storage vendors to plug into the multipathing framework within ESXiVMkernel. What I am most excited about is our upcoming PSP plugin – this new Path Selection Plugin would auto detect newly available paths , and optimize I/O distribution across all auto discovered paths: From the storage software OS side, here‘s a sneak peak of our next release – can you spot what is NEW from looking at this picture? (HINT: look @ green circles!)
- 16. R. A. S (Reliability, Availability, Supportability) This is an area where storage vendors should invest heavily (aside from creating all the marketing *COUGH* stuff) . We should leverage the ―software defined‖ theme to bring software closer to hardware (let it be commodity or proprietary) – the software should have tight handshake with the underlying hardware, and proactively process hardware state changes to do the right thing to accommodate failures, report it, and show actionable items for end users to take to prevent it in the future. If you are evaluating ―software defined storage‖, be sure to evaluate it with the following R.A.S criteria in mind: 1) Monitoring & alerting (this is pretty self-explanatory – does the solution provide active monitoring of the software & hardware state, and alert you when things go wrong? Do you get actionable information out of the alerts?) 2) Risk determination (doe the solution inform you about things that *might* go wrong in the future, if you don‘t take corrective action? You shouldn‟t have to predict what the actions are, it should tell you!) 3) Efficiency Measurement (does the solution inform you whether things are running efficiently? Just because things are up and running doesn‘t mean they are optimized) vCenter Operations Manager addresses all three requirements above, for all the virtual entities/managed objects in the virtual infrastructure (VM CPU, memory, network, storage) – now, should vCenter Operations Manager report a VM being bound by storage, you‘d definitely want to dive deeper into the ―software defined storage‖ solution to find out which of the three areas to look at. Let‘s look at a real world scenario below – you have a VM that‘s running very active workload, and vCenter Operations indicates to you that the VM is bound by disk I/O, and
- 17. latency is high…your software defined storage solution should provide a way for you to look deeper and determine what might be a possible cause. From Nimble perspective, that‘s where Infosight comes in to play. Here‘s a sneak preview of what our support engineers and engineering teams look at – especially the supportability aspect. If you haven‘t seen the current release of InfoSight, check out the demo here and Brain (Neil Glick‘s blog here). If you have been using it, come see a tech preview of what is coming at our VMworld booth – teaser screenshot below: Here we go, vCenter Operations Manager reports VM bound by CPU: What might cause the latency? hmm how about a closer look from a new feature being added to InfoSight?
- 18. Aside from all the new tech preview stuff we will be showing at VMworld – here‘s a shameless self-plug for my presentations next week: vBrownBag „esxtop‟ technical talk (Monday, 8/26 @ 5:15PM) http://professionalvmware.com/2013/08/vbrownbag-tech-talks-vmworld-2013/ BCO5431 DR Panel (Tuesday, 8/27 @5:30PM) Panel session to share tips/tricks/‖gotcheas‖ in DR design for private and hybrid cloud (joining me in this session is the following customers: Jeff Winters from City of Hot Springs, Jerry Yang from Foster Pepper, Andrew Fife from Virtacore, Bryan Bond from Siemens e-meter) That‘s it for now – hope to see you @ VMworld next week!!
- 19. Red Hat OpenStack up and running in minutes with Nimble Cinder Driver? The “Why”, “What” and “How”…. Posted on August 15, 2013 by wenjyu There are lots of buzz around OpenStack these days – I‘m sure you want to give it a spin and see what the hype is all about. Here‘s a quick way to try it out using your existing resources (seriously, most of us don‘t have the freaking budget to buy new servers for experimental/eval projects; if you do, more power to you!). NOTE: NOTHING below is officially supported by VMware, Red Hat, Nimble Storage. Why am I doing it? Because I can J Wouldn‘t you want to leverage what you have in the infrastructure and check out what the hype is all about? If you answered yes, then read on. (*Special Thanks to Jay Wang and Brady Zuo in our R&D team for making this happen!) OpenStack 101 For those of you that don‘t know what OpenStack is, here‘s a quick 101 introduction, with key buzzwords to use so you sound like a pro: Founded by RackSpace + NASA several years back Got massive traction after the formation of OpenStack Foundation It is cool because its fate is not controlled by a single company/vendor, projects are driven/led by end users, and the community It is a cloud Platform that has extensive API framework (rich API sets that allows for easy automation + built-in extensibility for the portal) API compatibility with AWS EC2 and S3 Consists of the following projects: o Nova (compute)
- 20. o o o o o o o Cinder (block storage: you probably know this one; volume access based on SCSI standard) Swift (object storage: scalable storage for unstructured data: think pictures, videos, iso images) Neutron (networking; used to be called Quantum; you do have a choice with various vendor‘s SDN implementation) Glance (image repository: where your ISO, VM images reside) Horizon (Dashboard/self service portal: this is where admin comes to create projects, review project resource utilization; this is where end consumers login to deploy instances/VMs) Keystone (identify/authentication) Ceilometer (monitoring/operational mgmt) Here are some very useful links from various folks in the community: https://ask.openstack.org/en/questions/ (great community support; I asked a few questions here and there and folks are very responsive) http://www.openstack.org/summit/portland-2013/session-videos/ (my favorites are: Day 2OpenStack Grizzly Architecture 101, Top 10 Things We‘ve learned about OpenStack by my friend Cloud Czar from NetApp , OpenStack in Production: the Good, the Bad & the Ugly; Day3-OpenStack, SDN, and the Future of Infrastructure-as-a-Service) http://cloudarchitectmusings.com/page/2/ (Blog by Kenneth Hui from RackSpace – very informative/technical blog posts) Now, let‘s jump straight into my setup:
- 21. Step 0: Download CentOS 6.4 DVD if you haven‘t done so already: http://isoredirect.centos.org/centos/6/isos/x86_64/ Step 1: Controller VM Install Install CentOS (DUH) as a VM, I chose ―Base Server‖ so I am not sure if a minimal one would have all the dependencies needed for OpenStack ―Gotchas‖ -if you bypass networking setup during installation, your eth0 interface would be disabled by default, to get it back, simply do this: #vi /etc/sysconfig/network-scripts/ifcfg-eth0 Change ―ONBOOT=no‖ to ―ONBOOT=yes‖ #service network restart -be sure you connect this to a network with internet access (unless you are going to build your own YUM repository) Step 2: Install Red Hat OpenStack
- 22. Install RDO packages for OpenStack – I simply follow the instructions from Red Hat‘s RDO page: http://openstack.redhat.com/Quickstart *I actually wanted to try out Neutron so I use ―packstack –allinone –os-quantum-install=y‖ instead* After this command finishes (takes about 10 minutes or so), you will see a screen like this: ―Gotcha‖ -the default admin password is cryptic, and in a non-obvious location; you could find the actual password in the following file: ―keystonerc_admin‖ After you find the password, copy it, and then open up OpenStack Horizon in your browser: http://<your_serverhost/ip>/dashboard -don‘t forget to change the admin password to one that you would actually remember Step 3: Install Nimble Cinder Driver (this step is optional if you don‟t want to use shared storage for Cinder; you could start creating project and stand up instances with the VMDK that‟s attached to the CentOS VM) *Note* if you are a customer of Nimble and want to try out the Cinder driver as a tech preview, give us a shout out; or send me an email wen@nimblestorage.com After you obtain the binary from us: a) #cp nimble.py /usr/lib/python2.6/site-packages/cinder/volume/drivers/
- 23. b) Add the following lines to /etc/cinder/cinder.conf nimble_username=admin nimble_password=pass nimble_mgmt_ip=your_array_mgmt_ip volume_driver=cinder.volume.drivers.nimble.NimbleISCSIDriver volume_name_template = volume-%s c)restart all related cinder services: cd /etc/init.d/ for i in $( lsopenstack-cinder-* ) do service $i restart done You are now ready to rock n‘ roll! You can perform the following operations with Nimble: create volume snap volume clone volume delete volume Each volume could be tied to an individual instance in OpenStack. So you could enjoy the benefits of per-VM level performance monitoring, snapshot, cloning with zero copy clone. One advantage you have with shared storage for Cinder is you won‘t have to scale compute to get storage capacity/performance. I will post more stuff once I get to play with this setup some more. Stay tuned!
- 24. Another deeper look at deploying Nimble with Cisco UCS Posted onJuly 30, 2013bywenjyu We continue to get customer inquiries on the specifics of deploying Nimble with Cisco UCS – particularly on what the service profile should look like for iSCSIvNICs. So here we go, we will dive straight into that bad boy: We will start with the Fabric Interconnect, then to the vNICS, then to Nimble array, and last but not least, the vSpherevSwitch 1. Fabric Interconnect Configure cluster for the FI o The FIs should be configured in cluster mode, with a primary and subordinate (clustering of FI does NOT mean data traffic flows between the two – it is an active/passive cluster with management traffic flowing between the pair) o Configure appliance ports The ports connected with Nimble data interfaces should be configured with appliance port mode – why you may ask? Well, prior to UCSM 1.4 release, the ports on the FI are Ethernet ports that will receive broadcast/multicast traffic
- 25. from the Ethernet fabric. Appliance ports are designed specifically to accommodate Ethernet-based storage devices such as Nimble so its ports don’t get treated as another host/VM connected to an Ethernet uplink port Here’s what ours look like for each FI (under “Physical Ports” for each FI in the “Equipment” tab FI-A (connect one 10G port from each controller to the FI-A) FI-B (connect remaining 10G port from each controller to FI-B) 2. vNIC (it’s important to pin the iSCSIvNICs to a specific FI) In our service profile, we have two vNICs defined for iSCSI traffic, and each vNIC is pinned to a specific FI1 Here‘s what the vNIC setting looks like for each vNIC dedicated for iSCSI (under ―General‖ tab):
- 27. We use VLAN 27 & 28 representing the two subnets we have Why didn‘t we check ―Enable Failover‖? Simply put, we let ESX SATP/PSP to handle failover for us. More on topic is discussed in my joint presentation with Mostafa Khalil from VMware. 3. Nimble Array Notice we have subnet 127 & 128? Why you may ask – that is so we could leverage both FIs for iSCSI data traffic
- 29. 4. vSpherevSwitch We will need two VMkernel ports for data traffic, each configured on a separate subnet to match our design. You could use either a single vSwitch or two vSwitches. Note if you use a single vSwitch, your NIC teaming policy for each VMKernel port must be overridden like below: How the hell do I know vmnic1 & vmnic2 are the correct vNICs dedicated for iSCSI? Please don‘t share this secret J If you click on ―vNICs‖ under your service profile/service profile template, you get to see the ―Desired Order‖ in which they will show up in ESX – remember, ESX assigns this based on the PCI bus number. Desired order of ―1‖ will show up as vmnic0, so our vNICiSCSI-A with desired order of ―2‖ will show up as vmnic1, so forth with vNICiSCSI-B That‘s it, wish I could make it more complicated. If you missed my post on booting ESXi from SAN on UCS, check out my previous pos
- 31. iSCSI Booting UCS blade/rack server with Nimble Storage Posted onJune 6, 2013bywenjyu More and more customers are inquiring about how to do boot-from-SAN with Nimble Storage (save a few bucks on having to buy local SAS/SSD disks) – fortunately, we got both in our playground. Here it is, step-by-step checklist/instructions… *NOTE* *The setup is configured to attach Nimble directly to the fabric interconnects with two subnets defined (one for each 10G interface of the controller) – if you attach the Nimble to a pair of access layer switches such as Nexus 5k with vPC, then dual subnets is NOT needed. Remember, even though the FIs are configured as a cluster pair, the cluster interconnect interfaces between the FIs DO NOT carry data traffic, thus, the need for dual subnets for both FI connections to be active to the Nimble array
- 32. *You have to have a service profile template configured to have iSCSI boot – here is what yours should look like, for the ―iSCSIvNICs‖ and ―Boot Order‖ tabs:
- 33. ―Boot Order‖ tab should be pretty self-explanatory, first boot from CDROM, then iSCSI VNICs
- 34. Next up is configuring the IP and target parameters for each iSCSIvNIC (this is so the iSCSIvNIC knows where to find the boot LUN) – remember to configure BOTH vNICs otherwise you‟d have a single point of failure!
- 36. 1)ensure you have an IQN pool to derive iQN name for the iSCSIvNIC initiator (so an initiator group can be created on the array side to ensure only this blade could have access to the boot volume) *take note of the initiator name so you could add it to the initiator group on the array side 2)set a static IP for the iSCSIvNIC (there‘s a nice little feature here to determine if the address is used by other blades within UCSM) 3)add the iSCSI array target information(at this point, you are going to switch to the Nimble interface to obtain two pieces of required info: create a boot volume for the blade and obtain its UUID obtain the target discovery IP
- 37. Here‘s how to get this stuff from the Nimble side: First let‘s get the iSCSI discovery IP:
- 38. Next obtain the iQN for each iSCSIvNIC and add them into an initiator group (you certainly want to do this because you don‘t want the volume to be presented to every and any host that sees it!)…the IQN can be found under the server‘s service profile->―boot order‖->vNIC1 or vNIC2->‖set iSCSI Boot Parameters‖: Remember, you‘d want to get the IQN for both iSCSI VNICs, and then add them to an initiator group from the Nimble side:
- 39. Once the initiator group has been created, you are now ready to create a volume to serve as the boot LUN for the ESXi host:
- 41. Notice I have all the boot LUNs on the ESX server configured to be part of a volume collection – it‘s for safety measures in case something were to go wrong with the ESXi install. It‘s a lot quicker to restore from a snap than to reinstall ESX all over again (unless you are fortunate to have stateless ESXi Auto Deploy configured). If you have a DR site, it certainly wouldn‘t hurt to configure replication for the ESXi boot LUN volume collection as well! After the volume has been created, we‘ll then obtain the UUID for the volume so it could get entered in the blade server‘s iSCSI boot target parameter:
- 42. Here we go again, same screen as before, but this time with the required info for both 1 & 2 below: Now you are ready to boot/install ESXi on a Nimble volume! Power on the blade, and watch for the following screens to make sure the volume is discovered correctly:
- 43. On Nimble (as the server boots, the iSCSI connection would be made if things are configured properly – if ―Connected Initiators‖ count remains ‗0‘ even when you see the ESXi install prompt, then go back to the previous iSCSI boot parameters to make sure 1)array target IP is entered correctly 2)boot volume UUID is entered correctly for EACH of the iSCSIvNICs: Want to see this in action
- 45. Notice I have all the boot LUNs on the ESX server configured to be part of a volume collection – it‘s for safety measures in case something were to go wrong with the ESXi install. It‘s a lot quicker to restore from a snap than to reinstall ESX all over again (unless you are fortunate to have stateless ESXi Auto Deploy configured). If you have a DR site, it certainly wouldn‘t hurt to configure replication for the ESXi boot LUN volume collection as well! After the volume has been created, we‘ll then obtain the UUID for the volume so it could get entered in the blade server‘s iSCSI boot target parameter:
- 46. Here we go again, same screen as before, but this time with the required info for both 1 & 2 below:
- 47. Now you are ready to boot/install ESXi on a Nimble volume! Power on the blade, and watch for the following screens to make sure the volume is discovered correctly: On Nimble (as the server boots, the iSCSI connection would be made if things are configured properly – if ―Connected Initiators‖ count remains ‗0‘ even when you see the ESXi install prompt, then go back to the previous iSCSI boot parameters to make sure 1)array target IP is entered correctly 2)boot volume UUID is entered correctly for EACH of the iSCSIvNICs: Want to see this in action? Check out Mike Mclaughlin‘s demo video on Nimble Connect
- 48. Storage for Your Branch Office VDI By Radhika Krishnan, Head of Solutions and AlliancesOn October 10, 2012 · Add Comment ―One size fits all‖ is not a tenet applicable for branch office deployments. Branch office deployments vary based on number of users, type of applications, available WAN bandwidth, and IT infrastructure. A recent ESG survey shows that 92 percent of customers are interested in replacing the laptops/PCs of their remote office employees with virtual desktops running in a central location. VMware, working with partners such as Nimble Storage, provides a variety of approaches to tackle VDI with their Branch Office Desktop solution. One way to deploy is the centrally-hosted desktop environment and the other is using a locally-hosted desktop solution kept in sync using VMware Mirage. Either way, you want to make sure the storage you choose is optimized for your specific deployment model. With the centralized desktop hosting model, the storage not only needs to be cost-effective, but also deliver high performance. This is where Nimble shines with optimizations for both read and write operations. In addition, built-in snapshot-based data protection allows you to dramatically improve business continuity. In the case of the locally-hosted desktop environment, the primary storage factors in play are cost, ease of deployment and use, as well as supportability. Nimble‘s CS200 series offers costeffective, dense performance for these environments in a 3U form factor. Systems come tuned out of the box with only a few easy steps to go from plug-in to operational. Finally, proactive wellness features enable the relay of comprehensive system telemetry data to Nimble HQ that is analyzed in real-time to identify potential problems at the branch location. In case of a support incident, the system can be serviced remotely the majority of the time. Additionally, in the locally-deployed VDI solution, Nimble Storage used for branch office desktops can serve as a replication target for the primary datacenter. That way critical data can
- 49. be replicated and protected in case of a disaster at the primary site. Similarly, critical data such as local persona and user files can be replicated back to the primary datacenter.
- 50. re All Hybrid Storage Arrays Created Equal? By Ajay Singh Vice President, Product ManagementOn October 9, 2012 · Add Comment Nimble Storage was founded in early 2008 on the premise that hybrid storage arrays would be the dominant networked storage architecture over the next decade – a premise that is now widely accepted. The interesting question today is, ―Are all hybrid storage arrays are created equal?‖ After all, SSDs and HDDs are commodities, so the only factor setting them apart is the effectiveness of the array software. How does one compare hybrid storage arrays? Here are some key factors: 1. How cost-effectively does the hybrid storage array use SSDs to minimize costs while maximizing performance? 2. How cost-effectively does the hybrid storage array use HDDs to minimize costs while maximizing useable capacity? 3. How responsive and flexible is the hybrid array at handling multiple workloads and workload changes? 4. Aside from price/performance and price/capacity, how efficient is the array data management functionality (such as snapshots, clones, and replication)? This blog will cover the first three. The fourth dimension of efficient data management is a very important factor in evaluating storage arrays, and a topic we‘ll cover in detail in a future blog post. How cost-effectively does the hybrid storage array use SSDs? Most hybrid storage array architectures stage all writes to SSDs first in order to accelerate write performance, allowing data that is deemed less ―hot‖ to be moved to HDDs at a later point. However as explained below, this is an expensive approach.Nimble storage arrays employ a unique architecture in that only data that is deemed to be cache-worthy for subsequent read access is written to SSDs, while all data is written to low-cost HDDs. Nimble‟s unique architecture achieves very high write performance despite writing all data to HDDs by converting random write IOs issued by applications into sequential IOs on the fly, leveraging the fact that HDDs are very good at handling sequential IO. 1. Write endurance issues demand the use of expensive SSDs. When SSDs receive random writes directly, the actual write activity within the physical SSD itself is higher than the number of logical writes issued to the SSD (a phenomenon called write amplification). This eats into the SSD lifespan, i.e. the number of write cycles that the SSD can endure. Consequently, many storage systems are forced to use higher endurance eMLC or SLC SSDs, which are far more expensive. In addition to the selective writing capability mentioned above, the Nimble architecture also optimizes the written data layout on SSDs so as to minimize write amplification. This allows the use of lower cost commodity MLC SSDs, while still delivering a 5 year lifespan.
- 51. 2. Overheads reduce useable capacity relative to raw capacity of SSDs.Hybrid arrays that can leverage data reduction techniques such as compression and de-duplication can significantly increase useable capacity. On the flip side, RAID parity overheads can significantly reduce useable capacity. Nimble’s architecture eliminates the need for RAID overheads on SSD entirely and further increases useable capacity by using inline compression. 3. Infrequent decision-making about what data to place on SSDs and moving large-sized data chunks wastes SSD capacity. Most hybrid storage arrays determine what data gets placed on SSDs vs. HDDs by analyzing access patterns for (and eventually migrating) large “data chunks”, sometimes called pages or extents. This allows “hot” or more frequently requested data chunks to be promoted into SSDs, while keeping the “cold” or less frequently requested data on HDDs. Infrequent decisions on data placement cause SSD over-provisioning. Many storage systems analyze what data is “hot” on an infrequent basis (every several hours) and move that data into SSDs with no ability to react to workload changes between periods. Consequently, they have to over-provision SSD capacity to optimize performance between periods. Nimble’s architecture optimizes data placement real-time, with every IO operation. Optimizing data placement in large data chunks (many MB or even GB) causes SSD overprovisioning. The amount of meta-data needed to manage placement of data chunks gets larger as the data chunks get smaller. Most storage systems are not designed to manage a large amount of meta-data and they consequently use large-sized data chunks, which wastes SSD capacity. For example, if a storage array were to use data chunks that are 1GB in size, frequent access of a database record that is 8KB in size results in an entire 1GB chunk of data being treated as “hot” and getting moved into SSDs. Nimble’s architecture manages data placement in very small chunks (~4KB), thus avoiding SSD wastage. How cost-effectively does the hybrid storage array use HDDs? This means assessing the ratio of usable to raw HDD capacity, as well as the cost per GB of capacity. Three main areas drive this: 1. Type of HDDs. Many hybrid arrays are forced to use high-RPM (10K or 15K) HDDs to handle performance needs for data that is not on SSDs, because of their (higher) random IO performance. Unfortunately high RPM HDD capacity is about 5x costlier ($/GB) vs. low RPM HDDs. As mentioned earlier, Nimble’s write-optimized architecture coalesces thousands of random writes into a small number of sequential writes.Since low-cost, high-density HDDs are good at handling sequential IO, this allows Nimble storage arrays to deliver very high random write performance with low-cost HDDs. In fact a single shelf of low RPM HDDs with the Nimble layout handily outperforms the random write performance of multiple shelves of high RPM drives. 2. Data Reduction. Most hybrid arrays are unable to compress or de-duplicate data that is resident on HDDs (some may be able to compress or de-duplicate data resident on SSDs). Even among those that do, many recommend that data reduction approaches not be deployed for transactional applications (e.g., databases, mail applications, etc.). The Nimble architecture is able to compress data inline, even for high-performance applications. 3. RAID and Other System Overheads. Arrays can differ significantly in how much capacity is lost due to RAID protection and other system overheads. For example many architectures force the use of mirroring (RAID-10) for performance intensive workloads. Nimble on the other hand uses
- 52. a very fast version of dual parity RAID that delivers resiliency in the event of dual disk failure, allows high performance, and yet consumes low capacity overhead. This can be assessed by comparing useable capacity relative to raw capacity, while using the vendor’s RAID best practices for your application. How responsive and flexible is the hybrid array at handling multiple workloads? One of the main purposes of a hybrid array is to deliver responsive, high performance at a lower cost than traditional arrays. There are a couple of keys to delivering on the performance promise: 1. Responsiveness to workload changes based on timeliness and granularity of data placement. As discussed earlier, hybrid arrays deliver high performance by ensuring that “hot” randomly accessed data is served out of SSDs. However many hybrid arrays manage this migration process only on a periodic basis (on the order of hours) which results in poor responsiveness if workloads change between intervals. And in most cases hybrid arrays can only manage very large data chunks for SSD migration, on the order of many MB or even GB. Unfortunately, when such large chunks are promoted into SSDs, large fractions of that can be “cold data” that is forced to be promoted because of design limitations. Then because some of the SSD capacity is used up by this cold data, not all the “hot” data that would have been SSD worthy is able to make it into SSDs. Nimble’s architecture optimizes data placement real-time, for every IO that can be as small as a 4 KB in size. 2. The IO penalty of promoting “hot” data and demoting “cold” data. Hybrid arrays that rely on a migration process often find that the very process of migration can actually hurt performance when it is most in need! In a migration based approach, promotion of “hot” data into SSDs requires not just that data be read from HDDs and written to SSDs, but also that to make room for that hot data, some colder data needs to be read from SSDs and written into HDDs – which we already know are slow at handling writes. The Nimble architecture is much more efficient in that promoting hot data only requires that data be read from HDDs and written into SSDs – the reverse process is not necessary since a copy of all data is already stored in HDDs. 3. Flexibly scaling the ratio of SSD to HDD on the fly. Hybrid arrays need to be flexible in that as the attributes of SSDs and HDDs change over time (performance, $/GB, sequential bandwidth, etc.), or as the workloads being consolidated on the array evolve over time, you can vary the ratio of SSD to HDD capacity within the array. A measure of this would be whether a hybrid array can change the SSD capacity on the fly without requiring application disruption, so that you can adapt the flash/disk ratio if and when needed, in the most cost effective manner. We truly believe that storage infrastructure is going through the most significant transformation in over a decade, and that efficient hybrid storage arrays will displace modular storage over that time frame. Every storage vendor will deploy a combination of SSDs and HDDs within their arrays, and argue that they have already embraced hybrid storage architectures. The real winners over this transformation will be those who have truly engineered their product architectures to maximize the best that SSDs and HDDs together can bring to bear for Enterprise applications.
- 53. NimbleStorage User Interface leave a comment » In my last post related to NimbleStorage it was more focused on the Company, and products they offer. However I did note that I would take a few moments to document the UI and how easy it is to manage. In this post I am going to go over the UI and the different features contained within it. The UI is Adobe Flash based, you will need v9 or higher installed on your management system to view all aspects of the UI, it will still function without Adobe Flash installed, but you will be missing some of the charts. I have ran the interface from Chrome, IE, FireFox, and Safari without any issues. Landing Page Once you open up your browser of choice go to the management IP that you configured on your array. You will be presented with the following page. Home This is the Home Page, and will contain a dashboard related to all the information you will normally want to see from a quick health check.
- 54. Disk Space: Will show everything you need to know about your usage, as you can see it will show the Volume Usage, Snapshot Usage, and unused reserve. It is very simple to read, and makes for a great screen shot. Space Savings: This is where you get to see your savings and how the Nimble is saving you some space. As you can see from below my space savings is 2.51 TB or 40.55%. Throughput: From here you can see how much data is passing over your Array interfaces. This shows current usage and for the past Hour. IOPS: Again from here you get to see your Current IOPS usage across all your LUNs, this also shows back for an hour. Event Summary: All Events that have happened in the last 24 Hours Recent Events: All recent events, last hour. The interface is controlled from a tabbed driven menu, this is the the menu you will see from any page within the Nimble Management Interface. I will explain the rest of the Interface in order.
- 55. Manage The Manage tab is where you can configure your Volumes, Replication, Snapshots, Protection and Performance Policies, Array, and Security. Volumes The Volume Menu, is where all the magic happens with the Volumes, you can do anything volume related within this Menu. The first page you will see will give you a full overview of all Volumes that reside on your array, with basic information related to the usage. Click on a volume name, and now you have all information pertaining to that Volume. Here you will get the overview of your volume, you can edit, take a snapshot, set it to offline, Take ownership of the volume with ―Claim‖ (Used if the Volume came from a replicated source) or Delete the Volume. You can also look at the Snapshot, and replication status for the Volume.
- 56. Protection The Protection Tab offers three choices. 1. Volume Collections: This allows you to protect your Volumes with Snapshot schedules and replicate those snapshots off to a second Nimble Array. 2. Protection Templates: Predefined templates to help protect your critical applications. You can use these to as a baseline for creating your own custom Volume Collection Groups. Nimble was just nice enough to give us something to start with.
- 57. 3. Replication Partners: A place where you can view your configured replication partners, or define new ones. I don‘t have any configured but you would see them here, you can also setup Bandwidth Policies so you can replicate without having to worry about the bandwidth being affected during busy times within your environment. Array From here you can look at the status of your Hardware, and view all the system information related to your Array and Controllers. You can also edit the Array name, and Network Address information.
- 58. Performance Policies Here is where you can setup Policies to configure your Volumes with certain parameters. These Policies give you the option to create volume with certain Block size, and if you want to cache, or compress the volume. We all know we have certain workloads or datasets that we don‘t want to waste our precious cache on or they won‘t benefit from compression. Initiator Groups This allows us to create groups of initiators that we can then assign to volumes to allow a host access to the volume. Chap Accounts From here we can create a Chap Account, that we can then assign to Volumes we create to gives us some control over what we allow to connect to our Volume.
- 59. Monitor This is the place where you can see all the great performance you are getting out of your Nimble Performance You can view performance based off all Volumes, or a selected Volume. The time frame can also be for 5 Minutes, 24 Hours, 7 Days, or 30 Days. This will give you a very good picture of how your system is performing, it will also allow you to pin-point Volumes that are eating up the majority of your system.
- 60. Replication The place you will want to head to find out how your replication are performing, and if you have any issues with them.
- 61. Connections This section shows each Volume you have configured, and how many connections are connected to the Volume. From here you can make sure you have the proper amount of connections as you have configured from your host.
- 62. Events This Menu shows all the events related to your array, it keeps a log for 30 days, and you have the ability to filter the results based off of severity, Category, and Time. Administration As the name depicts this has everything to do with Administration. I will explain the Menu items below. This is the only Menu that once you select one item, the other items will be listed on the left hand side of the window. This gives you quicker access to the other items. Email Alerts Here you can configure the system to send you email alerts. You can also tell it to send alerts back to Nimble support, which will create a support ticket.
- 63. AutoSupport/HTTP Proxy AutoSupport enables the array to send health updates to Nimble Support, this lets them know what Software you are currently running, and if you have any configuration issues that may exist. This is a very nice feature, Nimble support will contact you regarding Software Updates, related to your system, they will know which version you are running and why you should be running the latest version. It gives you the personal touch when it comes to support. Also from this menu you can enable Secure Tunnel, this allows Nimble Support to directly connect to your array. This can be enabled or disabled at any time, you can leave it disabled until you need a support tech to connect.
- 64. Software This is where you can update the software for the Array. It will keep two versions of the software on the Array. When you want to check for a new version click Download, and it will connect to the Nimble Support site, and check for any software updates that are compatible with your Array. If your Array is not connected to the Internet on the management interface, you can go ahead and upload a software file to the array.
- 65. Change Password No need for a picture here, you can change your password. Default Space Reservations When you create a new Volume, these are the defaults settings that are displayed. Date/Timezone You can set the time, and timezone, you can set this manually or with a NTP.
- 66. Inactivity Timeout The amount of time before you session expires. The default is 30 Minutes. DNS Here you setup the DNS servers, you can have a min of 1 and a max of 5 SNMP Configured your SNMP to communicate with a network management system. Plugins This is new to 1.3.3.0 Software. Right now all it includes is the ability to add the Nimble Array to vCenter for management from the DataStore View. If you are running Software below 1.3.3.0 you need to do this with CLI. Later in this posting I will talk more about the vCenter Plugin and the CLI. While on the topic of 1.3.3.0 Software, another great feature that was enabled was the ability for the Array to support more than one drive failure, that is great news! If you are running a Nimble Array, upgrade your software as soon as possible.
- 67. Help We all love to look at the Help Menu, right? This one is pretty intuitive, and make‘s life a little easier. Nimble Support Takes you directly to the Nimble Support Site. About CS-Series Array Gives you the Normal About Screen
- 68. Administrator’s Guide I like this, no PDF to download, always up to date. Just click the menu item and look for the information you need. Hardware Guide Just like the Administrator‘s guide, just click and enjoy. Conclusion As you can see the Interface is very user friendly, but gives you all the information you need to Configure, Monitor, and troubleshoot your Array. In this post I had planned to talk more about configuring your array, updating the Software, and the CLI. But just the walk through of the UI took longer than expected. I plan in the next couple of weeks to post a few different blogs related to NimbleStorage.
- 69. O Snapshot: What Art Thou? By SachinChheda - Product Marketing On November 16, 2012 · Add Comment This is part one of a two-part blog on snapshots. In the storage world, snapshots are a point-in-time copy of data. They have been around for some time and are increasingly being used by IT to protect stored data. This post recalls some of the popular Nimble Storage blog posts on snapshots. But before I jump into the list of blogs, let me quickly walk you through the different types of storage-based snapshots, including their attributes. A snapshot copies the metadata (think index) of the data instead of copying the data itself. This means taking a snapshot is almost always instantaneous. This is one of the primary advantages of storage-based snapshots—they eliminate backup windows. In traditional backup deployments, applications either have to be taken off-line or suffer from degraded performance during backups (which is why traditional backups typically happen during off-peak hours). This means snapshot-based backups can be taken more frequently, improving recovery point objectives. However not all snapshot implementations are created equal, posing different requirements and restrictions on their use (example: reserve space required, how frequently snapshots can be taken, and number of snapshots that can be retained). In the ‗Copy-on-Write‘ (COW) implementation, the address map related metadata is copied whenever a snapshot is taken. None of the actual data is copied at that time—resulting in an instant snapshot. In almost all implementations this copy is taken to a ‘pre-designated’ space on storage (aka a snapshot reserve). When the data is modified through writes, the original data is copied over to the reserve area. The snapshot‘s metadata is then updated to point to the copied data. Because of this, ‗COW‘ implementation requires two writes and a read when any of the original data is modified for the first time after a snapshot is taken—causing a performance hit when the original data is updated. This gets progressively worse with frequent snapshots. Vendors such as EMC, IBM, and HP have used COW implementations on their traditional storage. The other major implementation of snapshots is ‗Redirect on Write‘ (ROW). Like COW, only the metadata is copied when a snapshot is taken. Unlike COW, whenever original data is being modified after a snapshot, the write is redirected to a new free location on disk. This means ROW snapshots do not suffer the performance impact of COW snapshots as none of the original data is copied. Nimble snapshots are based on the ROW implementation as the write-optimized data layout in the CASL architecture always redirects writes to new free space. A lightweight, background sweeping process in CASL ensures the continued availability of free space and assures consistent performance, addressing a shortcoming of some older ROW implementations. This efficiency allows IT to think of snapshot + replication in a new light—store weeks/months of history versus
- 70. mere days of backups with traditional, inefficient implementations. This allows virtually all of the operational recoveries to come from snapshots and dramatically improves RTOs. (Umesh‘s blog ‗A Comparison of File System Architectures‘ linked below covers this in detail.) Nimble Storage snapshots are stored (compressed) alongside the primary data on high-capacity disk drives. This allows 1000s of snapshots to be taken and retained on the same system as primary data. A measurement of our install base shows that over 50% of our customers retain their snapshots for over a month. First is the support of universal inline compression for storing data. This ensures data takes up less space on disk, which as discussed earlier makes replication more efficient and allows for more snapshots to be retained in a given storage space. On average, Nimble‘s install base measure compression rates ranging from 30% to 75% for a variety of workloads. Second is the support of cloning, which is fully functional read/writable copy of the original. Cloning is useful in the cases of VDI and test/development where many copies (clones) of a master data set are needed. In the ROW implementations, clones do not take up any additional space. Last but not least is the granularity of the snapshot. This determines how small a snapshot can be for a volume. This is relevant when the data volume being protected has a small rate of daily change. When the extent of a data write is smaller than the snapshot granularity, the snapshot wastes considerable space storing a duplicate copy of unchanged data. Snapshots in Nimble’s CASL architecture can be as granular as a single 4K block.
- 71. Before going onto the blogs, I wanted to share that Nimble Storage (@NimbleStorage) and CommVault (@CommVault) recently did a joint Twitter Chat on the Nimble Storage integrations through CommVaultIntelliSnap Connect Program. The chat featured experts from Nimble Storage (@wensteryu, @schoonycom& @scnmb… me) and CommVault (@gregorydwhite& @liemnguyen). Here is the edited transcript for your reading pleasure. Blogs: Leveraging Snapshots for Backup: An Expert View (http://www.nimblestorage.com/blog/technology/leveraging-snapshots-for-backup/): Radhika Krishnan interviews Jason Buffington (@JBuff) who is ESG’s Senior Analyst covering Data Protection. According to ESG’s research 55% of the IT shops are looking at snapshots augmenting their backups. Snapshots + Backup Management = the Best of Both Worlds (http://www.nimblestorage.com/blog/technology/snapshots-backup-management-thebest-of-both-worlds/): Another blog talking about need for integration between storage systems and their native snapshot capabilities and backup storage delivering rich data management functionality How Snappy and Skinny Are Your Snapshots? (http://www.nimblestorage.com/blog/technology/how-snappy-and-skinny-are-yoursnapshots/): UmeshMaheshwari (our CTO) talks about concept of COW versus ROW and discusses benefits of variable block support. A Comparison of File System Architectures (http://www.nimblestorage.com/blog/technology/a-comparison-of-filesystemarchitectures/): Another blog by Umesh. This one talks about the concept of keeping data optimized on disk–especially applicable if your want to know how should storage handle deleted snapshots. The comments at the bottom are worth reading.
- 72. Extended Snapshots and Replication As Backup (http://www.nimblestorage.com/blog/technology/2160/): Ajay Singh discusses using snapshots and replication for deploying Disaster Recovery. Can you have a backup system based solely on snapshots and replication? (http://www.backupcentral.com/mr-backup-blog-mainmenu-47/13-mr-backup-blog/299snapshots-replication-backups.html/): A W. Curtis Preston special calling it as he sees it. The Nightmare of Incremental Backup is Over (http://www.nimblestorage.com/blog/technology/the-nightmare-of-incremental-backupis-over/): Nicholas Schoonover discusses concepts of RPO and RTO with incremental backups. Better Than Dedupe: Unduped! (http://www.nimblestorage.com/blog/technology/better-thandedupe-unduped/): Umesh shows a mathematically comparison of total storage space between different types of storage making the case for optimizing your entire storage environment. Be sure to skim through the comments at the bottom. This is a part one in a two part series. In the second blog, we’ll cover the concept of data integrity, discuss application integration and review the different demos covering data protection and high availability. We would love to hear from you. Follow us on Twitter (@NimbleStorage), send us a tweet (#nimblestorage #hybridstorage) or leave a note below.
- 73. Targeting EMC and NetApp, Nimble Storage Flashing Towards an IPO Comment Now Follow Comments Image via CrunchBase Suresh Vasudevan is offering a very compelling proposition to companies trying to store and retrieve data. And that offer could make the investors in the venture of which he‘s CEO, Nimble Storage, even richer than they already are. In an August 10 interview, Vasudevan explained that Nimble sells storage that‘s a hybrid of traditional spinning disks and arrays of flash — the memory chips commonly used in digital cameras. Nimble‘s hybrid storage provides a good mix of high performance — rapid storage and retrieval – and lots of usable capacity. Nimble is going after a segment of the $20 billion network storage industry — and the figure excludes add-on software. Different competitors, such as EMC (EMC) and NetApp (NTAP) are the market leaders. Vasudevan says that Nimble‘s segment — including software – is worth $5 billion and it‘s growing at 15% annually. Nimble is winning a big piece of this market — getting ―600 customers in two years and 1,000 deployments.‖ Vasudevan told me that Nimble wins due to five customer benefits it provides over its competitors: More and faster storage for the buck. Two to five times more storage capacity and five to six times greater performance for the same amount of capital spending. More frequent backup. With a tiny increase in stored data, Nimble’s system lets customers back up their networks every 15 minutes — or as often as they wish — far more frequently than competing products. Quicker recovery. Nimble’s storage arrays let companies recover data in minutes compared to an hour for competitors’ products. Simplicity. While it can take four to eight hours to set up competitors’ products, Nimble customers are up and running in 20 to 30 minutes. Service. At five minute intervals, Nimble analyzes the health of its customers’ networks and if it identifies a current or potential problem — such as unusually high temperature in the data center — initiates a support call. Nimble spurs 75% of these calls to nip such problems in the bud.
- 74. Customers buy from Nimble in two predominant order sizes. About 70% are orders for about $50,000 and the balance range between $100,000 and $150,000, according to Vasudevan. Vasudevan came into Nimble as CEO after a decade at NetApp. He oversaw ―product strategy/direction that helped NetApp triple‖ between 2001 and 2004. In 2006, as the leader of its Decru subsidiary, revenues grew from $6 million to $45 million in a year. He then joined Omneon, as CEO and led it to a successful acquisition by Harmonic. In 2008, Vasudevan was thinking about the next generation of storage and how flash should be incorporated into the product. He was talking with companies working on that problem and met with Nimble — concluding that its approach would be his approach if he were starting a storage company from scratch. Shortly thereafter, he joined Nimble‘s board. The board ended up hiring Vasudevan as CEO, and he‘s happy to report that Nimble‘s founders, Varun Mehta and UmeshMaheshwari, remain as VP of product development and CTO, respectively. Meanwhile, Nimble has had some help from the venture capital community. It has raised $58 million in total — including $25 million in a Series D round in July 2011 from Sequoia Capital and Accel Partners, among others. When Vasudevan joined in January 2011, Nimble had 40 people — it now has 230. And its headcount is growing fast — he reports that Nimble added 43 people in the second quarter of 2012, alone. And Nimble is hiring sales and engineering people who are highly talented, fit with its culture, and have a record of taking risks. In the last couple of quarters, Nimble has been changing gradually the mix of its people. In particular, as its business model became more established, Nimble‘s risk level declined accordingly. Now Nimble is adding people who have experience growing a more established venture quickly. By the end of 2014, Vasudevan expects Nimble to be ready for an IPO. In his view, that means generating trailing revenues of $25 million to $35 million a quarter and sprinting on a path to achieve ―breakeven within one to two quarters.‖ Vasudevan does not expect Nimble to be acquired — at least not before its IPO. Vasudevan is not concerned about macroeconomic factors and believes that its market is big enough to achieve these goals. He is focusing on keeping Nimble on its three-fold year-over-year growth in the number of customers and revenue. In addition to boosting his sales and service staff, Vasudevan recently introduced a new set of capabilities that offer customers more reasons to buy from Nimble. Specifically, Nimble‘s newest product helps customers expand their storage capacity more flexibly than do competitors‘.
- 75. For example, if they need more storage, say, for massive databases, they can add ‖new expansion shelves;‖ if they need greater performance, they can add ―a new controller or more flash memory.‖ ―Competitors force customers to increase performance and capacity in tandem,‖ Vasudevan says, ―saddling them with a huge capital investment long before they need it.‖ Nimble appears to be outrunning its competitors and if it can keep adding customers while staying close to breakeven, its investors will become even richer.
- 76. “Gotcha” with VMware Site Recovery Manager Posted onOctober 10, 2012bywenjyu I have recently been playing a lot more with VMware‘s Site Recovery Manager (SRM) product – as the Nimble SRA EA is out to customers, we have gotten quite a few inquiries on WTF moments (in other words, ―gotchas‖)…so here they are, in order of installation, configuration, test failover & failover. Gotcha 1 During installation, you will get prompted for ―Local Host‖ – several folks had entered the ESX host IP address! DO NOTdo that or else you will NOT be able to download the SRM plugin for vCenter! Installation will proceed without any sort of warning that you shot yourself in the foot, so it‘s best to do it right during installation. Select ―localhost‖ or the IP that shows up and don‘t be a smart ass Gotcha 2 Post installation, with ―Inventory Mapping‖ workflow, you will get prompted to configure ―Placeholder‖ datastore for each site. This is the datastore that is needed to temporarily store the .vmx file, so a nice little ―shadow‖ VM could show up in the recovery site, to give you a peace of mind.
- 77. To make life easier, provision shared storage to the ESX cluster participating in DR test/recovery. Though you could use local datastore, but you‘d have to configure local datastore for each ESX host. Why make it so messy when you could just have it centralized, with a meaningful name. I find it easiest to name it as <placeholder_remotesite_name> because the placeholder datastore for the recovery site is used to hold the shadow VMs from the protected site. This is what my setup looks like‖ it‘s a thin provisioned volume, 1GB in size, with no snapshot/replication schedule (NOT needed), and named in a way that can easily be correlated. Gotcha 3 During Array Manager configuration, don‘t forget to enable the array pairs, after you have configured array manager for each site! If everything is greyed out during ―Protection Group‖ creation, then the most likely cause is the array pairs have not been enabled – so don‘t forget this important step! Oh one more thing, when you have a protection group created, you cannot disable the array pairs. Gotcha 4
- 78. During Protection Group creation, if you replicated volume does not show up in the list, be sure to ask yourself: 1)is the volume part of a volume collection? (in non-nimble terms, is it part of a consistency group of volumes configured with replication?) 2)is the volume collection configured with snapshot + replication schedule? 3)is the volume provisioned to ESX server cluster, with VMFS volume formatted? Gotcha 5 After new VMs get deployed to the replicated volume used for SRM DR test/recovery, don‘t forget to configure protection (as in walking through a quick wizard check on which folder, resource pool, network, datastore the VM will live, on the recovery site). It‘s basically read only info, as the global settings are set at the site level (in ―Resource Mapping‖ step Gotcha 6 Last but not least, if you use in-guest/direct attached storage for your VM (i.e., SQL server with OS disk on VMDK, DB & log disks on direct mounted iSCSI storage within the guest), then the workflow is NOT very ‗out-of-box‘ with SRM. Below are the high level checklist/steps you have to keep in mind (of course, this can certainly be automated to a script that can be invoked from the SRM server – stay tuned for that one ) For SRM Recovery Plan
- 79. Below is an example extra step that you could add, to the test and recovery steps. After the array SRA has promoted the replica volume to primary during DR, add a prompt in the recovery plan to ensure the volume ACL is updated with the initiator group for the respective in-guest sw/iscsi initiator: And here‘s the other extra step you could add, after the VM power on step by SRM, to configure the in-guest attached storage for each VM that has direct attached storage:
- 80. For array & in-guest initiator within guest efore test failover/failover: -ensure the direct attached volumes are on the same consistency group (in Nimble‘s terms, same volume collection) -ensure the initiator group on the array side is created with IQNs for the in-guest iSCSI initiators (this will come in handy during test recovery/recovery) During test failover/failover: -update in-guest initiator with remote site array discovery IP
- 82. -update direct attached volume ACL with the IQN group containing the IQN for the in-guest initiators -rescan/‘favorite‘ the newly discovered replicated storage
- 83. That‘s it for now – I will post more findings as I get to do full blown recovery, reprotect, failback scenarios. Stay tuned.