SlideShare a Scribd company logo
1 of 16
PHOTOGRAPH BY STEVE WINTER
http://proof.nationalgeographic.com/2013/11/14/a-cougar-ready-for-his-closeup/

Every Picture Tells a Story
There’s a story behind every picture:
A guide for using online pictures
It took over one year for Steve Winter to get this picture!

See http://www.youtube.com/watch?v=TdPB-iB8il4
Facts:

From
Microsoft
Clip Art

Many pictures on the Internet cost a
lot of money to capture
Photographers often travel to remote
places and risk their lives to take
pictures!
It’s simply the right thing to credit the
photographer and their organization
when using pictures for school
projects!

Image From Microsoft Clip Art (not necessary to credit)
Full Citation for Online Image
-MLA Style
Winter, Steve. 2013. Photograph. National Geographic. ProofNational Geographic. National Geographic Society, Nov. 2013.
Web. 3 Feb. 2014.
http://proof.nationalgeographic.com/2013/11/14/a-cougarready-for-his-closeup

This full citation is the best way, but it is generally ok to list the
photographer and the URL. See the example from the first slide
(also the next slide)
PHOTOGRAPH BY STEVE WINTER
http://proof.nationalgeographic.com/2013/11/14/a-cougar-ready-for-his-closeup/
Never use watermarked
photos in a presentation!
This is a
watermark
Do not use images that say
©All rights Reserved

Unless Website mentions ‘for noncommercial’ or ‘educational use.’
When asked ‘Where did you
get that picture?’
Do not say Google Images!
Only a Search tool!

Also an image library and
may be cited as source
These tools locate both Copyrighted
Images and those that are rightsfree or licensed for re-use

All Public Domain images
Search Tips-Demo for Google Images

For more info see:
http://googlesystem.blogspot.com/2014/01/quickly-find-creative-commons-images.html
Search Tips-Demo for Flickr
Search Tips-Demo for Flickr part 2
Other Considerations for Photo Selection
• File Type –NOT GIF or PDF
• For Large Print-Need Large size, greater
than 1mb or 1200px width
• For Large Screen-Greater than Medium
size, 250px width
• All these can be searched in Google and
Flickr
Final Points
• Always check Website containing photo for
more information about picture AND license!
• National Geographic is a sure bet for quality
photos that may be used in Education
• Anything in Wikipedia is public domain and
may be used
• Wikimedia Commons has huge list of public
domain collections
http://en.wikipedia.org/wiki/Wikipedia:Public_
domain_image_resources

More Related Content

Similar to Every picture

Fighting the Filter, NEKLS July 2011
Fighting the Filter, NEKLS July 2011Fighting the Filter, NEKLS July 2011
Fighting the Filter, NEKLS July 2011
Buffy Hamilton
 
Use of Images: Copyright and Copywrong
Use of Images: Copyright and CopywrongUse of Images: Copyright and Copywrong
Use of Images: Copyright and Copywrong
micdslibrary
 
Moving from Nice to Necessary: Academic Libraries and Communities Collaborat...
Moving from Nice to Necessary:  Academic Libraries and Communities Collaborat...Moving from Nice to Necessary:  Academic Libraries and Communities Collaborat...
Moving from Nice to Necessary: Academic Libraries and Communities Collaborat...
Buffy Hamilton
 
People, Partnerships, and Participatory Culture: Librarianship of the People...
People, Partnerships, and Participatory Culture:  Librarianship of the People...People, Partnerships, and Participatory Culture:  Librarianship of the People...
People, Partnerships, and Participatory Culture: Librarianship of the People...
Buffy Hamilton
 

Similar to Every picture (20)

Copyright friendly images hand out tesl ontario webinar
Copyright friendly images hand out tesl ontario webinarCopyright friendly images hand out tesl ontario webinar
Copyright friendly images hand out tesl ontario webinar
 
Seeing Is Believing: Using Visual Content in Social Media Marketing
Seeing Is Believing: Using Visual Content in Social Media MarketingSeeing Is Believing: Using Visual Content in Social Media Marketing
Seeing Is Believing: Using Visual Content in Social Media Marketing
 
Seeing Is Believing: Using Visual Content in Social Media Marketing
Seeing Is Believing: Using Visual Content in Social Media MarketingSeeing Is Believing: Using Visual Content in Social Media Marketing
Seeing Is Believing: Using Visual Content in Social Media Marketing
 
Fighting the Filter, NEKLS July 2011
Fighting the Filter, NEKLS July 2011Fighting the Filter, NEKLS July 2011
Fighting the Filter, NEKLS July 2011
 
Seeing Is Believing: Governor's Small Business Forum
Seeing Is Believing: Governor's Small Business ForumSeeing Is Believing: Governor's Small Business Forum
Seeing Is Believing: Governor's Small Business Forum
 
Seeing is Believing: Using Visual Content in Social Media Marketing
Seeing is Believing: Using Visual Content in Social Media MarketingSeeing is Believing: Using Visual Content in Social Media Marketing
Seeing is Believing: Using Visual Content in Social Media Marketing
 
Using copyright free images
Using copyright free imagesUsing copyright free images
Using copyright free images
 
Finding attributing and referencing online images
Finding attributing and referencing online images Finding attributing and referencing online images
Finding attributing and referencing online images
 
Education Wants To Be Free
Education Wants To Be FreeEducation Wants To Be Free
Education Wants To Be Free
 
Seeing Is Believing: Using Visual Content in Social Media Marketing
Seeing Is Believing: Using Visual Content in Social Media MarketingSeeing Is Believing: Using Visual Content in Social Media Marketing
Seeing Is Believing: Using Visual Content in Social Media Marketing
 
Teaching & Reaching the Millennial Learner: New Possibilities for the Informa...
Teaching & Reaching the Millennial Learner: New Possibilities for the Informa...Teaching & Reaching the Millennial Learner: New Possibilities for the Informa...
Teaching & Reaching the Millennial Learner: New Possibilities for the Informa...
 
Use of Images: Copyright and Copywrong
Use of Images: Copyright and CopywrongUse of Images: Copyright and Copywrong
Use of Images: Copyright and Copywrong
 
Visual Storytelling: The State of “Show Me” Social Sharing
Visual Storytelling: The State of “Show Me” Social SharingVisual Storytelling: The State of “Show Me” Social Sharing
Visual Storytelling: The State of “Show Me” Social Sharing
 
Moving from Nice to Necessary: Academic Libraries and Communities Collaborat...
Moving from Nice to Necessary:  Academic Libraries and Communities Collaborat...Moving from Nice to Necessary:  Academic Libraries and Communities Collaborat...
Moving from Nice to Necessary: Academic Libraries and Communities Collaborat...
 
Fighting the Filter: Delivering a Knockout Punch to Information Censorship
Fighting the Filter:  Delivering a Knockout Punch to Information CensorshipFighting the Filter:  Delivering a Knockout Punch to Information Censorship
Fighting the Filter: Delivering a Knockout Punch to Information Censorship
 
People, Partnerships, and Participatory Culture: Librarianship of the People...
People, Partnerships, and Participatory Culture:  Librarianship of the People...People, Partnerships, and Participatory Culture:  Librarianship of the People...
People, Partnerships, and Participatory Culture: Librarianship of the People...
 
Social Software For Business
Social Software For BusinessSocial Software For Business
Social Software For Business
 
Strategies for Fighting Internet Filtering
Strategies for Fighting Internet FilteringStrategies for Fighting Internet Filtering
Strategies for Fighting Internet Filtering
 
Social Media Marketing
Social Media Marketing Social Media Marketing
Social Media Marketing
 
Working and collaborating in an online world
Working and collaborating in an online worldWorking and collaborating in an online world
Working and collaborating in an online world
 

More from Highland Park High School

More from Highland Park High School (10)

Information literate: A Badge of Honor
Information literate: A Badge of HonorInformation literate: A Badge of Honor
Information literate: A Badge of Honor
 
Information Literacy in the Age of Twitter
Information Literacy in the Age of TwitterInformation Literacy in the Age of Twitter
Information Literacy in the Age of Twitter
 
Twitter in the classroom
Twitter in the classroomTwitter in the classroom
Twitter in the classroom
 
Retweet, not reteach!
Retweet, not reteach!Retweet, not reteach!
Retweet, not reteach!
 
Getting social
Getting socialGetting social
Getting social
 
A library media center for New Tech High School
A library media center for New Tech High SchoolA library media center for New Tech High School
A library media center for New Tech High School
 
It's your library@amsnths
It's your library@amsnthsIt's your library@amsnths
It's your library@amsnths
 
Running your high school library like a business
Running your high school library like a businessRunning your high school library like a business
Running your high school library like a business
 
Chess @ your library
Chess @  your libraryChess @  your library
Chess @ your library
 
Qr codes for librarians
Qr codes for librariansQr codes for librarians
Qr codes for librarians
 

Recently uploaded

1029-Danh muc Sach Giao Khoa khoi 6.pdf
1029-Danh muc Sach Giao Khoa khoi  6.pdf1029-Danh muc Sach Giao Khoa khoi  6.pdf
1029-Danh muc Sach Giao Khoa khoi 6.pdf
QucHHunhnh
 
Seal of Good Local Governance (SGLG) 2024Final.pptx
Seal of Good Local Governance (SGLG) 2024Final.pptxSeal of Good Local Governance (SGLG) 2024Final.pptx
Seal of Good Local Governance (SGLG) 2024Final.pptx
negromaestrong
 
Beyond the EU: DORA and NIS 2 Directive's Global Impact
Beyond the EU: DORA and NIS 2 Directive's Global ImpactBeyond the EU: DORA and NIS 2 Directive's Global Impact
Beyond the EU: DORA and NIS 2 Directive's Global Impact
PECB
 

Recently uploaded (20)

1029-Danh muc Sach Giao Khoa khoi 6.pdf
1029-Danh muc Sach Giao Khoa khoi  6.pdf1029-Danh muc Sach Giao Khoa khoi  6.pdf
1029-Danh muc Sach Giao Khoa khoi 6.pdf
 
Seal of Good Local Governance (SGLG) 2024Final.pptx
Seal of Good Local Governance (SGLG) 2024Final.pptxSeal of Good Local Governance (SGLG) 2024Final.pptx
Seal of Good Local Governance (SGLG) 2024Final.pptx
 
Measures of Central Tendency: Mean, Median and Mode
Measures of Central Tendency: Mean, Median and ModeMeasures of Central Tendency: Mean, Median and Mode
Measures of Central Tendency: Mean, Median and Mode
 
Key note speaker Neum_Admir Softic_ENG.pdf
Key note speaker Neum_Admir Softic_ENG.pdfKey note speaker Neum_Admir Softic_ENG.pdf
Key note speaker Neum_Admir Softic_ENG.pdf
 
Grant Readiness 101 TechSoup and Remy Consulting
Grant Readiness 101 TechSoup and Remy ConsultingGrant Readiness 101 TechSoup and Remy Consulting
Grant Readiness 101 TechSoup and Remy Consulting
 
Class 11th Physics NEET formula sheet pdf
Class 11th Physics NEET formula sheet pdfClass 11th Physics NEET formula sheet pdf
Class 11th Physics NEET formula sheet pdf
 
Food Chain and Food Web (Ecosystem) EVS, B. Pharmacy 1st Year, Sem-II
Food Chain and Food Web (Ecosystem) EVS, B. Pharmacy 1st Year, Sem-IIFood Chain and Food Web (Ecosystem) EVS, B. Pharmacy 1st Year, Sem-II
Food Chain and Food Web (Ecosystem) EVS, B. Pharmacy 1st Year, Sem-II
 
Introduction to Nonprofit Accounting: The Basics
Introduction to Nonprofit Accounting: The BasicsIntroduction to Nonprofit Accounting: The Basics
Introduction to Nonprofit Accounting: The Basics
 
Mehran University Newsletter Vol-X, Issue-I, 2024
Mehran University Newsletter Vol-X, Issue-I, 2024Mehran University Newsletter Vol-X, Issue-I, 2024
Mehran University Newsletter Vol-X, Issue-I, 2024
 
INDIA QUIZ 2024 RLAC DELHI UNIVERSITY.pptx
INDIA QUIZ 2024 RLAC DELHI UNIVERSITY.pptxINDIA QUIZ 2024 RLAC DELHI UNIVERSITY.pptx
INDIA QUIZ 2024 RLAC DELHI UNIVERSITY.pptx
 
Presentation by Andreas Schleicher Tackling the School Absenteeism Crisis 30 ...
Presentation by Andreas Schleicher Tackling the School Absenteeism Crisis 30 ...Presentation by Andreas Schleicher Tackling the School Absenteeism Crisis 30 ...
Presentation by Andreas Schleicher Tackling the School Absenteeism Crisis 30 ...
 
psychiatric nursing HISTORY COLLECTION .docx
psychiatric  nursing HISTORY  COLLECTION  .docxpsychiatric  nursing HISTORY  COLLECTION  .docx
psychiatric nursing HISTORY COLLECTION .docx
 
Unit-V; Pricing (Pharma Marketing Management).pptx
Unit-V; Pricing (Pharma Marketing Management).pptxUnit-V; Pricing (Pharma Marketing Management).pptx
Unit-V; Pricing (Pharma Marketing Management).pptx
 
ComPTIA Overview | Comptia Security+ Book SY0-701
ComPTIA Overview | Comptia Security+ Book SY0-701ComPTIA Overview | Comptia Security+ Book SY0-701
ComPTIA Overview | Comptia Security+ Book SY0-701
 
Ecological Succession. ( ECOSYSTEM, B. Pharmacy, 1st Year, Sem-II, Environmen...
Ecological Succession. ( ECOSYSTEM, B. Pharmacy, 1st Year, Sem-II, Environmen...Ecological Succession. ( ECOSYSTEM, B. Pharmacy, 1st Year, Sem-II, Environmen...
Ecological Succession. ( ECOSYSTEM, B. Pharmacy, 1st Year, Sem-II, Environmen...
 
Sociology 101 Demonstration of Learning Exhibit
Sociology 101 Demonstration of Learning ExhibitSociology 101 Demonstration of Learning Exhibit
Sociology 101 Demonstration of Learning Exhibit
 
Nutritional Needs Presentation - HLTH 104
Nutritional Needs Presentation - HLTH 104Nutritional Needs Presentation - HLTH 104
Nutritional Needs Presentation - HLTH 104
 
ICT Role in 21st Century Education & its Challenges.pptx
ICT Role in 21st Century Education & its Challenges.pptxICT Role in 21st Century Education & its Challenges.pptx
ICT Role in 21st Century Education & its Challenges.pptx
 
Beyond the EU: DORA and NIS 2 Directive's Global Impact
Beyond the EU: DORA and NIS 2 Directive's Global ImpactBeyond the EU: DORA and NIS 2 Directive's Global Impact
Beyond the EU: DORA and NIS 2 Directive's Global Impact
 
microwave assisted reaction. General introduction
microwave assisted reaction. General introductionmicrowave assisted reaction. General introduction
microwave assisted reaction. General introduction
 

Every picture

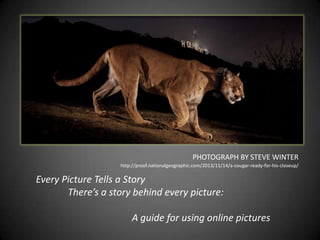
  • 1. PHOTOGRAPH BY STEVE WINTER http://proof.nationalgeographic.com/2013/11/14/a-cougar-ready-for-his-closeup/ Every Picture Tells a Story There’s a story behind every picture: A guide for using online pictures
  • 2. It took over one year for Steve Winter to get this picture! See http://www.youtube.com/watch?v=TdPB-iB8il4
  • 3. Facts: From Microsoft Clip Art Many pictures on the Internet cost a lot of money to capture Photographers often travel to remote places and risk their lives to take pictures!
  • 4. It’s simply the right thing to credit the photographer and their organization when using pictures for school projects! Image From Microsoft Clip Art (not necessary to credit)
  • 5. Full Citation for Online Image -MLA Style Winter, Steve. 2013. Photograph. National Geographic. ProofNational Geographic. National Geographic Society, Nov. 2013. Web. 3 Feb. 2014. http://proof.nationalgeographic.com/2013/11/14/a-cougarready-for-his-closeup This full citation is the best way, but it is generally ok to list the photographer and the URL. See the example from the first slide (also the next slide)
  • 6. PHOTOGRAPH BY STEVE WINTER http://proof.nationalgeographic.com/2013/11/14/a-cougar-ready-for-his-closeup/
  • 7. Never use watermarked photos in a presentation! This is a watermark
  • 8. Do not use images that say ©All rights Reserved Unless Website mentions ‘for noncommercial’ or ‘educational use.’
  • 9. When asked ‘Where did you get that picture?’ Do not say Google Images!
  • 10. Only a Search tool! Also an image library and may be cited as source
  • 11. These tools locate both Copyrighted Images and those that are rightsfree or licensed for re-use All Public Domain images
  • 12. Search Tips-Demo for Google Images For more info see: http://googlesystem.blogspot.com/2014/01/quickly-find-creative-commons-images.html
  • 14. Search Tips-Demo for Flickr part 2
  • 15. Other Considerations for Photo Selection • File Type –NOT GIF or PDF • For Large Print-Need Large size, greater than 1mb or 1200px width • For Large Screen-Greater than Medium size, 250px width • All these can be searched in Google and Flickr
  • 16. Final Points • Always check Website containing photo for more information about picture AND license! • National Geographic is a sure bet for quality photos that may be used in Education • Anything in Wikipedia is public domain and may be used • Wikimedia Commons has huge list of public domain collections http://en.wikipedia.org/wiki/Wikipedia:Public_ domain_image_resources

Editor's Notes

  1. Wipe transitions with pictures and captions(Basic)To reproduce the picture effects on this slide, do the following:On the Home tab, in the Slides group, click Layout, and then click Blank.On the Insert tab, in the Images group, click Picture. In the Insert Picture dialog box, select a picture and then click Insert.Select the picture. Under PictureTools, on the Format tab, in the Size group, click the Size and Position dialog box launcher. In the Format Picture dialog box, resize or crop the image so that the height is set to 4” and the widthis set to 10”. To crop the picture, click Crop in the left pane, and in the right pane, under Crop position, enter values into the Height, Width, Left, and Top boxes. To resize the picture, click Size in the left pane, and in the right pane, under Size and rotate, enter values into the Height and Width boxes.Also in the Format Picture dialog box, click Shadow in the left pane, in the Shadow pane, click the button next to Presets, and then under Inner click Inside Top.Also in the Format Picture dialog box, click Glow and Soft Edges in the left pane, in the Glow and Soft Edges pane, under Glow, do the following:Click the button next to Color, click More Colors, and then in the Colors dialog box, on the Custom tab, enter values for Red: 157, Green: 177, and Blue: 91.In the Size box, enter 8 pt.In the Transparency box, enter 60%.To reproduce the text effects on this slide, do the following:On the Insert tab, in the Text group, click TextBox, and then on the slide drag to draw your text box.Enter text in the text box, and then select the text. On the Home tab, in the Font group, do the following:In the Font list, select Calibri.In the Font Size list, select 24 pt. Click the Font Color, and then under ThemeColors click White, Background 1 (first row).Click Italic.Position the text box below the picture.To reproduce the transition effects on this slide, do the following:On the Transitions tab, in the Transition to This Slide group, click More, and then click Wipe.Also on the Transitions tab, in the Transition to This Slide, click Effect Options, and then click From Right.Also on the Transitions tab, in the Timing group, do the following:In the Duration box, enter 2.00 seconds.Clear the On Mouse Click box.Select After, and then in the After box enter 3.00 seconds.To reproduce the second, third, and fourth slides, do the following:In the Slides pane, select the slide. On the Home tab, in the Slides group, click the arrow below New Slide, and then click Duplicate Selected Slides. Repeat this process until there are three slides.On the slide, select the picture. Under Picture Tools, on the Format tab, in the Adjust group, click ChangePicture. In the Insert Picture dialog box, select a picture and then click Insert.In the Slides pane, select the third slide. On the slide, select the picture. Under Picture Tools, on the Format tab, in the Adjust group, click ChangePicture. In the Insert Picture dialog box, select a picture and then click Insert.To reproduce the background on this slide, do the following:On the Design tab, in the Background group, click Background Styles, and then click Style 12 (third row).(Note: Selecting this background changes the colors on the slide.)
  2. Wipe transitions with pictures and captions(Basic)To reproduce the picture effects on this slide, do the following:On the Home tab, in the Slides group, click Layout, and then click Blank.On the Insert tab, in the Images group, click Picture. In the Insert Picture dialog box, select a picture and then click Insert.Select the picture. Under PictureTools, on the Format tab, in the Size group, click the Size and Position dialog box launcher. In the Format Picture dialog box, resize or crop the image so that the height is set to 4” and the widthis set to 10”. To crop the picture, click Crop in the left pane, and in the right pane, under Crop position, enter values into the Height, Width, Left, and Top boxes. To resize the picture, click Size in the left pane, and in the right pane, under Size and rotate, enter values into the Height and Width boxes.Also in the Format Picture dialog box, click Shadow in the left pane, in the Shadow pane, click the button next to Presets, and then under Inner click Inside Top.Also in the Format Picture dialog box, click Glow and Soft Edges in the left pane, in the Glow and Soft Edges pane, under Glow, do the following:Click the button next to Color, click More Colors, and then in the Colors dialog box, on the Custom tab, enter values for Red: 157, Green: 177, and Blue: 91.In the Size box, enter 8 pt.In the Transparency box, enter 60%.To reproduce the text effects on this slide, do the following:On the Insert tab, in the Text group, click TextBox, and then on the slide drag to draw your text box.Enter text in the text box, and then select the text. On the Home tab, in the Font group, do the following:In the Font list, select Calibri.In the Font Size list, select 24 pt. Click the Font Color, and then under ThemeColors click White, Background 1 (first row).Click Italic.Position the text box below the picture.To reproduce the transition effects on this slide, do the following:On the Transitions tab, in the Transition to This Slide group, click More, and then click Wipe.Also on the Transitions tab, in the Transition to This Slide, click Effect Options, and then click From Right.Also on the Transitions tab, in the Timing group, do the following:In the Duration box, enter 2.00 seconds.Clear the On Mouse Click box.Select After, and then in the After box enter 3.00 seconds.To reproduce the second, third, and fourth slides, do the following:In the Slides pane, select the slide. On the Home tab, in the Slides group, click the arrow below New Slide, and then click Duplicate Selected Slides. Repeat this process until there are three slides.On the slide, select the picture. Under Picture Tools, on the Format tab, in the Adjust group, click ChangePicture. In the Insert Picture dialog box, select a picture and then click Insert.In the Slides pane, select the third slide. On the slide, select the picture. Under Picture Tools, on the Format tab, in the Adjust group, click ChangePicture. In the Insert Picture dialog box, select a picture and then click Insert.To reproduce the background on this slide, do the following:On the Design tab, in the Background group, click Background Styles, and then click Style 12 (third row).(Note: Selecting this background changes the colors on the slide.)
  3. Wipe transitions with pictures and captions(Basic)To reproduce the picture effects on this slide, do the following:On the Home tab, in the Slides group, click Layout, and then click Blank.On the Insert tab, in the Images group, click Picture. In the Insert Picture dialog box, select a picture and then click Insert.Select the picture. Under PictureTools, on the Format tab, in the Size group, click the Size and Position dialog box launcher. In the Format Picture dialog box, resize or crop the image so that the height is set to 4” and the widthis set to 10”. To crop the picture, click Crop in the left pane, and in the right pane, under Crop position, enter values into the Height, Width, Left, and Top boxes. To resize the picture, click Size in the left pane, and in the right pane, under Size and rotate, enter values into the Height and Width boxes.Also in the Format Picture dialog box, click Shadow in the left pane, in the Shadow pane, click the button next to Presets, and then under Inner click Inside Top.Also in the Format Picture dialog box, click Glow and Soft Edges in the left pane, in the Glow and Soft Edges pane, under Glow, do the following:Click the button next to Color, click More Colors, and then in the Colors dialog box, on the Custom tab, enter values for Red: 157, Green: 177, and Blue: 91.In the Size box, enter 8 pt.In the Transparency box, enter 60%.To reproduce the text effects on this slide, do the following:On the Insert tab, in the Text group, click TextBox, and then on the slide drag to draw your text box.Enter text in the text box, and then select the text. On the Home tab, in the Font group, do the following:In the Font list, select Calibri.In the Font Size list, select 24 pt. Click the Font Color, and then under ThemeColors click White, Background 1 (first row).Click Italic.Position the text box below the picture.To reproduce the transition effects on this slide, do the following:On the Transitions tab, in the Transition to This Slide group, click More, and then click Wipe.Also on the Transitions tab, in the Transition to This Slide, click Effect Options, and then click From Right.Also on the Transitions tab, in the Timing group, do the following:In the Duration box, enter 2.00 seconds.Clear the On Mouse Click box.Select After, and then in the After box enter 3.00 seconds.To reproduce the second, third, and fourth slides, do the following:In the Slides pane, select the slide. On the Home tab, in the Slides group, click the arrow below New Slide, and then click Duplicate Selected Slides. Repeat this process until there are three slides.On the slide, select the picture. Under Picture Tools, on the Format tab, in the Adjust group, click ChangePicture. In the Insert Picture dialog box, select a picture and then click Insert.In the Slides pane, select the third slide. On the slide, select the picture. Under Picture Tools, on the Format tab, in the Adjust group, click ChangePicture. In the Insert Picture dialog box, select a picture and then click Insert.To reproduce the background on this slide, do the following:On the Design tab, in the Background group, click Background Styles, and then click Style 12 (third row).(Note: Selecting this background changes the colors on the slide.)
  4. Wipe transitions with pictures and captions(Basic)To reproduce the picture effects on this slide, do the following:On the Home tab, in the Slides group, click Layout, and then click Blank.On the Insert tab, in the Images group, click Picture. In the Insert Picture dialog box, select a picture and then click Insert.Select the picture. Under PictureTools, on the Format tab, in the Size group, click the Size and Position dialog box launcher. In the Format Picture dialog box, resize or crop the image so that the height is set to 4” and the widthis set to 10”. To crop the picture, click Crop in the left pane, and in the right pane, under Crop position, enter values into the Height, Width, Left, and Top boxes. To resize the picture, click Size in the left pane, and in the right pane, under Size and rotate, enter values into the Height and Width boxes.Also in the Format Picture dialog box, click Shadow in the left pane, in the Shadow pane, click the button next to Presets, and then under Inner click Inside Top.Also in the Format Picture dialog box, click Glow and Soft Edges in the left pane, in the Glow and Soft Edges pane, under Glow, do the following:Click the button next to Color, click More Colors, and then in the Colors dialog box, on the Custom tab, enter values for Red: 157, Green: 177, and Blue: 91.In the Size box, enter 8 pt.In the Transparency box, enter 60%.To reproduce the text effects on this slide, do the following:On the Insert tab, in the Text group, click TextBox, and then on the slide drag to draw your text box.Enter text in the text box, and then select the text. On the Home tab, in the Font group, do the following:In the Font list, select Calibri.In the Font Size list, select 24 pt. Click the Font Color, and then under ThemeColors click White, Background 1 (first row).Click Italic.Position the text box below the picture.To reproduce the transition effects on this slide, do the following:On the Transitions tab, in the Transition to This Slide group, click More, and then click Wipe.Also on the Transitions tab, in the Transition to This Slide, click Effect Options, and then click From Right.Also on the Transitions tab, in the Timing group, do the following:In the Duration box, enter 2.00 seconds.Clear the On Mouse Click box.Select After, and then in the After box enter 3.00 seconds.To reproduce the second, third, and fourth slides, do the following:In the Slides pane, select the slide. On the Home tab, in the Slides group, click the arrow below New Slide, and then click Duplicate Selected Slides. Repeat this process until there are three slides.On the slide, select the picture. Under Picture Tools, on the Format tab, in the Adjust group, click ChangePicture. In the Insert Picture dialog box, select a picture and then click Insert.In the Slides pane, select the third slide. On the slide, select the picture. Under Picture Tools, on the Format tab, in the Adjust group, click ChangePicture. In the Insert Picture dialog box, select a picture and then click Insert.To reproduce the background on this slide, do the following:On the Design tab, in the Background group, click Background Styles, and then click Style 12 (third row).(Note: Selecting this background changes the colors on the slide.)