Weitere ähnliche Inhalte
Ähnlich wie Photoshop_BlendingPhotos (20)
Mehr von tutorialsruby (20)
Kürzlich hochgeladen (20)
Photoshop_BlendingPhotos
- 1. Blending Photos Using Layer Masks and the Gradient Tool
by LaWanna Desjardin
www.desjardindigitaldesigns.com
In this tutorial, we'll be blending a photo into a background using two tools in Photoshop, the layer
mask and the gradient tool. You'll also use brushes. (Note: This tutorial was written for Photoshop CS3.
However, you can get layer mask tools free from Grant's Tools that will work at least through version 5.
There are a lot of other very useful tools in Grant's Tools like alignment tools. You might also like
Hidden Power Tools Free Download.)
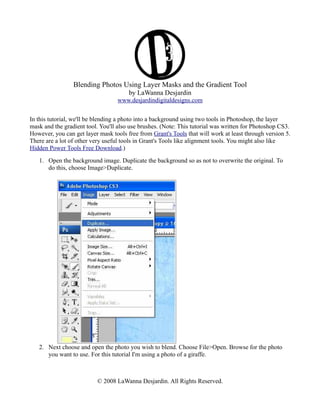
1. Open the background image. Duplicate the background so as not to overwrite the original. To
do this, choose Image>Duplicate.
2. Next choose and open the photo you wish to blend. Choose File>Open. Browse for the photo
you want to use. For this tutorial I'm using a photo of a giraffe.
© 2008 LaWanna Desjardin. All Rights Reserved.
- 2. 3. Now you will need to add the photo to the background image. If your windows are maximized,
you need to minimize them, so that you can see them both in the workspace like this:
Choose Windows>Arrange>Tile Vertically. Tile Horizontally or Cascade will also allow you to see
both windows at once.
4. Select the photo image, in my case the giraffe photo. Choose the move tool from the tool box.
Click the photo image and hold the mouse button. Drag it onto the background image.
© 2008 LaWanna Desjardin. All Rights Reserved.
- 3. 5. You photo and background should now be on the same canvas.
6. Select the photo from the layers palette. You will now add a layer mask to this layer. From
the tool bar select Layer>Layer Mask>Reveal All. In the layer palette, the layer mask will
appear next to the photo.
7. Now you will add a gradient to the photo's layer mask Because a layer mask reacts only to
shades of gray, we'll use black and white in varying opacities to blend the photo. You'll see this
demonstrated as we work.
Select the gradient tool. In Photoshop, the gradient is
contained with the paint bucket tool. Click and hold the
paint bucket until the fly out appears. Then choose the
gradient tool.
© 2008 LaWanna Desjardin. All Rights Reserved.
- 4. 9. Set your foreground and background color to
black and white. You can do this by clicking the
icon to the bottom left of the color chooser. (See
Image at the Right). This will set the default
colors of black and white. Black should be the
foreground color, the one on top. >>>>>
If you need to reverse the foreground and the
background color. Click the double-headed
arrow at the top right of the color picker.
10. Now you need to look at the gradient tool's option bar. You will find this at the top of the
workspace just under the tool bar. Here you will set the options regarding the gradient.
a. Select the gradient chooser at the arrow.
This will open the fly out menu and allow
you to select a gradient preset. Select one of
the gradients indicated (see image at right).
This is the black to white gradient or the
black to transparent gradient.
© 2008 LaWanna Desjardin. All Rights Reserved.
- 5. b. Then select the type of gradient. This option is to the right of the gradient chooser. Pick the
second option. Also set the reverse option. The options bar should now look like this. I've
marked the options discussed in red, but the other options should also be the same.
11. Now you will use this gradient
on the layer mask. In the layers
palette, make sure the mask is
selected. Do this by clicking
the mask with the mouse as in
the image on the right.>>>>>>
12.On the canvas,
hover the mouse over
the photo. The cursor
will look like a small
plus sign. Click and
drag outward toward
the photos outer edge.
© 2008 LaWanna Desjardin. All Rights Reserved.
- 6. 13. If done correctly you will see part of the image disappear. Now, the image and layer palette should
look like this. Note the look of the layer mask in the palette.
As you can see, the edges of the photo are still a little too defined on the canvas. Now we will soften
those edges and bring back some of the photo that are a little too transparent. Before you begin, make
sure the layer mask is chosen, by clicking on the mask thumbnail.
14. Select the brush tool from the tool box. In addition, make sure the
foreground color is set to black.
© 2008 LaWanna Desjardin. All Rights Reserved.
- 7. 15. Now note the brush's options bar, again beneath the tool bar. This is where you'll choose
the brush and the opacity of the brush.
16. In the brush picker, click the arrow to
reveal brushes. At the right of this menu,
there is another arrow which reveal
another fly-out menu. From this menu,
select Reset Brushes. This will reset the
brushes to the default set.
Now Select the brush, Airbrush Soft
Round 300.
In the options bar, choose an opacity of
40-60%.
© 2008 LaWanna Desjardin. All Rights Reserved.
- 8. 17. Check again to be sure the layer mask is selected in the palette. Now on the canvas, paint along the
still-visible borders of the photo. You will gradually see this border disappear. Below, compare the
before and after versions of the blended photo.
© 2008 LaWanna Desjardin. All Rights Reserved.
- 9. 18. Continue to “erase” the edges of the photo by painting in black on the layer mask. Don't
worry if you “erase” too much. The beauty of layer masks is that you can simply bring back
what you've erased. I'll show you how in a moment. Here is what I have so far:
As you can see the edges are blended nicely, but there are parts I would like to bring back,
reduce the opacity, such as the face of the giraffe.
How do we bring it back? We will paint on the layer mask again, but this time, we are going to
paint with white instead of black.
© 2008 LaWanna Desjardin. All Rights Reserved.
- 10. 19. This time we will want to change the foreground
color to white. In the color picker (in the tool
box) click the double headed arrow to reverse
the colors.
20. Select the brush tool again from the tool box. I
am using the same brush (Airbrush Soft Round
300), but you can select another brush from the
brush drop-down in the options box. I have left
the opacity of the brush the same.
© 2008 LaWanna Desjardin. All Rights Reserved.
- 11. 21. Now brush along the areas you want to bring back. This will increase the opacity of those areas
so they will be more visible.
Here is a comparison of the photo before I painted back in the photo and then after I increased
the opacity. The result is noticeable but subtle.
© 2008 LaWanna Desjardin. All Rights Reserved.
- 12. Here is the finished result. Note the look of the layer mask in the palette. You can see where you have
painted in black and white with the gradient and the brush.
© 2008 LaWanna Desjardin. All Rights Reserved.
- 13. If you want to you can temporarily deactivate the layer mask by clicking the layer mask while holding
the shift key, or by selecting Layer>Layer Mask>Disable. In the palette, the layer mask will be X-ed
out and the photo on the canvas will return to it's original state. To enable the layer mask, choose
Layer>Layer Mask>Enable. This is a good way to get a good before and after of the blended photo.
You can use this same technique for a variety of effects such as colorizing part of the photo or blurring
the background. Here are a couple of examples. Take note of the layers palettes for more details.
© 2008 LaWanna Desjardin. All Rights Reserved.
- 14. In this one, I placed a photo of a weathered wooden beneath the photo in the palette. I also duplicated
the photo to slightly increase it's opacity.
In this one, I've duplicated the photo and deleted the mask on the duplicate. (To delete a layer mask,
right click it and choose delete layer mask.) Then on the duplicate photo ( the bottom one) I applied a
radial blur.
© 2008 LaWanna Desjardin. All Rights Reserved.