
Empfohlen
Weitere ähnliche Inhalte
Was ist angesagt?
Was ist angesagt? (19)
Andere mochten auch
Ähnlich wie Create and populate MySQL DB using phpMyAdmin
Ähnlich wie Create and populate MySQL DB using phpMyAdmin (20)
Mehr von tutorialsruby
Mehr von tutorialsruby (20)
Kürzlich hochgeladen
Kürzlich hochgeladen (20)
Create and populate MySQL DB using phpMyAdmin
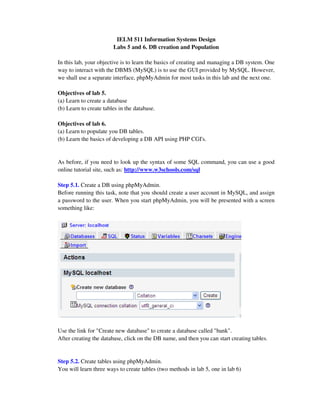
- 1. IELM 511 Information Systems Design Labs 5 and 6. DB creation and Population In this lab, your objective is to learn the basics of creating and managing a DB system. One way to interact with the DBMS (MySQL) is to use the GUI provided by MySQL. However, we shall use a separate interface, phpMyAdmin for most tasks in this lab and the next one. Objectives of lab 5. (a) Learn to create a database (b) Learn to create tables in the database. Objectives of lab 6. (a) Learn to populate you DB tables. (b) Learn the basics of developing a DB API using PHP CGI's. As before, if you need to look up the syntax of some SQL command, you can use a good online tutorial site, such as: http://www.w3schools.com/sql Step 5.1. Create a DB using phpMyAdmin. Before running this task, note that you should create a user account in MySQL, and assign a password to the user. When you start phpMyAdmin, you will be presented with a screen something like: Use the link for "Create new database" to create a database called "bank". After creating the database, click on the DB name, and then you can start creating tables. Step 5.2. Create tables using phpMyAdmin. You will learn three ways to create tables (two methods in lab 5, one in lab 6)
- 2. 1. Using the GUI of phpMyAdmin program. 2. Using a SQL “CREATE TABLE …” command issued from phpMyAdmin GUI. 3. Using a CGI program to connect to your MySQL DB, and sending the command from your CGI program Before you create any table(s), please do your planning: - Names of all the tables. - All the attributes for each table - The domain constraint(s) for each attribute - The primary key for each table - The referential constraints (Foreign keys) Conventions: Try to use a consistent convention for all names that you will assign. For example: All table names: First letter capitalized with no underscores: e.g. Loan. All attribute names: lower case with underscores: name, ssn, start_date. All constraint names: lower case, underscored; for example, a foreign key constraints from in table Loan fk_loan_c1, etc. 1. How to use phpMyAdmin to create your own table? 1. Login in to phpMyAdmin, click on the database name on the left-hand-side 2. Enter the table name and number of fields, then click 'Go'.
- 3. 3. For each attribute (field), enter the name and specify the type, length, set the primary key, etc.; Click on “Save” to create the table. Conventions: I suggest use only three data types: VARCHAR, DOUBLE and DATE. Task: Use this method to create the 'Branch' table from your lecture notes. 2. How to use SQL command to create tables using phpMyAdmin 1. Click on the SQL tab (blue color) from any page of phpMyAdmin 2. Type your SQL command in a TXT file. Load the TXT file as below, and click 'Go'. bank localhost bank (-) Type your SQL “create table ..” command in a TXT file. Use this interface to load the query in this box Task: Use this method to create all the tables of the 'bank' database from the lecture notes. Step 6.1. Populate the tables using phpMyAdmin. There are several ways to insert rows of data into a table: 1. Using the GUI provided by phpMyAdmin: - select the table - click on the "Insert" button, and - enter the data.
- 4. b_name char(30) city char(60) assets double enter values here 2. The preferred way for this lab: Use the "insert into …" command of SQL, and type all the store data commands into a TXT file3. Then load the file into the SQL interface and run it. 3. It may be possible to import the data from some previously exported DB file (or even from text or Excel files – however, you should not use that method for this lab. Task: Use this method to populate all the tables you have created. For the tables in the lecture notes, please use the same data as given (this will be later useful to test your homework solutions!). For other tables, please use data consistent with the notes and the design. Step 6.2. Learn the basics of developing a DB API using PHP CGI's. In this lab, we will first learn the simplest method for a PHP program to connect to the MySQL database. For now, you can use a modified version of the following PHP script, and execute it directly from the phpDesigner (or compile it and run it from your local host. NOTE: modify the portions that are in bold black. <?php $hostname = 'localhost'; $username = 'root'; $password = "password"; $link = mysql_connect( $hostname, $username, $password ) or die("Could not connect : " . mysql_error()); echo "Connected successfully!"; $mydb = "dbname";
- 5. $db = mysql_select_db( $mydb ) or die("Could not select database"); echo "Database " . $mydb . " selected."; // Note: values that are of type char( ) must be quoted; numbers are not in quotes. $query = "insert into mytable values( 'v1', 'v2', v3)"; $result = mysql_query($query) or die("Query failed: " . mysql_error()); /* $result is a special data structure; the function mysql_fetch_assoc is used to convert the returned table into a PHP associative array. */ while ($row = mysql_fetch_assoc($result)) { echo $row['column_name_1']; echo $row['column_name_2']; echo $row['column_name_3']; } mysql_close($link); ?> References: 1. HTML quick reference file. 2. PHP tutorials and function references: (from www.php.net) 3. PHP tutorial site: http://www.w3pop.com/learn/view/p/3/o/0/doc/php_ref_string/ 4. Another PHP tutorial/reference: http://www.w3schools.com/PHP/php_ref_array.asp 5. MySQL tutorial/reference: http://www.w3schools.com/sql Lab materials for IELM 511 prepared by WEI Xiangzhi, Dept of IELM, HKUST.