4. Table of Contents
Introduction i
Chapter 1. Photographic Challenges. 1
Chapter 2. Extending DOF. 5
Chapter 3. Conclusion. 13
Table of Contents i
5.
6. Introduction
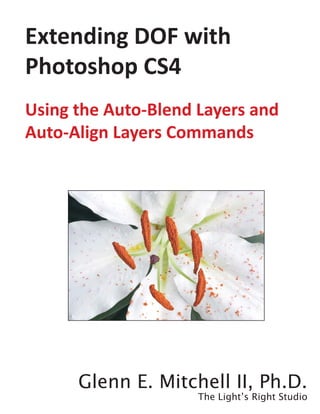
Flowers like this are a challenge for photographers. Close working distance,
even the f/32 aperture of a macro lens cannot extend deep enough. This is the
result of stacking four separate shots of the same flower in Adobe® Photoshop®
CS4®.
Experienced macro and botanical photographers fight a continuous battle for Depth of Field (DOF). When you
work close to a photographic subject, DOF can sometimes extend only a fraction of an inch. A flower with long
stamens, like the Atamasco lily above, can be a real challenge. In fact, the photograph shown here is not possible
with a single photographic exposure. To make the black tip of the pistil and all of the powdery stamens sharp
would have been tricky enough. To look down inside the flower and see the petals sharp and even see definable
details along the green leaves, DOF for a 35mm DSLR just doesn’t extend that far.
iii
Introduction
7. The example at the top is one of the stacked shots. The pistil and pollen grains
are sharp. As noted, the powdery stamens are not completely in focus. This
was shot at f/32 for maximum DOF. The example underneath is the stacked
photo again. The difference in DOF is obvious, even at the reduced magnifica-
tion for this tutorial.
iv Preface
8. I’m going to avoid the math, but the maximum DOF for this shot was approximately a little over 1 1/2 inches
(5 cm). However, approximately one-half of that (three-quarter inch) would extend in front of the pistil and
pollen grains. The math comes from using a Canon 1Ds MkII, a Canon 180mm “L” macro lens at f/32, and
approximately 3 feet (1 meter) distant from the front surface of the pistil of the flower. The Canon 1Ds MkII is a
full frame 35mm camera.
The pistil and stamens extended about 2 to 2 1/2 inches in front of the flower petals. To extend the focus from the
pistil back to the petals would require at least 3 to 4x the DOF available from a 35mm camera and macro lens at
minimum aperture.
With a lens of any less optical quality than the Canon 180mm “L” macro lens, an aperture of f/32 would make me
extremely nervous. First, only a specialized macro lens can typically reach f/32. Such a tiny aperture is associated
with diffraction, which would add softness. Fortunately, the Canon 180mm “L” lens is tack sharp uniformly
across its Field of View (FOV) and diffraction is not a significant issue even at f/32. Substitute a Canon 100mm
EF macro lens and you would likely want to stick with f/16, maybe f/22. You would need more stacked images or
you would have to move back further.
Photoshop CS4 to the Rescue! Maybe.
Photoshop CS4 has improved two features which, when combined, can extend DOF. The Auto-Align Layers
command is used to superimpose stacked photos that are loaded as layers. The Auto-Blend Layers command is
then used to blend features of a photograph from different points of focus.
Extending DOF with the Auto-Blend Layers command is a popular improvement to Photoshop CS4. Unfortu-
nately, most of the tutorials and videos I’ve seen so far have not offered a lot of practical advice with the technique.
They leave the reader/viewer with the impression that the technique is easy and fool-proof. The steps are easy to
enumerate, but the practical application can be tricky, and it is far from fool-proof.
Preface v
10. Photographic
Challenges
Obtaining a handful of candidate photographs to stack together
and extend DOF is not as easy as it sounds in theory. Most of the
examples that I’ve seen in tutorials and videos have focused on
blending exposures of stationary objects. The distance between
camera and subject were much further than macro or near-macro.
The example in this tutorial is more typical. A flower at close distance.
To add complications that are common enough, the photographs
were taken outdoors under natural lighting on a bright overcast day.
I already mentioned f/32 for maximum photographic DOF. That
meant a relatively long exposure. 2 seconds in this case.
TIP
Start With Good Photographic Technique
Use a solid tripod and
The Canon 1Ds MkII has extremely fine resolution. 16.7 million solid head. Make sure
pixels. which translates into 3504 x 2336 pixels. Any movement
larger than a pixel while the shutter is open can result in a visible to tighten the head so
“ghost” added to the photograph. For the mathematically chal- that the camera does
lenged, that’s approximately 1/2336th of an inch in this case. Fortu-
nately, the air was relatively still while I was taking the photographs: not move as you twist
relatively being the important caveat. The air was not consistently the focus ring on the
still. A lily will sway in a slight breeze. Its stamens will dance about
with even the tiniest gust of air. lens.
Macro and botanical photographers are accustomed to waiting
for the air to become still. You stand there behind the viewfinder,
repeatedly half depressing your cable release to keep the shutter
activated and ready to fire. With an exposure of 2 seconds, you’ll
guess wrong and just as you depress the shutter button, an eddy of
air will swirl and the flower will move. Extending DOF by stacking
photos is possible with subjects like flowers that move slightly.
Forget it with a steadily moving subject. This is a technique more
useful for rigid, stationary subjects or those with very minute move-
ments.
Photographic Challenges 2
11. Be sure to use a cable release, a rigid tripod, and a solid head to
minimize any movment of the camera while adjusting focus. Mirror
lock is also strongly recommended.
I knew movement was going to be a challenge even with good
macro technique. I took several sets of photos as insurance. Six or
seven sets for each intended final shot.
I was determined to come back with at least one or two sets of
photos that could be successfully belnded together. To increase the
chance of success, I also got out a pair of Canon 550EX flashes and
a Canon ST-E3 Transmitter. I used my preferred 3:1 flash ratio for
a more realistic shadow. That gave me an exposure of 1/60th second,
which would stop movement from tiny gusts of air. I did not use
the flash shots for this tutorial.
Taking three or four shots at different points of focus is not so easy
TIP
with macro or near macro subject. The amount of rotation of the
focus ring is likely to be a tiny fraction of an inch. A macro focus
rail will give you more control. It’s a piece of essential gear for a
macro photographer. We do not change the focus on the lens. We
move the lens slightly closer to or farther from the subject to change
A macro focusing rail is the point of focus. The fine gearing of the macro focus rail allows
ideal for attempting to change of focus in very tiny increments, much finer than is possible
with the focus ring on a macro lens.
extend DOF for macro
or near-macro shots. The farther you can extend the photographic DOF, the fewer
stacked photos that will be required. Fewer stacked photos increases
the likelihood that Auto-Align Layers and Auto-Blend Layers
can successful extend DOF. Extending photographic DOF means
smaller apertures and longer exposures. You also need to get the
front of the lens parallel to the subject.
Even With Care, It’s Still Hit Or Miss
I came back with several candidate sets for stacking together. The
process of aligning photos and selecting deifferent features to blend
for maximum sharpness overall is not yet a perfect process. The
Auto-Align Layers and Auto-Blend Layers commands work
reasonably well.
Several of my candidate sets did not blend as well as I had hoped.
There was no way to tell until I loaded them into Photoshop and
ran them through the process of aligning them and blending them.
3 Chapter 1
12. Remember, this is Adobe Photoshop’s first attempt at DOF blending. I expect the technology will improve with
future versions of Photoshop.
Imperfect as the technique is, you can use it successfully even with macro and near-macro subjects. The example
we’ll be working with in this tutorial - the close-up of a white Atamasco lily - is impossible to obtain with a single
photographic exposure.
Photographic Challenges 4
14. Extending DOF
Step One. Load A Stack Of Photos.
The first step is to load a stack of photographs into Photoshop. The easiest way to do this is to use a feature in
Adobe Bridge CS4. Select the group of photos you intend to blend together in Photoshop. Under the Tools menu,
choose the Photoshop | Load Files Into Photoshop Layers submenu item.
The result will be a multilayer image loaded in Photoshop CS4. You should probably close Adobe Bridge at this
point to free up system resources. The Auto-Align Layers and Auto-Blend Layers commands are RAM-
intensive.
Adobe Bridge CS4 supports the stacking of multiple photographs as separate layers in a
Photoshop image. This is the first step in blending photographs to extend DOF.
Extending DOF 6
15. Layer stack before alignment. Layer stack after alignment.
Use the Auto projection option for blending DOF.
7 Chapter 2
16. Step 2. The Auto-Align Layers . . . Command.
The second step is to apply the Auto-Align Layers . . . command from the Edit menu item. Make sure to have
all of the layers active before initiating the Auto-Align Layers . . . command. Select the Auto projection option.
The Auto-Align Layers . . . and Auto-Blend Layers . . . commands are not new to Photoshop CS4. There
are tutorials that describe them as new or give you that impression. They have been improved however. They were
added to Photoshop CS3 and they were expected to be used in tandem to stitch together a panorama from several
shots. That’s still their primary intended use.
You will typically want to leave Vignette Removal and Geometric Distortion unchecked. They are more
appropriate for panoramas using extreme wide angle lens. Vignette Removal corrects lens vignetting, which is
darkened edges. This can result from lens aberrations or from using a lens shade or a big filter stack on extreme
wide angle lenses. Geometric Distortion corrects for pincushion and barrel distortion. Again, more likely a
problem with a wide angle lens.
The example below is the result after running the Auto-Align Layers . . . command on a stack of four photos. As
you change focus, subject magnification changes. There can also be subject movement between shots. The aligned
layers can show the tell-tale pattern of checkerboards where there are no pixels. In the example below, it looks like
an edge effect.
Here is the aligned result. As you change focus, subject magnification changes. There can also
be subject movements. It is common for areas of a layer to be left with no pixels.
Extending DOF 8
17. Layer stack after blending.
Use the Stack Images and the Seamless
Tones and Colors options.
9 Chapter 2
18. Step 3. The Auto-Blend Layers . . . Command.
The third step is to apply the Auto-Blend Layers . . . command from the Edit menu item. The order of these
steps does matter. Make sure to run the Auto-Align Layers . . . command before the Auto-Blend Layers . . .
command for best results with this technique.
The Auto-Blend Layers . . . command will select portions from each layer with the sharpest focus to blend
together in a final result. This is achieved by adding a layer mask to each layer. Where the mask is white, detail
from that layer will blend in the composite image. Where the mask is black, detail from that layer will be rejected.
Intermediate shades of gray allow intermediate blending.
The example below is one of the layer masks that resulted from the Auto-Blend Layers . . . command. This was
obviously the layer from the stacked photo where the point of focus was on the surface detail of the white petals.
The stamens and pistil are black. Their details will be drawn from another photo in the stack. In this example, it
is the areas that correspond to the petals that are white, allowing the detail from this layer to to become visible in
the composite photograph.
Here is an example of the layer masks generated by the Auto-Blend
Layers . . . command. In this case, the layer is being used primarily
for details along the white petals. The stamens and pistil are black,
which hides them from blending.
Extending DOF 10
19. You can usually find a layer with the detail to
restore. Duplicate it and replace the layer mask
with a Hide All layer mask (one filled with
black). You can then use the Brush tool at low
to moderate Opacity to restore the lost detail.
11 Chapter 2
20. Step 4. Retouching.
The final step is to retouch the composite photograph. As I mentioned, the current implementation in Photoshop
CS4 does a reasonably good job of blending together a stack of photographs. You should carefully examine your
photograph. There are likely to be a few isolated areas where the blending was less than perfect. Many tutorials fail
to mention this.
In the example below, there are a couple of blurry patches and also a rather pronouced edge artifact that looks like
stray black pixels. Martin Evening offers one solution in his recent book Adobe Photoshop CS4 for Photographers. He
recommends saving a version of the aligned layers as a Layer Group, adding a Hide All layer mask to each (i.e.,
layer masks filled with black to make them invisible). It’s a workable solution when you do not expect to run up
against system resource limitations. I prefer instead to wait and then duplicate any layer that might be needed for
retouching the blended composite. In the case of the example in this tutorial, the detail for the blurry edges was
very likely to lay along the layer with the petal details. I duplicated that layer and replaced its layer mask so I could
use the Brush tool with white to restore the details. The stray black pixels were easier to handle. I waited until I
added a layer for the Dust & Scratches filter. The flower (very typical) had plenty of dust and dirt. I created a
duplicate layer, applied the Dust & Scratches filter, and then used the Healing Brush on the same layer to dab
out those stray pixels.
Be sure to carefully examine your photograph for tiny artifacts from from the DOF blending
with the Auto-Align Layers . . . and Auto-Blend Layers . . . commands.
Extending DOF 12
22. Conclusion
Photoshop CS4 has added to our creative opportunities with the improvements to the Auto-Align Layers and
Auto-Blend Layers commands.
In practice, I found that I needed several candidate stacks with subjects that are not rigidly still. For macro and
near-macro subjects like flowers, a macro focusing rail also improves the likelihood of a successful DOF blend. I
had a few stacks from this same point of view that did not blend successfully. There were simply too many blend-
ing artifacts to make it worthwhile to retouch manually.
The improved Auto-Blend Layers command appears to be a bit buggy in the early Photoshop CS4 release.
It appears to suffer from a memory leak, at least with Windows operating systems. It is also very RAM-hungry.
With photos from the current crop of Canon, Nikon, and Sony professional and prosumer DSLRs, you will
likely only be able to blend a small handful of photographs unless you take steps to reduce the memory foot-
print, like converting to 8-bits per channel, reducing the size of the photos, and clearing the cache.
I find this to be an exciting new technique. I hope it improves your digital photography. Cheers!
The ability to stack multiple shots of the same subject allows us to extend
DOF in a way that is impossible with a camera and lens alone.
Conclusion 14