
Empfohlen
Empfohlen
Weitere ähnliche Inhalte
Empfohlen
Empfohlen (20)
Make your own pottery stamps
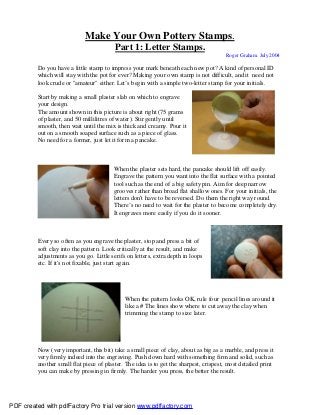
- 1. Make Your Own Pottery Stamps. Part 1: Letter Stamps. Roger Graham. July 2004 Do you have a little stamp to impress your mark beneath each new pot? A kind of personal ID which will stay with the pot for ever? Making your own stamp is not difficult, and it need not look crude or "amateur" either. Let’s begin with a simple two-letter stamp for your initials. Start by making a small plaster slab on which to engrave your design. The amount shown in this picture is about right (75 grams of plaster, and 50 millilitres of water). Stir gently until smooth, then wait until the mix is thick and creamy. Pour it out on a smooth soaped surface such as a piece of glass. No need for a former, just let it form a pancake. When the plaster sets hard, the pancake should lift off easily. Engrave the pattern you want into the flat surface with a pointed tool such as the end of a big safety pin. Aim for deep narrow grooves rather than broad flat shallow ones. For your initials, the letters don't have to be reversed. Do them the right way round. There’s no need to wait for the plaster to become completely dry. It engraves more easily if you do it sooner. Every so often as you engrave the plaster, stop and press a bit of soft clay into the pattern. Look critically at the result, and make adjustments as you go. Little serifs on letters, extra depth in loops etc. If it's not fixable, just start again. When the pattern looks OK, rule four pencil lines around it like a # The lines show where to cut away the clay when trimming the stamp to size later. Now (very important, this bit) take a small piece of clay, about as big as a marble, and press it very firmly indeed into the engraving. Push down hard with something firm and solid, such as another small flat piece of plaster. The idea is to get the sharpest, crispest, most detailed print you can make by pressing in firmly. The harder you press, the better the result. PDF created with pdfFactory Pro trial version www.pdffactory.com
- 2. 2 Leave the little piece of hard-pressed clay undisturbed on the plaster, while you lightly score the back and add a dab of slurry. Now make a little handle from the same soft clay. Score the end and apply a dab of slurry, then join it firmly to the stamp with a twisting to-and-fro action. Try not to disturb the stamp itself, which is still attached firmly to the plaster. Don’t worry too much about the shape at this stage. Better to trim it later. This is where the # pattern of pencil lines is needed. The lines extend beyond the edges of the hard-pressed clay, so you can see where to trim away the surplus. Carefully cut along each line with a sharp narrow blade, and remove the unwanted clay. Lift the entire clay stamp away from the plaster. If it looks OK, now is the time to make another one for a spare. Or two spares, or three. Accurate trimming of the edges is best done later, when the clay is leather hard. Stamps work best if fired to bisque temperature only. Stoneware fired stamps are harder, but they aren't porous so they tend to get stuck in damp clay. Bisqued stamps last for ages anyway. How big to make the stamp? Something about fingernail size is a good place to start. The bigger the stamp, the more likely it is to deform the pot when you try to make an imprint. Unless you can support the damp pot from beneath, a big wide stamp will very likely make an ugly dent. On the underside of a mug, for example, this can be a problem. If you want to add a longer word, not just your initials, it may be better to make a second stamp just for that word, and apply it close to the edge of the base. PDF created with pdfFactory Pro trial version www.pdffactory.com
- 3. 3 A Mug Handle Stamp. Here is another useful stamp, useful for making a neat finish when you’re adding a handle to a mug or a jug. For making this one you don’t need to engrave the design on plaster first. Just carve the pattern directly into leather-hard clay. Bisque fired before use, of course. Any simple geometrical design will do, but of course you’ll have to think in reverse when doing the carving. This one has a simple eight-petal flower pattern. Its purpose is partly decorative, to make a plain handle a bit less boring. But importantly, it helps make a more secure joint if you use it properly. By impressing it firmly over the end of a newly-added handle, it helps ensure that the handle and the mug body are well and truly joined. This is how it looks on a freshly-made handle. Notice that with this kind of stamp you apply it with a bit more aggression. Don’t just make a little neat imprint. Push in hard so the clay beneath the handle gets a good firm squeeze. And wiggle the stamp left-right-left with a twisting motion as you do so, to make the clay rise up into the deeper cavities in the stamp. This way you’ll get both a secure joint and a crisply defined image of your design. This is how it looks under a temmoku glaze on a finished soup mug. Notice that simple imprinted stamp such as your initials would not be a big success under a dark glaze like this, since the grooves of the design simply fill up with glaze and disappear. Under a dark opaque glaze it’s better to create a stamp to give a design which rises above the surface, so it stands out when the glaze “breaks” away from the upstanding ridges. PDF created with pdfFactory Pro trial version www.pdffactory.com
- 4. 4 Make Your Own Pottery Stamps. Part 2: Some Creative Ideas. Roger Graham. July 2004 Pottery stamps aren’t limited to just letters, of course. Once you discover how effective they are, creative inspirations will pop up. Geometrical designs? Flower shapes? Nursery animals? To get you started, here is an idea developed for a baby’s plate with a bunny rabbit design. The intention was to make imprints around the rim of the plate, then infill each print with cobalt blue slip, and finally finish off with a clear glaze. Four different stylized bunny rabbit shapes were engraved on a little plaster slab. Following the procedure given in Part 1, several stamps were made from each rabbit design. Here is a newly-made stamp, just as it appears when you lift it off the plaster bat. It could be left flat like this if you wished, but it’s better to carefully trim away the surplus around the edges when it stiffens a bit. This picture shows how a stamp should look when the edges are trimmed. Surplus clay has been carved away around the outline, to leave a cleaner imprint. A very thin sharp knife blade is the tool to use, and it’s easiest when the stamp is firm leather hard. PDF created with pdfFactory Pro trial version www.pdffactory.com
- 5. 5 Planning Ahead. Stamps applied to the underside of a bowl aren’t a big success, since they’re mostly out of sight down there. Think in terms of patterns applied to the top edge of your plate. This means you need to make the rim wide enough and thick enough to accept the stamp you have in mind. The traditional “baby’s plate” shape shown below has fairly vertical walls with a thick strong horizontal rim, just asking for a bunny rabbit imprint. Or perhaps you might fancy a whole warren of rabbits in the centre of the plate? It’s easy to get carried away. You aren’t limited to just stamping the design, of course. Fancy a few blades of grass to go with the rabbits? Draw them in with a pointed tool, sgraffito fashion. Just remember that you intend to infill the design with coloured slip, so make the impressions deep enough. Making a Suitable Slip. This seems to be the right time to consider the kind of slip to prepare. It’s quite simple to make up the slip from the same clay as the pot (just the slurry from the wheel tray), mixed to a thin creamy consistency. It needs to be thin enough to be brushed smoothly into the imprinted patterns, but still thick enough to nearly fill the imprints when it dries out. Cobalt blue is a traditional colour for decoration on a baby’s plate, easily achieved by addition of cobalt oxide to the slip. A good proportion is 1.5% cobalt oxide “weight over weight”, that is 1.5 grams of oxide for every 100 grams of dry clay. Thin creamy slip contains about 50% solids by weight, so you’d use 1.5 grams of oxide for every 200 millilitres of slip. Close approximation is good enough. It’s not moon-rocket science. If you don’t have scales suitable for measuring tiny amounts, 1.5 grams of black cobalt oxide is about ¼ of a level teaspoon. Mix the measured amount of oxide thoroughly into the slip, and work it all through a fine sieve to ensure a uniform colour. Expect the mixture to become a mid-grey colour. If you choose to use cobalt carbonate instead of the oxide, you’ll need half as much again. The carbonate gives the same blue colour in the end of course, but the slip will be pale pink instead of grey, and a bit harder to see when you’re applying it. The plate is ready for the slip when it’s leather hard. Use a small soft brush, so you can dab the slip into every small imprint without damaging the pattern. When the slip dries a bit, you may decide to revisit parts of the job and add a bit more slip here and there to fill up the print. But you’ll find the cobalt blue colour is strong enough to come through clearly even if very thin. PDF created with pdfFactory Pro trial version www.pdffactory.com
- 6. 6 Cleaning Up. By the time you’ve dabbed slip into every imprint, the project may look a bit of a mess. Don’t cry. It will come up smiling when you clean it up, but you’ll have to be patient. Don’t hurry this stage. Leave the pot until it’s completely dry before you attempt to rub the surface down. You’ll notice that this plate was thrown on a small bat, and has not yet been cut off. It helps to delay cutting off until all the imprint stamps are in place, to avoid making unsightly bumps on the underside. It’s easy to get carried away. Maybe this plate has too many rabbits? Don’t even think about trying to scrape the excess slip away with a knife. You’ll take forever, and do an inferior job anyway. Steel wool is excellent, or one of those woven plastic pot scouring pads. Just rub carefully, and don’t breathe the dust. I do this in a well-ventilated spray booth with a strong exhaust fan. If you don’t have access to something similar, then do the job outside in the wind, and wear a mask. Since the pot needs to be truly dry when rubbing away the excess slip, there’s no escaping the dust. Be careful. If you find you’ve missed a bit of detail here and there, you can just add a further dab of slip, then wait a little longer and rub it back again. This picture shows a plate with the clean-up partly completed. Gentle rubbing with a plastic pot-scouring pad has smoothed away the excess slip. When doing this, watch the pattern carefully as you rub, and stop when you think it’s just right. You be the judge. PDF created with pdfFactory Pro trial version www.pdffactory.com
- 7. 7 Here is what to expect when the pot is bisque fired. The dull grey slip should become cobalt blue. If you’ve missed any little specks of slip when rubbing back at the green- ware stage, they’ll be easier to see now. Just rub a bit more, using abrasive paper this time. You’re unlikely to find little gaps in the imprints after the bisque firing, but if you do it’s possible to make minor alterations even at this late stage. With a sharp tool you can scrape out a groove if it’s really necessary, and dab in a little more slip. For just a small repair, it’s OK to raw-glaze over the top of the repair, and you’ll never notice. Finished at last. Here’s how it looks with a coat of clear glaze This plate was decorated with a bit more restraint. Not so many rabbits, but the idea is the same. Finished size, 150 mm diameter and 40 mm high PDF created with pdfFactory Pro trial version www.pdffactory.com
- 8. 8 Two More Examples: A cat’s plate and a doggie dish. (These are 220 mm diameter, and 40 mm high) The stamped imprints are just stylized outlines, infilled with cobalt blue slip in the same way as the baby-plate described above. PDF created with pdfFactory Pro trial version www.pdffactory.com
- 9. 9 Another Example (just to be sure you get the idea). One of my students, planning her wedding, devised a neat stamp to imprint beneath small souvenir serviette rings. She made 60 of them, one for each guest, to serve as place markers at the table. Here is the bisqued stamp she created, in the shape of a ribbon bow with the names of bride and groom, and the date. It reads: “Roy & Tracy God Bless 6/11/99” This photo shows the crisp sharp imprint it made on the underside of the ring. The stamp was impressed while the soft clay was still in the form of a flat slab, before being rolled into a ring shape. This made it easier to support the clay from beneath, since a stamp of this size tends to deform a soft pot. And here is the finished item. At the wedding reception there were guests from all over the world. Think of this as a puzzle for archaeologists somewhere in the future.... how did all these little pottery artefacts with their strange inscriptions come to be so widely distributed? PDF created with pdfFactory Pro trial version www.pdffactory.com
- 10. 10 It’s a less demanding job if the stamp is in the form of a simple stylized pattern, but you can strive for reality if you choose. The examples shown below were made to fill an order from operators of a nature reserve. They asked for outlines of native birds and animals, to be imprinted beneath a clear copper-green glaze. Wombat Echidna Wonga Pigeon Mopoke Blue Wren Bower Bird PDF created with pdfFactory Pro trial version www.pdffactory.com
- 11. 11 Stamps like these aren’t a big success underneath an opaque glaze such as temmoku. The pattern just disappears beneath the glaze. But they really come alive with transparent coloured glaze, particularly copper green. You don’t need to infill the pattern with coloured slip in this case. The glaze itself simply shows up as a more intense colour where it’s thicker, in the lines of the pattern. Glaze Suggestions. A plain clear glossy glaze over blue slip is OK for a project such as the baby’s plate. The recipe “Cone 10 clear” is one that works well. It isn’t likely to obscure the pattern beneath, even if applied thickly, but maybe is a bit boring. A not-quite-transparent magnesia glaze is a more interesting choice (see the“Magnesia White” recipe), but you have to be careful. It gives a lovely satin smooth finish, but if applied too thickly, expect the rabbits to be hidden in a fog. So avoid letting this glaze pool too thickly in the little depressions around the stamp, if you want the blue slip colour to show clearly after firing. If you have the facility for spraying glazes, it gives these plates a buzz to apply a thin misty overspray of pale blue around the outside. Try the “Talc White” recipe with just 0.5% or 1% of cobalt carbonate added, and spray just a little as a second coat over the top of the main glaze. But only around the outside edge so you don’t drown the rabbits. Recipes. Talc White Glaze. Cone 9-10, Oxidation or Reduction. (Modified from glaze No.147 in Janet deBoos book “More Glazes for Australian Potters” now out of print. A good reliable glaze for interior of domestic stoneware. Smooth white, not too glossy. OK over blue cobalt slip, if not applied too thickly.) Pot feldspar 27 Talc 16 Silica 28 Ball clay 16 Calcite 13 For a pale pastel blue, add cobalt carbonate 0.25% (very pale) or 0.5% (a bit stronger). or even 1% (stronger still).Good as a misty overspray on the outside of the “baby plate” item above. PDF created with pdfFactory Pro trial version www.pdffactory.com
- 12. 12 Copper Green Glaze. Cone 9-10 Oxidation only. Modified from glaze No.112 in Janet deBoos textbook "Glazes for Australian Potters", now out of print. Best with a fairly thick coat. For rich even green, the kiln atmosphere must be oxidising all the way. Good over sgraffito decoration, or over an imprinted stamp. Pot Feldspar 45 Silica 23 Kaolin 9 Dolomite 9 Calcite 9 Zinc oxide 5 Copper carbonate 5 Copper Green. Electric kiln cone 10 Cone 10 Clear. General purpose clear glossy glaze. OK over coloured slip in a stamped imprint. Potash feldspar 15 Calcite 19 Ball clay 29 Silica 31 Talc 7 PDF created with pdfFactory Pro trial version www.pdffactory.com