
Empfohlen
Weitere ähnliche Inhalte
Andere mochten auch
Ähnlich wie Portal admin elluminate
Ähnlich wie Portal admin elluminate (20)
Mehr von thsieh
Mehr von thsieh (20)
Kürzlich hochgeladen
Kürzlich hochgeladen (20)
Portal admin elluminate
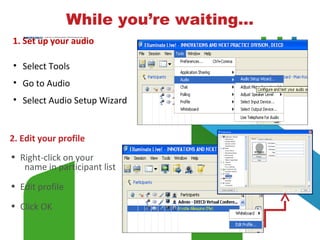
- 1. 1. Set up your audio • Select Tools • Go to Audio • Select Audio Setup Wizard 2. Edit your profile WHILE YOU’RE WAITING… • Right-click on your name in participant list • Edit profile • Click OK While you’re waiting...
- 2. Getting to know Elluminate Whiteboard Tools
- 3. Chat Window “This session is supervised. All messages, including private messages, are seen by moderators” Send an instant message to: •This Room •Moderators •Selected participant(s)
- 4. Save the Whiteboard • Go to File – Save – Whiteboard • Select ‘Current Screen Group’ to capture all slides *.WBD files will open in Elluminate only. *.PDF files will open in Adobe Reader.
- 5. The School Portal Admin will be able to: 1. Customise the look and feel of their school community page. This means they will have the ability to • Create the organisation (school) pages • Change the background and colours of the school community page • Add the school logo onto the page What can a School Portal Admin do?
- 6. When the Coach provides lead user training for the school, the coach will then assign the School Portal Administrator to the appropriate person in the school. (After this has been performed, each school will have at least 2 people who can perform the School Portal Administrator role – the first is the Coach, the second is the nominated School Portal Admin) DEECD assigns School Portal Administrator rights to each Ultranet coach for the schools they look after. (If you are the coach for 3 schools, you will be the School Portal Administrator for your 3 schools.) Overall Process for assigning the School Portal Administrators
- 7. How to access Manage Pages & assign Administrators?
- 8. Step Action 0 Login as School Portal Admin or Coach 1 Navigate to Control Panel 2 Select Organisations from the left side menu 3 Search for the School 4 Select Manage Pages from the Action button (you should then see the screen below) Create Organisation Pages
- 9. Create Organisation Pages (cont..) Step Action 5 Enter a name for the page that you wish to create and click the Add Page button 6 Click on the newly created page in the page tree on the left. This will display a second layer of tags: Page - change the page properties and permissions or delete the page Children – add a child page Look and Feel – change the look and feel of the page
- 10. Change Look and Feel of Organisation Page Step Action 7 Select the Look and Feel tab NOTE: You may select the top tab to apply the default look and feel for all pages, or you may select the second tab to apply a look and feel for a specific page 8 NOTE: The CSS classes are also controlled by page themes, so to ensure that the custom style takes effect, the command ! important should be added to each style value (please see the attached text file for an example) 9 Click the Save button CSS.txt Enter Custom Styles to change the look and feel. An example of the CSS is provided in the attached text file on the left (just double click to open.
- 12. Apply School Logo & Display the School Page Step Action 10 Select the Settings tab 11 Browse for the logo (image file) on your PC. This would usually be the school logo. NOTE: The logo appears in the top left corner of each page. The ideal dimensions of the logo are 212 px wide by 62 px high. 12 Click the Save button. You have now applied the school logo. 13 In order to see all your changes, click Communities > Select your organisation in the My Organisation portlet, and hit the hyperlink to your school. Your changes should now appear. Work from here to add portlets and create publications as you would in other community spaces.
- 13. Display the School Page Step Action 13 In order to see all your changes, click Communities > Select your organisation in the My Organisation portlet, and hit the hyperlink to your school. Your changes should now appear. You should work from here to add portlets and create publications as you would in other community spaces.
- 14. My Organisations
- 15. Examples of what information can be stored on the Community Space Calendar • Important events, camps, excursion, incursion, parent teacher nights • Special events News/Information for Parents/School community · Newsletter/Newsflash/reminders · iFrame to school website · Sports results · Canteen menu and price list · School uniform price list and expectations · Principals corner · BER updates · "Ask your child about..." question stems · School council minutes · Photos · ·
- 16. Canteen / sick bay /working bee roster · Policies / planners / over views · Coordinator pages for information and with information about them · School profile · Contact details · Google map of excursion sites / camps etc · School photos · Teacher photos with phone extension numbers / voice mail / email · From parents- survey/polls/feedback/opinion · Booklists · Curriculum · Images and video · Assessment and reporting information · Year level updates · Links to relevant websites or space · School policies · Specialist corner – timetables · School motto - Organisation of school events eg ‘Mothers day stall’, school fete
Hinweis der Redaktion
- INSERT AT BEGINNING OF PRESENTATION(ths) Please set up your audio with the audio setup wizard Please edit your profile, so that we can know where you are joining us from and if you have a photo handy, this allows us to put a face to the name Go ahead and test out your microphone once you’ve done the audio setup wizard by pushing the microphone button in the bottom left hand corner Audio works best when you have a microphone headset to avoid any feedback
- INSERT AT BEGINNING OF PRESENTATION(ths) I’m going to take you on a short tour of the basic features of Elluminate: Let’s start by looking at the participant list, this shows you who is in the room. You can hover over people’s names here to see their profiles. Your name will appear in blue in the participant list. You can change your view of the Elluminate interface by clicking the drop down box to select the layout. If there are many participants in the session, you may wish to switch to ‘Wide layout’ You can use the chat window to type messages to other participants. Simply type your message in and then hit send. Go ahead and try it now. The raise hand button lets you alert the moderator that you have a question. Press it now and notice that a number is allocated next to your name in the order in which you raised your hand. You can then press the same button to lower your hand. Emoticons are a great way to give feedback to the presenter since you won’t be able to show your feelings through facial expressions and body language. You can use the smiley face to indicate that all is well but it also shows laughter. You can also express confusion, applause or disapproval. If you do need to leave the session temporarily, please press the Step Away button. This doesn’t change your connection to the session at all. Go ahead and try it. It simply puts your name in italics as a courtesy to let others know that you are not currently present and able to interact. Then just press it again to re-enter the session. The Shared Whiteboard usually displays the presenter’s slides, but you can also draw and write on the whiteboard using the tools on the left, when asked to by the presenter. Polling allows you to answer questions and give feedback when prompted by the presenter. You can see that our polling tools are set to True/False with a tick and a cross but these may change to ABCD buttons if we require these during the session. The Notes feature allows you to take notes during the session and you can export these to a text file afterwards. We’re going to test out the Live video function now. Even if you don’t have a webcam, you can go through the steps with us and see how it all works. Simply press the webcam button in the toolbar and hit the ‘Preview’ button. This allows you to position your camera so that you are centred and ready to transmit. Then hit ‘Transmit’ to start sending your live video.
- INSERT AT BEGINNING OF PRESENTATION(ths) Messages to the whole room appear in black. Private messages to you will appear in blue (moderators can still see private messages – they appear in red) If you have a private message for someone, please select their name from the dropdown box Feel free to send a message to the moderators if you require any assistance
- INSERT AT END OF PRESENTATION(ths)
- kd
- kv
- Kv Then de to go live
- Where is manage pages, Action button?de
- de
- de
- ths
- De – sunshine heights
- de
- De to screen, kv to explain
- ths
- ths
- kv