Creating Multi Boot DVD
•Als DOC, PDF herunterladen•
1 gefällt mir•539 views

This document provides instructions to create a multi-boot DVD that contains installation files for Windows 98, ME, NT 4.0, 2000, XP, and 2003. It describes extracting boot files from each OS installation disc, combining them into a single ISO file, modifying files to allow booting from the DVD, and creating a multi-boot image file to provide a boot menu at startup to select the desired OS installation. The final steps are to apply the multi-boot image to the ISO and burn the combined files to a DVD.

Empfohlen
Weitere ähnliche Inhalte
Was ist angesagt?
Was ist angesagt? (18)
Andere mochten auch
Ähnlich wie Creating Multi Boot DVD
Ähnlich wie Creating Multi Boot DVD (20)
Kürzlich hochgeladen
Kürzlich hochgeladen (20)
Creating Multi Boot DVD
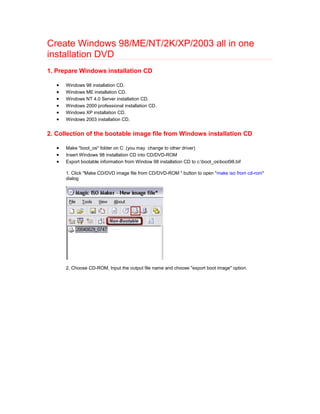
- 1. Create Windows 98/ME/NT/2K/XP/2003 all in one installation DVD 1. Prepare Windows installation CD • Windows 98 installation CD. • Windows ME installation CD. • Windows NT 4.0 Server installation CD. • Windows 2000 professional installation CD. • Windows XP installation CD. • Windows 2003 installation CD. 2. Collection of the bootable image file from Windows installation CD • Make "boot_os" folder on C: (you may change to other driver) • Insert Windows 98 installation CD into CD/DVD-ROM • Export bootable information from Window 98 installation CD to c:boot_osboot98.bif 1. Click "Make CD/DVD image file from CD/DVD-ROM " button to open "make iso from cd-rom" dialog 2. Choose CD-ROM, Input the output file name and choose "export boot image" option.
- 2. 3. Click OK. • Insert Windows ME installation CD into CD/DVD-ROM • Export bootable information from Window ME installation CD to c:boot_osbootme.bif • Insert Windows NT 4.0 installation CD into CD/DVD-ROM • Export bootable information from Window NT4.0 installation CD to c:boot_osbootnt.bif • Insert Windows 2000 professional installation CD into CD/DVD-ROM • Export bootable information from 2000 professional installation CD to c:boot_osboot2k.bif • Insert Windows XP installation CD into CD/DVD-ROM • Export bootable information from Window XP installation CD to c:boot_osbootxp.bif • Insert Windows 2003 installation CD into CD/DVD-ROM • Export bootable information from Window 2003 installation CD to c:boot_osboot2k3.bif 3. Making of multiple OS installation DVD image file • Click "Create new image file" button on toolbar. • Click button to create "Win98" folder into root directory. • Insert Windows 98 installation CD to CD-ROM.
- 3. • Add all files and folders from Windows 98 installation CD to "Win98" folder. • Click button to save Windows 98 installation into c:multi_os.iso ( you may choose other iso image file name) • Take out Windows 98 installation CD, and insert Windows ME installation CD to CD/DVD-ROM • Click button to create "WinME" folder into root directory. • Add all files and folders from Windows ME installation CD to "WinME" folder. • Click button to save Windows ME installation into multi_os.iso • Take out Windows ME installation CD, and insert Windows NT 4.0 installation CD to CD/DVD-ROM • Click button to create "WinNT" folder into root directory. • Add all files and folders from Windows NT 4.0 installation CD to "WinNT" folder.
- 4. • Click button to save Windows NT 4.0 installation into multi_os.iso • Take out Windows NT 4.0 installation CD, and insert Windows 2000 Professional installation CD to CD/DVD-ROM • Click button to create "Win2K" folder into root directory. • Add all files and folders from Windows 2000 Professional installation CD to "Win2K" folder. • Click button to save Windows 2000 Professional installation into multi_os.iso • Take out Windows 2000 Professional installation CD, and insert Windows XP installation CD to CD/DVD-ROM • Click button to create "WinXP" folder into root directory. • Add all files and folders from Windows XP installation CD to "WinXP" folder.
- 5. • Click button to save Windows XP installation into multi_os.iso • Take out Windows XP installation CD, and insert Windows 2003 installation CD to CD/DVD-ROM • Click button to create "Win2K3" folder into root directory. • Add all files and folders from Windows 2003 installation CD to "WinXP" folder. • Click button to save Windows 2003 installation into multi_os.iso 4. Do some change of multiple OS installation DVD image file for creating multiple bootable DVD • Open c:multi_os.iso with MagicISO. • Copy the folder "Win2Ki386" to "iW2K". 1. Hold the CTRL key down, and use mouse to drag folder "Win2Ki386" to root.
- 6. 2. Click button to rename i386 to iW2K. • Copy the folder "WinXPi386" to "iWXP". 1. Hold the CTRL key down, and use mouse to drag folder "WinXPi386" to root. 2. Click button to rename i386 to iWXP.
- 7. • Copy the folder "Win2K3i386" to "i2K3". 1. Hold the CTRL key down, and use mouse to drag folder "Win2K3i386" to root. 2. Click button to rename i386 to i2K3. • Copy the file "Win2KCDROM_IP.5" and "Win2KCDROM_NT.5" to root directory. Hold the CTRL key down, and use mouse to drag the files "Win2KCDROM_IP.5" and "Win2KCDROM_NT.5" to root.
- 8. • Copy the file "WinXPWIN51" and "WinXPWIN51IP" to root directory. Hold the CTRL key down, and use mouse to drag the files "WinXPWIN51" and "WinXPWIN51IP" to root. • Copy the file "Win2K3WIN51IA" to root directory. Hold the CTRL key down, and use mouse to drag the files "Win2K3WIN51IA" to root. • Create "iW2K" folder into "c:boot_os" • Extract "iW2KSETUPLDR.BIN" file to "c:boot_osiW2K". 1. Select "iW2KSETUPLDR.BIN" file. 2. Click button to extract the file to "c:boot_osiW2K". • Open "c:boot_osiW2KSETUPLDR.BIN" with UltraEdit or WinHex.
- 9. • Replace all words "I386" with "IW2K"(Must be capitalization). 1.Click "seach"->"Replace" menu item. Or Press "CTRL+R" 2. Input "I386" into "Find What". Input "IW2K"(Must be capitalization) into "Replace With" 3. Click "Replace All" button. 4. Press CTRL+S to save the modified file. • Copy c:boot_osiW2KSETUPLDR.BIN back to "iW2KSETUPLDR.BIN" within c:multi_os.iso. • Extract "iW2KTXTSETUP.SIF" file to "c:boot_osiW2K". 1. Select "iW2KTXTSETUP.SIF" file. 2. Click button to extract the file to "c:boot_osiW2K". • Open "c:boot_osiW2KTXTSETUP.SIF" with UltraEdit or NotePad
- 10. • Replace all words "i386" within the section "[SourceDisksNames.x86]" with "IW2K"
- 11. • Copy "c:boot_osiW2KTXTSETUP.SIF" back to "iW2KTXTSETUP.SIF" within c:multi_os.iso. • Create "iWXP" folder into "c:boot_os" • Extract "iWXPSETUPLDR.BIN" file to "c:boot_osiWXP". 1. Select iWXPSETUPLDR.BIN file. 2. Click button to extract the file to "c:boot_osiWXP". • Open "c:boot_osiWXPSETUPLDR.BIN" with UltraEdit or WinHex • Replace all words "I386" with "IWXP"(Must be capitalization). • Copy c:boot_osiWXPSETUPLDR.BIN back to "iWXPSETUPLDR.BIN" within c:multi_os.iso • Extract "iWXPTXTSETUP.SIF" file to "c:boot_osiWXP". 1. Select "iWXPTXTSETUP.SIF" file. 2. Click button to extract the file to "c:boot_osiWXP". • Open "c:boot_osiWXPTXTSETUP.SIF" with UltraEdit or NotePad • Replace all words "i386" within the section "[SourceDisksNames.x86]" with "IWXP" • Copy "c:boot_osiWXPTXTSETUP.SIF" back to "iWXPTXTSETUP.SIF" within c:multi_os.iso. • Create "i2K3" folder into "c:boot_os" • Extract "i2K3SETUPLDR.BIN" file to "c:boot_osi2K3". 1. Select i2K3SETUPLDR.BIN file. 2. Click button to extract the file to "c:boot_osi2K3". • Open "c:boot_osi2K3SETUPLDR.BIN" with UltraEdit or WinHex • Replace all words "I386" with "I2K3"(Must be capitalization). • Copy c:boot_osW2K3SETUPLDR.BIN back to "i2K3SETUPLDR.BIN" within c:multi_os.iso. • Extract "i2K3TXTSETUP.SIF" file to "c:boot_osi2K3". 1. Select "i2K3TXTSETUP.SIF" file. 2. Click button to extract the file to "c:boot_osi2K3". • Open "c:boot_osi2K3TXTSETUP.SIF" with UltraEdit or NotePad • Replace all words "i386" within the section "[SourceDisksNames.x86]" with "I2K3" • Copy "c:boot_osi2K3TXTSETUP.SIF" back to "iWXPTXTSETUP.SIF" within c:multi_os.iso.
- 12. • Click button to save c:multi_os.iso. • Open "c:boot_osboot2k.bif" with UltraEdit or WinHex. • Replace all words "I386" with "IW2K"(Must be capitalization). • Open "c:boot_osbootxp.bif" with UltraEdit or WinHex. • Replace all words "I386" with "IWXP"(Must be capitalization). • Open "c:boot_osboot2k3.bif" with UltraEdit or WinHex. • Replace all words "I386" with "I2K3"(Must be capitalization). 5. Making of multi-boot image file • Click "Make multi-boot CD/DVD image file" button to open "Multi-Boot Image Editor" • Click "Add ..." button to add one boot item into multi-boot image file.
- 13. • Choose "Boot from bootable image file" option. and click "Next" button to next step. • Choose "From Local Computer" option, and input "c:boot_osboot98.bif", and click "Next" button to next step.
- 14. • Input description of Window 98 boot image, and set "Hot Key" to "1" • Click "Finish" to complete Windows 98 bootable item. • Add Windows ME bootable item in the same way as creating Windows 98 bootable item. From Local Computer: c:boot_osbootme.bif Description: 2. Install Window ME Hok Key: 2 • Add Windows NT 4.0 bootable item in the same way as creating Windows 98 bootable item. From Local Computer: c:boot_osbootnt.bif Description: 3. Install Window NT 4.0 Hok Key: 3 • Add Windows 2000 professional bootable item in the same way as creating Windows 98 bootable item. From Local Computer: c:boot_osboot2k.bif
- 15. Description: 4. Install Window 2000 Professional Hok Key: 4 • Add Windows XP bootable item in the same way as creating Windows 98 bootable item. From Local Computer: c:boot_osbootxp.bif Description: 5. Install Window XP Hok Key: 5 • Add Windows 2003 bootable item in the same way as creating Windows 98 bootable item. From Local Computer: c:boot_osboot2k3.bif Description: 6. Install Window 2003 Hok Key: 6 • Add first assistant bootable item for booting from hard disk. • Choose booting from first hard disk • Input "7. Boot from hard disk" into description of bootable item, and set "Hot Key" to "7", and click "finish" button
- 16. • Add second assistant bootable item for booting from floppy driver. • Input "8. Boot from floppy driver" into description of bootable item, and set "Hot Key" to "8", and click "finish" button
- 17. • Add third assistant bootable item for reboot
- 18. • Input "9. Reboot" into description of bootable item, and set "Hot Key" to "9", and click "finish" button • Set "boot from hard disk" as default bootable item. (you may choose other bootable item) • Click "Save" button to save multi-boot image file to c:boot_osmulti_os_boot.mbi • Click "Close" to complete making of multi-boot image file. 6. Apply multi-boot image file into DVD image file • Open c:multi_os.iso with MagicISO.
- 19. • Click "Load boot image ..." button to open "bootable option" dialog. • Choose "From multi-bootable image file" option, and input "c:boot_osmulti_os_boot.mbi" • Click "OK' to apply. • Click button to save c:multi_os.iso 7. Burn ISO to DVD • Because multi_os.iso is larger than the capacity of CD. So we have to burn multi_os.iso onto DVD. Please place DVD-R, DVD-R/RW, DVD+R or DVD+R/RW into your DVD recorder.
- 20. • Click button to open "Burn CD!" Dialog • Choose your DVD recorder, the CD/DVD image file, and other parameters. • Click "Burn It" to start • Finish