Ccna4
- 1. CCNA Exploration: Accessing the WAN Student Skills Based
Assessment Lab
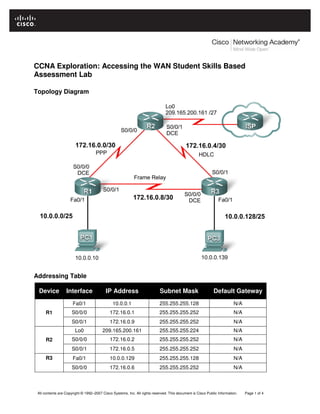
Topology Diagram
Addressing Table
Device Interface IP Address Subnet Mask Default Gateway
Fa0/1 10.0.0.1 255.255.255.128 N/A
R1 S0/0/0 172.16.0.1 255.255.255.252 N/A
S0/0/1 172.16.0.9 255.255.255.252 N/A
Lo0 209.165.200.161 255.255.255.224 N/A
R2 S0/0/0 172.16.0.2 255.255.255.252 N/A
S0/0/1 172.16.0.5 255.255.255.252 N/A
R3 Fa0/1 10.0.0.129 255.255.255.128 N/A
S0/0/0 172.16.0.6 255.255.255.252 N/A
All contents are Copyright © 1992–2007 Cisco Systems, Inc. All rights reserved. This document is Cisco Public Information. Page 1 of 4
- 2. CCNA Exploration
Accessing the WAN: Skills Based Assessment Student Skills based Assessment Lab
Device Interface IP Address Subnet Mask Default Gateway
S0/0/1 172.16.0.10 255.255.255.252 N/A
PC1 NIC 10.0.0.10 255.255.255.128 10.0.0.1
PC3 NIC 10.0.0.139 255.255.255.128 10.0.0.129
Learning Objectives
To complete this lab:
• Cable a network according to the topology diagram
• Erase the startup configuration and reload a router to the default state
• Perform basic configuration tasks on a router
• Configure and activate interfaces
• Configure and activate serial interfaces (PPP with CHAP, HDLC, and Frame Relay)
• Configure RIP on all the routers
• Configure basic router security
• Configure ACLs
• Configure basic NAT
Scenario
This lab tests you on the skills and knowledge that you learned in Exploration 4. Use cisco for all
passwords in this lab, except for the enable secret password, which is class.
Task 1: Prepare the Network
Step 1: Cable a network that is similar to the one in the topology diagram.
Step 2: Clear any existing configurations on the routers.
Task 2: Perform Basic Device Configurations
Configure the R1, R2, and R3 routers according to the following guidelines:
• Configure the router hostname.
• Disable DNS lookup.
• Configure an EXEC mode password.
• Configure a message-of-the-day banner.
• Configure a password for console connections.
• Configure synchronous logging.
• Configure a password for vty connections.
All contents are Copyright © 1992–2007 Cisco Systems, Inc. All rights reserved. This document is Cisco Public Information. Page 2 of 4
- 3. CCNA Exploration
Accessing the WAN: Skills Based Assessment Student Skills based Assessment Lab
Task 3: Configure and Activate Serial and Ethernet Addresses
Step 1: Configure interfaces on R1, R2, and R3.
Step 2: Verify IP addressing and interfaces.
Step 3: Configure the PC1 and PC3 Ethernet interfaces.
Step 4: Test connectivity between the PCs and routers.
Task 4: Configure Serial Interfaces
Step 1: Configure and verify PPP encapsulation with CHAP authentication between R1 and R2.
The password is “cisco”.
Step 2: Configure and verify HDLC encapsulation between R2 and R3.
Step 3: Configure Frame Relay between R1 and R3.
Task 5: Configure RIP
Step 1: Configure RIP on R1, R2, and R3.
RIP updates should only be sent on the serial links between the routers. Prevent all other RIP
updates on all networks.
Step 2: Test connectivity with the ping command.
Step 3: Verify the routing table with the appropriate command.
Task 6: Configure Basic Router Security
Step 1: Enable a secure Telnet login using a local database on R2.
Step 2: Disable unused services and interfaces on R2.
Step 3: Confirm that R2 is secured.
Task 7: Configure Access Control Lists
Step 1: Allow telnet to R1 and R3 from R2 only.
Step 2: Do not allowlHTTP, Telnet, and FTP traffic from the Internet to PC1.
Step 3: Do not allow PC1 to receive traffic from the 10.0.0.128 /25 network.
Step 4: Verify that PC3 cannot ping PC1, but can ping 10.0.0.1.
Task 8: Configure NAT.
Step 1: Configure NAT to allow PC3 to ping PC1.
All contents are Copyright © 1992–2007 Cisco Systems, Inc. All rights reserved. This document is Cisco Public Information. Page 3 of 4
- 4. CCNA Exploration
Accessing the WAN: Skills Based Assessment Student Skills based Assessment Lab
Step 2: Verify that PC3 can reach PC1.
Task 9: Document the Router Configurations
Task 10: Clean Up
Erase the configurations and reload the routers. Disconnect and store the cabling. For PC hosts that are
normally connected to other networks, such as the school LAN or to the Internet, reconnect the
appropriate cabling and restore the TCP/IP settings.
All contents are Copyright © 1992–2007 Cisco Systems, Inc. All rights reserved. This document is Cisco Public Information. Page 4 of 4