Unblocking The Main Thread Solving ANRs and Frozen Frames
Picture manager
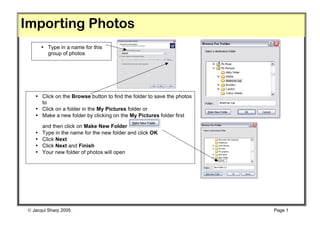
1. Importing Photos
• Type in a name for this
group of photos
• Click on the Browse button to find the folder to save the photos
to
• Click on a folder in the My Pictures folder or
• Make a new folder by clicking on the My Pictures folder first
and then click on Make New Folder
• Type in the name for the new folder and click OK
• Click Next
• Click Next and Finish
• Your new folder of photos will open
Jacqui Sharp 2005 Page 1
2. Edit Photos
Microsoft Office Picture
Manager
• Go to Start – All Programs –
Microsoft Office – Microsoft Office
tools – Microsoft Office Picture
Manager
• Your screen should look something
like this
• If you haven’t got all the toolbars or side WARNING: before resizing or
menus then go to View and make sure all compressing your photos Save
of these are selected another copy of that photo, Click
o Thumbnails on a photo, press Ctrl C on the
o Task Pane keyboard and then press Ctrl V.
o Shortcuts (this will mean that you have 2
o Show File Names copies of the same photo.) Do this
o Show Pictures only because when you have compressed
• If your Task Pane at the left is or resized your photo you will be
not visible then click on the asked to save at some stage and all
changes will be saved, which means
Shortcuts button
the original quality of your photo will
be lost.
Jacqui Sharp 2005 Page 2
3. Edit Photos
• This is your ‘My Pictures Folder’, to see all of it click on the Plus sign
• Click on a Folder and all of the pictures inside of it will appear
• Rename a picture by clicking once on it and once again then type in a new name
• Double clicking a picture will bring it into full screen and you can use the Zoom button
to zoom in and out
• Clicking on the AutoCorrect button will automatically correct colour, brightness and
contrast of your photo
• Click on the Edit Pictures button to make changes to the photos
To change Brightness
Click on Brightness and Contrast
Select Auto brightness or move the controllers to adjust it
manually. To go back to other options click on
the arrow
Jacqui Sharp 2005 Page 3
4. Edit Photos
To change Colour click on Color
Select Enhance Color or move the controllers to adjust it manually. To go back
to other options click on the arrow
• To crop the photos
• Click on Crop .
• Click on the Black handles in the middle or corners and drag
to the centre of the photo.
• Click OK.
• If you have made a mistake click on the Undo
arrow in the Toolbar.
• To go back to other options click on the arrow
To Rotate a picture
Click on Rotate.
Choose the option you want.
To go back to other options click on
the arrow
Jacqui Sharp 2005 Page 4
5. Edit Photos
To fix redeye
• Click on The Redeye removal button.
• Place your mouse over the eye and click, continue to click
on all the red eyes in the photo.
• Click OK when you have finished.
• To go back to other options click on the arrow.
To resize the photo
• Click on Resize.
To compress the photo
• Click in the Click on Compress
Predefined width x Pictures.
height. Choose what you want to
• Select from those compress for (the email
choices or click on option is very tiny).
Percentage of original See the difference in size
width…, type in a under heading
percentage like 50, Estimated total size,
click OK. Click OK. To go back to
other options click on
• To go back to other the arrow.
options click on
the arrow.
Jacqui Sharp 2005 Page 5
6. More on Photos
• Go back to the beginning options by clicking on
the Home button .
• Rename pictures in this option by clicking on
Rename pictures .
• Click on the picture to be renamed and type in the
name of the picture and press OK.
• To go back to other options click on the
arrow .
Email pictures Find out the size
• In this option click on Email pictures. of your photo by
clicking on it and
• Click on Attached to the message, or looking down at
Displayed as previews. the bottom left of
• Choose a preview size and click on Create the information
Message. Outlook will open and you can type in bar
email address and message and press OK
Jacqui Sharp 2005 Page 6
7. More on Photos
Quick Photo presentation
• Send a whole group of photos to PowerPoint or Word.
• Click on one photo or hold down the Ctrl key and click on multiple photos,
click on Send Pictures to Microsoft office
• Select PowerPoint and Send and they will all appear in a PowerPoint
presentation.
View Pictures
in different ways by
clicking on the three
Send photos to another choices available to
location on your hardrive, you
Select photos, click on Thumbnail
Filmstrip
Browse and select folder Thumbnail view
you would like to send them Filmstrip view
to, change name and file Single picture.
type if you wish and finally
decided what size you want
to export them. Click OK.
Single Picture
Jacqui Sharp 2005 Page 7