Import Photos and Edit in iPhoto
•Download as DOCX, PDF•
0 likes•670 views

The document provides instructions for importing photos into iPhoto, editing photos in iPhoto, and performing various photo editing tasks like rotating, cropping, adjusting brightness and contrast, straightening, retouching, adding effects and removing red eye. It describes connecting a camera to import photos, naming events, and options for keeping or deleting original photos after import. It also outlines steps for duplicating photos before editing, rotating, cropping, adjusting settings like exposure and saturation, straightening tilted photos, using the retouch tool, adding effects, and removing red eye.

Recommended
More Related Content
What's hot
What's hot (16)
Similar to Import Photos and Edit in iPhoto
Similar to Import Photos and Edit in iPhoto (20)
More from Jacqui Sharp
More from Jacqui Sharp (20)
Recently uploaded
Recently uploaded (20)
Import Photos and Edit in iPhoto
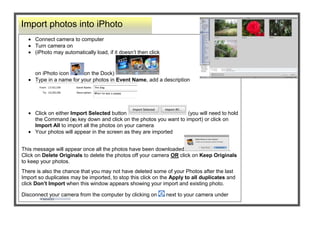
- 1. -1497965-56896000-7555865-568960Import photos into iPhoto00Import photos into iPhoto-7670165-68326000-2914652540Connect camera to computerTurn camera on (iPhoto may automatically load, if it doesn’t then click on iPhoto icon on the Dock) Type in a name for your photos in Event Name, add a description Click on either Import Selected button (you will need to hold the Command () key down and click on the photos you want to import) or click on Import All to import all the photos on your cameraYour photos will appear in the screen as they are importedThis message will appear once all the photos have been downloaded. Click on Delete Originals to delete the photos off your camera OR click on Keep Originals to keep your photos.There is also the chance that you may not have deleted some of your Photos after the last Import so duplicates may be imported, to stop this click on the Apply to all duplicates and click Don’t Import when this window appears showing your import and existing photo.Disconnect your camera from the computer by clicking on next to your camera under devices00Connect camera to computerTurn camera on (iPhoto may automatically load, if it doesn’t then click on iPhoto icon on the Dock) Type in a name for your photos in Event Name, add a description Click on either Import Selected button (you will need to hold the Command () key down and click on the photos you want to import) or click on Import All to import all the photos on your cameraYour photos will appear in the screen as they are importedThis message will appear once all the photos have been downloaded. Click on Delete Originals to delete the photos off your camera OR click on Keep Originals to keep your photos.There is also the chance that you may not have deleted some of your Photos after the last Import so duplicates may be imported, to stop this click on the Apply to all duplicates and click Don’t Import when this window appears showing your import and existing photo.Disconnect your camera from the computer by clicking on next to your camera under devices<br />-62865-568960Rotating Photos00Rotating Photos-177165-683260Rotate a photo by clicking on the photo first , then click on the Rotate button and your picture will rotate Find out how big your photo is and when it was taken by clicking on the button Click in the Title box to rename the photo. By clicking on date, time or rating you can make more changes.Click in the ‘description’ box if you would like to add more information.00Rotate a photo by clicking on the photo first , then click on the Rotate button and your picture will rotate Find out how big your photo is and when it was taken by clicking on the button Click in the Title box to rename the photo. By clicking on date, time or rating you can make more changes.Click in the ‘description’ box if you would like to add more information.<br />-228600-6184900000-685800Exporting Photos to another folder on your Hardrive and resizing photos00Exporting Photos to another folder on your Hardrive and resizing photos-62865345440Click once on an Album or an Event Go to File – ExportLeave it Current if you want to keep them the same size or if you want to scale the images down click on the Kind dropdown menu, select JPEG . Click on the Size dropdown and select small, medium or large or choose Custom to select an exact size Click Export, decide where you would like to save these photos (this enables you to save your photos to a separate folder away from iPhoto)00Click once on an Album or an Event Go to File – ExportLeave it Current if you want to keep them the same size or if you want to scale the images down click on the Kind dropdown menu, select JPEG . Click on the Size dropdown and select small, medium or large or choose Custom to select an exact size Click Export, decide where you would like to save these photos (this enables you to save your photos to a separate folder away from iPhoto)<br />73152000000228600Crop PhotosIn Photos or Events click on the photo you want to editClick the Edit button Click the Crop button Click and drag on a handle to highlight the part you want tokeepClick Apply That photo is now cropped 00Crop PhotosIn Photos or Events click on the photo you want to editClick the Edit button Click the Crop button Click and drag on a handle to highlight the part you want tokeepClick Apply That photo is now cropped -6286500-571500Edit your photos00Edit your photos-6515100-68580000<br />34290037915850010287002491740009912351183005004226560-815340Before making changes to your Photo, duplicate it in the Photo Library by Clicking on photo and pressing – D on the keyboard00Before making changes to your Photo, duplicate it in the Photo Library by Clicking on photo and pressing – D on the keyboard<br />-24765-416560Edit your photos00Edit your photos-253365-645160Set Constraints You can set constraints when cropping photos so that the cropped photos will fit to photo paper size. Before clicking on the Crop button click on the Constrain dropdown menu and select a size Drag a handle and the box will drag to the dimensions you have set. Your mouse pointer will also turn into a hand so that you can reposition the highlighted area over the part you want to crop. Click Apply .00Set Constraints You can set constraints when cropping photos so that the cropped photos will fit to photo paper size. Before clicking on the Crop button click on the Constrain dropdown menu and select a size Drag a handle and the box will drag to the dimensions you have set. Your mouse pointer will also turn into a hand so that you can reposition the highlighted area over the part you want to crop. Click Apply .<br />6553200800100004394835-568960In Photos or Events click on the photo you want to editClick the Edit button 00In Photos or Events click on the photo you want to editClick the Edit button -628654917440Click the Done button when you have finished or click on the Arrow button to move to the next photo.00Click the Done button when you have finished or click on the Arrow button to move to the next photo.-177165-568960Adjust brightness and contrast00Adjust brightness and contrast-177165116840Click on the Adjust button Make adjustments to your photos by clicking and dragging the slidersAdjust Black levels by dragging the slider under the histogram The Saturation slider will boost coloursThe White balance is controlled by the Temperature slider, to the left is colder and to the right is warmerWhen you use the Sharpness slider adjust the zoom first by clicking on the Zoom slider Click on the Control key on the keyboard to see what your photo looked like previouslyClick on the Eyedropper icon place over a white or gray colour and click, this fixes the colour balance, if you don’t like it go to Edit - UndoClick on Reset Sliders button to return the image back to its original state. Click on the to close it.00Click on the Adjust button Make adjustments to your photos by clicking and dragging the slidersAdjust Black levels by dragging the slider under the histogram The Saturation slider will boost coloursThe White balance is controlled by the Temperature slider, to the left is colder and to the right is warmerWhen you use the Sharpness slider adjust the zoom first by clicking on the Zoom slider Click on the Control key on the keyboard to see what your photo looked like previouslyClick on the Eyedropper icon place over a white or gray colour and click, this fixes the colour balance, if you don’t like it go to Edit - UndoClick on Reset Sliders button to return the image back to its original state. Click on the to close it.<br />434340024003000002400300004394835-568960In Photos or Events click on the photo you want to editClick the Edit button 00In Photos or Events click on the photo you want to editClick the Edit button -291465-68326000-177165-568960Straighten your Photo00Straighten your Photo-62865180340Click on the Straighten button Clicking on the Straighten slider will show a grid which you can line your photo up on if it isn’t straightDrag the slider to the left or right and the picture will tilt slightly, click Done00Click on the Straighten button Clicking on the Straighten slider will show a grid which you can line your photo up on if it isn’t straightDrag the slider to the left or right and the picture will tilt slightly, click Done<br />3023235-568960In Photos or Events click on the photo you want to edit, Click the Edit button 00In Photos or Events click on the photo you want to edit, Click the Edit button 6452235-60007500-577852540Before making changes to your Photo, duplicate it in the Photo Library by Clicking on photo and pressing – D on the keyboard so that you have an original.00Before making changes to your Photo, duplicate it in the Photo Library by Clicking on photo and pressing – D on the keyboard so that you have an original.26803353660140This old photo had a black mark on the hand. The Retouch button removed it.00This old photo had a black mark on the hand. The Retouch button removed it.4051935354584000165735354584000-628651835785Use the Retouch button to make small touch ups to your photo. Click on the button and then click and drag over the mark to be removed.Adjust the slider to the left or right to change the size of the retouch marker00Use the Retouch button to make small touch ups to your photo. Click on the button and then click and drag over the mark to be removed.Adjust the slider to the left or right to change the size of the retouch marker-291465-68326000-177165-568960More editing effects00More editing effects-62865728345Click on the Effects button to convert your colour photo to any of the nine effects shown. Click on the Effect and it will be applied to your photos00Click on the Effects button to convert your colour photo to any of the nine effects shown. Click on the Effect and it will be applied to your photos<br />5995035-594360In Photos or Events click on the photo you want to edit, Click the Edit button 00In Photos or Events click on the photo you want to edit, Click the Edit button 519493517170400051949354597400072523355146040Enhanced 00Enhanced 51949355146040Original 00Original 70999353420745004813935340360000-177165235585Remove the Red Eye from your photosClick on the Red Eye Button Click on the centre of the eye in the photo and the red eye will be removedAdjust the size of the red eye marker by selecting Manual and dragging the slider00Remove the Red Eye from your photosClick on the Red Eye Button Click on the centre of the eye in the photo and the red eye will be removedAdjust the size of the red eye marker by selecting Manual and dragging the slider-1771652860040Increase the color enhancement by clicking the Enhance button After the photo has enhanced, press the Shift key, this will show your original photoIf you don’t like the change, click on the picture go to Photos - Revert to Original 00Increase the color enhancement by clicking the Enhance button After the photo has enhanced, press the Shift key, this will show your original photoIf you don’t like the change, click on the picture go to Photos - Revert to Original 2794635-454660Before making changes to your Photo, duplicate it in the Photo Library by Clicking on photo and pressing – D on the keyboard.00Before making changes to your Photo, duplicate it in the Photo Library by Clicking on photo and pressing – D on the keyboard.-177165-568960More editing effects00More editing effects-291465-68326000<br />