1. Guidelines for Point To Point (PxP) applications installation:
Point To Point applications are used quite a lot. What are they?
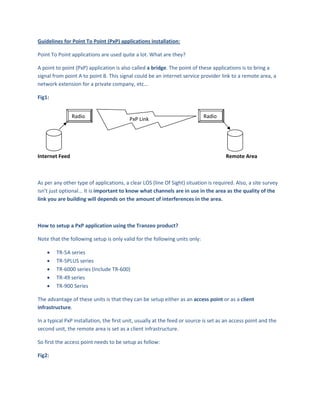
A point to point (PxP) application is also called a bridge. The point of these applications is to bring a
signal from point A to point B. This signal could be an internet service provider link to a remote area, a
network extension for a private company, etc...
Fig1:
Radio PxP Link Radio
Internet Feed Remote Area
As per any other type of applications, a clear LOS (line Of Sight) situation is required. Also, a site survey
isn’t just optional... It is important to know what channels are in use in the area as the quality of the
link you are building will depends on the amount of interferences in the area.
How to setup a PxP application using the Tranzeo product?
Note that the following setup is only valid for the following units only:
• TR-5A series
• TR-5PLUS series
• TR-6000 series (Include TR-600)
• TR-49 series
• TR-900 Series
The advantage of these units is that they can be setup either as an access point or as a client
infrastructure.
In a typical PxP installation, the first unit, usually at the feed or source is set as an access point and the
second unit, the remote area is set as a client infrastructure.
So first the access point needs to be setup as follow:
Fig2:
2. Note that as this moment the PxP isn’t enabled. I will explain later why. On the access point as well as
the client infrastructure the network configuration should be set as bridge and not router. Now that the
access point is setup, let’s take a look at the client infrastructure setup:
Fig3:
3. As you can see, in infrastructure mode, no channels are available to choose the reason for that is that
the client infrastructure looks for a MAC address and an SSID (name of the unit). Now, here again we
can see that the PxP option isn’t selected. The reason behind that is because if you set the PxP now, you
will not be able to see other network in the area.
Let’s take a look at the AP List in the client infrastructure:
Fig4:
4. As we can see, there is quite a few things around that are using the same channel as the link I am
creating. So let’s change the channel on the access point. A good guess here, would be set the access
point on channel 11:
Fig5:
Now let’s go back to the infrastructure client and refresh the AP list:
Fig6:
As we can see now, I’m on channel 11 and the other units are on channel 1. This will protect me from
interferences. Also notice that one of the access point which had a bad signal is now gone from the list.
Now it is time to set the units in PxP mode. How does this work?
First, we need the two MAC addresses of the units. In my case, we can see above that the MAC address
of the access point is 0060B34FF113. To get the MAC address of the client infrastructure you can:
Check the station list on the access point, Fig7:
5. As we can see, the first unit is the client infrastructure that I want to connect to. The second one is an
unwanted CPQ. The CPQ will be dealt with when the PxP mode becomes active.
You can also check the MAC address of the client infrastructure by clicking on Back To The Information
Page on the client infrastructure GUI interface Fig8:
6. So we now can see that the MAC address of the client infrastructure is 0060B34FF120. Now on the client
infrastructure, go back to the Wireless Settings Page and set the PxP mode as follow:
Fig9:
When you apply these settings and then take a look at the AP list you can see that now, only the access
point I want to connect to is showing Fig10:
But this time we are not associated. The reason for that is that the client infrastructure knows what
MAC address it should be looking at but the access point still doesn’t. Let’s now set the PxP mode on the
access point Fig11:
Now let’s take a look at the station list on the access point Fig12:
7. This time only the client infrastructure of my PxP link is showing. The CPQ is now gone, the reason for
that is that the access point is now accepting request for only one MAC address, the MAC address of the
client infrastructure in my PxP link.
Now let’s take a look at the AP list on the client infrastructure Fig13:
Only one access point, the one of my PxP link.