
Empfohlen
Empfohlen
Weitere ähnliche Inhalte
Was ist angesagt?
Andere mochten auch
Andere mochten auch (13)
Ähnlich wie Copying photos from your digital camera to your iPad
Ähnlich wie Copying photos from your digital camera to your iPad (20)
Kürzlich hochgeladen
Kürzlich hochgeladen (20)
Copying photos from your digital camera to your iPad
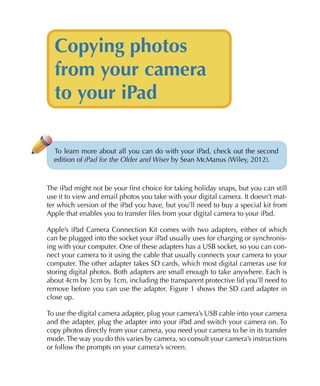
- 1. Copying photos from your camera to your iPad To learn more about all you can do with your iPad, check out the second edition of iPad for the Older and Wiser by Sean McManus (Wiley, 2012). The iPad might not be your first choice for taking holiday snaps, but you can still use it to view and email photos you take with your digital camera. It doesn’t mat- ter which version of the iPad you have, but you’ll need to buy a special kit from Apple that enables you to transfer files from your digital camera to your iPad. Apple’s iPad Camera Connection Kit comes with two adapters, either of which can be plugged into the socket your iPad usually uses for charging or synchronis- ing with your computer. One of these adapters has a USB socket, so you can con- nect your camera to it using the cable that usually connects your camera to your computer. The other adapter takes SD cards, which most digital cameras use for storing digital photos. Both adapters are small enough to take anywhere. Each is about 4cm by 3cm by 1cm, including the transparent protective lid you’ll need to remove before you can use the adapter. Figure 1 shows the SD card adapter in close up. To use the digital camera adapter, plug your camera’s USB cable into your camera and the adapter, plug the adapter into your iPad and switch your camera on. To copy photos directly from your camera, you need your camera to be in its transfer mode. The way you do this varies by camera, so consult your camera’s instructions or follow the prompts on your camera’s screen.
- 2. iPad for the Older and Wiser Figure 1 Using the SD card adapter is much simpler. You just insert your SD card into the adapter and then insert the adapter into your iPad’s socket. When you connect either of these adapters to your iPad, the iPad will go into the Photos app and show you the photos on the camera or SD card, as you can see in Figure 2. Copying photos to your iPad is called ‘importing’ them. If you want to import all the photos from your camera to your iPad, tap the button to Import All at the bottom of the screen. You can also delete all the photos using the Delete All button, but take care – this will delete all the photos from your camera. Alternatively, to select a photo, tap it and a blue tick will appear in its bottom-right corner. You can choose as many photos as you want, dragging the screen up to see more, and then tap Import to copy the selected photos to your iPad. You can also tap Delete to delete the selected photos from your camera. The Import button will give you another chance to import all the photos even if you’ve already selected some, as you can see in Figure 2. 2
- 3. Copying photos from your camera to your iPad Figure 2 During importing, you’ll see all the blue ticks on photos turn green as the pictures are copied across. When it’s finished, your iPad will ask you if you want to delete photos from your camera. Don’t lose concentration here and tap Delete by mistake! Be very careful if you choose to delete photos while using the iPad Camera Connection Kit – when you delete them, you remove them from your SD card or camera completely, and you won’t be able to copy them from your camera to your computer later. When you have finished, you can disconnect your adapter from the iPad. You can copy the photos stored on your iPad to your computer in the same way you copy images taken or created using the iPad. 3