Making of: Mountain Lodge
•
8 gefällt mir•7,064 views

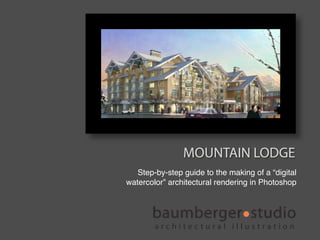
Step-by-step guide to the making of a "digital watercolor" architectural rendering in Photoshop.

Empfohlen
Weitere ähnliche Inhalte
Ähnlich wie Making of: Mountain Lodge
Ähnlich wie Making of: Mountain Lodge (20)
Kürzlich hochgeladen
Kürzlich hochgeladen (20)
Making of: Mountain Lodge
- 1. MOUNTAIN LODGE Step-by-step guide to the making of a “digital watercolor” architectural rendering in Photoshop architectural illustration
- 2. Wireframe view of 3-d model Built in Sketchup and Autocad, each floor was constructed on a “layer = material” basis in separate files to more easily incorporate design changes. All files were then compiled in one model file in 3D Studio MAX for rendering.
- 3. Hidden-line view of model
- 4. Base render Rendered with the Maxwell plug-in. Background masked out in Photoshop.
- 5. Selection sets Rendered as a separate image file from Maxwell – the ability to select by object or material within Photoshop is a huge timesaver. Note the colors here correspond to the wireframe view from earlier.
- 6. Background building inserted The neighboring building to the right was cut out from the base render and put on a separate layer to control its opacity throughout the design process.
- 7. Photoshop filters applied A custom combination of smart blur, find edges and watercolor filters applied to base render layer. A copy is made to control the strength of each effect, but this can also be accomplished via Smart Filters. Background building “filtered” separately.
- 8. Close up of base render with filters applied
- 9. Sky and background added A mix of site photos and a painted sky create the backdrop. Filters are applied to these items as needed to ensure continuity with rendered buildings. Atmospheric perspective is added with layers set to Normal, Overlay and Color blending modes to get the right effect.
- 10. Glass adjustments Imagery and glows are added to the glass in both buildings. Street level windows reflect the expected retail mix of ski apparel and restaurants. Residential imagery used above. Glows are created in a random pattern using the dodge tool.
- 11. Adjustment to wood siding Quick adjustment requested by client to color of the siding. Using the selection sets created in the initial render, this change is easily accommodated.
- 12. Street trees added Winter trees are added per landscape plan along both streets. Slight “artistic license” is made with their placement to ensure visibility of drop-off area mid-block.
- 13. Cars added A minimum of cars were requested to maintain pedestrian quality of scene. Careful masking of the red car was necessary to help explain the separation between marquee and retail shops beyond.
- 14. People added As with the trees and shops, the people should reflect the time of year as well as the time of day in the scene. The bench in the lower right was rendered separately and inserted into the middle of the people set.
- 15. Close-up of people Filters are applied to the entourage as well so they blend in with the building as much as possible. Additionally, most of the people are at 80-90% opacity to aid in the blending.
- 16. More entourage The foreground car was rendered separately so it could be scaled and moved within to scene as necessary to minimize view blockage. A snow-covered winter tree helps to frame the right side of the image.
- 17. More glows on building A subtle new color wash applied to the sun side of the building helps to vignette the edges and bring out some highlights on the building.
- 18. Smart blur The scene is flattened, and a gentle smart blur filter is applied to the entire image to soften everything up, and once again assist in unifying the entourage. The effect can be masked out selectively as needed.
- 19. Close-up of roof
- 20. First layer of textures added Scanned watercolor paper set on top of the flattened image in Overlay blending mode. The scan is adjusted so the brightness level is centered at 50% to ensure the effect is not too strong.
- 21. Final adjustments Slight adjustment to curves to increase contrast and new “sketch lines” are added to the peaks. One more texture layer is applied as a pattern layer style to control its strength. Signage is added to the marquee, and weʼre done!
- 22. Close-up of roof with textures added
- 23. MOUNTAIN LODGE Client: Callison Architecture Entourage assistance: Lucid Arts ASAI Award of Excellence winner, 2009 Visit us online at www.baumbergerstudio.com or at Facebook: http://companies.to/baumbergerstudio/ And thanks for watching! architectural illustration