Good Stuff Happens in 1:1 Meetings: Why you need them and how to do them well
Sm64 abc routes
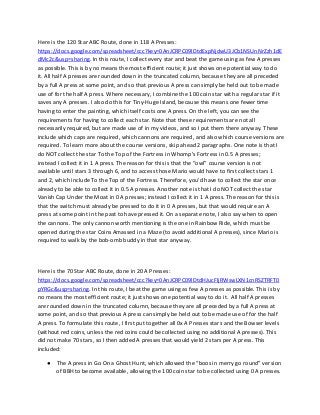
1. Here is the 120 Star ABC Route, done in 118 A Presses:
https://docs.google.com/spreadsheet/ccc?key=0AnJCRPC09lDtdExpNjdwU3JCb1NSUnNrZzh1dE
dMc2c&usp=sharing. In this route, I collect every star and beat the game using as few A presses
as possible. This is by no means the most efficient route; it just shows one potential way to do
it. All half A presses are rounded down in the truncated column, because they are all preceded
by a full A press at some point, and so that previous A press can simply be held out to be made
use of for the half A press. Where necessary, I combine the 100 coin star with a regular star if it
saves any A presses. I also do this for Tiny-Huge Island, because this means one fewer time
having to enter the painting, which itself costs one A press. On the left, you can see the
requirements for having to collect each star. Note that these requirements are not all
necessarily required, but are made use of in my videos, and so I put them there anyway. These
include which caps are required, which cannons are required, and also which course versions are
required. To learn more about the course versions, skip ahead 2 paragraphs. One note is that I
do NOT collect the star To the Top of the Fortress in Whomp's Fortress in 0.5 A presses;
instead I collect it in 1 A press. The reason for this is that the “owl” course version is not
available until stars 3 through 6, and to access those Mario would have to first collect stars 1
and 2, which include To the Top of the Fortress. Therefore, you'd have to collect the star once
already to be able to collect it in 0.5 A presses. Another note is that I do NOT collect the star
Vanish Cap Under the Moat in 0 A presses; instead I collect it in 1 A press. The reason for this is
that the switch must already be pressed to do it in 0 A presses, but that would require an A
press at some point in the past to have pressed it. On a separate note, I also say when to open
the cannons. The only cannon worth mentioning is the one in Rainbow Ride, which must be
opened during the star Coins Amassed in a Maze (to avoid additional A presses), since Mario is
required to walk by the bob-omb buddy in that star anyway.
Here is the 70 Star ABC Route, done in 20 A Presses:
https://docs.google.com/spreadsheet/ccc?key=0AnJCRPC09lDtdHJucFljRWswLXN1cnRSZTRFT0
pYRGc&usp=sharing. In this route, I beat the game using as few A presses as possible. This is by
no means the most efficient route; it just shows one potential way to do it. All half A presses
are rounded down in the truncated column, because they are all preceded by a full A press at
some point, and so that previous A press can simply be held out to be made use of for the half
A press. To formulate this route, I first put together all 0x A Presses stars and the Bowser levels
(without red coins, unless the red coins could be collected using no additional A presses). This
did not make 70 stars, so I then added A presses that would yield 2 stars per A press. This
included:
●
The A press in Go On a Ghost Hunt, which allowed the “boos in merry go round” version
of BBH to become available, allowing the 100 coin star to be collected using 0 A presses.
2. ● The A press to go to HMC, which allowed both the Toad #1 star for 0 A presses and
Swimming Beast in the Cavern for 0 A presses.
● The A press in Inside the Ancient Pyramid, which allowed the “extra tornado” version of
SSL to become available, allowing the star Free Flying for 8 Red Coins to be collected
using 0 A presses.
● The A press in Plunder in the Sunken Ship, which allowed the “eel in home” version of
JRB to become available, allowing the star Can the Eel Come Out to Play? to be
collected using 0 A presses.
● The A press to enter THI, which allowed both the 100 coin star and the star Make
Wiggler Squirm for 0 A presses.
● The A press to enter TTC, which allowed both the 100 coin star and the star Stop Time
for Red Coins for 0 A presses.
Those were all A presses that yielded 2 stars each. At this point, I simply added A presses that
yielded 1 star each until 70 stars were achieved.
Here are the course versions:
https://docs.google.com/spreadsheet/ccc?key=0AnJCRPC09lDtdEllX3ZaRHNSUmdhMlNnWjVJN
1dpSmc&usp=sharing. You may have noticed that when you select certain stars, the courses
vary slightly. For example, selecting the first star of BoB causes King Bob-omb to be on top of
the hill, whereas he is not there in other stars. We denote these variations of the courses as
different versions of the courses. Some versions of courses are required to collect stars using
the optimal number of A presses. For example, Fall Onto the Caged Island must be collected
during the star Chip Off Whomp’s Block, since it requires jumping off of King Whomp’s head.
Yet, which version you receive upon selecting a star is not entirely obvious. If there are any blue
stars in the stage select, then the last version you can select is the leftmost blue star. If you
select a star to the right of the leftmost blue star, you will STILL receive the version for that
leftmost blue star. For example, let’s say the first time I play in Whomp’s Fortress, I collect the
star Fall Onto the Caged Island. The next time I enter the course, I can select either Chip Off
Whomp’s Block (a blue star) or Fall Onto the Caged Island (a yellow star). However, since the
leftmost blue star is still Chip Off Whomp’s Block, selecting Fall Onto the Caged would STILL
yield the version with King Whomp in it. Understanding how this system works and recognizing
which versions are required for which stars is crucial for understanding the ABC routes I have
presented. The versions I list are all fairly intuitive, except perhaps for the “extra tornado”
version of SSL. You may never have noticed this, but one of the two quicksand patches in SSL
near where Mario starts may or may not form a tornado when Mario goes close. It only does
this during stars 4 through 6, and this is required for collecting the star Free Flying for 8 Red