Automated Cool Frames PSD Templates
•
0 gefällt mir•856 views

12 very cool frames in PSD file format. Composition is created from unique frame and background image (usually pattern). Process of placing image and replacing background image/graphic is automated using Photoshop actions. In addition there are and 6 Layer Styles which can be applied to any frame.

Empfohlen
Empfohlen
Weitere ähnliche Inhalte
Kürzlich hochgeladen
Kürzlich hochgeladen (20)
Empfohlen
Empfohlen (20)
Automated Cool Frames PSD Templates
- 1. Download test files and buy from Graphic River
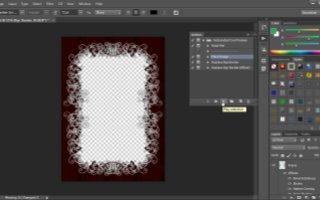
- 2. Automated Cool Frames User Guide There are only few things you should know before start using actions to automate placement of image and replacement of background (usually) pattern: Do not change template if you plan to use actions. It is desired to duplicate template and to change size/resolution as needed but do not change layer names, order in layers stack and do not create any additional layer in between existing. There are two (2) actions to replace background pattern: Replace Bgr Border and Replace Bgr Border (Effect). Bgr Border is my naming convection for layer with background pattern which has attached layer mask. The differnce is that some templates have Drop Shadow effect applied to Bgr Border layer and in that case run Replace Bgr Border (Effect) action. Bonus Styles I created 6 styles which should be applied to Frame layer. To load styles navigate to Frame Styles.asl file and double click it. Select Frame layer then click style icon in Styles panel. Download test files and buy from Graphic River
- 3. Load Actions To load actions first display Actions panel from Window > Actions. Click on Actions panel menu and choose Load Actions. Navigate to Automated Cool Frames.atn file and double click on it. Download test files and buy from Graphic River
- 4. Change Pixel Dimensions and Resolution Open any of 12 available templates and duplicate it from Image > Dulicate. You can change size and resolution from Image > Image Size and do not forget to turn on Scale Styles option. Download test files and buy from Graphic River
- 5. Play Action To play any action select it in Actions panel then click Play button at the bottom of Actions panel. There are only three (3) actions: Place Image to place image you want to use and Replace Bgr Border actions to replace background image/pattern. You can place image in any way you want but with action you will save couple of extra clicks. Replace Bgr Border actions are more complex and will save you couple of clicks plus action will create proper layer mask and apply layer effect Drop Shadow (Replace Bgr Border (Effect) action) to newly placed background. Existing background image will be deleted. Download test files and buy from Graphic River
- 6. Actions Index After loading actions you will see total of 3 actions. Here I will list and explain what each of actions is doing. • Place Image action will select Your Image layer and invoke Replace Contents command which will open Place dialog to navigate to image you want to use. • Replace Bgr Border action will select Bgr Border layer and open Place dialog to navigate to image/graphic you want to use as background. After placing image/ graphic you will be able to scale and reposition it. Immediatelly after you confirm placement action will replicate layer mask from original Bgr Border layer and delete it because you do not need it anymore. You can use this and any other action as many times as you want in the same document. • Replace Bgr Border (Effect) is doing exact same thing as above described with addition of copying layer effect Drop Shadow from original Bgr Border layer. Download test files and buy from Graphic River
- 7. Download test files and buy from Graphic River
- 8. Download test files and buy from Graphic River
- 9. Download test files and buy from Graphic River
- 10. Download test files and buy from Graphic River
- 11. Download test files and buy from Graphic River
- 12. Download test files and buy from Graphic River
- 13. Download test files and buy from Graphic River
- 14. Download test files and buy from Graphic River
- 15. Download test files and buy from Graphic River