How I painted that - The Grand Canyon
•Als DOC, PDF herunterladen•
1 gefällt mir•272 views

This is one of a series of articles that I am writing about how I paint. Eventually, these will be collected into a book. For full details on all my artwork, visit my website at www.richardharpum,.com

Empfohlen
Weitere ähnliche Inhalte
Kürzlich hochgeladen
Kürzlich hochgeladen (20)
Empfohlen
Empfohlen (20)
How I painted that - The Grand Canyon
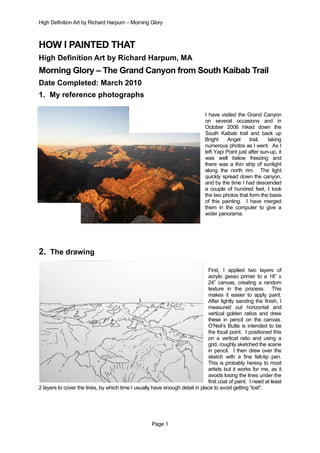
- 1. High Definition Art by Richard Harpum – Morning Glory HOW I PAINTED THAT High Definition Art by Richard Harpum, MA Morning Glory – The Grand Canyon from South Kaibab Trail Date Completed: March 2010 1. My reference photographs I have visited the Grand Canyon on several occasions and in October 2006 hiked down the South Kaibab trail and back up Bright Angel trail, taking numerous photos as I went. As I left Yapi Point just after sun-up, it was well below freezing and there was a thin strip of sunlight along the north rim. The light quickly spread down the canyon, and by the time I had descended a couple of hundred feet, I took the two photos that form the basis of this painting. I have merged them in the computer to give a wider panorama. 2. The drawing First, I applied two layers of acrylic gesso primer to a 18” x 24” canvas, creating a random texture in the process. This makes it easier to apply paint. After lightly sanding the finish, I measured out horizontal and vertical golden ratios and drew these in pencil on the canvas. O’Neil’s Butte is intended to be the focal point. I positioned this on a vertical ratio and using a grid, roughly sketched the scene in pencil. I then drew over the sketch with a fine felt-tip pen. This is probably heresy to most artists but it works for me, as it avoids losing the lines under the first coat of paint. I need at least 2 layers to cover the lines, by which time I usually have enough detail in place to avoid getting “lost”. Page 1
- 2. High Definition Art by Richard Harpum – Morning Glory 3. Initial blocking in and painting the sky I blocked in the main areas very roughly in colour to get a feel for how the painting would look. I then painted the sky, using Prussian blue and white in several layers to obtain the right depth of colour. I added clouds to create interest and balance. My intent was for the main clouds to lead the eye down through the focal point in a sloping “Z” shape. Clouds were over-painted in white using a No. 4 short hog filbert, with the paint as dry as I could get it (dabbing off excess paint on a rag). Acrylics are ideal for this as they dry so quickly and multiple layers can be applied in quick succession to achieve a realistic effect. Cloud shadows were created with my home-made neutral dark and some extra blue, again applied almost dry. 4. Painting the canyon Unlike most artists, I tend to complete discrete sections of a painting at a time, rather than gradually building up the whole painting. I can therefore see a finished segment before moving onto another. Not only does this help me to avoid missing crucial detail but I also find that it inspires and motivates me to continue, as I get “instant gratification” with each completed section. In this painting, the sky was 95% finished before I moved on. I worked from the distance forward. I usually paint distant objects slightly darker than they will end up. I used a base of titanium buff (a “convenience colour”) mixed with cadmium orange, raw umber and burnt sienna for the rock strata. For the shadows I used my home-made neutral dark with added red and blue to create a purple shade. I only use black for man-made objects and use neutral dark for all shadows, as it looks much more natural. As I add more detail, I use finer brushes, typically starting with a No 4 round and migrating to a No. 2 for the really fine detail. I also use a No. 1 or 2 rigger for the fine lines. Page 2
- 3. High Definition Art by Richard Harpum – Morning Glory 5. Painting the foreground I painted from distance to foreground. Although my photograph shows very little detail in the shaded areas, I wanted to show more, so I enhanced the photo on the computer so that the detail was more visible and used this as my reference. As the photo showed little detail in the foreground, I made this up and moved the tree to create a better balance. 6. Creating atmosphere and sunshine Having virtually completed the painting, my final stage was to add “atmosphere”. Acrylics are ideal for this. The base painting is dry within a short time and washes can be applied without disturbing it. To create a haze on the distant strata, I copy nature by covering the area with a thin acrylic wash of white plus blue, applied with a No.10 round. I wait for about 30 seconds and then wipe off 90% of the wash with a cloth and where necessary rub it with my finger. I use the same process to accentuate shadows (using my home- made neutral dark) and sunshine (using cadmium yellow). I then dry with a hair dryer. If necessary, I repeat the process until I have achieved the desired level of saturation. The effect is amazing; suddenly the sun is shining much more brightly! Page 3
- 4. High Definition Art by Richard Harpum – Morning Glory 7. The finishing touches After completing a painting, I usually spend a few days standing back and looking at it to find the snags. I note these and correct them in a final session. Here I changed the foreground rock formations, enhanced the highlights and moved the bush. After scanning, I apply 2 to 3 coats of Liquitex gloss varnish. 8. Completed Painting: Morning Glory – Grand Canyon Vista from South Kaibab Trail, acrylic on canvas, 18 x 24” (46 x 61 cm) Page 4
- 5. High Definition Art by Richard Harpum – Morning Glory What I used Support stretched canvas (18” x 24”) Brushes No. 2, 4, & 10 rounds No. 14 flat No. 4 short hog filbert Other materials white ceramic tile (I use this as a palette, rather than a stay-wet system; it keeps the paint wet, makes it easy to see colour tones and is easy to clean up under the tap) old towel (12” x 8” for wiping off washes) water spray bottle (used mainly for keeping my paint moist on the palette). Colours Titanium white Titanium buff Prussian blue Cadmium orange Raw umber Burnt sienna Vermillion (hue) Cadmium yellow (hue) Neutral dark (home made, 50/50 ultramarine and raw umber) Page 5