Beginners Guide to TikTok for Search - Rachel Pearson - We are Tilt __ Bright...
Mount Manual
1. Prismasonic Ceiling Mount CB-200 Prismasonic Ceiling Mount CB-200
Assembly Instructions
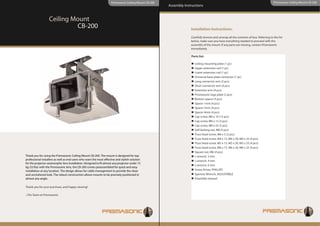
Ceiling Mount
CB-200 Installation Instructions:
Carefully remove and unwrap all the contents of box. Referring to the list
below, make sure you have everything needed to proceed with the
assembly of the mount. If any parts are missing, contact Prismasonic
immediately.
Parts list:
Ceiling mounting plate (1 pc)
Upper extension rod (1 pc)
Lower extension rod (1 pc)
Universal base plate connector (1 pc)
Long connector arm (2 pcs)
Short connector arm (4 pcs)
Extension arm (4 pcs)
Prismasonic logo plate (2 pcs)
Bottom spacer (4 pcs)
Spacer 1mm (4 pcs)
Spacer 2mm (4 pcs)
Spacer 4mm (4 pcs)
Cap screw, M6 x 10 (12 pcs)
Cap screw, M6 x 12 (2 pcs)
Cap screw, M8 x 55 (5 pcs)
Self-locking nut, M8 (5 pcs)
Truss head screw, M6 x 5 (2 pcs)
Truss head screw, M4 x 15, M4 x 20, M4 x 25 (4 pcs)
Truss head screw, M5 x 15, M5 x 20, M5 x 25 (4 pcs)
Truss head screw, M6 x 15, M6 x 20, M6 x 25 (4 pcs)
Square nut, M6 (4 pcs)
Thank you for using the Prismasonic Ceiling Mount CB-200. The mount is designed for top L-wrench, 3 mm
professional installers as well as end users who want the most effective and stylish solution L-wrench, 4 mm
for the projector-anamorphic lens installation. Designed to fit almost any projector under 15
L-wrench, 6 mm
kg (33 lbs) with the Prismasonic lens, the CB-200 comes preassembled for quick and easy
installation at any location. The design allows for cable management to provide the clean Screw Driver, PHILLIPS
and uncluttered look. The robust construction allows mounts to be precisely positioned in Spanner Wrench, ADJUSTABLE
almost any angle. Assembly manual
Thank you for your purchase, and happy viewing!
–The Team at Prismasonic
2. Prismasonic Ceiling Mount CB-200 Prismasonic Ceiling Mount CB-200
Assembly Instructions Assembly Instructions
Introduction
The long connector arms extending the projector's front edge are attached to the universal base
In order to achieve a stable assembly, it is necessary to attach plate with cap screws, M6x10 and square nuts, M6 (example3), and to the rectangular plate of lens
the projector body to the mount at least from the three spots. stand with cap screws, M6x12. Check that the lens is now orthogonally as close as possible to the cen-
There are many different ways to attach the projector + lens to tre of the projector optics. After everything is appropriately positioned make the final tightening of all
the mount, but probable only the one most optimal solution. screws.
The important issue is that the universal base plate is mounted
as close to the centre of gravity of projector + lens combination NOTE! You will have to tilt the lens to the direction of the light path (watch the Lens Manual). This lens
as possible. Note that the weight of lens is around 3.4 -3.8 kg tilting needs some extra space between the projector optics and the lens.
depending on the model.
STEP 1
Turn around your projector upside down and arrange the fastening arms on the bottom (Fig 1). The universal
base plate is attached to the projector body with the aid of short connector arm + extension arm (example1), or
using only the short connector arm (example2), or to connect the plate directly to the projector using the bot-
tom spacer below the plate (example2), or with the aid long connector arm (example3). The connection method
for the projector body depends on where the centre of gravity spot locates in relation to the screw threads of the
projector. Make sure the both axes of the universal base plate are at rectangular position related to the projector
optics. The truss head screws M4,5,6 x 15,20,25 are for attaching the arms to the projector body, while the cap
screws M6x10 are for attaching the arms to the universal base plate (look examples). Tight all the screws first
only to an amount that the arms still are loosely held.
Example 1 Example 2
Example 3
STEP 2
Install the ceiling mounting plate to the cor-
rect location on ceiling (Fig 2) (installation
parts not included) . Please consult the profes-
sional installer if you do NOT know an appro-
priate way to attach heavy loads to your
Figure 1 ceiling material.
Figure 2
3. Prismasonic Ceiling Mount CB-200 Prismasonic Ceiling Mount CB-200
Assembly Instructions Assembly Instructions
STEP 3
First align two holes on the lower extension
rod at the suitable holes on the upper exten-
sion rod, tighten them with cap screw, M8 x Important Notes!
55 and self-locking nut, M8. Use the two truss
head screw, M6 x 5 on sides for locking the To ensure correct usage, please read this instruc-
rods to each other completely (Fig 3). tions manual thoroughly. Keep this manual for
future reference.
Now attach the extension rods to the universal
base plate connector with cap screw, M8 x 55
Brackets should be mounted only by a qualified
and self-locking nut, M8 refer to Fig 3. Tighten
installer
screws and nuts, including the all screws and
nuts of universal base plate connector securely
User will be responsible for any injuries and dam-
using the L -wrench, 6 mm and Spanner
ages that may arise from improper installation and
wrench.
handling of Ceiling mounting kit
Lift the whole setup from the extension rods to
Ensure all mounting screws are appropriately posi-
the ceiling and attach it to the ceiling mount-
tioned and properly tightened/fastened
ing plate using the three cap screws, M8 x 55
and Self-locking nuts, M8 refer to Fig 3.
Installers are to ensure everyone’s safety during
Tighten the screws again securely with L -
installation
wrench, 6 mm and Spanner wrench.
Figure 3
Finally insert the two Prismasonic logo plates
to the ceiling mounting plate (Fig 4). In order
to get the flanges of the logo plates inserted,
the assembly screws of ceiling mounting plate
have first to be loose a bit.
Figure 4
In order to minimize the drop from ceiling, projec-
tor + lens can be mounted directly to the ceiling
mounting plate without the extension rods re-
fer to Fig 5. Loose the two cap screws, M8 x 15
from the unused part of universal base plate
connector and attach the ceiling mounting
plate to the modified base connector using the
screws and the two self-locking nuts, M8, exactly
as shown in Fig 5.
Figure 5