1. Test D’Un Port GPIO
4.0
Osistar
p. 1
Test Des Ports Gpio
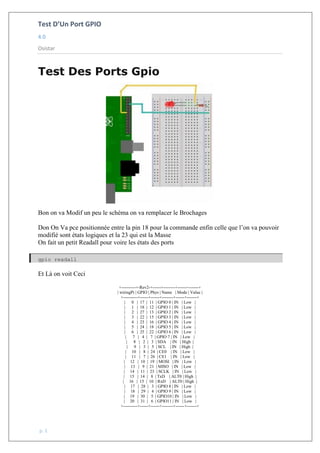
Bon on va Modif un peu le schéma on va remplacer le Brochages
Don On Va pce positionnée entre la pin 18 pour la commande enfin celle que l’on va pouvoir
modifié sont états logiques et la 23 qui est la Masse
On fait un petit Readall pour voire les états des ports
gpio readall
Et Là on voit Ceci
+----------+-Rev2-+------+--------+------+-------+
| wiringPi | GPIO | Phys | Name | Mode | Value |
+----------+------+------+--------+------+-------+
| 0 | 17 | 11 | GPIO 0 | IN | Low |
| 1 | 18 | 12 | GPIO 1 | IN | Low |
| 2 | 27 | 13 | GPIO 2 | IN | Low |
| 3 | 22 | 15 | GPIO 3 | IN | Low |
| 4 | 23 | 16 | GPIO 4 | IN | Low |
| 5 | 24 | 18 | GPIO 5 | IN | Low |
| 6 | 25 | 22 | GPIO 6 | IN | Low |
| 7 | 4 | 7 | GPIO 7 | IN | Low |
| 8 | 2 | 3 | SDA | IN | High |
| 9 | 3 | 5 | SCL | IN | High |
| 10 | 8 | 24 | CE0 | IN | Low |
| 11 | 7 | 26 | CE1 | IN | Low |
| 12 | 10 | 19 | MOSI | IN | Low |
| 13 | 9 | 21 | MISO | IN | Low |
| 14 | 11 | 23 | SCLK | IN | Low |
| 15 | 14 | 8 | TxD | ALT0 | High |
| 16 | 15 | 10 | RxD | ALT0 | High |
| 17 | 28 | 3 | GPIO 8 | IN | Low |
| 18 | 29 | 4 | GPIO 9 | IN | Low |
| 19 | 30 | 5 | GPIO10 | IN | Low |
| 20 | 31 | 6 | GPIO11 | IN | Low |
+----------+------+------+--------+------+-------+
2. Test D’Un Port GPIO
4.0
Osistar
p. 2
Et la on l’active en tant que sortie et non entrée avec la commande :
gpio mode 0 out
Et après on commande l’état du port avec les deux commande suivantes :
1- Mettre la pin en mode “out”
pi@rpi:~ $ gpio -g mode 24 out
2- Changer l’état de la pin
pi@rpi:~ $ gpio -g write 24 1
pi@rpi:~ $ gpio -g write 24 0