Clay and metal milagros
•
6 gefällt mir•3,648 views

The lesson teaches students about milagros, votive objects in Latin American culture. Students will create their own milagros using either clay or foil as the material. They will learn about the cultural significance of milagros and use techniques like incising, adding texture and borders. The teacher will demonstrate procedures like flattening, shaping and punching holes in the materials. Students' understanding of milagros and their ability to correctly use production techniques will be assessed.

Empfohlen
Weitere ähnliche Inhalte
Was ist angesagt?
Was ist angesagt? (20)
Andere mochten auch
Andere mochten auch (20)
Ähnlich wie Clay and metal milagros
Ähnlich wie Clay and metal milagros (20)
Mehr von Nancy Walkup
Mehr von Nancy Walkup (20)
Clay and metal milagros
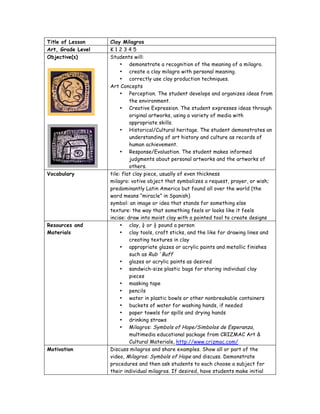
- 1. Title of Lesson Clay Milagros Art, Grade Level K12345 Objective(s) Students will: • demonstrate a recognition of the meaning of a milagro. • create a clay milagro with personal meaning. • correctly use clay production techniques. Art Concepts • Perception. The student develops and organizes ideas from the environment. • Creative Expression. The student expresses ideas through original artworks, using a variety of media with appropriate skills. • Historical/Cultural heritage. The student demonstrates an understanding of art history and culture as records of human achievement. • Response/Evaluation. The student makes informed judgments about personal artworks and the artworks of others. Vocabulary tile: flat clay piece, usually of even thickness milagro: votive object that symbolizes a request, prayer, or wish; predominantly Latin America but found all over the world (the word means “miracle” in Spanish) symbol: an image or idea that stands for something else texture: the way that something feels or looks like it feels incise: draw into moist clay with a pointed tool to create designs Resources and • clay, ¼ or ½ pound a person Materials • clay tools, craft sticks, and the like for drawing lines and creating textures in clay • appropriate glazes or acrylic paints and metallic finishes such as Rub ‘ Buff • glazes or acrylic paints as desired • sandwich-size plastic bags for storing individual clay pieces • masking tape • pencils • water in plastic bowls or other nonbreakable containers • buckets of water for washing hands, if needed • paper towels for spills and drying hands • drinking straws • Milagros: Symbols of Hope/Simbolos de Esperanza, multimedia educational package from CRIZMAC Art & Cultural Materials, http://www.crizmac.com/ Motivation Discuss milagros and share examples. Show all or part of the video, Milagros: Symbols of Hope and discuss. Demonstrate procedures and then ask students to each choose a subject for their individual milagros. If desired, have students make initial
- 2. thumbnail sketches. Procedures Give each student a piece of clay and a plastic bag and direct them to work with the clay on top of the bag. Have each student use his/her palms to flatten a ball of clay into a thin, even rectangular slab about the size and shape of a piece of bread. Have students smooth the edges with water and then inscribe their names on the back of each milagro. Tell students to draw their chosen image on the clay, making designs very simple. Point out that they can carve deeper lines and create textures on the clay, especially on the background and on the edges of the tile. As students work, circulate around the room and drill a hole in each tile for hanging with a straw. If students cannot finish the work in one class period, have them wrap their tiles in their plastic bags and label them with their names (write on masking tape and stick to the bag). Store the bagged work until the next class. When the tiles are finished, let them dry completely before firing, glazing, or painting. Bisque-fired work can be painted with acrylics and rubbed with Rub ‘n Buff or glazed and refired. Self- hardening clay can be painted or sprayed with acrylics. Assessment/Evaluation To what extent did students: • demonstrate recognition of the meaning of a milagro? • create a clay milagro with personal meaning? • correctly use clay production techniques? Extensions • use papier mache or another modeling material instead of clay • add low sides or borders to the tile to create a nicho (nicho) or retablo, other Latin American three-dimensional forms Nancy Walkup Editor, SchoolArts Magazine www.schoolartsonline.com nwalkup@netzero.net
- 3. Title of Lesson Metal Milagros Art, Grade Level 345 Objective(s) Students will: • demonstrate a recognition of the meaning of a milagro. • create a foil milagro with personal meaning. • correctly production techniques. Art Concepts • Perception. The student develops and organizes ideas from the environment. • Creative Expression. The student expresses ideas through original artworks, using a variety of media with appropriate skills. • Historical/Cultural heritage. The student demonstrates an understanding of art history and culture as records of human achievement. • Response/Evaluation. The student makes informed judgments about personal artworks and the artworks of others. Vocabulary milagro: votive object that symbolizes a request, prayer, or wish; predominantly Latin America but found all over the world (the word means “miracle” in Spanish) symbol: an image or idea that stands for something else texture: the way that something feels or looks like it feels incise: draw into a surface with a pointed tool to create designs Resources and • copper or aluminum foiling, lightest weight, sold in rolls, Materials cut into small squares or rectangles by teacher • pencils • rulers • hole punch • examples of real milagros from Mexico made from stamped tin • Milagros: Symbols of Hope educational package from CRIZMAC Art & Cultural Materials, http://www.crizmac.com/ Motivation Discuss milagros and share examples. Show all or part of the video, Milagros: Symbols of Hope and discuss. Demonstrate procedures and then ask students to each choose a subject for their individual milagros. If desired, have students make initial thumbnail sketches. Procedures Distribute foil squares or rectangles of foil to students. To flatten the edge, have students rub a ruler over each side. Students should then fold back a narrow border on each side and then smooth those edges with the ruler. Using a pencil, students can now draw their designs in the center of the foil piece. Encourage them to add borders and textured backgrounds to their pieces. Punch a small hole in the middle of one side to
- 4. faciliate display. Assessment/Evaluation To what extent did students: • demonstrate a recognition of the meaning of a milagro? • create a foil milagro with personal meaning? • correctly use production techniques? Extensions • Make milagros from clay instead of foil. Nancy Walkup Editor, SchoolArts Magazine www.schoolartsonline.com nwalkup@netzero.net