

Empfohlen
Weitere ähnliche Inhalte
Ähnlich wie Newsletter Handout
Mehr von Neil Stewart
Mehr von Neil Stewart (20)
Kürzlich hochgeladen
Kürzlich hochgeladen (20)
Newsletter Handout
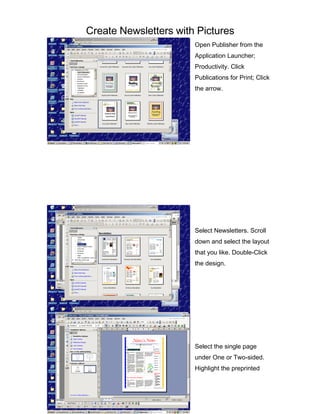
- 1. Create Newsletters with Pictures Open Publisher from the Application Launcher; Productivity. Click Publications for Print; Click the arrow. Select Newsletters. Scroll down and select the layout that you like. Double-Click the design. Select the single page under One or Two-sided. Highlight the preprinted
- 2. Create Newsletters with Pictures information and replace it with your information. You can also change colors, but please remember that your newsletters will be printed in black and white. We cannot print sets of newsletters in color…per Cindy. To insert clipart or photographs: Go to Insert in the menu bar and select Picture; select clipart or from file (for photos). Locate the clipart or photo that you want to use and double-click it.
- 3. Create Newsletters with Pictures You may have to resize it to fit where you need it. Hold the shift key and resize from the corner to keep it from distorting. You may have to resize it to fit where you need it. Hold the shift key and resize from the corner to keep it from distorting. Be sure that you save your newsletter to YOUR H: drive. Give it a name that will help you locate it. Once you have one created, you can just edit it each month and resave with a different name. Happy publishing!!!!