Fastback 9 binding a hard cover book
•Als PPT, PDF herunterladen•
1 gefällt mir•465 views

http://www.MyBinding.com brings you this demonstration of the Powis Parker Fastback 9. The Fastback 9 is an excellent thermal binding system that leaves your documents looking crisp and professional. For more details and product specifications, please visit: http://www.mybinding.com/.sc/ms/dd/ee/26663/Fastback-Model-9-Binding-Machine Take a look and if you have any questions feel free to give us a call toll-free at 1-800-944-4573. We have a huge selection of binding machines, supplies, and more from Fastback. You can also find us online on Twitter, Facebook, and our blog. Twitter - http://twitter.com/mybinding Facebook - http://www.facebook.com/MyBinding Blog - http://www.mybindingblog.com

Empfohlen
Empfohlen
Weitere ähnliche Inhalte
Kürzlich hochgeladen
Kürzlich hochgeladen (10)
Empfohlen
Empfohlen (20)
Fastback 9 binding a hard cover book
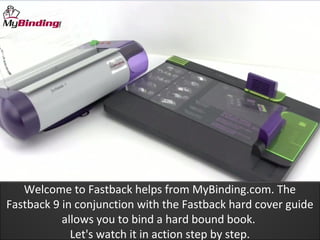
- 1. Welcome to Fastback helps from MyBinding.com. The Fastback 9 in conjunction with the Fastback hard cover guide allows you to bind a hard bound book. Let's watch it in action step by step.
- 2. Two main materials are used, a hard bound cover as well as what's called a block. The block is first bound and then glued inside the cover.
- 3. The first step is to bind the block. This is done the same way as you bind any document with the Fastback 9,
- 4. the only difference being the project is sandwiched between two end sleeves in the front and the back with your project in the middle.
- 5. These will then be attached to the inside of the hard cover. All that goes right on to the binding tape. Jog it over to the corner, hit the button, and let it bind.
- 6. After it's all done, remove it, and let it cool completely. And while the inside of the book is cooling, you can begin to prep the outside.
- 7. These little strips add a texture that's not necessary for binding the book, it just looks a little nicer in the finished product.
- 8. Cut two trapezoid-type shapes, make them a little wider than the binding of your book, peel back the adhesive, and drape it around the corner of your book, making sure the checkered end is just above the top of your book.
- 9. The end result will look like this. However, let's get to that point first.
- 10. Open the hardback cover you've chosen and lay it flat on top of the guide.
- 11. The right hand side slides in just underneath the holder. Then lock it down.
- 12. With that locked down, peel back about one inch of the left side of the adhesive covering on that panel.
- 13. And then lay your bound document on top of this very tacky surface. Use the guides on the right and the top to make sure things are square and centered.
- 14. Press down firmly to get a good contact. Folding back all the pages with the left hand, hold your book while the right hand removes the rest of the adhesive.
- 15. Gently pull it along as you lay the book down. Now you're ready for the opposite side.
- 16. Pull back the adhesive cover there all the way and lay the cover flat down on top. And as you do this, you want to apply pressure to the outside toward the spine of the book.
- 17. Unlock it, press everything down nice and firm on both sides, and you're done.
- 18. This is a good time to open up the front and the back leave just to make sure everything is down, there are no bubbles anywhere, and things look perfect.
- 19. There you are. That's how to bind a hardcover book using the Fastback 9 and the hardcover guide. This is the Fastback 9.
- 20. For more demos, reviews, and how-tos, check out MyBinding.com.
Hinweis der Redaktion
- Welcome to Fastback helps from MyBinding.com. The Fastback 9 in conjunction with the Fastback hard cover guide allows you to bind a hard bound book. Let's watch it in action step by step.
- Two main materials are used, a hard bound cover as well as what's called a block. The block is first bound and then glued inside the cover.
- The first step is to bind the block. This is done the same way as you bind any document with the Fastback 9,
- the only difference being the project is sandwiched between two end sleeves in the front and the back with your project in the middle.
- These will then be attached to the inside of the hard cover. All that goes right on to the binding tape. Jog it over to the corner, hit the button, and let it bind.
- After it's all done, remove it, and let it cool completely. And while the inside of the book is cooling, you can begin to prep the outside.
- These little strips add a texture that's not necessary for binding the book, it just looks a little nicer in the finished product.
- Cut two trapezoid-type shapes, make them a little wider than the binding of your book, peel back the adhesive, and drape it around the corner of your book, making sure the checkered end is just above the top of your book.
- The end result will look like this. However, let's get to that point first.
- Open the hardback cover you've chosen and lay it flat on top of the guide.
- The right hand side slides in just underneath the holder. Then lock it down.
- With that locked down, peel back about one inch of the left side of the adhesive covering on that panel.
- And then lay your bound document on top of this very tacky surface. Use the guides on the right and the top to make sure things are square and centered.
- Press down firmly to get a good contact. Folding back all the pages with the left hand, hold your book while the right hand removes the rest of the adhesive.
- Gently pull it along as you lay the book down. Now you're ready for the opposite side.
- Pull back the adhesive cover there all the way and lay the cover flat down on top. And as you do this, you want to apply pressure to the outside toward the spine of the book.
- Unlock it, press everything down nice and firm on both sides, and you're done.
- This is a good time to open up the front and the back leave just to make sure everything is down, there are no bubbles anywhere, and things look perfect.
- There you are. That's how to bind a hardcover book using the Fastback 9 and the hardcover guide. This is the Fastback 9.
- For more demos, reviews, and how-tos, check out MyBinding.com.