Understanding Discord NSFW Servers A Guide for Responsible Users.pdf
Creating a data report in visual basic 6
1. Data Report Designer allows you to create reports. The reports generated through Data Report Designer take data from
data sources such as Data Environment. Using Data Report Designer you can do the following:
Export report to HTML file or text file
Create report with groups and aggregates
Create a hierarchical report
Components of Data Report Designer
The following are the various parts of Data Report Designer.
DataReport object
This is like a Visual Basic form. It contains the visible designer and code. Code is used to control report at runtime by
responding to the events generated by the data report. Visible designer allows you to design the layout of the report.
Sections Collection
This is a collection of section objects. A section object represents a section of the report. You can use section objects at
runtime to reconfigure the section. At design time each section is represented by a header, which is used to select the
section.
Data Report Controls
Data report can contain only a set of special controls. When you are in Data Report Designer, a different toolbox is
displayed with controls that are specific to Data Report.
Note: You cannot use Visual Basic's intrinsic controls, or any ActiveX controls, on the Data Report designer.
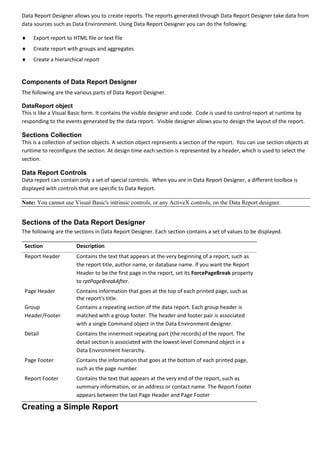
Sections of the Data Report Designer
The following are the sections in Data Report Designer. Each section contains a set of values to be displayed.
Section Description
Report Header Contains the text that appears at the very beginning of a report, such as
the report title, author name, or database name. If you want the Report
Header to be the first page in the report, set its ForcePageBreak property
to rptPageBreakAfter.
Page Header Contains information that goes at the top of each printed page, such as
the report's title.
Group Contains a repeating section of the data report. Each group header is
Header/Footer matched with a group footer. The header and footer pair is associated
with a single Command object in the Data Environment designer.
Detail Contains the innermost repeating part (the records) of the report. The
detail section is associated with the lowest-level Command object in a
Data Environment hierarchy.
Page Footer Contains the information that goes at the bottom of each printed page,
such as the page number.
Report Footer Contains the text that appears at the very end of the report, such as
summary information, or an address or contact name. The Report Footer
appears between the last Page Header and Page Footer
Creating a Simple Report
2. Now, let us create a sample report to understand the steps involved in creating a simple report. For any report that is
generated using Data Report Designer, you have a few important steps.
Add Data Report Designer to project
Establish a connection to database and create a command using Data Environment designer.
Change DataSource and DataMember properties of Data Report object.
Place fields on the Data Report Designer in the required sections.
Invoking the report using Show method.
The following steps illustrate how to create a simple report using Data Report Designer and Data Environment.
The report displays the list of products from Products table of Products.mdb.
1. Start a new project by selecting File menu and New Project option.
2. Select Data Project in New Project dialog box.
3. Visual Basic creates a new project with a form, Data Environment and Data Report. As shown in figure 21.1
4. Invoke Data Environment Designer and select Connection object.
5. Click on right button and invoke Properties of the Connection object.
6. Select Microsoft Jet 3.51 OLE DB Provider as the provider.
7. Select Connection tab and select “D:VBBOOKPRODUCTS.MDB” as the database. Please note that in your system
the path may be different. So choose whichever path is appropriate to your system.
8. Rename Connection object to cnnProducts.
9. Select popup menu of cnnProducts and select Add Command to add a command object.
A Command object with the name command1 will be created.
10. Select properties of command object and change the following properties.
Command Name comProducts
Database Object Table
Object Name Products
Figure 21.1: Data Project's project explorer.
Placing fields on Data Report Designer
After command object is created, place the fields in the command object on Data Report Designer. The following are
the required steps to do that:
1. Open Data Report Designer by double clicking on DataReport1 in Project Explorer.
2
3. 2. Invoke properties window using F4 when you are in Report Designer
3. Change the following properties of Data Report Designer.
DataSource DataEnvironment1
DataMember comProducts
4. Arrange Data Report Designer and Data Environment Designer in such a way that you can see both of them. See
figure 21.2.
5. Drag fields from comProducts command object into Detail section Data Report Designer.
Or Drag comProducts command object from Data Environment into Detail section of Data Report Designer.
1. In Data Environment Designer, select Data Environment object.
2. Click on right button and select Option menu from popup menu.
3. Select Field Mapping tab in Options dialog, then uncheck Drag and Drop Field Captions.
Arranging fields in Data Report Designer
1. If field headings are also placed in Data Report Designer then we have to move them to Page Header section.
2. If field headings are not copied then create labels in Page Header section using RptLabel control.
3. When you are dealing with Data Report Designer you get DataReport toolbox. RptLabel is a control available in
DataReport toolbox.
4. Whether you got labels (headings) automatically or you manually added, change the caption property of each label
as follows.
Field Heading
Prodno Product Number
Prodesc Product Description
Qoh Quantity On Hand
Rpu Rate Per Unit
Ptype Product Type
5. Select all labels and change Font Name to Arial, Bold to True, and Size to 10.
6. Change Alignment property of all heading labels to 2-rptJustifyCenter.
7. Increase the Height of all the labels to 450 units. This is done to ensure that the heading will wrap to next line if it
cannot be accommodated in one line.
8. Reduce the size of Detail section to eliminate extra space below fields.
9. Change Alignment property of QOH and RPU fields to 1-rptJustifyRight.
10. Change Alignment property of PRODNO and PTYPE to 2-rptJustifyCenter.
Running the Report
To invoke report you can make either the report the startup object or you can invoke report using Show method of the
data report object.
4. Making report the startup object will be easier while you are designing report. But final reports are always invoked
either by user selecting an option in menu or by clicking on a command button.
Let us see how to invoke report using a command button. As you have seen, when you selected Data Project, Visual
Basic has created a Form, Data Environment, and Data Report. So invoke Form designer and place a command button.
Change the following properties of command button.
Name cmdProductlist
Caption &Products List
And write code to invoke report in click event of the command button.
Private Sub cmdproductlist_Click()
DataReport1.Show
End Sub
Listing 21.1: Code to invoke data report.
Figure 21.2: Placing fields from data environment to data report object.
Note: You can also make DataReport the Start up object of the project to start project with Data Report.
1. Run the project using F5.
2. When form is displayed, click on command button to invoke report.
3. At runtime the report should look like figure 21.3.
4
5. Figure 21.3: Data Report at runtime.
Improving Appearance of the report
The report shown in figure 21.3 is O.K but not good. We can modify the report to make it more readable. Also observe,
it wastes a lot of space at the top and on the left. So let us see how to modify the report.
1. Invoke Properties window from Data Report Designer and select properties for DataReport1.
2. Change the following properties.
Left Margin 100
Right Margin 100
Top Margin 100
Bottom Margin 100
3. Place a line control at the bottom of the headings to separate heading from details.
4. Change BorderStyle property to 1- vbFixedSingle.
Adding Report Title and Report Footer
A report can contain a title, which is printed at the top of the report and a report footer, which is printed at the bottom
of the report.
To add report title and report footer sections to Data Report Designer:
1. Click right button of mouse on Data Report Designer.
2. Check Show Report Header/Footer option on popup menu.
3. Data Report Designer adds two more sections – Report Header and Report Footer.
To add a title to the report:
1. Select Report Header section and place a label control in it.
2. Change the Caption of the label to “Products List”
3. Change Font related properties to increase the size of the title.
To add current date and page number:
1. Select Report Header section and click on right button.
6. 2. From popup menu select Insert controls -> Current Date(long format)
A label is placed with Caption property set to %D (which stands for date long format).
3. Place a label on the left of it and change it’s Caption property to “Date:”
4. Click right button on the data report again and select Insert Controls -> Current Page Number.
Another label is placed with caption %p (which means current page number). You can also select Total Number of
Pages; which means a label with caption %P (capital P).
5. Place a label on the left and change caption to “Page:”
6. Change Font Bold setting of “Date:” and “Page:” labels to True.
Arrange all labels and fields in a neat format and then run the report (click on Products List command button). Your
report should look like the one shown in figure 21.4.
Figure 21.4: Data Report after formatting.
Introduction to data reports
Reports are important and useful in many respects because they provide useful and meaningful information concerning a
set of data. In this chapter, we will show you how to create a report in Visual Basic 6.
In previous versions of Visual Basic 6, there is no primary reporting . Previous versions of Visual basic 6 uses Crystal
Reports tool, a software from Seagate. Fortunately, Microsoft has integrated a good report writer into Visual Basic 6, so
you no longer need to use Crystal Report.
Steps in building your report in Visual Basic 6
Visual Basic 6 provides you with a data report designer to create your report, it is somewhat similar to data report
designer in Microsoft Access. The data report designer has its own set of controls which allow you to customize your
report seamlessly. The steps in creating the report in VB6 are listed below:
Step 1: Adding Data Report
Start Visual Basic as a Standard EXE project. From the Projectmenu in the VBE, select Add Data Report in the
dropdown menu. Now, you will be presented with the data report environment, as shown in Figure 40.1. The data report
environment contains 6 controls, they are RptTextBox, RptLine, RptFunction, RptLabel, RptImage and RptShape.
You can customize your report here by adding a title to the page header using the report label RptLabel. Simply drag
and draw the RptLabel control on the data report designer window and use the Caption property to change the text that
should be displayed. You can also add graphics to the report using the RptImage control.
6
7. Figure 40.1: The Data Report Environment
Step 2: Connecting the report to database using Data Environment Designer
Click the Project menu, then select Data Environment. from the drop-down menu. The default data environment will
appear, as shown in figure 40.2
Figure 40.2: Data Environment
Now, to connect to the database, right-click connection1 and select Microsoft Jet 3.51 OLE DB Provider (as we are
using MS Access database) from the Data Link Properties dialog (as shown in Figure 40.3), then click next.
8. Figure 40.3
Now, you need to connect to the database by selecting a database file from your hard disk. For demonstration purpose,
we will use the database BIBLIO.MDB that comes with Visual Basic, as shown in Figure 40.4. The path to this database
file is C:Program FilesMicrosoft Visual StudioVB98BIBLIO.MDB. This path varies from computers to computers,
depending on where you install the file. After selecting the file, you need to test the connection by clicking the Test
Connection button at the right bottom of the Data Link Properties dialog. If the connection is successful, a message that
says 'Test Connection Succeeded' will appear. Click the OK button on the message box to return to the data
environment. Now you can rename connection1 to any name you like by right-clicking it. For example, you can change it
to MyConnection. You may also change the name of DataEnvironment1 to MyDataEnvironment using the Properties
window.
8
9. Figure 40.4
Step 3: Retrieving Information from the Database
In order to use the database in your report, you need to create query to retrieve the information from the database. Here ,
we will use SQL command to create the query. First of all, right click on MyConnection to add a command to the data
environment. The default command is Command1, you can rename it as MyCommand, as shown in Figure 40.5.
10. Figure 40.5: MyCommand
In order to use SQL command, right-click MyCommand and you can see its properties dialog. At the General tab, select
SQL statement and key in the following SQL statement:
SELECT Au_ID, Author
FROM Authors ORDER BY Author
This command is to select all the fields from the Authors table in the Biblio.Mdb database. The command ORDER BY
Author is to arrange the list in ascending order according to the Authors' Names.
Now, you need to customize a few properties of your data report so that it can connect to the database. The first property
to set is the DataSource, set it to MyDataEnvironment. Next, you need to set the DataMember property to
MyCommand,as shown in Figure 40.6
Figure 40.6: Properties of
To add data to your report, you need to drag the fields from MyCommand in MyDataEnvironment into MyDataReport, as
shown in Figure 40.7.Visual Basic 6 will automatically draw a RptTextBox, along with a RptLabel control for each field on
the report. You can customize the look of the labels as well as the TextBoxes from the properties window of
MyDataReport.
Figure 40.7
The Final step is to set MydataReport as the Startup form from the Project menu, then run the program. You will see your
report as shown in Figure 40.8. You can print out your report.
10
11. Figure 40.8: The Final Report.
Creating VB database applications using ADO control
we have learned how to build VB database applications using data control. However, data control is not a
very flexible tool as it could only work with limited kinds of data and must work strictly in the Visual
Basic environment.
To overcome these limitations, we can use a much more powerful data control in Visual Basic, known
as ADO control. ADO stands for ActiveX data objects. As ADO is ActiveX-based, it can work in different
platforms (different computer systems) and different programming languages. Besides, it can access
many different kinds of data such as data displayed in the Internet browsers, email text and even
graphics other than the usual relational and non relational database information.
To be able to use ADO data control, you need to insert it into the toolbox. To do this, simply press Ctrl+T
to open the components dialog box and select Microsoft ActiveX Data Control 6. After this, you can
proceed to build your ADO-based VB database applications.
Data Environment
Data Environment, which was introduced in Visual Basic 6.0, how to use DataCombo, which is a data-bound ActiveX
control, and how to use DataGrid, which is also a data-bound ActiveX control.
Let us understand each of them first. Then we will develop a data-entry screen using all these three.
Data Environment
Data Environment object is created and managed using Data Environment designer. A Data Environment object can
accomplish any of the following tasks.
Can contain connection and command objects
Can establish relationship between command object to represent hierarchies
12. Can group data and get aggregates
Allows fields to be dragged and dropped on to a Data Report, for report, and a Form for data entry screen
Can work as source for Databound control such as DataCombo controls and Hierarchical Flexgrid control.
In order to work with Data Environment object, you have to add Data Environment Designer to your project. Data
Environment Designer allows programmer to accomplish any of the tasks mentioned above. Data Environment
Designer is invoked when you double click on Data Environment object in Project Explorer.
To add Data Environment object to the project:
1. Select Project-> Add Data Environment. If Add Data Environment option is not found then select More ActiveX
Designers and then select Data Environment.
Note: Visual Basic adds Data Environment Designer to your project and also creates a connection object.(See figure
20.1)
Figure 20.1: Data Environment Designer
Working with Connection Object
Whenever you create a Data Environment object a Connection object is added to Data Environment object. But that
Connection object is not connected to any database. So first we have to establish a connection with the Connection
object. Now, let us see how to connect to database through Connection object.
To connect to Biblio.mdb using connection object:
1. Select Connection object (Connection1) and click on right button.
2. From popup menu select Properties option
Data Environment designer displays Data Link properties dialog.
3. Select the required OLEDB provider (Microsoft Jet 3.51 OLE DB Provider)
4. Select Connection tab and select the name of the database ( BIBLIO.MDB)
5. Click on Ok
To rename connection object:
12
13. 1. Invoke popup menu by click on Connection object with right button.
2. Select Rename option.
3. Enter new name and press enter key to confirm it.
Creating Command Object
After connection is established using Connection object, now we have to create a command object to access the data of
the database. A connection object can contain any number of command objects. In fact, a command object can contain
another command object, which is called as child command object.
To create command object to get data from Authors table:
1. Invoke popup menu of Connection object and select Add Command option
Data Environment Designer creates a command object with name Command1.
2. Invoke Popup menu of command object by clicking on right button and select Properties option.
Properties dialog is displayed (see figure 20.2)
3. Change the Name of the command object to Authors
4. Select Table as Database Object
5. Invoke the list of tables by clicking on down arrow of Object Name drop down and select Authors as the name of
the table.
6. For the time being, ignore remaining tabs and click on OK.
A command object is created with the default name
(command1). If you expand the command object by
clicking on + sign, you get the columns of AUTHORS
table. (See figure 20.3).
Figure 20.2 : Properties of Command object.
Figure 20.3: Data Environment designer after a command object is created.
To create master-detail relationship:
14. One of the interesting features of Data Environment object is, it allows you to create hierarchy of objects.
To understand how to create hierarchy of command objects, let us create two command objects. One for Publishers
table and another for Titles table.
Publishers command object becomes parent command and Titles command object becomes child command object.
These hierarchies can be used straightaway in Hierarchical FlexGrid control and Data Report object.
To create command object for Publishers:
1. Select connection object, Biblio, and click on right button to invoke popup menu and select Add Command option
of popup menu.
2. After a command object is created invoke its properties by selecting Properties option from Popup menu.
3. Change Name of the command object to Publishers
4. Choose Table as the Database Object and select Publishers as the name of the object.
5. Click on Ok.
To create child command object for Titles:
1. Select Publishers command object and invoke popup menu.
2. Select Add Child Command option.
3. A new command object is created and placed along with fields of Publishers command object.
4. Select Child command object and invoke its properties
5. Change name to Titles.
6. Choose Table as Database Object and Titles as the name of the database object.
7. Click on Relation tab (see figure 20.4) to set relationship between Publishers and Titles command object.
8. Make sure Parent Fields and Child Fields are set to PubID and click on Add button to establish relationship
between Publishers and Titles based on PubId field.
9. Click on Ok.
After child object is created, Data Environment Designer has three command objects – Authors, Publishers, and Titles.
Where Authors and Publishers are at the same level (Parent objects), Titles is a child command object of Publishers
command object. When you expand all command objects, Data Environment Designer should look like figure 20.5.
14
15. Figure 20.4: Relation tab of command properties
dialog.
Figure 20.5: Data Environment Designer after three
command objects are added.
16. Data Combo and Data List controls
DataCombo and DataList controls are used to present a list of values to users from which user can select one. The list of
values to be displayed to user will come from one recordset and the selected value goes into another recordset.
Note: Whenever I refer to DataCombo, it also refers to DataList, unless the difference is explicitly specified.
As DataCombo is an ActiveX control, it is to be loaded into its project explicitly. And DataCombo is based on OLEDB
interface. So it can be used with either Data Environment or ActiveX data control, because they are also based on OLEDB
(use ADO).
To load Data List controls:
1. Select Project->Components
2. Visual Basic displays a list of available ActiveX controls.
3. Turn on check box on the left of Microsoft DataList Controls 6.0 (OLEDB)
4. Click on OK.
Two ActiveX controls are loaded into project – DataList and DataCombo.
Note: You also have Microsoft Data Bound List Controls 6.0 ActiveX control. It contains DBList and DBCombo, which
work with Data Control and not with OLEDB. If you are developing a project with only DAOs or RDOs, then you can use
these controls.
The following are the important properties that are specific to Data List controls (Data Combo and Data List).
Property Meaning
BoundColumn Contains the name of the source field in the Recordset object that is used to
supply a data value to another Recordset to which control is bound.
ListField Returns or sets the name of the field in the Recordset object, specified by
the RowSource property, used to fill the DataCombo or DataList control's
list portion.
RowSource Sets a value that specifies the source from which the control’s list is filled.
The source is either an ActiveX Data control or Data Environment.
RowMember Returns or sets the data member to be used to display list text. Used when
RowSource is a Data Environment.
16
17. DataGrid Control
Allows you to display and manipulate a set of records and columns taken from the specified recordset. You can specify
whether you want to allow user to modify displayed data, add new records, and delete existing records.
The following are a few features supported by DataGrid control.
It supports the following features:
Each cell contains a value. The value of the cell can be edited interactively by user or programmatically.
Provides Columns collection using which you can access columns of the grid. When you select a column ColIndex
property is set to enable you to access the columns selected by the user.
Data in the current row can be accessed through Bookmark property, which provides access to underlying recordset
object’s record.
Each column can have its own display attributes
The DataGrid control functions similarly to the DBGrid (which is based on DAO & RDO) control except that it doesn't
support an unbound mode.
The following are the important methods, properties and events of DataGrid control.
Methods of DataGrid control
The following are the methods that are specific to DataGrid.
Method Meaning
CaptureImage Returns a captured image of the grid's display in its current state.
ClearFields Clears all fields and restores grid to two columns and two rows.
ClearselCols Deselects all the columns that are currently selected.
HoldFields Sets the current column/field layout as the customized layout.
ColContaining Returns the ColIndex value of the DataGrid control column containing the
specified coordinate (X) value.
GetBookmark Takes a relative row and returns the bookmark of the relative row. If
GetBookmark 1 is given then the bookmark of next row of the current row
is given.
17
18. Working with
Data Access Objects (DAO)
So far, we have used a few objects of Data Access Objects (DAO). In this chapter, we will understand what are the other
objects in DAO.
What is Jet Engine?
Jet Engine is the database engine that accesses the data. Jet Engine is a collection of programs that work together. Jet
Engine makes use of some other translators to access various types of databases. Each type of database such as dBase,
FoxPro, and Paradox etc has its own translator. These translators are to be available to access the particular type of
database.
Jet Engine can also access ODBC data sources using ODBC drivers.
Jet Engine also has its own query engine, which is used to search, order and filter the data without using the query engine of
the database. This may be an advantage with small databases such as MS-Access and FoxPro, but for large databases such as
Oracle database, using Jet query engine may be inefficient.
Also remember DAO and Jet Engine are not designed for Internet or Intranet. To access data in either Internet or Intranet
use ADO (ActiveX data objects) with OLE DB.
Objects in DAO object model
The following are the various objects in DAO object model. Here is the object model’s hierarchy (figure 17.1). Later we will
understand each object’s properties and methods.
Each object contains collections, methods and properties.
A collection is a collection of objects of the same type.
A method performs an operation on the object.
A property contains a single attribute of the object.
18
19. DBEngine object
This object is at the top level of the hierarchy. This object is automatically made available to your program. You do not have
to create this object. The following are collections, methods and properties of this object.
Type Name Meaning ype Jet or ODBC Direct) will be used
by the next workspace object
Colle Worksp A collection of workspaces defined
created.
ction aces currently.
InitPath Returns information about the
s
Windows Registry key that contains
Errors Contains list of most recently values for the Jet Engine.
occurred errors in the current
LoginTi representing the number of
session.
meout seconds before a login timeout
Properti Collection of properties of error occurs. Default value is 20.
es DBEngine object.
Systemd Specifies the location for
Meth RepairD Is used to fix a corrupted Jet b workgroup information file, which
ods atabase database file (.MDB). allows you to define different
Compac Is used to remove empty space and workgroups and set permission to
tDatabas perform other operations that will each object in the database for
e
improve performance. It can also each user in workgroup.
be used to convert old version’s DefaultP Sets the password to be used when
database to current version. assword creating default workspace.
Register Registers an ODBC data source for Default Sets the name of the user to be
Databas Jet access. User used when creating default
e workspace.
Idle The Idle method allows the Table 17.1 : Members of DB Engine object.
Microsoft Jet database engine to
perform background tasks that may
not be up-to-date because of
intense data processing.
SetOpti Used to change registry settings of
on Jet. These changes are in effect
only during runtime. They do not
change registry or INI file
permanently.
Create Creates a workspace for accessing
Worksp one or more databases.
ace
Prop Version Returns the version of DAO that is
erty currently in use.
DefaultT Sets or returns a value that indicates
what type of workspace (Microsoft
19
20. Workspace Object
Workspace object creates a session for the user. By default, a workspace object is automatically created. If you want you can
use that workspace object without creating any other workspace objects. But if you want the database to be accessed as a
different user from default workspace object or create a separate session for transaction processing, you have to create a
workspace object explicitly.
Database Object
This object is used to access a particular database. This object has the collections, methods and properties using which we
can access database and its structure and modify it. The following are the collections, methods and properties:
QueryDef object
This object is used to store an SQL query in the database. SQL query that is stored using this object can be used as the
source for recordset object later. Queries stored using QueryDef object are stored in processed format and as a result they
are executed faster than ordinary query.
TableDef Object
Contains details of a table in the database. The table may be a linked table also. TableDefs collection contains the list of
TableDef objects. Each TableDef object represent one table. The following are the collections, methods and properties of
the TableDef object.
Field object
A Field object represents a single field of a table, recordset, index or querydef. Fields collection contains a list of field
objects.
Index Object
Represents an index of a table. Indexes collection contains a list of index objects.The following are the collections, methods
and properties of the index object.
Relation Object
Relation object represents relationship between two fields in two tables. This is used to enforce referential integrity. The
following are the collections, methods and properties of relation object.
Connection Object
A connection object represents a connection to ODBC data source. This is used only in ODBCDirect workspace.
ODBCDirect workspace
ODBCDirect workspace was introduced in Visual Basic 5.0. When you establish a connection through ODBCDirect
workspace, you can access the database bypassing Jet Engine. This improves performance as well as flexibility.
At the time of creating workspace you have to explicitly specify the workspace as ODBCDirect workspace using
dbUseODBC as the type of the workspace. The following are the collections, methods and properties of the collection object.
Error Object
Contains the details of data access errors. Errors collection contains Error objects. The following are the properties of Error
object.
20
21. ODBC and Remote Data Objects (RDO)
Remote Data Objects (RDOs) are used to access a remote database through ODBC. Accessing an ODBC data source using
RDO is faster than accessing the same using DAO.
Remote Data Control is an ActiveX control that is used to access an ODBC data source using RDOs. This is same as a Data
Control, except that the data control uses DAOs and Remote data control uses RDOs.
First let us understand RDO object model and key features of RDOs and ODBC. Then we will understand how to use Remote
Data Control and RDOs to access Oracle through ODBC.
Remote Data Object (RDO)
Object Model
RDO object model is very small compared with DAO
object model. Here is the list of objects in RDO object
model. And most of them have their counterparts in DAO.
Figure 18.1: RDO object model
Here is a brief description about each object in the object model.
RDO object Description
rdoEngine The base object. Created automatically when you first access RDO in your
application.
rdoError Used to handle all ODBC errors and messages generated by RDO. Created
automatically.
rdoEnvironment Defines a logical set of connections and transaction scope for a particular
user name. Contains both open and allocated (but unopened) connections,
provides mechanisms for simultaneous transactions, and provides a security
context for data manipulation language (DML) operations on the database.
rdoEnvironments(0) created automatically.
rdoConnection Represents an open connection to a remote data source and a specific
database on that data source, or an allocated but as yet unconnected
object, which can be used to subsequently establish a connection.
rdoTable Represents the stored definition of a base table or an SQL view.
21
22. rdoResultset Represents the rows that result from running a query.
rdoColumn Represents a column of data with a common data type and a common set
of properties.
rdoQuery An SQL query definition that can include zero or more parameters.
rdoParameter Represents a parameter associated with an rdoQuery object. Query
parameters can be input, output, or both.
Table 18.1: Objects in RDO object model.
Remote Data Objects (RDOs) vs. Data Access Objects (DAOs)
Fundamentally RDO is same as DAO and Remote data control is same as Data control. However, RDO was designed and
implemented strictly for relational databases that are accessed using ODBC. RDO doesn’t have a query engine like DAO,
instead it depends on the query processor of the database that it is accessing.
The following table compares RDO objects and options with DAO objects and options.
Important concepts of RDO
There are three important concepts related to RDO. When you use RDO, you have to first understand these three concepts.
These concepts are:
Cursor Drive
Dataset (ResultSet) Type
Lock Type
The following section will discuss about each of these three concepts. Understanding them is important because even ADOs
use the same concept. In fact, most of the knowledge you gain with RDOs is usable with ADOs.
Cursor Drives
Cursor is the area where records are stored in memory. The process of keeping track of location of data pointer in the
dataset is called as cursor management. Which type of cursor you have to choose, it depends upon the functionality that
you want. But remember that the choice you make regarding cursor will have impact on the performance.
ResultSet Types
A Resultset is a collection of records. The following are various types of ResultSets. Remember, not all resultsets are
supported by cursor drivers.
Lock Type
This specifies the type of lock to be obtained while making changes to the ResultSet. The following are the available options.
Before we use RDOs to access an ODBC Data source, we have to understand ODBC. The following sections will discuss what
is ODBC and how to access Oracle using ODBC.
What is ODBC?
ODBC (Open Database Connectivity) is an interface through which you can access data in heterogeneous environments. For
example, using ODBC you can access data of DB2 running on Mainframe and you can access data of Oracle running on Sun
Sparc and so on. ODBC is an interface that was promoted by Microsoft. First let us understand why we need ODBC and its
importance in the industry.
22
23. Why do we need ODBC?
Assume you want to access data stored in Oracle from a program written in Visual Basic. For this, you use a set of functions
supplied by Oracle called as APIs (also called as Oracle Call Interface (OCI)) to access Oracle database. In the same way each
database vendor supplies a set of functions using which you can access the database. But the problem is, each set of
functions is different from others. That means if you want to access Oracle using OCI, you have to learn how to use these
functions. But tomorrow if you have to access Sybase, you have to use functions provided by Sybase to access its database.
That not only makes the life of programmer tough (as he has to learn a new set of functions again), it also necessitates great
amount of changes to your programs. In brief, each DBMS provides its own set of functions to access its database. So your
program becomes database dependent. That means a change in the type of database (say from Sybase to Oracle) needs the
program to be modified to a larger extent.
How does ODBC Function?
To understand how does ODBC function, please have a look at figure 18.2 . Each database vendor provides a program called
as ODBC driver, which takes standard ODBC calls and translates them into the language the database can understand. So the
application uses ODBC calls (called as ODBC API) either directly or indirectly (for example RDOs calling required ODBC calls)
to access the database. And these ODBC calls are translated by ODBC driver of the specific database to the required native
language. As a result the program uses the same ODBC calls irrespective of the database it is accessing and the ODBC driver
takes care of converting the standard calls to the native calls.
First of all, each database vendor, such as Oracle corporation, Microsoft , IBM and so on, provides ODBC driver for its
database. Remember if you do not have ODBC driver you cannot access the database using ODBC interface. It should also be
noted, that there are some third party ODBC drivers. There are companies that are specialized in creating ODBC drivers, for
example Intersolv.
Figure 18.2: Components related to ODBC.
You have to load ODBC drivers for database that you need to access. For example, if you want to access Oracle, you need to
load ODBC driver for Oracle. When you load ODBC driver, Windows OS stores the details of the driver in System Registry (a
part of Windows where important information is stored).
ODBC driver manager which is a part of Windows OS loads the required ODBC driver and passes the calls to driver and takes
results from driver and pass the result to Application.
ODBC driver manager comes to know about the driver to be used and the database to be accessed through using Data
source name (DSN) used by the application program.
23
24. ActiveX Data Objects(ADO)
DO is another data access method. ADO data model has a collection of objects using which you can access and manipulate
any database that is based on OLEDB interface (more about it later). ADO model is simple. It has fewest objects in its object
model. ADO is the data model for databases that are accessed using OLEDB interface, where as RDO is the data model for
databases that are accessed using ODBC interface.
What is OLEDB (OLE Database)?
OLEDB is an entirely new method to connect to databases. OLEDB is replacing ODBC. OLEDB provides flexibility and ease of
use than ODBC. OLEDB was designed to allow access to data of various formats. That means the data need not be in the
form of a relation database and accessed using SQL.
OLEDB needs a provider, which is a program that can sit between the application and the database (something like an ODBC
driver). So when you want to access a database using OLEDB interface, you have to make sure that you have OLEDB provider
for that database. Microsoft has provided the following OLEDB providers.
Microsoft OLE DB provider for ODBC drivers
Microsoft Jet 3.51 OLEDB provider
Microsoft OLE DB provider for Oracle
Microsoft OLE DB provider for SQL Server
Microsoft OLE DB provider for Directory Services
Figure 19.1: OLEDB interface.
ActiveX Data Object Model
This is a collection of objects that is used to access the database using OLEDB as the underlying interface. ADOs are simple
compared with DAO and RDO.
ActiveX Data Objects allow you to access only data and not the schema (table definitions, column definitions etc). As the
result it has very few objects in it object model.
The following are the objects in ActiveX data object model.
Object What it does?
24
25. Connection Allows you to connect to the database.
Command Is used to execute commands that are supported by the
database.
RecordSet Contains the collection of records retrieved by
executing a query.
Table 19.1: Important objects in ADO data model.
There are some more objects in the object model of ADO. But the three objects mentioned above are the most important
objects.
Connection Object
Connection object allows the application to connect to the database. It represents an open connection to the data source.
To establish a connection with a particular database, you have to set the ConnectionString property to the required string,
which specifies the OLEDB provider to be used and the data source to be accessed.
CursorLocation Property
Determines the location where cursor is managed.
Constant Description
AdUseNone No cursor services are used. (This constant is obsolete and appears solely for
the sake of backward compatibility.)
AdUseClient Uses client-side cursors supplied by a local cursor library. Local cursor engines
will often allow many features that driver-supplied cursors may not, so using
this setting may provide an advantage with respect to features that will be
enabled. For backward compatibility, the synonym adUseClientBatch is also
supported.
Using ActiveX Data Control
We have used data control, which is a control in standard set of controls. Now we will use an ActiveX control called as
ActiveX Data Control, which uses ADOs to access a database for which we have an OLEDB provider.
Here are the steps to display the details of publishers taken from biblio.mdb.
25
26. 1. Start a new project using File->New Project and select Standard Exe as the type of the project.
2. Load Microsoft ADO Data Control 6.0 (OLEDB) into project using Project->Components option and check the above
mentioned ActiveX control.
3. Place ADODC (ActiveX data objects data control) on the form.
4. Select ADODC properties options from popup menu of the ADODC control.
5. This brings up property pages of ADODC.
6. Click on Build button in Use Connection String radio button.
7. ADODC displays Data Link Properties windows.
8. Make sure Provider tab is selected and select Microsoft jet 3.51 OLEDB Provider (figure19.3)
9. Then click on Connection tab (figure 19.4)
10. Click on three dots and select the name of data file that you want to access.
11. At this stage you can test your connection to the database by clicking on Test Connection button.
12. Advanced tab mainly deals with access permissions, and All tabs displays the entire information.
13. Click on Ok in Data Link Properties window to close it and come back to property pages of activex data control.
14. At this stage you should see connect string created by Visual Basic placed in Use connection String option button.
15. Now select RecordSource tab and adCmdTable from the type of the command dropdown list box.
16. Click on down arrow for the next combo box and from the list of valid tables select Authors tables (shown in figure 19.5)
17. Click on Ok to close property pages.
18. Place three textboxes on the form and corresponding labels. Change the properties of these controls as follows.
Control Property Value
Text1 Datasource Adodc1
Datafield Au_id
Name txtauid
Text2 Datasource Adodc1
Datafield Author
Name txtauthor
Text3 Datasource Adodc1
Datafield Year born
Name Txtyb
19. Change remaining properties as required.
20. Run the project to get the details of authors into three textboxes.
Note: This application is same as the application we developed in “Accessing Data using Data Control” section of chapter 15.
But instead of using data control, we have used an ADODC to access the data. And there the underlying objects are Data
access object and here the objects are ActiveX Data Objects.
26
27. Acti
veX Data Control does the same job as the standard Data
Control but in a different way. The fundamental
difference is; standard data control is based on ADO and
ADODC is based on ADO & OLEDB. And there are
different set of events and properties for ADODC.
Figure 19.2: General Property Page of ADODC.
Figure 19.3: List of Providers.
Properties of ADODC
The following are properties that are specific to ADODC.
Property Meaning
BOFAction Specifies the action to be taken when record pointer reaches beginning
of the underlying Recordset.
CacheSize Specifies the number of records to be kept in the memory.
Caption The message to be displayed on the control.
Commandtimeout Specifies the amount of time to wait for the command to return. Time is
specified in seconds. Default is 30.
Commandtype Specifies the type of command. Valid options are, adcmdUnKnown,
adCmdText, adCmdTable, and adCmdStoredProc.
ConnectionString Contains the information required to connect to the database.
ConnectionTimeou The number of seconds to wait before aborting connection. This is
27
28. t specified in seconds. Default is 15.
CursorLocation Sepecifies whether client-side or server-side cursors are used. Default is
adUseClient – client side cursor.
CursorType Specifies which type of cursor is to be used. Default is adOpenStatic.
EOFAction Indicates the action to be taken when record pointer reaches end of the
recordset.
LockType Specifies the type of lock to be used. The default is adLockOptimistic.
Maxrecords Specifies the number of records retrieved at the time of opening the
underlying recordset.
Mode Specifies in which mode the recordset is to be opened. The mode of
recordset determines what operations other users can perform on the
Recordset.
Orientation Whether to display recordset vertically or horizontally.
Password Password of the user currently connected.
RecordSource The name of the table or stored procedure or SELECT command that
supplies data.
Username Name of the user currently connected.
Table 19.6: Properties of ADODC.
Figure 19.4: Connection attributes.
Figure 19.5: Record Source attributes.
Events of ADODC
28
29. The events of ADODC can be divided into two main groups. One group contains events that occur before the operation is
performed (WillMove) and another group contains events, which occur after the operation is completed (MoveComplete).
Will events which will occur before the action takes place and gives you an opportunity to cancel the operation that is about
to take place using cancel parameter. See the example later.
The following are the events that are specific to ADODC.
Event When it occurs?
Fetchprogress Periodically during a lengthy fetch operation.
FetchComplete After all records of the recordset are fetched.
WillMove Before record pointer moves from one record to another record.
Movecomplete After record pointer has moved from one row to another.
EndOfRecordset When record pointer has moved past the last record.
WillchangeRecordset Before a change is made to recordset.
RecordsetChangeComplete After change is made to recordset.
WillchangeRecord Before the changes of the current record are sent to database.
RecordChangeComplete After the record in the data source is modified with the data in
the recordset.
WillChangeField Before the current fields in the recordset is updated.
FieldChangeComplete After the current field is updated.
Table 19.7: Events of ADODC.
29
30. What is difference between ActiveX DLL and ActiveX EXE
ActiveX DLLs and ActiveX EXEs are almost exactly the same in the ways they are built and used. In both
cases, you build one or more classes that applications can use to do something. The big difference lies in
where they are used.
An ActiveX DLL's code is executed within the main program's address space. It behaves as if the class was
created within the main program's code. Because the code lies inside the program's address space, calling
methods is very fast.
An ActiveX EXE's code is run in a separate process. When the main program calls an ActiveX EXE's method,
the system marshalls the call to translate the parameters into the ActiveX EXE's address space, calls the
method, translates the results back into the main program's address space, and returns the result. This is
slower than running an ActiveX DLL's method inside the main program's address space.
Because of the difference in speed, an ActiveX DLL is almost always preferable. The reason ActiveX EXEs are
useful is they can run on a different computer than the main program while an ActiveX DLL must run on the
same computer as the main program.
What is ActiveX and Types of ActiveX Components in VB?
The main term here is ActiveX component. The remaining things i.e. ActiveX control, ActiveX Exe and ActiveX
Dll are three different kinds of ActiveX components.
ActiveX Dll and ActiveX Exe are code components that are not integrated in the VB IDE like the ActiveX
control, so that u cant put any instances of those code components by double clicking or drag-dropping those
on ur form. Rather these code components expose their functionality by methods and properties, that u can
change/access through only ur code. More precisely code components are classes that must be accessed
through a properly declared object variable and they dont have a visible interface.
Now ActiveX Exe and ActiveX dll are different from each other in how they get instantiated with the client
application.
1.Standard EXE.
2.ActiveX EXE.
3.ActiveX DLL.
4.ActiveX document.
5.ActiveX Control.
6.Project Group.
30