SlideShare ist ein Scribd-Unternehmen logo
1 von 10
Downloaden Sie, um offline zu lesen
Adding a Text Widget to Your Dashboard

   1. Text widgets are helpful to post as captions below other widgets and information that you gather and post to your dashboard. For the purposes of this
      “how to,” we will add a caption to the Prezi widget shown below. To add a text widget to your dashboard, click the “+ Add content” button at the top left
      of your browser window, as circled in red below.
2. Select the “Essential widgets” link. While this “how to” focuses on the text widget, Essential widgets has a number of good widgets that you can more
   easily manipulate for your project than the featured widgets that first show up when you click “Add content.”
3. Netvibes calls their text widget the “HTML editor.” The HTML editor allows for various types of formatting such as bolding text, inserting images, and
   embedding URLs. If your browser window is not maximized as it is in the screencap below, the HTML editor might not appear on the first page so you may
   have to check the second or third page, depending on how many widgets are showing per page. Be sure you select HTML editor, as circled below, and not
   the widget to the right of it, HTML, as the HTML editor and HTML widgets serve different functions. See the “how to” on embedding Prezis or YouTube
   videos for information on the HTML widget.
4. As shown below, a dialogue box will pop up any time you select a widget to add. Simply click “Add to my page.” All other edits are made once your widget
   is on your page.
5. The widget will be added to the top of the tab in which you are currently working. In order to make edits to your widget, you must select the “gear”
   symbol, as circled below (in between the “share” arrow and the “delete” X).
6. Allow the editor to load so that it is showing all the options below (bold, italic, underline etc.) and then change the title of the widget. Then add your own
   text in the main body of the widget and format it as you would a word document.


7. After you add your text, you must select the “Ok” button in order to save your edits.
8. This is how the text widget appears after selecting “Ok.” You can always go back and make more edits by selecting the “gear” symbol again.
9. If you want to move your widget, you start by grabbing the bar at the top of the widget (as indicated by the red arrow) and move it like you would move a
   window on your computer. In order to properly place the widget (in this case, below the Prezi widget that the text widget is describing), you must drag the
   widget towards the bottom of the widget it will be underneath. It must look like it is still partly on top of the widget above it, as seen in the circled portion
   of the image below. When it is properly placed, a red-dotted outline will appear (as indicated by the blue arrow) to display where the widget will show up
   when you release the widget. If that outline is not present and you release the widget, the widget will remain where it started so be sure to grab the top
   bar of the widget you want to move, drag it towards the bottom of the widget it will be under but still partly on top of that widget, and release it while the
   red-dotted outline is present.
10. The final screencap shows your completed text widget as placed below the Prezi widget. You can still make edits to the title and the text, and you can
    move the widget around, by following the same steps above.

Weitere ähnliche Inhalte

Was ist angesagt?

AskDrWiki.com WikiText Tutoral
AskDrWiki.com WikiText TutoralAskDrWiki.com WikiText Tutoral
AskDrWiki.com WikiText Tutoraldoctorwiki
 
How to... blog
How to... blogHow to... blog
How to... blogJenna9
 
How to Use Evernote - Liezel Kabigting - Simpliezel.m4v
How to Use Evernote - Liezel Kabigting - Simpliezel.m4vHow to Use Evernote - Liezel Kabigting - Simpliezel.m4v
How to Use Evernote - Liezel Kabigting - Simpliezel.m4vLiezel Kabigting
 
Wordpress handout
Wordpress handoutWordpress handout
Wordpress handoutweigansm
 
Wordpress handout
Wordpress handout Wordpress handout
Wordpress handout weigansm
 
Intro wordpress (1) copy with dipesh sharma
Intro wordpress (1)   copy with dipesh sharmaIntro wordpress (1)   copy with dipesh sharma
Intro wordpress (1) copy with dipesh sharmadegana2009
 
How to build your site
How to build your siteHow to build your site
How to build your siteJamesBowman
 
Blog Tutorial
Blog TutorialBlog Tutorial
Blog Tutorialalancarr
 
Using your dashboard (edublogs)
Using your dashboard (edublogs)Using your dashboard (edublogs)
Using your dashboard (edublogs)Paul L
 
How to embed a slideshare presentation in your post on enterprising.in
How to embed a slideshare presentation in your post on enterprising.inHow to embed a slideshare presentation in your post on enterprising.in
How to embed a slideshare presentation in your post on enterprising.inGetEvangelized
 
Computer Generated Flannel Boards
Computer Generated Flannel BoardsComputer Generated Flannel Boards
Computer Generated Flannel BoardsFantasy BookLover
 
How to upload a powerpoint presentation to your blog
How to upload a powerpoint presentation to your blogHow to upload a powerpoint presentation to your blog
How to upload a powerpoint presentation to your blogHelenWeatherhead
 

Was ist angesagt? (20)

Blog -Blogger
Blog -BloggerBlog -Blogger
Blog -Blogger
 
AskDrWiki.com WikiText Tutoral
AskDrWiki.com WikiText TutoralAskDrWiki.com WikiText Tutoral
AskDrWiki.com WikiText Tutoral
 
Fewd week8 slides
Fewd week8 slidesFewd week8 slides
Fewd week8 slides
 
How to... blog
How to... blogHow to... blog
How to... blog
 
How to Use Evernote - Liezel Kabigting - Simpliezel.m4v
How to Use Evernote - Liezel Kabigting - Simpliezel.m4vHow to Use Evernote - Liezel Kabigting - Simpliezel.m4v
How to Use Evernote - Liezel Kabigting - Simpliezel.m4v
 
Dickmalott.com
Dickmalott.com Dickmalott.com
Dickmalott.com
 
Wordpress handout
Wordpress handoutWordpress handout
Wordpress handout
 
Wordpress handout
Wordpress handout Wordpress handout
Wordpress handout
 
Fewd week7 slides
Fewd week7 slidesFewd week7 slides
Fewd week7 slides
 
Intro wordpress (1) copy with dipesh sharma
Intro wordpress (1)   copy with dipesh sharmaIntro wordpress (1)   copy with dipesh sharma
Intro wordpress (1) copy with dipesh sharma
 
my presentation
my presentationmy presentation
my presentation
 
Trenamento Mc4
Trenamento Mc4Trenamento Mc4
Trenamento Mc4
 
How to build your site
How to build your siteHow to build your site
How to build your site
 
Blog Tutorial
Blog TutorialBlog Tutorial
Blog Tutorial
 
Flickr
FlickrFlickr
Flickr
 
Using your dashboard (edublogs)
Using your dashboard (edublogs)Using your dashboard (edublogs)
Using your dashboard (edublogs)
 
How to embed a slideshare presentation in your post on enterprising.in
How to embed a slideshare presentation in your post on enterprising.inHow to embed a slideshare presentation in your post on enterprising.in
How to embed a slideshare presentation in your post on enterprising.in
 
Computer Generated Flannel Boards
Computer Generated Flannel BoardsComputer Generated Flannel Boards
Computer Generated Flannel Boards
 
How to upload a powerpoint presentation to your blog
How to upload a powerpoint presentation to your blogHow to upload a powerpoint presentation to your blog
How to upload a powerpoint presentation to your blog
 
Topic Two: Adding Content
Topic Two: Adding ContentTopic Two: Adding Content
Topic Two: Adding Content
 

Ähnlich wie How To - Add a Text Widget to Netvibes

A2WPress Roadfighter Theme Documentation
A2WPress Roadfighter Theme DocumentationA2WPress Roadfighter Theme Documentation
A2WPress Roadfighter Theme DocumentationA2WPress
 
Webme Slide Tutorial
Webme Slide TutorialWebme Slide Tutorial
Webme Slide Tutorialmariamcgarry
 
A2WPress Localbusiness Theme Documentation
A2WPress Localbusiness Theme DocumentationA2WPress Localbusiness Theme Documentation
A2WPress Localbusiness Theme DocumentationA2WPress
 
What are sections
What are sectionsWhat are sections
What are sectionsvokeron
 
A2WPress Dzonia Theme Documentation
A2WPress Dzonia Theme DocumentationA2WPress Dzonia Theme Documentation
A2WPress Dzonia Theme DocumentationA2WPress
 
Cms Train The Trainer Guide
Cms Train The Trainer GuideCms Train The Trainer Guide
Cms Train The Trainer GuideFrances O'Neill
 
A2WPress Themia Documentation
A2WPress Themia DocumentationA2WPress Themia Documentation
A2WPress Themia DocumentationA2WPress
 
A2WPress Rethink Theme Documentation
A2WPress Rethink Theme DocumentationA2WPress Rethink Theme Documentation
A2WPress Rethink Theme DocumentationA2WPress
 
A2WPress Andrina Theme Documentation
A2WPress Andrina Theme DocumentationA2WPress Andrina Theme Documentation
A2WPress Andrina Theme DocumentationA2WPress
 
A2WPress Appointway Theme Documentation
A2WPress Appointway Theme DocumentationA2WPress Appointway Theme Documentation
A2WPress Appointway Theme DocumentationA2WPress
 
A2 w press geocraftdocs
A2 w press geocraftdocsA2 w press geocraftdocs
A2 w press geocraftdocsA2WPress
 
A2WPress Cloriato Theme Documentation
A2WPress Cloriato Theme DocumentationA2WPress Cloriato Theme Documentation
A2WPress Cloriato Theme DocumentationA2WPress
 
Working with Gutenberg - The WordPress Block Editor (A Beginner’s Guide)
Working with Gutenberg - The WordPress Block Editor (A Beginner’s Guide)Working with Gutenberg - The WordPress Block Editor (A Beginner’s Guide)
Working with Gutenberg - The WordPress Block Editor (A Beginner’s Guide)WPWhiteBoard
 
A2WPress Blogstrend Theme Documentation
A2WPress Blogstrend Theme DocumentationA2WPress Blogstrend Theme Documentation
A2WPress Blogstrend Theme DocumentationA2WPress
 
A2 w press videocraftdocs
A2 w press videocraftdocsA2 w press videocraftdocs
A2 w press videocraftdocsA2WPress
 
A2 w press coveradocs
A2 w press coveradocsA2 w press coveradocs
A2 w press coveradocsA2WPress
 
A2WPress Swiftray Theme Documentation
A2WPress Swiftray Theme DocumentationA2WPress Swiftray Theme Documentation
A2WPress Swiftray Theme DocumentationA2WPress
 
A2 w presseliteprodocs
A2 w presseliteprodocsA2 w presseliteprodocs
A2 w presseliteprodocsA2WPress
 

Ähnlich wie How To - Add a Text Widget to Netvibes (20)

A2WPress Roadfighter Theme Documentation
A2WPress Roadfighter Theme DocumentationA2WPress Roadfighter Theme Documentation
A2WPress Roadfighter Theme Documentation
 
Webme Slide Tutorial
Webme Slide TutorialWebme Slide Tutorial
Webme Slide Tutorial
 
A2WPress Localbusiness Theme Documentation
A2WPress Localbusiness Theme DocumentationA2WPress Localbusiness Theme Documentation
A2WPress Localbusiness Theme Documentation
 
What are sections
What are sectionsWhat are sections
What are sections
 
A2WPress Dzonia Theme Documentation
A2WPress Dzonia Theme DocumentationA2WPress Dzonia Theme Documentation
A2WPress Dzonia Theme Documentation
 
Cms Train The Trainer Guide
Cms Train The Trainer GuideCms Train The Trainer Guide
Cms Train The Trainer Guide
 
A2WPress Themia Documentation
A2WPress Themia DocumentationA2WPress Themia Documentation
A2WPress Themia Documentation
 
A2WPress Rethink Theme Documentation
A2WPress Rethink Theme DocumentationA2WPress Rethink Theme Documentation
A2WPress Rethink Theme Documentation
 
A2WPress Andrina Theme Documentation
A2WPress Andrina Theme DocumentationA2WPress Andrina Theme Documentation
A2WPress Andrina Theme Documentation
 
A2WPress Appointway Theme Documentation
A2WPress Appointway Theme DocumentationA2WPress Appointway Theme Documentation
A2WPress Appointway Theme Documentation
 
A2 w press geocraftdocs
A2 w press geocraftdocsA2 w press geocraftdocs
A2 w press geocraftdocs
 
A2WPress Cloriato Theme Documentation
A2WPress Cloriato Theme DocumentationA2WPress Cloriato Theme Documentation
A2WPress Cloriato Theme Documentation
 
Working with Gutenberg - The WordPress Block Editor (A Beginner’s Guide)
Working with Gutenberg - The WordPress Block Editor (A Beginner’s Guide)Working with Gutenberg - The WordPress Block Editor (A Beginner’s Guide)
Working with Gutenberg - The WordPress Block Editor (A Beginner’s Guide)
 
Simple Cms manual
Simple Cms manualSimple Cms manual
Simple Cms manual
 
A2WPress Blogstrend Theme Documentation
A2WPress Blogstrend Theme DocumentationA2WPress Blogstrend Theme Documentation
A2WPress Blogstrend Theme Documentation
 
Wps
WpsWps
Wps
 
A2 w press videocraftdocs
A2 w press videocraftdocsA2 w press videocraftdocs
A2 w press videocraftdocs
 
A2 w press coveradocs
A2 w press coveradocsA2 w press coveradocs
A2 w press coveradocs
 
A2WPress Swiftray Theme Documentation
A2WPress Swiftray Theme DocumentationA2WPress Swiftray Theme Documentation
A2WPress Swiftray Theme Documentation
 
A2 w presseliteprodocs
A2 w presseliteprodocsA2 w presseliteprodocs
A2 w presseliteprodocs
 

How To - Add a Text Widget to Netvibes

  • 1. Adding a Text Widget to Your Dashboard
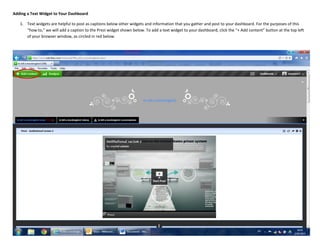
  • 2. Adding a Text Widget to Your Dashboard 1. Text widgets are helpful to post as captions below other widgets and information that you gather and post to your dashboard. For the purposes of this “how to,” we will add a caption to the Prezi widget shown below. To add a text widget to your dashboard, click the “+ Add content” button at the top left of your browser window, as circled in red below.
  • 3. 2. Select the “Essential widgets” link. While this “how to” focuses on the text widget, Essential widgets has a number of good widgets that you can more easily manipulate for your project than the featured widgets that first show up when you click “Add content.”
  • 4. 3. Netvibes calls their text widget the “HTML editor.” The HTML editor allows for various types of formatting such as bolding text, inserting images, and embedding URLs. If your browser window is not maximized as it is in the screencap below, the HTML editor might not appear on the first page so you may have to check the second or third page, depending on how many widgets are showing per page. Be sure you select HTML editor, as circled below, and not the widget to the right of it, HTML, as the HTML editor and HTML widgets serve different functions. See the “how to” on embedding Prezis or YouTube videos for information on the HTML widget.
  • 5. 4. As shown below, a dialogue box will pop up any time you select a widget to add. Simply click “Add to my page.” All other edits are made once your widget is on your page.
  • 6. 5. The widget will be added to the top of the tab in which you are currently working. In order to make edits to your widget, you must select the “gear” symbol, as circled below (in between the “share” arrow and the “delete” X).
  • 7. 6. Allow the editor to load so that it is showing all the options below (bold, italic, underline etc.) and then change the title of the widget. Then add your own text in the main body of the widget and format it as you would a word document. 7. After you add your text, you must select the “Ok” button in order to save your edits.
  • 8. 8. This is how the text widget appears after selecting “Ok.” You can always go back and make more edits by selecting the “gear” symbol again.
  • 9. 9. If you want to move your widget, you start by grabbing the bar at the top of the widget (as indicated by the red arrow) and move it like you would move a window on your computer. In order to properly place the widget (in this case, below the Prezi widget that the text widget is describing), you must drag the widget towards the bottom of the widget it will be underneath. It must look like it is still partly on top of the widget above it, as seen in the circled portion of the image below. When it is properly placed, a red-dotted outline will appear (as indicated by the blue arrow) to display where the widget will show up when you release the widget. If that outline is not present and you release the widget, the widget will remain where it started so be sure to grab the top bar of the widget you want to move, drag it towards the bottom of the widget it will be under but still partly on top of that widget, and release it while the red-dotted outline is present.
  • 10. 10. The final screencap shows your completed text widget as placed below the Prezi widget. You can still make edits to the title and the text, and you can move the widget around, by following the same steps above.