Linux router
•
0 gefällt mir•685 views

The document describes how to configure a Linux machine as a router to connect two subnets. It provides instructions to enable IP forwarding and configure the network interfaces using temporary and permanent methods. The summary is: - Enable IP forwarding and configure the network interfaces of two Ethernet cards using ifconfig to set up routing temporarily - Use netconf to configure the interfaces and routing permanently by editing settings, accepting changes, and rebooting to confirm the configuration persists - Install traffic generator programs on end stations to test routing of UDP and TCP packets between subnets going through the router

Empfohlen
Weitere ähnliche Inhalte
Was ist angesagt?
Was ist angesagt? (20)
Andere mochten auch
Andere mochten auch (20)
Ähnlich wie Linux router
Ähnlich wie Linux router (20)
Kürzlich hochgeladen
Kürzlich hochgeladen (20)
Linux router
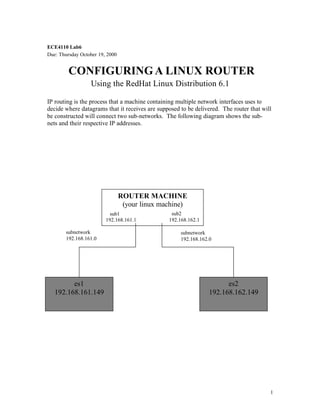
- 1. ECE4110 Lab6 Due: Thursday October 19, 2000 CONFIGURING A LINUX ROUTER Using the RedHat Linux Distribution 6.1 IP routing is the process that a machine containing multiple network interfaces uses to decide where datagrams that it receives are supposed to be delivered. The router that will be constructed will connect two sub-networks. The following diagram shows the subnets and their respective IP addresses. ROUTER MACHINE (your linux machine) sub1 192.168.161.1 subnetwork 192.168.161.0 es1 192.168.161.149 sub2 192.168.162.1 subnetwork 192.168.162.0 es2 192.168.162.149 1
- 2. The following steps will guide you in constructing the small network shown above. You will be configuring the router using two different methods. One of the methods is permanent and the other has a temporary effect of the Linux kernel. You must get TA check offs for both methods to receive full credit for this lab. Router Machine 1. Start one of the router machines. The set ups in the lab have one router and two endstations. The endstations are already configured for you. You may logon to an end station using linux_class and password linux_class. You should not need to make any networking configuration changes in the end stations. 2. Enable IP Forwarding To turn on IP forwarding the network file in the /etc/sysconfig directory must be edited using your favorite editor. The line containing FORWARD_IPV4 by default is set to disable IP forwarding. To enable IP forwarding you need to change “no” to “yes”. Below is a sample of what the file should like when you have finished editing it. NETWORKING=yes FORWARD_IPV4="yes" HOSTNAME="sub1" GATEWAY="130.207.231.1" GATEWAYDEV="" In order for this change to take effect you must reboot the machine. You will be required to reboot later on in the lab. If you want to save time, wait to reboot after doing more of the lab. (The top of page 4 is where you reboot.) Note: We are setting our default gateway to a nonexistent address in our lab setup. We are doing this to remove default routing so that you may experiment with the routing set ups manually. It is strange to use this address 130.207.231.1 in our network, however for our lab purposes lets use it. 3. In order for any machine to recognize another (in a network without a running nameserver), the IP address needs to be in the /etc/hosts. In the /etc/hosts file for your router make sure there are entries for each interface (192.168.161.1, 192.168.162.1, etc) and each endstation (192.168.161.149, 192.168.162.149). Example: IP 192.168.161.1 192.168.162.1 Machine Name sub1.eecom.gatech.edu sub2.eecom.gatech.edu Host Name sub1 sub2 2
- 3. 192.168.161.149 192.168.162.149 es1.eecom.gatech.edu es2.eecom.gatech.edu es1 es2 Verify that Linux sees two ethernet cards To check to see if your network card(s) were initialized automatically do the following: 1 Log into the router machine as root account 2 Type dmesg | more at the command prompt You are now looking at the messages which scroll across the screen during boot. You should find two different ethernet cards listed in the messages. Linux version 2.2.12 -20 (root@porky.devel.redhat.com) (gcc ve rsion egcs-2.91.66 19990314/Linux (egcs -1.1.2 release)) #1 Mon Sep 27 10:40:35 EDT 1999 Detected 451026999 Hz processor. Console: colour VGA+ 80x25 Calibrating delay loop... 448.92 BogoMIPS Memory: 127608k/131008k available (1008k kernel code, 412k reserve d, 1636k data, 64k init) DENTRY hash table entries: 262144 (order: 9, 2097152 bytes) Buffer-cache hash table entries: 131072 (order: 7, 524288 bytes) Page-cache hash table entries: 32768 (order: 5, 131072 bytes) VFS: Diskquotas version dquot_6.4.0 initiali zed CPU: Intel Pentium III (Katmai) stepping 03 Checking 386/387 coupling... OK, FPU using exception 16 error reporting. Checking 'hlt' instruction... OK. POSIX conformance testing by UNIFIX mtrr: v1.35a (19990819) Richard Gooch (rgooch@atnf.csiro.au) PCI: PCI BIOS revision 2.10 entry at 0xf08b0 PCI: Using configuration type 1 PCI: Probing PCI hardware Linux NET4.0 for Linux 2.2 Based upon Swansea University Computer Society NET3.039 NET4: Unix domain sockets 1.0 for Linux NET4.0. NET4: Linux TCP/IP 1.0 for NET4.0 IP Protocols: ICMP, UDP, TCP, IGMP TCP: Hash tables configured (ehash 131072 bhash 65536) Initializing RT netlink socket Starting kswapd v 1.5 Detected PS/2 Mouse Port. Serial driver version 4.27 with MANY_PORTS MULTIPORT SHARE_IRQ enabled ttyS00 at 0x03f8 (irq = 4) is a 16550A ttyS01 at 0x02f8 (irq = 3) is a 16550A pty: 256 Unix98 ptys configured apm: BIOS version 1.2 Flags 0x03 (Driver version 1.9) Real Time Clock Driver v1.09 RAM disk driver initialized: 16 RAM disks of 4096K size PIIX4: IDE controller on PCI bus 00 dev 21 PIIX4: not 100% native mode: will probe irqs later ide0: BM-DMA at 0xb800-0xb807, BIOS settings: hda:DMA, hdb:DMA 3
- 4. ide1: BM-DMA at 0xb808-0xb80f, BIOS settings: hdc:pio, hdd:pio hda: WDC WD43AA, ATA DISK drive hdb: ATAPI 44X CDROM, ATAPI CDROM drive ide0 at 0x1f0-0x1f7,0x3f6 on irq 14 hda: WDC WD43AA, 4112MB w/2048kB Cache, CHS=524/255/63 hdb: ATAPI 40X CD-ROM drive, 128kB Cache Uniform CDROM driver Revision: 2.56 Floppy drive(s): fd0 is 1.44M FDC 0 is a post-1991 82077 md driver 0.90.0 MAX_MD_DEVS=256, MAX_REAL=12 raid5: measuring checksumming speed raid5: MMX detected, trying high -speed MMX checksum routines pII_mmx : 1003.935 MB/sec p5_mmx : 1054.608 MB/sec 8regs : 774.573 MB/sec 32regs : 434.340 MB/sec using fastest function: p5_mmx (1054.608 MB/sec ) scsi : 0 hosts. scsi : detected total. md.c: sizeof(mdp_super_t) = 4096 Partition check: hda: hda1 hda2 < hda5 > RAMDISK: Compressed image found at block 0 autodetecting RAID arrays autorun ... ... autorun DONE. VFS: Mounted root (ext2 filesystem). autodetecting RAID arrays autorun ... ... autorun DONE. VFS: Mounted root (ext2 filesystem) readonly. change_root: old root has d_count=1 Trying to unmount old root ... okay Freeing unused kernel me mory: 64k freed Adding Swap: 265032k swap -space (priority -1) eth0: Intel EtherExpress Pro 10/100 at 0xb000, 00:A0:C9:F7:0C:41, IRQ 10. Board assembly 352433-005, Physical connectors present: RJ45 Primary interface chip i82553-A/B PHY #1. General self-test: passed. Serial sub-system self-test: passed. Internal registers self-test: passed. ROM checksum self-test: passed (0x49caa8d6). Receiver lock-up workaround activated. eth1: Intel EtherExpress Pro 10/100 at 0xa800, 00:A0:C9:F7:0C:30, IRQ 10. Board assembly 352433-005, Physical connectors present: RJ45 Primary interface chip i82553-A/B PHY #1. General self-test: passed. Serial sub-system self-test: passed. Internal registers self-test: passed. ROM checksum self-test: passed (0x49caa8d6). Receiver lock-up workaround activated. 4
- 5. Next we will configure the network for each of the two ethernet cards. We will use a temporary method and then later a permanent method. Method 1 – The Temporary Method This method is a good way to troubleshoot your router but all changes that you have made will not exist when you reboot. DO NOT REBOOT THE MACHINE DURING THE REMAINDER OF THIS METHOD. First type ifconfig to see what your machine looks like before you make any changes. Here you will still only see one ethernet card because we have not configured the network information. The machine knows it has two (dmesg told us this) but the configuration on how to use the resources does not know about the second card yet. Also type route -nv to see what routes the machine knows about before your changes. Ø Configure All network information for both network cards Configure Adapter 1 by entering the following on the command line. (Note that the subnet ID of eth0 must correspond to the subnet ID of the machine that is physically connected to eth0): ifconfig eth0 192.168.161.1 netmask 255.255.255.0 broadcast 192.168.161.255. up Configure Adapter 2 by entering the following on the command line: ifconfig eth1 192.168.162.1 netmask 255.255.255.0 broadcast 192.168.162.255 up Again type ifconfig. Look at the changes. You should see something like: eth0 Link encap:Ethernet HWaddr 00:A0:C9:F7:0C:41 inet addr:192.168.161.1 Bcast:192.168.161.255 Mask:255.255.255.0 UP BROADCAST RUNNING MULTICAST MTU:1500 Metric:1 RX packets:0 errors:0 dropped:0 overruns:0 frame:0 TX packets:0 errors:0 dropped:0 overruns:0 carrier:0 collisions:0 txqueuelen:100 5
- 6. Interrupt:10 Base address:0xb000 eth1 Link encap:Ethernet HWaddr 00:A0:C9:F7:0C:30 inet addr:192.168.162.1 Bcast:192.168.162.255 Mask:255.255.255.0 UP BROADCAST RUNNING MULTICAST MTU:1500 Metric:1 RX packets:0 errors:0 dropped:0 overruns:0 frame:0 TX packets:0 errors:0 dropped:0 overruns:0 carrier:0 collisions:0 txqueuelen:100 Interrupt:10 Base address:0xa800 lo Link encap:Local Loopback inet addr:127.0.0.1 Mask:255.0.0.0 UP LOOPBACK RUNN ING MTU:3924 Metric:1 RX packets:0 errors:0 dropped:0 overruns:0 frame:0 TX packets:0 errors:0 dropped:0 overruns:0 carrier:0 collisions:0 txqueuelen:0 Ø Setup the routing tables To check the routes on the machine type the following at the command prompt: route -nv Note that Linux has automatically added your routes for the new network configuration. Although it is not necessary add an explicit host route with: route add -host 192.168.161.149 eth0 Type route -nv to see this new entry Now remove this extra entry route del -host 192.168.161.149 eth0 delete your existing net entry with route del -net 192.168.161.0 netmask 255.255.255.0 eth0 route -nv to see it is removed put it back route add -net 192.168.161.0 netmask 255.255.255.0 eth0 route -nv to see it is back 6
- 7. Show the TA that you can ping the two end stations from the router and that you can ping from es1 to es2. Reboot the machine and show the TA that you are not able to do any pings because you lost the temporary configuration. If you are out of time for now this is a good place to stop for a break. Method 2 – The Permanent Method Use ifconfig to see that only one ethernet card is presently configured Ø Configure All network information for the network cards Type netconf at the command prompt Next Choose the Basic Host Information option Enter the host name sub1 Primary Name + domain : sub1.eecom.gatech.edu Alias sub1 IP address 192.168.161.1 Change the setting so you see what is shown below: [*]Enabled Config Mode [*]Manual _ [ ]Bootp _ [ ]DHCP_ _ _ _ _ Primary Name + Domain_ sub1.eecom.gatech.edu IP Address_ 192.168.161.1 _ _ _ _ _ _ _ _ _ _ _ _ _ _ _ _ Netmask_ 255.255.255.0_ _ _ _ _ _ _ _ _ _ _ _ _ _ _ _ _ _ Net Device_ eth0 _ _ _ _ _ _ _ _ _ _ _ _ _ _ _ _ _ _ _ _ _ _ Kernel Module_ eepro100 _ _ _ _ _ _ _ _ _ _ _ _ _ _ _ _ _ _ _ _ IO Port (leave blank) IRQ (leave blank) Scroll down to adapter 2 Choose the Enable option Config Mode choose the Manual option Primary Name + Domain enter sub2.eecom.gatech.edu Alias sub2 IP Address enter 192.168.162.1 Netmask enter 255.255.255.0 7
- 8. Net Device enter eth1 Net Device_ eth1 _ _ _ _ _ _ _ _ _ _ _ _ _ _ _ _ _ _ _ _ _ _ Kernel Module_ eepro100 _ _ _ _ _ _ _ _ _ _ _ _ _ _ _ _ _ _ _ _ IO Port (Leave Blank) IRQ (Leave Blank) Select Accept, Quit, and activate changes options Ignore error log ifconfig should now show two cards configured. Ø Setup the routing tables The RedHat kernel will setup the network default routes automatically if the permanent method is employed. To check the routes on the machine type the following at the command prompt: route -nv You should now see something like the following: Kernel IP routing table Destination Gateway 192.168.162.1 0.0.0.0 192.168.161.1 0.0.0.0 192.168.162.0 0.0.0.0 192.168.161.0 0.0.0.0 127.0.0.0 0.0.0.0 Genmask 255.255.255.255 255.255.255.255 255.255.255.0 255.255.255.0 255.0.0.0 Flags UH UH U U U Metric 0 0 0 0 0 Ref 0 0 0 0 0 Use 0 0 0 0 0 Iface eth1 eth0 eth1 eth0 lo Show the TA that you can ping the two end stations from the router and that you can ping the router from the two endstations. Reboot the machine and show the TA that you are still able to ping the two end stations from the router and that you can ping the router from the two endstations. Part 3: Install your UDP and TCP traffic generator executable object code onto es1 and es2 by using ftp and linux_class password linux_class. Place your code into a directory under /home/linux_class/your group name groupXX. Demonstrate to the TA that you can run both the TCP and UDP traffic from es1 to es2 at the same time. 8
- 9. Part 4: Using the TCP and UDP traffic generators, try to demonstrate how UDP can slow down TCP traffic so that TCP cannot get very much throughput. Write down the parameters you used in the traffic generators. Put both traffic generator sources on es1, put both sinks on es2. You will run the two sources through the router to the sinks so that the router will have traffic at the same time from both sources. What you are trying to see is if UDP traffic that blocks TCP traffic causes the TCP traffic flow control mechanism to slow down the TCP throughput while UDP which has no flow control mechanism keeps on going at the same speed. Can you see this? Run TCP by itself and note that it works as expected. Next run the UDP generator. Leave the UDP gen running and test TCP. See whether the TCP stats have been affected by running UDP at the same time. Repeat this test but keep increasing the traffic generated by UDP while holding TCP’ rate constant. s See if you can show that with more and more UDP traffic, TCP can eventually be really slowed down or stopped. Recall TCP has a flow control mechanism, while UDP does not. Record the sent and received inter-arrival times and through put of the traffic generators and see if you can make a table or graph showing this “undesirable” effect on TCP as a result of UDP traffic in the same network. Turn into the TA a written explanation of how you did or did not show that UDP can starve out TCP traffic. 9