
Recommended
More Related Content
What's hot
Similar to Flash Intro 2 Car And Ramp
Similar to Flash Intro 2 Car And Ramp (20)
More from khawer001
Recently uploaded
Recently uploaded (20)
Flash Intro 2 Car And Ramp
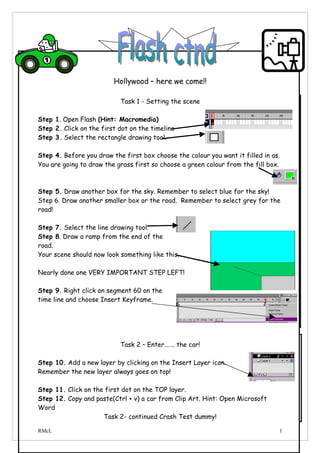
- 1. Hollywood – here we come!! Task 1 - Setting the scene Step 1. Open Flash (Hint: Macromedia) Step 2. Click on the first dot on the timeline Step 3. Select the rectangle drawing tool. Step 4. Before you draw the first box choose the colour you want it filled in as. You are going to draw the grass first so choose a green colour from the fill box. Step 5. Draw another box for the sky. Remember to select blue for the sky! Step 6. Draw another smaller box or the road. Remember to select grey for the road! Step 7. Select the line drawing tool. Step 8. Draw a ramp from the end of the road. Your scene should now look something like this. Nearly done one VERY IMPORTANT STEP LEFT! Step 9. Right click on segment 60 on the time line and choose Insert Keyframe. Task 2 – Enter……. the car! Step 10. Add a new layer by clicking on the Insert Layer icon. Remember the new layer always goes on top! Step 11. Click on the first dot on the TOP layer. Step 12. Copy and paste(Ctrl + v) a car from Clip Art. Hint: Open Microsoft Word Task 2- continued Crash Test dummy! RMcL 1
- 2. OR Draw your own car using the tools available Step 13. Click on the Select tool and move the car to the start of the road. Step 14. Right click on 10 on the TOP layer and insert a Keyframe. Step 15. Move the car along the road to the start of the ramp. Step 16. Drag the first dot to the second dot on the TOP layer and right click. Choose Create Motion Tween. Step 17. Right click further down the timeline insert another key frame. Step 18. Click on the Free transform tool Your picture should now look like this Step 19. To rotate the picture so you can make it move up the ramp, place the cursor over one of the corners of the picture until this symbol appears. Step 20. Rotate the picture and then move it up the ramp. It should look like this. Step 21. Continue to Insert KeyFrames and move the car along the ramp. Remember: the closer the segments the quicker the car will move. Step 22. When the car gets to the end of the ramp you will need to insert more KeyFrames and rotate the picture so it looks like it is falling. Step 23. To watch your movie press the Enter button. Step 24. To really impress the producers can you make the car look like it has fallen into a puddle of water??? Step 25. Welcome to Hollywood!!!! RMcL 2