Sliding touch panels for mobile web – HTML5, CSS3
•Als DOCX, PDF herunterladen•
0 gefällt mir•2,442 views

In this tutorial I will discuss about creating a sliding touch panel meant for mobile web apps. You must have seen, that in iPhone or iPod settings when you tap on a menu item the whole panel slides out and a detailed panel slides in. I am going to talk exactly on how to create something similar for iPhones and Android devices using CSS3 transitions and a little bit of java script. Even those who have worked with mobile web apps using Sencha Touch must be aware of sliding touch panels. For the full post download the file or visit the blog link: http://jbkflex.wordpress.com/2012/02/09/sliding-touch-panels-for-mobile-web-html5-css3/

Empfohlen
Empfohlen
Weitere ähnliche Inhalte
Kürzlich hochgeladen
Kürzlich hochgeladen (20)
Empfohlen
Empfohlen (20)
Sliding touch panels for mobile web – HTML5, CSS3
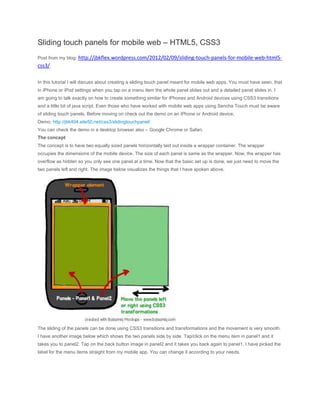
- 1. Sliding touch panels for mobile web – HTML5, CSS3 Post from my blog: http://jbkflex.wordpress.com/2012/02/09/sliding-touch-panels-for-mobile-web-html5- css3/ In this tutorial I will discuss about creating a sliding touch panel meant for mobile web apps. You must have seen, that in iPhone or iPod settings when you tap on a menu item the whole panel slides out and a detailed panel slides in. I am going to talk exactly on how to create something similar for iPhones and Android devices using CSS3 transitions and a little bit of java script. Even those who have worked with mobile web apps using Sencha Touch must be aware of sliding touch panels. Before moving on check out the demo on an iPhone or Android device, Demo: http://jbk404.site50.net/css3/slidingtouchpanel/ You can check the demo in a desktop browser also – Google Chrome or Safari. The concept The concept is to have two equally sized panels horizontally laid out inside a wrapper container. The wrapper occupies the dimensions of the mobile device. The size of each panel is same as the wrapper. Now, the wrapper has overflow as hidden so you only see one panel at a time. Now that the basic set up is done, we just need to move the two panels left and right. The image below visualizes the things that I have spoken above. The sliding of the panels can be done using CSS3 transitions and transformations and the movement is very smooth. I have another image below which shows the two panels side by side. Tap/click on the menu item in panel1 and it takes you to panel2. Tap on the back button image in panel2 and it takes you back again to panel1. I have picked the label for the menu items straight from my mobile app. You can change it according to your needs.
- 2. Two panels side by side I will not go into the design aspect of the menu and the rest of the pages. You can always check out the CSS content from the code. The menu itself can help you in some other project as it has got an iPhone look and feel with nice rounded corners. Getting started Let’s see how to place the two panels horizontally inside a wrapper container. This needs some HTML and CSS, <section id="wrapper"> <dl id="panelContainer"> <dd id="panel1"> <!--contents of panel1 goes here --> </dd> <dd id="panel2"> <!--contents of panel2 goes here --> </dd> </dl> </section>
- 3. The wrapper is a HTML5 section tag. The panel container is a dl element and holds two dd elements – panel 1 andpanel2. The two dd elements are placed horizontally using float:left CSS property. Note that only float:left is not enough for them to be placed horizontally. There must be enough width inside the panelContainer dl element to hold the two panels horizontally. I will talk about this later. Coming back to the HTML code above, this is the basic HTML skeleton needed for the app. If you see the source code of the demo app you will see the contents inside the panels (the header bar, navigation menu etc). Let’s see the CSS needed for the HTML block above, #wrapper { width:100%; height:auto; overflow:hidden; } #wrapper dl { -webkit-transition:-webkit-transform ease; } #wrapper dl dd { float:left; } The wrapper occupies the entire width of the device as it is 100%. For the dl (panelContainer) element I have set a web-kit transition property. So whenever we move the dl element using CSS3 transformation functions (eg. -webkit- transform = translateX(20px);) the movement is smooth and continuous over time. Try to remove the transition style property from dl, and now if the panel container moves the movement will not be continuous. It will jump to its new position. Remember transition is important for the sliding movement. For panel1 and panel2 to be placed horizontally side by side enough width must be set to the panel container. I have done this in java script code (when window loads, check out the source of the demo app) so that based on the device width I can set the values accordingly. This is how I have done it, panelContainer = document.getElementById("panelContainer"); panelContainer.style.width = (2 * window.innerWidth) + "px";
- 4. panel1 = document.getElementById("panel1"); panel1.style.width = window.innerWidth + "px"; panel2 = document.getElementById("panel2"); panel2.style.width = window.innerWidth + "px"; The panel container gets a width of twice the panels inside it. So it has got enough room now. Let’s slide the Panels If you have checked out the demo already, you might have clicked on one of the menu items to slide to the other panel. For each of the menu items an event listener is registered. So when you tap/click on it a function is called – navigateTo(event) and the event object is passed as a parameter. I have two of them as example below, <dd onclick="navigateTo(event)"> About <img src="images/arrow_grey.png"/> </dd> <dd onclick="navigateTo(event)"> Work Areas <img src="images/arrow_grey.png"/> </dd> Similarly the back button also registers a listener to listen to click events. backBtn = document.getElementById("backBtn"); backBtn.addEventListener("click", backBtnClicked, false); Inside the navigateTo() event listener function, I get the label of the menu item clicked and also translate the panel container to an x-distance of -window.innerWidth. The negative value is for moving the panel container to the left so that panel1 slides out and panel2 slides in. The value of window.innerWidth is same as the individual panel widths. I have used this value to auto adjust to every device screen – iPhone, iPad, Android, desktop browsers. Now, the panel container moves to the left exactly a distance of the width of panel1, hence it looks like panel1 has slide out. For iPhone it is -320px. function navigateTo(event) {
- 5. panelContainer.style.webkitTransform = "translate3d(-" + window.innerWidth + "px, 0, 0)"; panelContainer.style.webkitTransitionDuration = speed + "ms"; clickedMenuText = event.currentTarget.firstChild.nodeValue.trim(); headerText.innerText = clickedMenuText; } I have used translate3d(x,y,x) function over translateX() as the former one is hardware accelerated and helps in optimization. You can also set the speed of transition by setting the webkitTransitionDuration value. Similarly when you tap on the back button image in panel2 the panel container is again translated back to x=0 i.e the original position. Hence it looks like panel1 has slide in. function backBtnClicked() { panelContainer.style.webkitTransform = "translate3d(0, 0, 0)"; panelContainer.style.webkitTransitionDuration = speed + "ms"; } The entire concept of sliding effect is to move the panel container back and forth by a distance value equal to the width of its panel which is equal to the device’s browser screen width. For the full code check out the source of the demo app below, Demo: http://jbk404.site50.net/css3/slidingtouchpanel/ The demo is meant for web-kit browsers only. So check in iPhone/iPod/iPad, Android browsers and for desktop check out in Google Chrome or Safari.