SlideShare a Scribd company logo
1 of 19
Download to read offline
essential embroidery stitches	

designs and techniques

essential embroidery stitches:

Free Hand and Machine
Embroidery Designs
and Techniques

1

2

4

3

1
	

Defining the Line:
Free-motion Embroidery Skills


ellen anne eddy

2
	

Versatile Satin Stitch

3
	
4
	

Kathy york

		Yvonne Brown


Off-site Embroidery

		Susie Williams
	

Reverse Appliqué  Bobbin
Embroidery with a Twist

essential embroidery stitches: embroidery designs and techniques Q u i lt i n g A r t s . c o m

1

©Interweave
essential embroidery stitches	
Machine and hand embroidery are
the hallmarks of art quilt design and
construction. Depending on the stitch and
the thread or fiber used,
embroidery can give your
quilts a contemporary edge or
vintage charm.
In this free eBook, Essential
Embroidery Stitches: Free
Hand and Machine Embroidery
Designs and Techniques, we’ve assembled four
of our best articles on machine and hand
embroidery. Each one gives you tips, hints,
and instructions for adding embroidery to
your quilts.
First up, internationally known expert Ellen
Anne Eddy reviews the basics of free-motion
embroidery in her article “Defining the Line:
Free-motion Embroidery Skills.” Ellen offers
tips and hints for how to get started, from
which foot to use to how to sign your name
in stitches.
One of the most versatile machine
embroidery stitches to master is the satin
stitch. In Kathy York’s article of the same
name, she explains how the satin stitch
can play a unique role in the making of art
quilts. From using it to finish the edges of a
quilt, to joining quilt blocks, to free-motion
quilting and creating shapes, the satin stitch
is one you’ll use over and over again.

put
more

designs and techniques
Susie Williams shows how to incorporate
a hand-embroidered motif into a pieced
quilt in “Off-site Embroidery.” This method
involves stitching a design on a piece of
cloth, cutting the finished embroidered
image off the base fabric, and appliquéing
the motif to your artwork. It’s a great way to
add detailed hand work without your piece
becoming too bulky.

ESSENTIAL
EMBROIDERY STITCHES:
FREE HAND AND
MACHINE EMBROIDERY
DESIGNS AND
TECHNIQUES

Finally, in “Reverse Appliqué  Bobbin
Embroidery with a Twist,” Yvonne Brown
teaches you to combine painted tissue paper,
fabric, and machine bobbin embroidery to
create flowing, textured, and layered designs.
Because you wind the specialty threads or
ribbons in the bobbin, you stitch with your
work face down on the machine. A more
challenging technique, but the results are
worth the effort!

Pokey Bolton
	editor 	 Cate Coulacos
		Prato
	Editorial director	

creative services

Larissa Davis
	 Photographers	 Larry Stein
		 Korday Studios

	Division Art Director	

We know you’ll use the knowledge and
inspiration from Essential Embroidery Stitches:
Free Hand and Machine Embroidery Designs
and Techniques again and again to enhance
your skills and artistry.

Projects and information are for inspiration and personal use only. Interweave
Press LLC is not responsible for any liability arising from errors, omissions, or
mistakes contained in this eBook, and
readers should proceed cautiously, especially with respect to technical information.
Interweave grants permission to photocopy any patterns published in this
issue for personal use only.

Warmly,

Pokey Bolton
Editorial Director

texture
in your life

ideas, textiles, and techniques
related to embellished and contemporary art quilting. Inside,
you’ll find design inspiration, step-by-step directions, gorgeous
photo­graphy, and motivation for developing your personal style, at
®

Quilting Arts Magazine explores

all skill levels.

EXTREME

QUILT
P. 72

MAKEOVER
Art quilts
transformed,
before  after

create

  fabrics
11 playful techniques

plus:

to try, including:

Ice Dyeing . 48
Layered Marbling . 44
Monoprinting 
Finger Painting . 38
Stamping and Stenciling
with Unusual Objects . 52
P

P

P

quiltingarts.com

800.406.5283 (U.S.  Canada)
760.291.1519 (International)

P. 26

art
quilt
meets



P

Quilting Arts Magazine®, P.O. Box 469087, Escondido, CA 92046-9350

essential embroidery stitches: embroidery designs and techniques Q u i lt i n g A r t s . c o m

2

©Interweave
essential embroidery stitches	

defining

designs and techniques

line

Adapted from
Quilting Arts Magazine
Summer 2002

the
Free-Motion Embroidery Skills

F

ree-motion stitching offers a world of
possibilities to all kinds of quilters and

all types of quilts. For even the most ardent
traditionalist, the ability to stipple and
create beautiful feather designs down to the
last detail is a passion. For the art quilter,
it presents a paint box full of ways to draw,
detail, colorize, add texture, and breathe
life into quilts. And for the quilter wanting
to create something quickly, the ability to
easily machine quilt a top to be used and
loved makes it all worthwhile. Every quilter
will find their ability improved, creativity
stretched, and productivity increased by
some basic free-motion skills.
It helps to under­ tand free-motion
s
stitching if you first understand a bit more about
how a regular stitch is formed. For most machine
stitching, your feed dogs, the toothy grids under
your presser foot, feed your fabric through the
machine. The stitch length setting determines
what distance the dogs move with each stitch
taken. The presser foot, by applying pressure to
the top surface, holds the fabric stable and helps
the machine form each stitch.

by

E llen A nne E ddy

“Saracen Flame”; 20 × 37
Hand-dyed cotton, machine quilted, machine embroidered,
embroidered applique; rayon, cotton, nylon and metallic
threads, and novelty yarns for embellishment.

essential embroidery stitches: embroidery designs and techniques Q u i lt i n g A r t s . c o m

3

©Interweave
essential embroidery stitches	

M achines
Many quilters are under the
impression that you need a top-of-theline sewing machine to do free-motion
embroidery. Not so! In fact, it’s not
about fancy machinery or hard-tofind gadgets. The techniques used
have been around since the sewing
machine was invented. The only thing
necessary is a lockstitch machine (a
sewing machine that has a top and

designs and techniques

bottom thread), and either a hoop
or a darning foot, which is used to
stabilize your stitching. A wider range
of possibilities is opened up to quilters
with machines that have a built-in
zigzag stitch.

F eed D ogs
To begin, you need to either “drop” or
“quiet” your feed dogs, so that you,
not the machine, are guiding your

fabric. Many machines have a switch
or button that allows you to easily
drop the feed dogs. If your
machine does not, it may have a
special plate designed to cover the
feed dogs. You may need to check
your manual. If you cannot drop or
cover the feed dogs, simply move the
stitch length to zero — this basically
stops the feed dogs from moving.

essential embroidery stitches: embroidery designs and techniques Q u i lt i n g A r t s . c o m

4

©Interweave
essential embroidery stitches	

N eedles
While the entire sewing machine
is involved in creating stitches, it
is the needle that does the majority
of the work. Many stitch problems
are caused by dull, bent, or burred
needles; as you begin each new
project, you should use a new needle.
For free-motion stitching, the best
needle is typically a topstitching
needle. It has a sharp point that
ensures a straight drawing line (unlike
a universal needle, which has a ball
point, causing it to wheedle its way

designs and techniques
into the fabric and never create a
straight line), and a large eye, that
helps to reduce thread breakage as
well as making it easier to thread.
Keep in mind, however, that everyone
is a little different, and so is your
machine. Experiment and find what
works best for you.

F eet
Like a good pair of shoes, the right
foot can make all the difference. When
free-motion stitching, we drop our
feed dogs and remove the presser
foot; we need to stabilize the fabric in

another way. While there are several
ways to create a stable surface for
stitching, a darning foot is the best.
Most machines come with a darning
foot — it’s like a tiny embroidery
hoop held directly over where your
machine is stitching. A darning foot
provides the ideal surface support for
free-motion techniques, and the one
made specifically for your machine
is your best bet. Your machine may
have darning feet with small and large
openings; the smaller the hole, the
better the stabilization and quality
of the stitch. A foot with a larger

tips hints
Free-motion stitching is one of those skills
that seems impossible to master until you
try it! Here are several tips that will help.

•	 ake your shoes off. You’ll have much
T

more control over your foot pedal.
•	Hug your machine. You’ll want to sit as
close as possible to your machine to
protect your back.
•	Pay attention to your posture. Make sure
you have a chair that’s comfortable and
provides the
necessary support.
•	Take a break at least every two hours. It’s
a hard posture physically, so be gentle
with yourself.
•	SortKwick™ (a gel for sorting papers) will
help you get a better grip on your work.
•	A mustache trimmer can be used to
shave off any mistakes you make! Hold
the shaver upside down and cut against
the stitches. Turn the trimmer off, and
turn the piece over. You can use the
shaving head to brush off the threads
from the other side. Be gentle as you
shave—if you’re too aggressive, you can
put a hole in your piece.

Sample darning feet and darning spring.

essential embroidery stitches: embroidery designs and techniques Q u i lt i n g A r t s . c o m

5

©Interweave
essential embroidery stitches	
opening is appropriate when using
a thicker batting or a heavier quilt.
If your machine didn’t come with a
special darning foot, check to see if
one is available from your dealer. If
not, there are generic feet available,
typically classified as short shank, long
shank, or slant needle. You’ll need to
determine the type required for your
machine. For truly older machines, a
darning spring is an inexpensive but
workable option.

H oops
Even if you can’t find a darning foot,
you can free-motion stitch with
a hoop to stabilize your surface.
My favorite hoops are designed
for machine embroidery, made of
hardwood, and have a screw on the
side that you can tighten with a
screwdriver. When you place your
fabric in the hoop, it should be right
side down, opposite from the way
you would insert it for hand stitching.
The fabric must lay flat against the
arm of the sewing machine. I often
work with both a hoop and a darning
foot. Sometimes you need as much
stabilization as you can get!

S tabilizers
A quilt sandwich is already stabilized
due to the batting, but if you intend
to use your zigzag stitch, you may
want to stabilize it further with either
interfacing or stabilizers. A stabilizer
is made to be removed once you
are finished stitching. There are a

designs and techniques
number of different stabilizers: kinds
meant to be torn away, rinsed away,
or burned away. Whatever option you
choose, they will allow your finished
piece to hang softly or feel “cozy.” An
interfacing, on the other hand, stays
in the piece permanently. It is more
appropriate for a wall hanging or
tapestry, which may require the extra
support throughout its life.
If you have your machine with feed
dogs lowered or quieted, a new
topstitching needle in place, your
darning foot attached and/or your
fabric in a hoop, you’re ready to begin
stitching.

L earning
the  L ingo
Like any new skill or technique,
free-motion embroidery has its own
vocabulary. It’s easy to learn, and in
the process, a stitch sampler can be
created.
Straight stitching is the backbone of
free-motion. Here are three basic skills
that employ the straight stitch.

D rawing
Drawing free-motion is a bit like
drawing by moving your paper
while someone else holds the pencil.
While it seems a bit awkward at first,
it’s a wonderful way to sketch. It
helps if you see patterns as rhythmic
movement. You can move in any
direction, and back and forth in
patterns to add texture. It’s a cross

between doodling and contour
drawing. You can draw your image
first, or go with the flow. Like any
other skill, it vastly improves with
practice.

S tippling
While stippling originally referred
to a very specific quilting pattern, it
has come to mean any free-motion
fill-in stitch. Try swirls, sweeps,
stars and curves. Squiggle over the
surface. Sweep across the surface in
big zigzags. Variegated threads, with
their color changes, will sweep your
eye across the surface. If you change
colors of your stipppling thread
manually, you can tone your quilt.
While there are rules prohibiting
points and cross-overs, rules are
made to be broken! Work towards
the effects that work for you and your
quilt.

S ignatures
Free-motion is the perfect technique
for signing your name. It takes
practice, but you can sign your name
right into the piece! Your critics may
not care about who made the quilt,
but your grandchildren may. Help
them out. Sign your quilt.
Learn more about Ellen and her art at
ellenanneeddy.com.

essential embroidery stitches: embroidery designs and techniques Q u i lt i n g A r t s . c o m

6

©Interweave
essential embroidery stitches	

designs and techniques

Adapted from
Quilting Arts Magazine
February/March 2010

versatile satin stitch
Enrich your quilts
with simple machine stitching

S

atin stitching can play a unique
supporting role in the making of art quilts.

I have used it for finishing the edges of a quilt,
joining quilted blocks, free-motion quilting,

by

K athy Y ork

and creating shapes and defining lines. One
of the best aspects of satin stitching is that it
doesn’t have to be perfect to look fabulous!
essential embroidery stitches: embroidery designs and techniques Q u i lt i n g A r t s . c o m

7

©Interweave
essential embroidery stitches	

designs and techniques

	
“Falling Through the Cracks” • 30 x 39 • The edges of the protruding building
          motif are finished with satin stitching. This quilt won third place in the Embellished
category at the 2009 “Quilts: A World of Beauty,” the annual fall judged show of the
International Quilt Association at International Quilt Festival/Houston.

Basic

considerations
To get started, I recommend
experimenting with the same fabrics
that you plan on using for your
project. The basic considerations
when satin stitching include
stabilizing your work, choosing
threads and needles, and adjusting the
machine settings.

S tabilizing

•	 Stretch your fabric across an

Satin stitching through a single
layer of fabric is quite unruly. It is
important to stabilize the fabric before
stitching, and there are three main
ways of doing this:

•	 Make a quilt sandwich with a top,

•	 Place two layers of tearable
stabilizer under your fabric. Make
sure to turn them crosswise (90°)
to each other. After stitching, gently
tear the stabilizer off the back.

embroidery hoop that fits the
dimensions of your machine.
batting, and backing. It will be
easiest to work with if it is machine
quilted first.

T hread
There are three points to consider
when selecting a thread: color,
sheen, and weight. You can often
get wonderful results by choosing

essential embroidery stitches: embroidery designs and techniques Q u i lt i n g A r t s . c o m

8

©Interweave
essential embroidery stitches	

designs and techniques

an unexpected color, so experiment
with matching and contrasting colors.
Threads can either have a matte finish
or a shiny one. To make a line recede,
use a matte cotton thread of the same
color. To draw more attention to an
area, use a shiny contrasting thread.
Variegated threads can produce
wonderful results with different stitch
widths (see the bottom three examples
in the sample shown here).

Slowly pivoting your work as you go, while the presser foot is lifted, allows you to create
satin-stitched curves without the underlying fabric showing through.

The weight of the thread can also
affect the look of the stitching, with
thinner threads typically appearing
smoother.
When choosing a thread for the
bobbin, the easiest approach is to
select the same thread as the top.
However, an invisible or thin thread
like The Bottom Line™ from Superior
Threads also works well and requires
less frequent bobbin winding. Don’t
forget to check the tension in the
bobbin if you choose a thinner thread.

N eedle
The black and white stitched lines on this
sample demonstrate different machine settings.
The top tension of the first line is too tight and
the bottom tension of the second line is too loose;
in both cases, black bobbin thread is visible. The
tension of the third line is just right so only the
top white thread is visible. The purple lines on
this sample demonstrate the effects of different
stitch widths, colors, and types of thread: matte,
cotton, and variegated.

You will need to select a properly sized
needle for your project. Generally,
if you are using a thicker thread or
sewing through multiple layers, you
will need a larger needle. You may also
need a larger needle if your thread
is continually breaking. Once again,
practice on the materials specific to
your project, and if your thread is

breaking, select the next size larger
needle. However, keep in mind that
a needle that is too large will make
big holes in your fabric, which is also
undesirable.

T ension

settings

Your sewing machine’s tension settings
will need to be adjusted in preparation
for satin stitching. Always reduce the
top tension; this is the single-most
critical factor for achieving a beautiful
satin stitch. For example, the normal
top tension on my machine is about a
4, and I reduce it to a 2. You may also
need to tighten your bobbin tension.

S titch

specifics

For satin stitching, select a stitch
width that’s between 1 and 5, and
select a stitch length that’s between
0 and 1. For the satin stitch to look
full, you have to set the stitch length
really short. However, beware that the

essential embroidery stitches: embroidery designs and techniques Q u i lt i n g A r t s . c o m

9

©Interweave
essential embroidery stitches	

designs and techniques

repeated close punching of the fabric
with the needle can weaken the fabric
to the point of breaking.

F inding
the   balance
Check your machine’s settings by
putting white thread in the top and
black thread in the bobbin. Run a
wide stitch on a sample piece of fabric.
If black thread is showing on the top,
then the upper tension is too tight
and the bobbin tension is possibly
too loose. Adjust the tension and
try again. (See the white and black
threads in the sample piece.) If you
can’t get it perfect (I never can), the
best choice is to have only the top
thread showing on the front and some
of the top thread showing on the back.

Skills and

applications
S tarting

a line of
satin stitching
Pull the bobbin thread up to the top,
and reduce the stitch length and
stitch width to zero. While holding
onto both threads, sew in place for
3–4 stitches. This locks the thread in
place. Change the stitch width and
length back, start sewing, and closely
trim the tail threads.

satin stitch tip

Use a running stitch to create a guide
for your satin stitching. First, sew
a simple running stitch with your
machine to mark where the satin stitch
line will go. Then satin stitch over it.

These samples of satin stitching are done on fabric laid on top of two layers of tearable stabilizer.

essential embroidery stitches: embroidery designs and techniques Q u i lt i n g A r t s . c o m

10

©Interweave
essential embroidery stitches	

designs and techniques

Some threads will break if a few
stitches are sewn on top of each other.
For these threads, tie a knot after
pulling them to the top, and then bury
the ends between the quilt layers.
If you have to stop in the middle of
a line, place your needle in the last
hole that you finished before you start
sewing again; it will be as if you never
stopped.

S ewing

curves

When satin stitching a straight
line, the stitches should remain
perpendicular to the edge you are
sewing along. When sewing around
a curve, the stitch will become less
than perpendicular, so it is important
to stitch slowly. With the needle
down on the outside of the curve,
gently pivot your fabric around so it
is approaching perpendicular. The
key is that, if the needle is down
and you pivot your fabric, the next
stitch should not leave a gap of fabric
showing through, but should cover
the fabric with thread as you sew.

J oining

quilted

blocks

You can quilt small pieces of any
shape on your machine and join them
with satin stitching. First, trim your
blocks to a size that allows them to
fit flush with each other. Zigzag stitch
them together with a narrow stitch
width and invisible thread. Apply
a thin strip of fused fabric over the
back of the seam with an iron. If it
is a curved joint, cut the fused fabric
on the bias. On the front side, use a
wide satin stitch to cover the previous
stitching. This makes even large
pieces sturdy enough to withstand the
gravity of hanging.

These multi-colored circles are made with free-motion satin stitching and are embellished with a bit
of hand stitching.

F ree - motion

satin

stitching

This is really fun. Set up your machine
for free-motion quilting, and set
the stitch width to a wide stitch.
Depending on your speed and style,
you will get a lovely zigzag or a satin
stitch. Let loose and let it go! You can
achieve some wonderful effects by
layering several lines of satin stitch
with different colored threads.

F inishing

the
edges of a quilt

is to stitch around the edge of your
quilt multiple times. Start with a
standard running stitch to prevent
the edge from stretching, then set the
stitch width so that the needle’s left
position pierces the quilt and the right
position goes just off the edge. Stitch
around the edge of the quilt, creating
successively wider stitches each time
around.
Learn more about Kathy and her art at
aquamoonartquilts.blogspot.com.

To prevent the edges of your quilt
from rolling, satin stitch them using
a blind hem foot. Another option

essential embroidery stitches: embroidery designs and techniques Q u i lt i n g A r t s . c o m

1
1

©Interweave
essential embroidery stitches	

designs and techniques

off-site Embroidery
Adapted from
Quilting Arts Magazine
Winter 2004

by

S usie W illiams

“Mrs. McConkey’s Garden”
6 square • Silk, cotton, upholstery fabric, lace;
cotton and rayon floss, perle cotton, hand-dyed
silk ribbon, Caron Wildflowers thread; beads,
plastic flower beads, freshwater pearls; machine
pieced, hand embroidered.

essential embroidery stitches: embroidery designs and techniques Q u i lt i n g A r t s . c o m

12

©Interweave
essential embroidery stitches	

designs and techniques

F

or several months I struggled with how to embroider a finely
detailed motif onto a crazy quilt. I was intrigued with the machine-

embroidered patches of butterflies and flowers available at fabric shops,
however, I wanted to make my own designs. I had made attempts in
the past but I found that transferring intricate drawings onto my quilt
blocks for satin stitch work was almost impossible. My stitching always
ended up as a thick, bumpy mess. It wasn’t until I read Beginner’s
Guide to Stumpwork by Kay Dennis and took a class from Irene Kerr
that I discovered off-site embroidery. This method of embroidery
opened a world of exciting design possibilities to me that I could easily
incorporate into my artwork.
Off-site embroidery is the technique of
stitching a design on a piece of cloth,
cutting the finished embroidered image
off the base fabric, and appliquéing the
motif to your artwork.

D irections
1.	  o begin you need a design; it can
T

be one you have drawn or one of
the many copyright-free patterns
now available.

m a t e r i a l s
•	100% cotton fabric
•	Embroidery hoop
•	Embroidery threads and flosses in a
variety of colors

•	Pencil
•	Embroidery needles
•	Sharp scissors
•	Acid-free fabric glue
•	Small flat bristle brush
•	Acrylic paint (optional)

4.	  nce the design is completely
O

embroidered, use a small, flat
bristle brush and apply a thin coat
of acid-free fabric glue around the
edges of the motif, both on the back
and on the front.

5.	  hen the glue is dry, use very
W

sharp, fine-point scissors and
carefully cut the embroidery off
the base fabric. Trim all around the
edge, as close as possible.
Detail of the fawn in the forest
from “Wood Whisper.”

2.	  ron a piece of lightweight 100%
I

cotton fabric to smooth the
wrinkles. Use an ordinary pencil
and trace your design onto this
fabric.
3.	  tretch the fabric tight, using a
S

hoop big enough to contain the
entire design. Choose the floss
colors that you’ll use for your
embroidery. Using one strand of
floss at a time, satin stitch the
entire motif; change and blend the
colors and threads as you stitch.
I satin stitch fairly heavily so that
the foundation fabric doesn’t show
through the thread. I prefer the
satin stitch, but you may prefer to
use a looser stitch or a different
embroidery stitch entirely.

essential embroidery stitches: embroidery designs and techniques Q u i lt i n g A r t s . c o m

13

©Interweave
essential embroidery stitches	

designs and techniques

“Wood Whisper”
20 × 13 • Synthetics,
wool, cotton, silk, upholstery
fabric, antique lace; wool,
variegated and single color floss, perle
cotton, Caron Wildflowers thread, silk
ribbon; glass and plastic beads, freshwater
pearls, crocheted flowers, resin buttons;
machine pieced, hand embroidered.

For the little fawn, I used my flat
bristle brush to apply a small bead
of brown acrylic paint all around
the edges. This optional step
helps to outline the embroidery
and give it more definition. Take a
look at the fawn in this piece and
the chickens in “Mrs. McConkey’s
Garden,” and you will notice that

Off-site embroidery is not difficult.
I think it will provide a wonderful
new means of expression in your
handwork.

The fawn is attached with invisible

For instructions on how to make
a crazy patch, see Issue 1 of
Quilting Arts Magazine®.

thread while the chicken and

Susie Williams is an award-winning

rooster are attached with the same

quilter from North Carolina.

they both are three-dimensional.

color floss as I used in the off-site
embroidery.

essential embroidery stitches: embroidery designs and techniques Q u i lt i n g A r t s . c o m

14

©Interweave
essential embroidery stitches	

designs and techniques

reverse appliqué
 bobbin embroidery
with a twist

W

hile I was a City  Guilds
student I had the opportunity

to experiment with a variety of paper
surfaces for my embroidery work. I
found that I just loved the qualities of
tissue paper that had been adhered to a
fabric for support. This paper provides
an unusually textured and surprisingly
strong surface for hand or machine stitch.
It can be made with white tissue paper
and colored with dyes or paints or it can
be colored afterwards. Alternatively, it
can be made with colored tissue paper. I
have found lots of uses for my handmade
paper but one of my favorites is to use
it as the background for my cut-work
embroideries. I use a reverse appliqué
technique with layers of synthetic fabrics
and bobbin embroidery and then cut back
the design using a soldering iron.

by

Y vonne B rown

A cut-work
embroidery
bobbin stitched on
handmade paper.
Embellished with
beads and French
knots.

Adapted from
Quilting Arts Magazine
Winter 2005

essential embroidery stitches: embroidery designs and techniques Q u i lt i n g A r t s . c o m

15

©Interweave
essential embroidery stitches	

designs and techniques

Making
the paper
Work on a flat surface where the paper
can be left undisturbed for at least 24
hours to dry. Cover the surface with
plastic before you begin.
1.	 Water down PVA or white glue

with about 40 percent water
to produce a single creamy
consistency and paint the plastic
surface with this mixture.
Lay your fabric on top and apply
another coat of the glue mixture.
2.	 Scrunch up tissue paper and

carefully flatten it out again, then
lay it on top of the fabric, gently
pushing it down onto the fabric
surface.

Samples of handmade papers in blue and brown.
3.	 Now, coat the tissue paper with

the glue mixture taking care not to
tear the paper. Don’t worry if you
do tear it as it provides interesting
results where the fabric shows
through.
4.	 If coloring your paper, apply dyes

m a t e r i a l s

for
m a k i n g

t h e

p a p e r

•	Tissue paper
•	Muslin, scrim, or cheesecloth
(I prefer scrim.)

•	PVA glue, Elmer’s® glue, or other
white glue

•	Liquid dyes or paints—e.g. Procion
dyes or any paint with a liquid
consistency

•	Metallic acrylic paint or Treasure
Gold (metallic wax)

•	A piece of plastic large enough to
cover your work surface

•	Foam applicator or large, soft paint
brush

•	Pipette or syringe for applying dyes
•	A small paint brush

or paints now. Use a pipette or
syringe and apply 2 or 3 colors—
remember your color mixing rules
or you will end up with something
resembling the color of mud. The
dyes will travel to a certain extent
on their own and begin merging
with each other, but you may
need to carefully manipulate them
with a small brush to achieve the
desired effect.
5.	 When you are happy with the

colors you’ve created, leave the
paper to dry. This will take around
24 hours.
6.	 Once it’s dry, peel the paper off the

plastic background and you are
ready for the next stage.

F inishing

suggestions
•	 Use a small amount of metallic
acrylic paint or Treasure Gold and
rub it into the textured surface of
the paper with your fingertip to
gild the surface.

•	 If the paper was left white, you can
color it with acrylic paints once it is
completely dry.

bobbin

e m b r o i d e ry

Bobbin embroidery is great for
when you want to achieve simple,
flowing designs and work with
specialty threads or ribbons too
heavy or big to fit through your top
needle. Simply wind the specialty
thread or ribbon in your bobbin,
place your work face down on your
sewing machine, and stitch with
your fabric in this position.

essential embroidery stitches: embroidery designs and techniques Q u i lt i n g A r t s . c o m

16

©Interweave
essential embroidery stitches	

•	 To achieve a pearlized finish, mix a
very small amount of acrylic paint
with Liquitex Iridescent Tinting
Medium and paint this sparingly
onto the surface.

Creating your
embroidery

1.	 You will need a piece of your

handmade paper a little larger than
your design.
2.	 Trace your design onto the

stabilizer and center this on the
back of your paper—remember
that the completed image will be
reversed on the front.

m a t e r i a l s

for
t h e

e m b r o i d e ry
•	Your design
•	A piece of lightweight sew-in
stabilizer the size of your design

•	Synthetic felt (I use Kunin felt.)
•	A selection of synthetic organzas or
voiles in colors that work together
(Do not use metallic organza as it
will not melt.)

•	A synthetic metallic fabric in your
color scheme

•	An iridescent organza in your color
scheme

•	Machine embroidery threads
(I use Madeira Metallic FS 20, also
known as “black core.”)

•	Your sewing machine, set up for
free-motion work

•	A fine-tipped soldering iron
Note: It is very important to check that
all the fabrics will melt before you start
the project.

designs and techniques
3.	 Cut your synthetic fabrics

a little bigger than your
design and layer them
on the front of the paper
starting with the Kunin
felt, next the iridescent
organza, and then 2 or
3 layers of the colored
organzas.
4.	 Audition these against

each other to find the most
pleasing combination and
pin through all layers at all
4 corners of the piece.
5.	 Set up your sewing

machine for free-motion
work. Put the feed-dogs
down and use a darning
foot.
6.	 Load the bobbin with

machine embroidery
thread as this will show
on the right side of your
work. I use Madeira
Metallic threads FS
2/2 and I use polyester
bobbinfil on the top of the
machine.
7.	 Stitch the design from the

back of the work going
over each line twice to
give a good clean edge.
8.	 Turn it over to see your

design sewn through to
the right side.
9.	 Carefully cut away

the fabric around the
design with a fine-tipped
soldering iron. The
soldering iron will only
melt away the synthetic
fabrics. It will not burn
the paper or damage the

essential embroidery stitches: embroidery designs and techniques Q u i lt i n g A r t s . c o m

17

©Interweave
essential embroidery stitches	

designs and techniques

Above: Sequence of layers for the
embroidery, beginning with Kunin felt then
various sheers and organzas.
Right: A soldering iron has cut through the
bottom portion of the embroidery.

essential embroidery stitches: embroidery designs and techniques Q u i lt i n g A r t s . c o m

18

©Interweave
essential embroidery stitches	

designs and techniques

using a

soldering iron
•	Always wear a mask when
melting and burning synthetic
fabrics and work either outside
or in a well-ventilated area.

•	Choose a soldering iron with a
really fine tip.

•	Always work on a heatproof
surface. I use a piece of glass
with smooth bevelled edges.

•	Support the soldering iron in a
safe way when not in use. I use
an upturned terra cotta plant
pot—not a plastic one!

sewing threads because they are
not synthetic.
10.	After cutting out the design,

you can emphasize areas of
the embroidery and create an
interesting textured surface by very
carefully melting the surface of
the top layer of organza with the
side of the soldering iron tip. This
will reveal tiny areas of the colors
beneath the surface.
11.	Finally, you can embellish the

surface of the design with hand
embroidery. Small clusters of
French knots and seed stitches in a
variegated thread always look good
with a scattering of seed beads in a
complementary color. (I like to use
Stef Francis’ silk threads for my
hand embroidery.)
Learn more about Yvonne and her art at
yvonnebrown.co.uk.
Above: A finished piece in autumnal tones.

essential embroidery stitches: embroidery designs and techniques Q u i lt i n g A r t s . c o m

19

©Interweave

More Related Content

What's hot

Asynchronous presentation
Asynchronous presentationAsynchronous presentation
Asynchronous presentationXanthan Agapay
 
Basic hand stitches
Basic hand stitchesBasic hand stitches
Basic hand stitchesampolito
 
MAKING CALADO EMBROIDERY
MAKING CALADO EMBROIDERYMAKING CALADO EMBROIDERY
MAKING CALADO EMBROIDERYAllanna Unias
 
Techniques in drafting and cutting pattern
Techniques in drafting and cutting patternTechniques in drafting and cutting pattern
Techniques in drafting and cutting patternKenzie Ancheta
 
Embroidery
EmbroideryEmbroidery
EmbroideryNing Jia
 
Types of embroidery machine
Types of embroidery machineTypes of embroidery machine
Types of embroidery machineMeenakshi Gupta
 
He module 5
He module 5He module 5
He module 5none
 
Embroidery 101
Embroidery 101Embroidery 101
Embroidery 101ajmahn
 
0963 sewing basics-resource_guide
0963 sewing basics-resource_guide0963 sewing basics-resource_guide
0963 sewing basics-resource_guideRahmahtul Bayyinah
 
First time sewing step by step basics and easy projects
First time sewing   step by step basics and easy projectsFirst time sewing   step by step basics and easy projects
First time sewing step by step basics and easy projectsTrang Nguyen Minh
 
Lesson 1-clothing-construction
Lesson 1-clothing-constructionLesson 1-clothing-construction
Lesson 1-clothing-constructionEmersonJohnRosete
 
Machine embroidery tips for beginners
Machine embroidery tips for beginnersMachine embroidery tips for beginners
Machine embroidery tips for beginnersJeff Hernandez
 

What's hot (20)

Asynchronous presentation
Asynchronous presentationAsynchronous presentation
Asynchronous presentation
 
Basic Stitches
Basic StitchesBasic Stitches
Basic Stitches
 
Basic stitches
Basic stitchesBasic stitches
Basic stitches
 
Basic hand stitches
Basic hand stitchesBasic hand stitches
Basic hand stitches
 
Hand stitches
Hand stitchesHand stitches
Hand stitches
 
Basic Hand Stitches
Basic Hand StitchesBasic Hand Stitches
Basic Hand Stitches
 
Embroidery stitch
Embroidery stitchEmbroidery stitch
Embroidery stitch
 
MAKING CALADO EMBROIDERY
MAKING CALADO EMBROIDERYMAKING CALADO EMBROIDERY
MAKING CALADO EMBROIDERY
 
Hand embroidery
Hand embroideryHand embroidery
Hand embroidery
 
Techniques in drafting and cutting pattern
Techniques in drafting and cutting patternTechniques in drafting and cutting pattern
Techniques in drafting and cutting pattern
 
Embroidery
EmbroideryEmbroidery
Embroidery
 
Types of embroidery machine
Types of embroidery machineTypes of embroidery machine
Types of embroidery machine
 
He module 5
He module 5He module 5
He module 5
 
Embroidery 101
Embroidery 101Embroidery 101
Embroidery 101
 
0963 sewing basics-resource_guide
0963 sewing basics-resource_guide0963 sewing basics-resource_guide
0963 sewing basics-resource_guide
 
First time sewing step by step basics and easy projects
First time sewing   step by step basics and easy projectsFirst time sewing   step by step basics and easy projects
First time sewing step by step basics and easy projects
 
Power point
Power pointPower point
Power point
 
Hand Sewing Needles
Hand Sewing NeedlesHand Sewing Needles
Hand Sewing Needles
 
Lesson 1-clothing-construction
Lesson 1-clothing-constructionLesson 1-clothing-construction
Lesson 1-clothing-construction
 
Machine embroidery tips for beginners
Machine embroidery tips for beginnersMachine embroidery tips for beginners
Machine embroidery tips for beginners
 

Viewers also liked

Embroidery Process
Embroidery ProcessEmbroidery Process
Embroidery ProcessCam_Schultz
 
Embellishment Techniques
Embellishment TechniquesEmbellishment Techniques
Embellishment TechniquesLisa Fernando
 
Process of machine embroidery
Process of machine embroideryProcess of machine embroidery
Process of machine embroideryJason Brook
 
Sewing definitions
Sewing definitionsSewing definitions
Sewing definitionspmgrnte
 
Surface Ornamentation Techniques For Textiles
Surface Ornamentation Techniques For TextilesSurface Ornamentation Techniques For Textiles
Surface Ornamentation Techniques For TextilesNidhi Saxena
 
Tools and equipmen tbyby
Tools and equipmen tbybyTools and equipmen tbyby
Tools and equipmen tbybymaricelbadad
 
Industrial visit for Department OF Mechanical Engineering - BHEL
Industrial visit for Department OF Mechanical Engineering - BHELIndustrial visit for Department OF Mechanical Engineering - BHEL
Industrial visit for Department OF Mechanical Engineering - BHELUPES Dehradun
 
Bead wire wrapping tutorial
Bead wire wrapping tutorialBead wire wrapping tutorial
Bead wire wrapping tutorialHouseofGems.com
 
dressmaking
dressmakingdressmaking
dressmakinglaridz
 
Flower Making and Arrangement
Flower Making and ArrangementFlower Making and Arrangement
Flower Making and ArrangementVeranadasamachar
 
Electromagnet prac
Electromagnet pracElectromagnet prac
Electromagnet pracmsali_aphs
 

Viewers also liked (15)

Embriodery
EmbrioderyEmbriodery
Embriodery
 
Embroidery Process
Embroidery ProcessEmbroidery Process
Embroidery Process
 
trims
trimstrims
trims
 
Embellishment Techniques
Embellishment TechniquesEmbellishment Techniques
Embellishment Techniques
 
Embroidery
EmbroideryEmbroidery
Embroidery
 
Process of machine embroidery
Process of machine embroideryProcess of machine embroidery
Process of machine embroidery
 
Sewing definitions
Sewing definitionsSewing definitions
Sewing definitions
 
Free sewing book
Free sewing bookFree sewing book
Free sewing book
 
Surface Ornamentation Techniques For Textiles
Surface Ornamentation Techniques For TextilesSurface Ornamentation Techniques For Textiles
Surface Ornamentation Techniques For Textiles
 
Tools and equipmen tbyby
Tools and equipmen tbybyTools and equipmen tbyby
Tools and equipmen tbyby
 
Industrial visit for Department OF Mechanical Engineering - BHEL
Industrial visit for Department OF Mechanical Engineering - BHELIndustrial visit for Department OF Mechanical Engineering - BHEL
Industrial visit for Department OF Mechanical Engineering - BHEL
 
Bead wire wrapping tutorial
Bead wire wrapping tutorialBead wire wrapping tutorial
Bead wire wrapping tutorial
 
dressmaking
dressmakingdressmaking
dressmaking
 
Flower Making and Arrangement
Flower Making and ArrangementFlower Making and Arrangement
Flower Making and Arrangement
 
Electromagnet prac
Electromagnet pracElectromagnet prac
Electromagnet prac
 

Similar to Essential embroidery stitches: 40+ embroidery designs and techniques

Stitching Styles in Garment Production.pdf
Stitching Styles in Garment Production.pdfStitching Styles in Garment Production.pdf
Stitching Styles in Garment Production.pdfmarketingcelestialfi
 
Free machine embroidery designs
Free machine embroidery designsFree machine embroidery designs
Free machine embroidery designsOregonpatchworks
 
Embroidery
EmbroideryEmbroidery
Embroiderykibrom G
 
Tools and Equipment in Dressmaking.pptx
Tools and Equipment in Dressmaking.pptxTools and Equipment in Dressmaking.pptx
Tools and Equipment in Dressmaking.pptxrizzaqueldaquioag2
 
Produce Embroidery Articles TLE 8. -.pdf
Produce Embroidery Articles TLE 8. -.pdfProduce Embroidery Articles TLE 8. -.pdf
Produce Embroidery Articles TLE 8. -.pdfAnneLavigne6
 
The dressmaker-s-handbook-of-couture-sewing-techniques-gnv64
The dressmaker-s-handbook-of-couture-sewing-techniques-gnv64The dressmaker-s-handbook-of-couture-sewing-techniques-gnv64
The dressmaker-s-handbook-of-couture-sewing-techniques-gnv64taller BIOarq
 
Couture hand sewing stitches you should know
Couture hand sewing stitches you should knowCouture hand sewing stitches you should know
Couture hand sewing stitches you should knowEdi Ta
 
Saddle stitch
Saddle stitchSaddle stitch
Saddle stitchpollobks
 
The Art of Hand Embroidery ppt.pptx
The Art of Hand Embroidery ppt.pptxThe Art of Hand Embroidery ppt.pptx
The Art of Hand Embroidery ppt.pptxQasimRaza63194
 
Knitting_and_Crocheting.ppt
Knitting_and_Crocheting.pptKnitting_and_Crocheting.ppt
Knitting_and_Crocheting.pptMarkEdwardOlango
 
EPP-SEWING AND THEIR TYPES AND DEFINITONS-copy.pptx
EPP-SEWING AND THEIR TYPES AND DEFINITONS-copy.pptxEPP-SEWING AND THEIR TYPES AND DEFINITONS-copy.pptx
EPP-SEWING AND THEIR TYPES AND DEFINITONS-copy.pptxJulieAnnMAlimento
 
Making felt slippers from an old sweater
Making felt slippers from an old sweaterMaking felt slippers from an old sweater
Making felt slippers from an old sweaterWoolcraft
 
Essential tools and equipment in Dressmaking - TLE
Essential tools and equipment in Dressmaking - TLEEssential tools and equipment in Dressmaking - TLE
Essential tools and equipment in Dressmaking - TLEMaryLoreignPalacioDo
 
Kriti Tolani ,Fashion Design ,Dezyne E'cole College
 Kriti Tolani ,Fashion Design ,Dezyne E'cole College Kriti Tolani ,Fashion Design ,Dezyne E'cole College
Kriti Tolani ,Fashion Design ,Dezyne E'cole Collegedezyneecole
 

Similar to Essential embroidery stitches: 40+ embroidery designs and techniques (20)

How to make your own fashion clothes
How to make your own fashion clothesHow to make your own fashion clothes
How to make your own fashion clothes
 
Stitching Styles in Garment Production.pdf
Stitching Styles in Garment Production.pdfStitching Styles in Garment Production.pdf
Stitching Styles in Garment Production.pdf
 
dressmaking.pptx
dressmaking.pptxdressmaking.pptx
dressmaking.pptx
 
Free machine embroidery designs
Free machine embroidery designsFree machine embroidery designs
Free machine embroidery designs
 
Embroidery
EmbroideryEmbroidery
Embroidery
 
Draping
DrapingDraping
Draping
 
Tools and Equipment in Dressmaking.pptx
Tools and Equipment in Dressmaking.pptxTools and Equipment in Dressmaking.pptx
Tools and Equipment in Dressmaking.pptx
 
Produce Embroidery Articles TLE 8. -.pdf
Produce Embroidery Articles TLE 8. -.pdfProduce Embroidery Articles TLE 8. -.pdf
Produce Embroidery Articles TLE 8. -.pdf
 
The dressmaker-s-handbook-of-couture-sewing-techniques-gnv64
The dressmaker-s-handbook-of-couture-sewing-techniques-gnv64The dressmaker-s-handbook-of-couture-sewing-techniques-gnv64
The dressmaker-s-handbook-of-couture-sewing-techniques-gnv64
 
Couture hand sewing stitches you should know
Couture hand sewing stitches you should knowCouture hand sewing stitches you should know
Couture hand sewing stitches you should know
 
Sewing PPT.pptx
Sewing PPT.pptxSewing PPT.pptx
Sewing PPT.pptx
 
Saddle stitch
Saddle stitchSaddle stitch
Saddle stitch
 
The Art of Hand Embroidery ppt.pptx
The Art of Hand Embroidery ppt.pptxThe Art of Hand Embroidery ppt.pptx
The Art of Hand Embroidery ppt.pptx
 
Knitting_and_Crocheting.ppt
Knitting_and_Crocheting.pptKnitting_and_Crocheting.ppt
Knitting_and_Crocheting.ppt
 
Knitting
KnittingKnitting
Knitting
 
EPP-SEWING AND THEIR TYPES AND DEFINITONS-copy.pptx
EPP-SEWING AND THEIR TYPES AND DEFINITONS-copy.pptxEPP-SEWING AND THEIR TYPES AND DEFINITONS-copy.pptx
EPP-SEWING AND THEIR TYPES AND DEFINITONS-copy.pptx
 
Making felt slippers from an old sweater
Making felt slippers from an old sweaterMaking felt slippers from an old sweater
Making felt slippers from an old sweater
 
Essential tools and equipment in Dressmaking - TLE
Essential tools and equipment in Dressmaking - TLEEssential tools and equipment in Dressmaking - TLE
Essential tools and equipment in Dressmaking - TLE
 
Kriti Tolani ,Fashion Design ,Dezyne E'cole College
 Kriti Tolani ,Fashion Design ,Dezyne E'cole College Kriti Tolani ,Fashion Design ,Dezyne E'cole College
Kriti Tolani ,Fashion Design ,Dezyne E'cole College
 
dressmaking 7.pptx
dressmaking 7.pptxdressmaking 7.pptx
dressmaking 7.pptx
 

Recently uploaded

西伦敦大学毕业证学位证成绩单-怎么样做
西伦敦大学毕业证学位证成绩单-怎么样做西伦敦大学毕业证学位证成绩单-怎么样做
西伦敦大学毕业证学位证成绩单-怎么样做j5bzwet6
 
Call Girls In Karkardooma 83770 87607 Just-Dial Escorts Service 24X7 Avilable
Call Girls In Karkardooma 83770 87607 Just-Dial Escorts Service 24X7 AvilableCall Girls In Karkardooma 83770 87607 Just-Dial Escorts Service 24X7 Avilable
Call Girls In Karkardooma 83770 87607 Just-Dial Escorts Service 24X7 Avilabledollysharma2066
 
Call Girls in Govindpuri Delhi 💯Call Us 🔝8264348440🔝
Call Girls in Govindpuri Delhi 💯Call Us 🔝8264348440🔝Call Girls in Govindpuri Delhi 💯Call Us 🔝8264348440🔝
Call Girls in Govindpuri Delhi 💯Call Us 🔝8264348440🔝soniya singh
 
(南达科他州立大学毕业证学位证成绩单-永久存档)
(南达科他州立大学毕业证学位证成绩单-永久存档)(南达科他州立大学毕业证学位证成绩单-永久存档)
(南达科他州立大学毕业证学位证成绩单-永久存档)oannq
 
E J Waggoner against Kellogg's Pantheism 8.pptx
E J Waggoner against Kellogg's Pantheism 8.pptxE J Waggoner against Kellogg's Pantheism 8.pptx
E J Waggoner against Kellogg's Pantheism 8.pptxJackieSparrow3
 
Call Girls In Dwarka Sub City ☎️7838079806 ✅ 💯Call Girls In Delhi
Call Girls In Dwarka Sub City  ☎️7838079806 ✅ 💯Call Girls In DelhiCall Girls In Dwarka Sub City  ☎️7838079806 ✅ 💯Call Girls In Delhi
Call Girls In Dwarka Sub City ☎️7838079806 ✅ 💯Call Girls In DelhiSoniyaSingh
 
Authentic No 1 Amil Baba In Pakistan Amil Baba In Faisalabad Amil Baba In Kar...
Authentic No 1 Amil Baba In Pakistan Amil Baba In Faisalabad Amil Baba In Kar...Authentic No 1 Amil Baba In Pakistan Amil Baba In Faisalabad Amil Baba In Kar...
Authentic No 1 Amil Baba In Pakistan Amil Baba In Faisalabad Amil Baba In Kar...Authentic No 1 Amil Baba In Pakistan
 
办理西悉尼大学毕业证成绩单、制作假文凭
办理西悉尼大学毕业证成绩单、制作假文凭办理西悉尼大学毕业证成绩单、制作假文凭
办理西悉尼大学毕业证成绩单、制作假文凭o8wvnojp
 
Inspiring Through Words Power of Inspiration.pptx
Inspiring Through Words Power of Inspiration.pptxInspiring Through Words Power of Inspiration.pptx
Inspiring Through Words Power of Inspiration.pptxShubham Rawat
 
(No.1)↠Young Call Girls in Sikanderpur (Gurgaon) ꧁❤ 9711911712 ❤꧂ Escorts
(No.1)↠Young Call Girls in Sikanderpur (Gurgaon) ꧁❤ 9711911712 ❤꧂ Escorts(No.1)↠Young Call Girls in Sikanderpur (Gurgaon) ꧁❤ 9711911712 ❤꧂ Escorts
(No.1)↠Young Call Girls in Sikanderpur (Gurgaon) ꧁❤ 9711911712 ❤꧂ EscortsDelhi Escorts Service
 
南新罕布什尔大学毕业证学位证成绩单-学历认证
南新罕布什尔大学毕业证学位证成绩单-学历认证南新罕布什尔大学毕业证学位证成绩单-学历认证
南新罕布什尔大学毕业证学位证成绩单-学历认证kbdhl05e
 

Recently uploaded (12)

西伦敦大学毕业证学位证成绩单-怎么样做
西伦敦大学毕业证学位证成绩单-怎么样做西伦敦大学毕业证学位证成绩单-怎么样做
西伦敦大学毕业证学位证成绩单-怎么样做
 
Call Girls In Karkardooma 83770 87607 Just-Dial Escorts Service 24X7 Avilable
Call Girls In Karkardooma 83770 87607 Just-Dial Escorts Service 24X7 AvilableCall Girls In Karkardooma 83770 87607 Just-Dial Escorts Service 24X7 Avilable
Call Girls In Karkardooma 83770 87607 Just-Dial Escorts Service 24X7 Avilable
 
Call Girls in Govindpuri Delhi 💯Call Us 🔝8264348440🔝
Call Girls in Govindpuri Delhi 💯Call Us 🔝8264348440🔝Call Girls in Govindpuri Delhi 💯Call Us 🔝8264348440🔝
Call Girls in Govindpuri Delhi 💯Call Us 🔝8264348440🔝
 
(南达科他州立大学毕业证学位证成绩单-永久存档)
(南达科他州立大学毕业证学位证成绩单-永久存档)(南达科他州立大学毕业证学位证成绩单-永久存档)
(南达科他州立大学毕业证学位证成绩单-永久存档)
 
E J Waggoner against Kellogg's Pantheism 8.pptx
E J Waggoner against Kellogg's Pantheism 8.pptxE J Waggoner against Kellogg's Pantheism 8.pptx
E J Waggoner against Kellogg's Pantheism 8.pptx
 
Call Girls In Dwarka Sub City ☎️7838079806 ✅ 💯Call Girls In Delhi
Call Girls In Dwarka Sub City  ☎️7838079806 ✅ 💯Call Girls In DelhiCall Girls In Dwarka Sub City  ☎️7838079806 ✅ 💯Call Girls In Delhi
Call Girls In Dwarka Sub City ☎️7838079806 ✅ 💯Call Girls In Delhi
 
Authentic No 1 Amil Baba In Pakistan Amil Baba In Faisalabad Amil Baba In Kar...
Authentic No 1 Amil Baba In Pakistan Amil Baba In Faisalabad Amil Baba In Kar...Authentic No 1 Amil Baba In Pakistan Amil Baba In Faisalabad Amil Baba In Kar...
Authentic No 1 Amil Baba In Pakistan Amil Baba In Faisalabad Amil Baba In Kar...
 
办理西悉尼大学毕业证成绩单、制作假文凭
办理西悉尼大学毕业证成绩单、制作假文凭办理西悉尼大学毕业证成绩单、制作假文凭
办理西悉尼大学毕业证成绩单、制作假文凭
 
Inspiring Through Words Power of Inspiration.pptx
Inspiring Through Words Power of Inspiration.pptxInspiring Through Words Power of Inspiration.pptx
Inspiring Through Words Power of Inspiration.pptx
 
(No.1)↠Young Call Girls in Sikanderpur (Gurgaon) ꧁❤ 9711911712 ❤꧂ Escorts
(No.1)↠Young Call Girls in Sikanderpur (Gurgaon) ꧁❤ 9711911712 ❤꧂ Escorts(No.1)↠Young Call Girls in Sikanderpur (Gurgaon) ꧁❤ 9711911712 ❤꧂ Escorts
(No.1)↠Young Call Girls in Sikanderpur (Gurgaon) ꧁❤ 9711911712 ❤꧂ Escorts
 
Model Call Girl in Lado Sarai Delhi reach out to us at 🔝9953056974🔝
Model Call Girl in Lado Sarai Delhi reach out to us at 🔝9953056974🔝Model Call Girl in Lado Sarai Delhi reach out to us at 🔝9953056974🔝
Model Call Girl in Lado Sarai Delhi reach out to us at 🔝9953056974🔝
 
南新罕布什尔大学毕业证学位证成绩单-学历认证
南新罕布什尔大学毕业证学位证成绩单-学历认证南新罕布什尔大学毕业证学位证成绩单-学历认证
南新罕布什尔大学毕业证学位证成绩单-学历认证
 

Essential embroidery stitches: 40+ embroidery designs and techniques

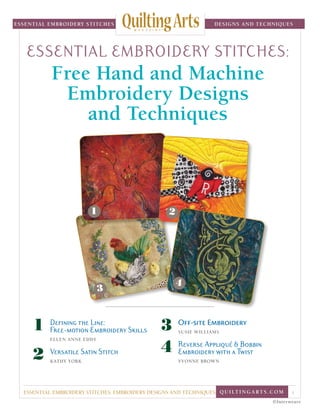
  • 1. essential embroidery stitches designs and techniques essential embroidery stitches: Free Hand and Machine Embroidery Designs and Techniques 1 2 4 3 1 Defining the Line: Free-motion Embroidery Skills ellen anne eddy 2 Versatile Satin Stitch 3 4 Kathy york Yvonne Brown Off-site Embroidery Susie Williams Reverse Appliqué Bobbin Embroidery with a Twist essential embroidery stitches: embroidery designs and techniques Q u i lt i n g A r t s . c o m 1 ©Interweave
  • 2. essential embroidery stitches Machine and hand embroidery are the hallmarks of art quilt design and construction. Depending on the stitch and the thread or fiber used, embroidery can give your quilts a contemporary edge or vintage charm. In this free eBook, Essential Embroidery Stitches: Free Hand and Machine Embroidery Designs and Techniques, we’ve assembled four of our best articles on machine and hand embroidery. Each one gives you tips, hints, and instructions for adding embroidery to your quilts. First up, internationally known expert Ellen Anne Eddy reviews the basics of free-motion embroidery in her article “Defining the Line: Free-motion Embroidery Skills.” Ellen offers tips and hints for how to get started, from which foot to use to how to sign your name in stitches. One of the most versatile machine embroidery stitches to master is the satin stitch. In Kathy York’s article of the same name, she explains how the satin stitch can play a unique role in the making of art quilts. From using it to finish the edges of a quilt, to joining quilt blocks, to free-motion quilting and creating shapes, the satin stitch is one you’ll use over and over again. put more designs and techniques Susie Williams shows how to incorporate a hand-embroidered motif into a pieced quilt in “Off-site Embroidery.” This method involves stitching a design on a piece of cloth, cutting the finished embroidered image off the base fabric, and appliquéing the motif to your artwork. It’s a great way to add detailed hand work without your piece becoming too bulky. ESSENTIAL EMBROIDERY STITCHES: FREE HAND AND MACHINE EMBROIDERY DESIGNS AND TECHNIQUES Finally, in “Reverse Appliqué Bobbin Embroidery with a Twist,” Yvonne Brown teaches you to combine painted tissue paper, fabric, and machine bobbin embroidery to create flowing, textured, and layered designs. Because you wind the specialty threads or ribbons in the bobbin, you stitch with your work face down on the machine. A more challenging technique, but the results are worth the effort! Pokey Bolton editor Cate Coulacos Prato Editorial director creative services Larissa Davis Photographers Larry Stein Korday Studios Division Art Director We know you’ll use the knowledge and inspiration from Essential Embroidery Stitches: Free Hand and Machine Embroidery Designs and Techniques again and again to enhance your skills and artistry. Projects and information are for inspiration and personal use only. Interweave Press LLC is not responsible for any liability arising from errors, omissions, or mistakes contained in this eBook, and readers should proceed cautiously, especially with respect to technical information. Interweave grants permission to photocopy any patterns published in this issue for personal use only. Warmly, Pokey Bolton Editorial Director texture in your life ideas, textiles, and techniques related to embellished and contemporary art quilting. Inside, you’ll find design inspiration, step-by-step directions, gorgeous photo­graphy, and motivation for developing your personal style, at ® Quilting Arts Magazine explores all skill levels. EXTREME QUILT P. 72 MAKEOVER Art quilts transformed, before after create   fabrics 11 playful techniques plus: to try, including: Ice Dyeing . 48 Layered Marbling . 44 Monoprinting Finger Painting . 38 Stamping and Stenciling with Unusual Objects . 52 P P P quiltingarts.com 800.406.5283 (U.S. Canada) 760.291.1519 (International) P. 26 art quilt meets   P Quilting Arts Magazine®, P.O. Box 469087, Escondido, CA 92046-9350 essential embroidery stitches: embroidery designs and techniques Q u i lt i n g A r t s . c o m 2 ©Interweave
  • 3. essential embroidery stitches defining designs and techniques line Adapted from Quilting Arts Magazine Summer 2002 the Free-Motion Embroidery Skills F ree-motion stitching offers a world of possibilities to all kinds of quilters and all types of quilts. For even the most ardent traditionalist, the ability to stipple and create beautiful feather designs down to the last detail is a passion. For the art quilter, it presents a paint box full of ways to draw, detail, colorize, add texture, and breathe life into quilts. And for the quilter wanting to create something quickly, the ability to easily machine quilt a top to be used and loved makes it all worthwhile. Every quilter will find their ability improved, creativity stretched, and productivity increased by some basic free-motion skills. It helps to under­ tand free-motion s stitching if you first understand a bit more about how a regular stitch is formed. For most machine stitching, your feed dogs, the toothy grids under your presser foot, feed your fabric through the machine. The stitch length setting determines what distance the dogs move with each stitch taken. The presser foot, by applying pressure to the top surface, holds the fabric stable and helps the machine form each stitch. by E llen A nne E ddy “Saracen Flame”; 20 × 37 Hand-dyed cotton, machine quilted, machine embroidered, embroidered applique; rayon, cotton, nylon and metallic threads, and novelty yarns for embellishment. essential embroidery stitches: embroidery designs and techniques Q u i lt i n g A r t s . c o m 3 ©Interweave
  • 4. essential embroidery stitches M achines Many quilters are under the impression that you need a top-of-theline sewing machine to do free-motion embroidery. Not so! In fact, it’s not about fancy machinery or hard-tofind gadgets. The techniques used have been around since the sewing machine was invented. The only thing necessary is a lockstitch machine (a sewing machine that has a top and designs and techniques bottom thread), and either a hoop or a darning foot, which is used to stabilize your stitching. A wider range of possibilities is opened up to quilters with machines that have a built-in zigzag stitch. F eed D ogs To begin, you need to either “drop” or “quiet” your feed dogs, so that you, not the machine, are guiding your fabric. Many machines have a switch or button that allows you to easily drop the feed dogs. If your machine does not, it may have a special plate designed to cover the feed dogs. You may need to check your manual. If you cannot drop or cover the feed dogs, simply move the stitch length to zero — this basically stops the feed dogs from moving. essential embroidery stitches: embroidery designs and techniques Q u i lt i n g A r t s . c o m 4 ©Interweave
  • 5. essential embroidery stitches N eedles While the entire sewing machine is involved in creating stitches, it is the needle that does the majority of the work. Many stitch problems are caused by dull, bent, or burred needles; as you begin each new project, you should use a new needle. For free-motion stitching, the best needle is typically a topstitching needle. It has a sharp point that ensures a straight drawing line (unlike a universal needle, which has a ball point, causing it to wheedle its way designs and techniques into the fabric and never create a straight line), and a large eye, that helps to reduce thread breakage as well as making it easier to thread. Keep in mind, however, that everyone is a little different, and so is your machine. Experiment and find what works best for you. F eet Like a good pair of shoes, the right foot can make all the difference. When free-motion stitching, we drop our feed dogs and remove the presser foot; we need to stabilize the fabric in another way. While there are several ways to create a stable surface for stitching, a darning foot is the best. Most machines come with a darning foot — it’s like a tiny embroidery hoop held directly over where your machine is stitching. A darning foot provides the ideal surface support for free-motion techniques, and the one made specifically for your machine is your best bet. Your machine may have darning feet with small and large openings; the smaller the hole, the better the stabilization and quality of the stitch. A foot with a larger tips hints Free-motion stitching is one of those skills that seems impossible to master until you try it! Here are several tips that will help. • ake your shoes off. You’ll have much T more control over your foot pedal. • Hug your machine. You’ll want to sit as close as possible to your machine to protect your back. • Pay attention to your posture. Make sure you have a chair that’s comfortable and provides the necessary support. • Take a break at least every two hours. It’s a hard posture physically, so be gentle with yourself. • SortKwick™ (a gel for sorting papers) will help you get a better grip on your work. • A mustache trimmer can be used to shave off any mistakes you make! Hold the shaver upside down and cut against the stitches. Turn the trimmer off, and turn the piece over. You can use the shaving head to brush off the threads from the other side. Be gentle as you shave—if you’re too aggressive, you can put a hole in your piece. Sample darning feet and darning spring. essential embroidery stitches: embroidery designs and techniques Q u i lt i n g A r t s . c o m 5 ©Interweave
  • 6. essential embroidery stitches opening is appropriate when using a thicker batting or a heavier quilt. If your machine didn’t come with a special darning foot, check to see if one is available from your dealer. If not, there are generic feet available, typically classified as short shank, long shank, or slant needle. You’ll need to determine the type required for your machine. For truly older machines, a darning spring is an inexpensive but workable option. H oops Even if you can’t find a darning foot, you can free-motion stitch with a hoop to stabilize your surface. My favorite hoops are designed for machine embroidery, made of hardwood, and have a screw on the side that you can tighten with a screwdriver. When you place your fabric in the hoop, it should be right side down, opposite from the way you would insert it for hand stitching. The fabric must lay flat against the arm of the sewing machine. I often work with both a hoop and a darning foot. Sometimes you need as much stabilization as you can get! S tabilizers A quilt sandwich is already stabilized due to the batting, but if you intend to use your zigzag stitch, you may want to stabilize it further with either interfacing or stabilizers. A stabilizer is made to be removed once you are finished stitching. There are a designs and techniques number of different stabilizers: kinds meant to be torn away, rinsed away, or burned away. Whatever option you choose, they will allow your finished piece to hang softly or feel “cozy.” An interfacing, on the other hand, stays in the piece permanently. It is more appropriate for a wall hanging or tapestry, which may require the extra support throughout its life. If you have your machine with feed dogs lowered or quieted, a new topstitching needle in place, your darning foot attached and/or your fabric in a hoop, you’re ready to begin stitching. L earning the  L ingo Like any new skill or technique, free-motion embroidery has its own vocabulary. It’s easy to learn, and in the process, a stitch sampler can be created. Straight stitching is the backbone of free-motion. Here are three basic skills that employ the straight stitch. D rawing Drawing free-motion is a bit like drawing by moving your paper while someone else holds the pencil. While it seems a bit awkward at first, it’s a wonderful way to sketch. It helps if you see patterns as rhythmic movement. You can move in any direction, and back and forth in patterns to add texture. It’s a cross between doodling and contour drawing. You can draw your image first, or go with the flow. Like any other skill, it vastly improves with practice. S tippling While stippling originally referred to a very specific quilting pattern, it has come to mean any free-motion fill-in stitch. Try swirls, sweeps, stars and curves. Squiggle over the surface. Sweep across the surface in big zigzags. Variegated threads, with their color changes, will sweep your eye across the surface. If you change colors of your stipppling thread manually, you can tone your quilt. While there are rules prohibiting points and cross-overs, rules are made to be broken! Work towards the effects that work for you and your quilt. S ignatures Free-motion is the perfect technique for signing your name. It takes practice, but you can sign your name right into the piece! Your critics may not care about who made the quilt, but your grandchildren may. Help them out. Sign your quilt. Learn more about Ellen and her art at ellenanneeddy.com. essential embroidery stitches: embroidery designs and techniques Q u i lt i n g A r t s . c o m 6 ©Interweave
  • 7. essential embroidery stitches designs and techniques Adapted from Quilting Arts Magazine February/March 2010 versatile satin stitch Enrich your quilts with simple machine stitching S atin stitching can play a unique supporting role in the making of art quilts. I have used it for finishing the edges of a quilt, joining quilted blocks, free-motion quilting, by K athy Y ork and creating shapes and defining lines. One of the best aspects of satin stitching is that it doesn’t have to be perfect to look fabulous! essential embroidery stitches: embroidery designs and techniques Q u i lt i n g A r t s . c o m 7 ©Interweave
  • 8. essential embroidery stitches designs and techniques “Falling Through the Cracks” • 30 x 39 • The edges of the protruding building motif are finished with satin stitching. This quilt won third place in the Embellished category at the 2009 “Quilts: A World of Beauty,” the annual fall judged show of the International Quilt Association at International Quilt Festival/Houston. Basic considerations To get started, I recommend experimenting with the same fabrics that you plan on using for your project. The basic considerations when satin stitching include stabilizing your work, choosing threads and needles, and adjusting the machine settings. S tabilizing • Stretch your fabric across an Satin stitching through a single layer of fabric is quite unruly. It is important to stabilize the fabric before stitching, and there are three main ways of doing this: • Make a quilt sandwich with a top, • Place two layers of tearable stabilizer under your fabric. Make sure to turn them crosswise (90°) to each other. After stitching, gently tear the stabilizer off the back. embroidery hoop that fits the dimensions of your machine. batting, and backing. It will be easiest to work with if it is machine quilted first. T hread There are three points to consider when selecting a thread: color, sheen, and weight. You can often get wonderful results by choosing essential embroidery stitches: embroidery designs and techniques Q u i lt i n g A r t s . c o m 8 ©Interweave
  • 9. essential embroidery stitches designs and techniques an unexpected color, so experiment with matching and contrasting colors. Threads can either have a matte finish or a shiny one. To make a line recede, use a matte cotton thread of the same color. To draw more attention to an area, use a shiny contrasting thread. Variegated threads can produce wonderful results with different stitch widths (see the bottom three examples in the sample shown here). Slowly pivoting your work as you go, while the presser foot is lifted, allows you to create satin-stitched curves without the underlying fabric showing through. The weight of the thread can also affect the look of the stitching, with thinner threads typically appearing smoother. When choosing a thread for the bobbin, the easiest approach is to select the same thread as the top. However, an invisible or thin thread like The Bottom Line™ from Superior Threads also works well and requires less frequent bobbin winding. Don’t forget to check the tension in the bobbin if you choose a thinner thread. N eedle The black and white stitched lines on this sample demonstrate different machine settings. The top tension of the first line is too tight and the bottom tension of the second line is too loose; in both cases, black bobbin thread is visible. The tension of the third line is just right so only the top white thread is visible. The purple lines on this sample demonstrate the effects of different stitch widths, colors, and types of thread: matte, cotton, and variegated. You will need to select a properly sized needle for your project. Generally, if you are using a thicker thread or sewing through multiple layers, you will need a larger needle. You may also need a larger needle if your thread is continually breaking. Once again, practice on the materials specific to your project, and if your thread is breaking, select the next size larger needle. However, keep in mind that a needle that is too large will make big holes in your fabric, which is also undesirable. T ension settings Your sewing machine’s tension settings will need to be adjusted in preparation for satin stitching. Always reduce the top tension; this is the single-most critical factor for achieving a beautiful satin stitch. For example, the normal top tension on my machine is about a 4, and I reduce it to a 2. You may also need to tighten your bobbin tension. S titch specifics For satin stitching, select a stitch width that’s between 1 and 5, and select a stitch length that’s between 0 and 1. For the satin stitch to look full, you have to set the stitch length really short. However, beware that the essential embroidery stitches: embroidery designs and techniques Q u i lt i n g A r t s . c o m 9 ©Interweave
  • 10. essential embroidery stitches designs and techniques repeated close punching of the fabric with the needle can weaken the fabric to the point of breaking. F inding the   balance Check your machine’s settings by putting white thread in the top and black thread in the bobbin. Run a wide stitch on a sample piece of fabric. If black thread is showing on the top, then the upper tension is too tight and the bobbin tension is possibly too loose. Adjust the tension and try again. (See the white and black threads in the sample piece.) If you can’t get it perfect (I never can), the best choice is to have only the top thread showing on the front and some of the top thread showing on the back. Skills and applications S tarting a line of satin stitching Pull the bobbin thread up to the top, and reduce the stitch length and stitch width to zero. While holding onto both threads, sew in place for 3–4 stitches. This locks the thread in place. Change the stitch width and length back, start sewing, and closely trim the tail threads. satin stitch tip Use a running stitch to create a guide for your satin stitching. First, sew a simple running stitch with your machine to mark where the satin stitch line will go. Then satin stitch over it. These samples of satin stitching are done on fabric laid on top of two layers of tearable stabilizer. essential embroidery stitches: embroidery designs and techniques Q u i lt i n g A r t s . c o m 10 ©Interweave
  • 11. essential embroidery stitches designs and techniques Some threads will break if a few stitches are sewn on top of each other. For these threads, tie a knot after pulling them to the top, and then bury the ends between the quilt layers. If you have to stop in the middle of a line, place your needle in the last hole that you finished before you start sewing again; it will be as if you never stopped. S ewing curves When satin stitching a straight line, the stitches should remain perpendicular to the edge you are sewing along. When sewing around a curve, the stitch will become less than perpendicular, so it is important to stitch slowly. With the needle down on the outside of the curve, gently pivot your fabric around so it is approaching perpendicular. The key is that, if the needle is down and you pivot your fabric, the next stitch should not leave a gap of fabric showing through, but should cover the fabric with thread as you sew. J oining quilted blocks You can quilt small pieces of any shape on your machine and join them with satin stitching. First, trim your blocks to a size that allows them to fit flush with each other. Zigzag stitch them together with a narrow stitch width and invisible thread. Apply a thin strip of fused fabric over the back of the seam with an iron. If it is a curved joint, cut the fused fabric on the bias. On the front side, use a wide satin stitch to cover the previous stitching. This makes even large pieces sturdy enough to withstand the gravity of hanging. These multi-colored circles are made with free-motion satin stitching and are embellished with a bit of hand stitching. F ree - motion satin stitching This is really fun. Set up your machine for free-motion quilting, and set the stitch width to a wide stitch. Depending on your speed and style, you will get a lovely zigzag or a satin stitch. Let loose and let it go! You can achieve some wonderful effects by layering several lines of satin stitch with different colored threads. F inishing the edges of a quilt is to stitch around the edge of your quilt multiple times. Start with a standard running stitch to prevent the edge from stretching, then set the stitch width so that the needle’s left position pierces the quilt and the right position goes just off the edge. Stitch around the edge of the quilt, creating successively wider stitches each time around. Learn more about Kathy and her art at aquamoonartquilts.blogspot.com. To prevent the edges of your quilt from rolling, satin stitch them using a blind hem foot. Another option essential embroidery stitches: embroidery designs and techniques Q u i lt i n g A r t s . c o m 1 1 ©Interweave
  • 12. essential embroidery stitches designs and techniques off-site Embroidery Adapted from Quilting Arts Magazine Winter 2004 by S usie W illiams “Mrs. McConkey’s Garden” 6 square • Silk, cotton, upholstery fabric, lace; cotton and rayon floss, perle cotton, hand-dyed silk ribbon, Caron Wildflowers thread; beads, plastic flower beads, freshwater pearls; machine pieced, hand embroidered. essential embroidery stitches: embroidery designs and techniques Q u i lt i n g A r t s . c o m 12 ©Interweave
  • 13. essential embroidery stitches designs and techniques F or several months I struggled with how to embroider a finely detailed motif onto a crazy quilt. I was intrigued with the machine- embroidered patches of butterflies and flowers available at fabric shops, however, I wanted to make my own designs. I had made attempts in the past but I found that transferring intricate drawings onto my quilt blocks for satin stitch work was almost impossible. My stitching always ended up as a thick, bumpy mess. It wasn’t until I read Beginner’s Guide to Stumpwork by Kay Dennis and took a class from Irene Kerr that I discovered off-site embroidery. This method of embroidery opened a world of exciting design possibilities to me that I could easily incorporate into my artwork. Off-site embroidery is the technique of stitching a design on a piece of cloth, cutting the finished embroidered image off the base fabric, and appliquéing the motif to your artwork. D irections 1. o begin you need a design; it can T be one you have drawn or one of the many copyright-free patterns now available. m a t e r i a l s • 100% cotton fabric • Embroidery hoop • Embroidery threads and flosses in a variety of colors • Pencil • Embroidery needles • Sharp scissors • Acid-free fabric glue • Small flat bristle brush • Acrylic paint (optional) 4. nce the design is completely O embroidered, use a small, flat bristle brush and apply a thin coat of acid-free fabric glue around the edges of the motif, both on the back and on the front. 5. hen the glue is dry, use very W sharp, fine-point scissors and carefully cut the embroidery off the base fabric. Trim all around the edge, as close as possible. Detail of the fawn in the forest from “Wood Whisper.” 2. ron a piece of lightweight 100% I cotton fabric to smooth the wrinkles. Use an ordinary pencil and trace your design onto this fabric. 3. tretch the fabric tight, using a S hoop big enough to contain the entire design. Choose the floss colors that you’ll use for your embroidery. Using one strand of floss at a time, satin stitch the entire motif; change and blend the colors and threads as you stitch. I satin stitch fairly heavily so that the foundation fabric doesn’t show through the thread. I prefer the satin stitch, but you may prefer to use a looser stitch or a different embroidery stitch entirely. essential embroidery stitches: embroidery designs and techniques Q u i lt i n g A r t s . c o m 13 ©Interweave
  • 14. essential embroidery stitches designs and techniques “Wood Whisper” 20 × 13 • Synthetics, wool, cotton, silk, upholstery fabric, antique lace; wool, variegated and single color floss, perle cotton, Caron Wildflowers thread, silk ribbon; glass and plastic beads, freshwater pearls, crocheted flowers, resin buttons; machine pieced, hand embroidered. For the little fawn, I used my flat bristle brush to apply a small bead of brown acrylic paint all around the edges. This optional step helps to outline the embroidery and give it more definition. Take a look at the fawn in this piece and the chickens in “Mrs. McConkey’s Garden,” and you will notice that Off-site embroidery is not difficult. I think it will provide a wonderful new means of expression in your handwork. The fawn is attached with invisible For instructions on how to make a crazy patch, see Issue 1 of Quilting Arts Magazine®. thread while the chicken and Susie Williams is an award-winning rooster are attached with the same quilter from North Carolina. they both are three-dimensional. color floss as I used in the off-site embroidery. essential embroidery stitches: embroidery designs and techniques Q u i lt i n g A r t s . c o m 14 ©Interweave
  • 15. essential embroidery stitches designs and techniques reverse appliqué bobbin embroidery with a twist W hile I was a City Guilds student I had the opportunity to experiment with a variety of paper surfaces for my embroidery work. I found that I just loved the qualities of tissue paper that had been adhered to a fabric for support. This paper provides an unusually textured and surprisingly strong surface for hand or machine stitch. It can be made with white tissue paper and colored with dyes or paints or it can be colored afterwards. Alternatively, it can be made with colored tissue paper. I have found lots of uses for my handmade paper but one of my favorites is to use it as the background for my cut-work embroideries. I use a reverse appliqué technique with layers of synthetic fabrics and bobbin embroidery and then cut back the design using a soldering iron. by Y vonne B rown A cut-work embroidery bobbin stitched on handmade paper. Embellished with beads and French knots. Adapted from Quilting Arts Magazine Winter 2005 essential embroidery stitches: embroidery designs and techniques Q u i lt i n g A r t s . c o m 15 ©Interweave
  • 16. essential embroidery stitches designs and techniques Making the paper Work on a flat surface where the paper can be left undisturbed for at least 24 hours to dry. Cover the surface with plastic before you begin. 1. Water down PVA or white glue with about 40 percent water to produce a single creamy consistency and paint the plastic surface with this mixture. Lay your fabric on top and apply another coat of the glue mixture. 2. Scrunch up tissue paper and carefully flatten it out again, then lay it on top of the fabric, gently pushing it down onto the fabric surface. Samples of handmade papers in blue and brown. 3. Now, coat the tissue paper with the glue mixture taking care not to tear the paper. Don’t worry if you do tear it as it provides interesting results where the fabric shows through. 4. If coloring your paper, apply dyes m a t e r i a l s for m a k i n g t h e p a p e r • Tissue paper • Muslin, scrim, or cheesecloth (I prefer scrim.) • PVA glue, Elmer’s® glue, or other white glue • Liquid dyes or paints—e.g. Procion dyes or any paint with a liquid consistency • Metallic acrylic paint or Treasure Gold (metallic wax) • A piece of plastic large enough to cover your work surface • Foam applicator or large, soft paint brush • Pipette or syringe for applying dyes • A small paint brush or paints now. Use a pipette or syringe and apply 2 or 3 colors— remember your color mixing rules or you will end up with something resembling the color of mud. The dyes will travel to a certain extent on their own and begin merging with each other, but you may need to carefully manipulate them with a small brush to achieve the desired effect. 5. When you are happy with the colors you’ve created, leave the paper to dry. This will take around 24 hours. 6. Once it’s dry, peel the paper off the plastic background and you are ready for the next stage. F inishing suggestions • Use a small amount of metallic acrylic paint or Treasure Gold and rub it into the textured surface of the paper with your fingertip to gild the surface. • If the paper was left white, you can color it with acrylic paints once it is completely dry. bobbin e m b r o i d e ry Bobbin embroidery is great for when you want to achieve simple, flowing designs and work with specialty threads or ribbons too heavy or big to fit through your top needle. Simply wind the specialty thread or ribbon in your bobbin, place your work face down on your sewing machine, and stitch with your fabric in this position. essential embroidery stitches: embroidery designs and techniques Q u i lt i n g A r t s . c o m 16 ©Interweave
  • 17. essential embroidery stitches • To achieve a pearlized finish, mix a very small amount of acrylic paint with Liquitex Iridescent Tinting Medium and paint this sparingly onto the surface. Creating your embroidery 1. You will need a piece of your handmade paper a little larger than your design. 2. Trace your design onto the stabilizer and center this on the back of your paper—remember that the completed image will be reversed on the front. m a t e r i a l s for t h e e m b r o i d e ry • Your design • A piece of lightweight sew-in stabilizer the size of your design • Synthetic felt (I use Kunin felt.) • A selection of synthetic organzas or voiles in colors that work together (Do not use metallic organza as it will not melt.) • A synthetic metallic fabric in your color scheme • An iridescent organza in your color scheme • Machine embroidery threads (I use Madeira Metallic FS 20, also known as “black core.”) • Your sewing machine, set up for free-motion work • A fine-tipped soldering iron Note: It is very important to check that all the fabrics will melt before you start the project. designs and techniques 3. Cut your synthetic fabrics a little bigger than your design and layer them on the front of the paper starting with the Kunin felt, next the iridescent organza, and then 2 or 3 layers of the colored organzas. 4. Audition these against each other to find the most pleasing combination and pin through all layers at all 4 corners of the piece. 5. Set up your sewing machine for free-motion work. Put the feed-dogs down and use a darning foot. 6. Load the bobbin with machine embroidery thread as this will show on the right side of your work. I use Madeira Metallic threads FS 2/2 and I use polyester bobbinfil on the top of the machine. 7. Stitch the design from the back of the work going over each line twice to give a good clean edge. 8. Turn it over to see your design sewn through to the right side. 9. Carefully cut away the fabric around the design with a fine-tipped soldering iron. The soldering iron will only melt away the synthetic fabrics. It will not burn the paper or damage the essential embroidery stitches: embroidery designs and techniques Q u i lt i n g A r t s . c o m 17 ©Interweave
  • 18. essential embroidery stitches designs and techniques Above: Sequence of layers for the embroidery, beginning with Kunin felt then various sheers and organzas. Right: A soldering iron has cut through the bottom portion of the embroidery. essential embroidery stitches: embroidery designs and techniques Q u i lt i n g A r t s . c o m 18 ©Interweave
  • 19. essential embroidery stitches designs and techniques using a soldering iron • Always wear a mask when melting and burning synthetic fabrics and work either outside or in a well-ventilated area. • Choose a soldering iron with a really fine tip. • Always work on a heatproof surface. I use a piece of glass with smooth bevelled edges. • Support the soldering iron in a safe way when not in use. I use an upturned terra cotta plant pot—not a plastic one! sewing threads because they are not synthetic. 10. After cutting out the design, you can emphasize areas of the embroidery and create an interesting textured surface by very carefully melting the surface of the top layer of organza with the side of the soldering iron tip. This will reveal tiny areas of the colors beneath the surface. 11. Finally, you can embellish the surface of the design with hand embroidery. Small clusters of French knots and seed stitches in a variegated thread always look good with a scattering of seed beads in a complementary color. (I like to use Stef Francis’ silk threads for my hand embroidery.) Learn more about Yvonne and her art at yvonnebrown.co.uk. Above: A finished piece in autumnal tones. essential embroidery stitches: embroidery designs and techniques Q u i lt i n g A r t s . c o m 19 ©Interweave