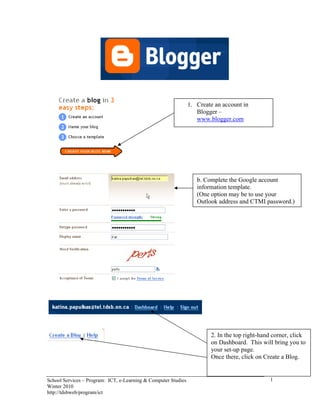
1. 1. Create an account in
Blogger –
www.blogger.com
b. Complete the Google account
information template.
(One option may be to use your
Outlook address and CTMI password.)
2. In the top right-hand corner, click
on Dashboard. This will bring you to
your set-up page.
Once there, click on Create a Blog.
School Services – Program: ICT, e-Learning & Computer Studies 1
Winter 2010
http://tdsbweb/program/ict
2. b. Give your
Blog a title,
(perhaps your
current grade
level or class).
Then create your
URL, (Internet
Address). You
may want to use
your school
name and grade.
www._____.blog
spot.com
Then press
Continue.
c. Select a template of your choice. Scroll to the
bottom of the page and press the orange arrow to
continue.
You are now ready to Blog!
3. The tool bar in the compose section works exactly like a word processor with fonts,
sizes, styles, links, and images etc….
School Services – Program: ICT, e-Learning & Computer Studies 2
Winter 2010
http://tdsbweb/program/ict
3. 4. Give your Post a title and then simply compose your message. There is a great
spellcheck function in the toolbar.
5. If you are ready to post, scroll to the bottom of the page and click on Publish Post.
.
If not, save your work as a draft where you can visit at another time.
6. To make it more personal go to the Settings tab and Basic.
** Remember to save your settings!
School Services – Program: ICT, e-Learning & Computer Studies 3
Winter 2010
http://tdsbweb/program/ict
4. 7. Change the date, time etc... with the Formatting tab.
8. To enable students or others to comment on your posts, click on
the Comments tab. Please note, students must have an email
account in order to comment. The easiest way would be to give them all a TEL
account in your school’s CTMI folder.
If you select the Anyone field
students without email
accounts can comment on
Posts – Registered or gmail
9. account holders can respond
with the other two.
Click Yes and fill in your
email address so that
comments are sent to your
email account.
10. Organize your posts and comments with the Archiving tab.
11. To finalize who can post comments to your blog, click on the
Permissions tab.
It is up to you who you would like to see your blog. If you want it open on the
Internet, simply click on the Anybody field. If you only want your students to
comment, click on the “Only people I choose field and enter their email addresses.
School Services – Program: ICT, e-Learning & Computer Studies 4
Winter 2010
http://tdsbweb/program/ict
5. ****I would not personally recommend allowing students to be blog authors until
they learn how to comment on blog posts. This field would be for another teacher or
staff member who is also helping with the blog.
School Services – Program: ICT, e-Learning & Computer Studies 5
Winter 2010
http://tdsbweb/program/ict
6. Layout
1. Adjustments to your template can be done at any time under the layout tab.
2. To customize your blog, click on Add a Gadget
.
This button will offer different options for you to incorporate onto your blog.
3. Click on View Blog to see how your blog looks. Change if necessary at any time!
School Services – Program: ICT, e-Learning & Computer Studies 6
Winter 2010
http://tdsbweb/program/ict
7. Posting
1. To make changes to postings or comments, go to the Posting tab and Edit Posts.
This function will allow you to change or delete any of your posts.
The Moderate comments will allow you to control the comments that are sent in to
the blog. You can either Publish or reject comments.
2. Always go to your Dashboard to create or modify your blog page. This is your
Admin page.
3. To make your blog more interactive, complete your profile, which will allow
other bloggers to search and interact with your site according to shared
hyperlinked interests.
4. Check out the Help section for FAQ’s and other questions you may have!
School Services – Program: ICT, e-Learning & Computer Studies 7
Winter 2010
http://tdsbweb/program/ict
8. Insert an Image onto your Blog
1. Go to the Posting tab and click on Create.
2. Click on the Insert Image button in the toolbar.
3. To get a picture from your computer, click on the Browse button and navigate to
your photo.
4. Click on 4.
the layout 5.
and sizeClick
you
prefer. on
the
5. Upload the image button. Your picture should now show up in your posting area!
From the Internet:
Copy and paste the URL into the image from the Internet field and follow the same steps
as above.
School Services – Program: ICT, e-Learning & Computer Studies 8
Winter 2010
http://tdsbweb/program/ict