
![Free Knitting Pattern: Vanna's Choice® Dragon Bookends Page 2 of 4
Free Knitting Pattern from Lion Brand Yarn
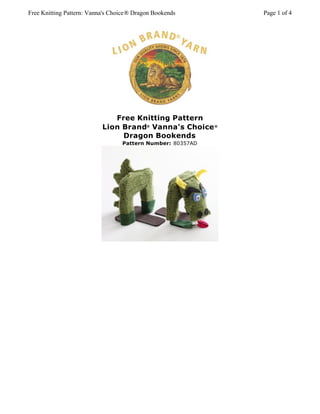
Lion Brand® Vanna's Choice ®
Dragon Bookends
Pattern Number: 80357AD
SKILL LEVEL: Easy +
SIZE: One Size
CORRECTIONS: None
MATERIALS
• 860-172 Lion Brand Vanna's Choice® Yarn: Kelly Green
1 Ball
• Lion Brand Knitting Needles- Size 9 [5.5 mm]
• Large-Eyed Blunt Needles
• Lion Brand Stitch Markers
• Additional Materials
2 large googly eyes
Craft felt, small amounts of black, blue, yellow, white, red, brown, and green
Craft glue
2 metal bookends, about 5 in. (12.5 cm) high x 5 in. (12.5 cm) wide
Small amount of fiberfill stuffing
Black marker (optional)
GAUGE:
16 sts + 22 rows = 4 in. (10 cm) over Rev St st (p on RS, k on WS). BE SURE TO
CHECK YOUR GAUGE. When you match the gauge in a pattern, your project will be the
size specified in the pattern and the materials specified in the pattern will be sufficient.
If it takes you less stitches and rows to make a 4 in. [10 cm] square, try using a
smaller size hook or needles; if more stitches and rows, try a larger size hook or
needles.
DRAGON
Base
Trace around flat base of bookends onto WS of brown felt. Cut pieces along marked lines and glue 1 to each
bookend.
BODY BACK (make 2)
Legs
Cast on 6 sts.
Work in Rev St st (k on WS, p on RS) for 15 rows. Sl sts to a holder.
Rep to make a 2nd leg, but do not sl sts to a holder.
Next Row (WS): Knit across 6 sts, cast on 10 sts for body as follows: sl last st worked back to left hand
needle, k this st but do not drop from needle, transfer new st from right hand needle back to left hand needle
(1 st cast on), continue in this way until 10 sts have been cast on, k across cast-on sts, then k 6 sts from
holder – 22 sts.
Continue in Rev St st on 22 sts for 11 more rows.
Bind off.
FINISHING
With WS together, seam inside edge of legs and body.
Wrap piece around one bookend, pin legs and body together at sides. Insert a small amount of stuffing
between knitted piece and one side of bookend. From RS, whipstitch pieces together or work single crochet
evenly spaced through both layers along sides and top edge.](data:image/gif;base64,R0lGODlhAQABAIAAAAAAAP///yH5BAEAAAAALAAAAAABAAEAAAIBRAA7)
Empfohlen
Weitere ähnliche Inhalte
Was ist angesagt?
Was ist angesagt? (19)
Andere mochten auch
Andere mochten auch (20)
Ähnlich wie Dragon
Ähnlich wie Dragon (20)
Kürzlich hochgeladen
Kürzlich hochgeladen (20)
Dragon
- 1. Free Knitting Pattern: Vanna's Choice® Dragon Bookends Page 1 of 4 Free Knitting Pattern Lion Brand® Vanna's Choice ® Dragon Bookends Pattern Number: 80357AD
- 2. Free Knitting Pattern: Vanna's Choice® Dragon Bookends Page 2 of 4 Free Knitting Pattern from Lion Brand Yarn Lion Brand® Vanna's Choice ® Dragon Bookends Pattern Number: 80357AD SKILL LEVEL: Easy + SIZE: One Size CORRECTIONS: None MATERIALS • 860-172 Lion Brand Vanna's Choice® Yarn: Kelly Green 1 Ball • Lion Brand Knitting Needles- Size 9 [5.5 mm] • Large-Eyed Blunt Needles • Lion Brand Stitch Markers • Additional Materials 2 large googly eyes Craft felt, small amounts of black, blue, yellow, white, red, brown, and green Craft glue 2 metal bookends, about 5 in. (12.5 cm) high x 5 in. (12.5 cm) wide Small amount of fiberfill stuffing Black marker (optional) GAUGE: 16 sts + 22 rows = 4 in. (10 cm) over Rev St st (p on RS, k on WS). BE SURE TO CHECK YOUR GAUGE. When you match the gauge in a pattern, your project will be the size specified in the pattern and the materials specified in the pattern will be sufficient. If it takes you less stitches and rows to make a 4 in. [10 cm] square, try using a smaller size hook or needles; if more stitches and rows, try a larger size hook or needles. DRAGON Base Trace around flat base of bookends onto WS of brown felt. Cut pieces along marked lines and glue 1 to each bookend. BODY BACK (make 2) Legs Cast on 6 sts. Work in Rev St st (k on WS, p on RS) for 15 rows. Sl sts to a holder. Rep to make a 2nd leg, but do not sl sts to a holder. Next Row (WS): Knit across 6 sts, cast on 10 sts for body as follows: sl last st worked back to left hand needle, k this st but do not drop from needle, transfer new st from right hand needle back to left hand needle (1 st cast on), continue in this way until 10 sts have been cast on, k across cast-on sts, then k 6 sts from holder – 22 sts. Continue in Rev St st on 22 sts for 11 more rows. Bind off. FINISHING With WS together, seam inside edge of legs and body. Wrap piece around one bookend, pin legs and body together at sides. Insert a small amount of stuffing between knitted piece and one side of bookend. From RS, whipstitch pieces together or work single crochet evenly spaced through both layers along sides and top edge.
- 3. Free Knitting Pattern: Vanna's Choice® Dragon Bookends Page 3 of 4 BODY FRONT Work same as Back. TAIL (make 2) Cast on 8 sts. Row 1: Sl 1, k 7. Row 2: K2tog, k 6 – 7 sts. Row 3: Sl 1, k 6. Row 4: K2tog, k 5 – 6 sts. Row 5: Sl 1, k 5. Row 6: K2tog, k 4 – 5 sts. Row 7: Sl 1, k 4. Row 8: K2tog, k 3 – 4 sts. Row 9: Sl 1, k 3. Row 10: Cast on 4 sts, k across – 8 sts. Rows 11-30: Rep Rows 1-10. Rows 31-39: Rep Rows 1-9. Row 40: Sl 1, k3tog, pass sl st over. FINISHING Sew Tails together, stuffing lightly before sewing closed. Sew Tail to stuffed side of Body Back. HEAD Cast on 17 sts. Work in Rev St st for 15 rows. Bind off 3 sts at beg of next 2 rows. Work even on rem 11 sts for 15 rows. Cast on 3 sts at beg of next 2 rows. Work even on 17 sts for 15 rows. Bind off. FINISHING With WS facing, fold piece in half. Seam sides (or work single crochet through both layers), stuffing lightly before sewing closed. Sew Head to stuffed side of Body Front. From blue felt, cut 2 circles slightly larger than eyes. Glue eyes to felt circles, glue circles to Head. From black felt, cut 2 crescent-shaped eyebrows, glue to Head above eyes. Cut 2 crescent-shaped horns from yellow felt and glue to top corners of Head. From black felt, cut 2 circles for nostrils and glue to Head. From red felt, cut tongue. Glue a narrow strip of red felt to center to tongue. If desired, shade strip lightly with marker. From white felt, cut 2 small squares. Glue to Head, one on either side of tongue. From green felt, cut 2 strips, each 2 in. (5 cm) wide. Glue strips around lower ends of back legs. From green felt, cut 2 strips, each 1 1/2 x 3 in. (3.5 x 7.5 cm). Cut notches along one short side of each strip, glue strips at base of front legs. ABBREVIATIONS / REFERENCES Click for explanation and illustration inc = increas(e)(s)(ing) k = knit k2tog = knit 2 together p = purl rep = repeat(s)(ing) RS = right side sl = slip St st = Stockinette stitch st(s) = stitch(es) WS = wrong side Learn to knit instructions:http://learnToKnit.LionBrand.com Every effort has been made to have the knitting and crochet instructions accurate and complete. We cannot be responsible for variance of individual knitters and crocheters, human errors, or typographical mistakes.
- 4. Free Knitting Pattern: Vanna's Choice® Dragon Bookends Page 4 of 4 *Vanna's Choice ® (Article #860) is a 4-ply worsted-weight 100% acrylic yarn. • Solids in 3.5 oz/100g (170 yd/156 m) balls • Prints in 3 oz/85 g (145 yd/133 m) balls 100% acrylic We want your project to be a success! If you need help with this or any other Lion Brand pattern, e-mail support is available 7 days per week. Just click here to explain your problem and someone will help you! For hundreds of free patterns, visit our website www.LionBrand.com To order visit our website www.e-yarn.com or call: (800) 258-YARN (9276) any time! Copyright ©1998-2005 Lion Brand Yarn Company, all rights reserved. No pattern or other material may be reproduced -- mechanically, electronically, or by any other means, including photocopying -- without written permission of Lion Brand Yarn Company. If you would like to send a copy of this page to someone, click here and we will be happy to do it for you.