SlideShare ist ein Scribd-Unternehmen logo
1 von 10
Downloaden Sie, um offline zu lesen
Lesson 4 (Part 1)
     Lesson Learning Outcomes:
       In this lesson students will:
                  Learn how to navigate through the Adobe Fireworks program
                  Produce computer generated imagery
                  Produce a basic form of graphic layout
                  Produce computer a generated illustration
                  Begin to realise some of their creative ability through the medium of computers
                  Begin to realise the potential of the Adobe Fireworks program


                                                                                                     Page | 1
Creating a New File
   1.   Choose > File > New


   2.   In the New Document dialogue box.
             a. Change the width to 760 pixels.
             b. Change the Height to 760 Pixels
             c. Change the resolution to 120 Pixels/Inch.
             d. Select White for the canvas colour


   3.   Click OK.


                                                            Page | 2
4.   From the tools panel select the Rounded Rectangle tool.


5.   Use the Rounded Rectangle to draw a large rectangle in the centre of the screen. Don’t worry about the colours and
     dimensions as we will change them in a moment.


6.   To change the fill options for our rectangle. Make sure that the rectangle is selected and go to the properties inspector
     and change the Fill category Solid.


7.   Select the rectangle using the pointer tool. Notice how some of the blue squares next to the objects edge change to
     yellow diamonds.


                                                                                                                      Page | 3
8.   Drag the yellow diamonds extremely close to the objects edge to reduce their curvature. Your shape should now only
     have a few pixels curving off at the edge.


9.   Your image should look something like the one below. (Don’t worry about the colour. We will change that in a few
     moments).


10. In the properties inspector
         a. Change the objects width to 715
         b. Change the objects height to 650
         c. The x coordinate to 23
         d. The y coordinate to 40


11. Change the swatch next to the bucket to white (#FFFFFF)


                                                                                                                 Page | 4
12. Change the stroke colour to white


13. In the properties inspector set
         a. Stoke category to one pixel soft.
         b. Edge to 0
         c. Texture to Grain and 0


14. Click on the + icon in the Filters section of the Properties Inspector.


15. From the expanded menu choose > Shadow and Glow > Drop Shadow


16. In the pop up box change the
         a. Distance to 1
         b. Colour to black
         c. Opacity to 65
         d. Softness to 6
         e. Angle to 268
         f. Make sure that Knock out is NOT selected.


                                                                              Page | 5
17. Your background image should now look like the one below.


18. We want a tab button to fit flush against the right hand side. Like the image below.


    However, if we use the image as it is a gap will appear where the corner is rounded. Like the image below.


    To combat this we will straighten just this one corner.

19. Select the background image using the subselection tool.


                                                                                                                 Page | 6
20. Click on the circled anchor point.


21. Move it up so that it is parallel to the nearest anchor point.


22. Select the same point again.


23. Then select the points direction handle and drag it t the left until it touches the neighbouring points direction line.


24. When you release the point you should be left with a straight edge on that corner.


                                                                                                                       Page | 7
25. Notice that the rest of the corners are still curved.


26. In the Layers Panel rename the Layer 1 folder to Base_Layer


27. Still in the Layers panel, lock the layer by clicking on the white square to the right of the eye icon. A lock will appear to
    indicate that you’ve locked the layer.


                                                                                                                         Page | 8
28. Choose File > Save as


29. Rename the file after your initials followed by website (eg. MCwebsite.png) Next to Save as type select
    Fireworks PNG and save it to the lesson 4 folder on the U drive.


                                                                                                         Page | 9
Creating Tabs/Buttons

   1.   In the layers Panel click on the New/Duplicate Layers icon. (The little folder icon with the plus sign at the bottom of the
        panel.)


   2.   A new Layer appears. (Layer 1)


   3.   Rename the layer tab_buttons


                                                                                                                         Page | 10

Weitere ähnliche Inhalte

Was ist angesagt?

spatial anaylisi using ilwis
spatial anaylisi using ilwisspatial anaylisi using ilwis
spatial anaylisi using ilwis
Asri Renggo
 
How to add a canvas to your image
How to add a canvas to your imageHow to add a canvas to your image
How to add a canvas to your image
Sirron Carrector
 

Was ist angesagt? (17)

Montage Effects
Montage EffectsMontage Effects
Montage Effects
 
spatial anaylisi using ilwis
spatial anaylisi using ilwisspatial anaylisi using ilwis
spatial anaylisi using ilwis
 
Inkscape Fall Fest Flyer Tutorial
Inkscape Fall Fest Flyer TutorialInkscape Fall Fest Flyer Tutorial
Inkscape Fall Fest Flyer Tutorial
 
Quickpointtest
QuickpointtestQuickpointtest
Quickpointtest
 
Assignment 26
Assignment 26Assignment 26
Assignment 26
 
Photoshop for Art/Design
Photoshop for Art/DesignPhotoshop for Art/Design
Photoshop for Art/Design
 
Applying masks in photoshop
Applying masks in photoshopApplying masks in photoshop
Applying masks in photoshop
 
Fireworks intro activity
Fireworks intro activityFireworks intro activity
Fireworks intro activity
 
Christine rose nd. tipones [gr. 11 abm, caritas]
Christine rose nd. tipones [gr. 11  abm, caritas]Christine rose nd. tipones [gr. 11  abm, caritas]
Christine rose nd. tipones [gr. 11 abm, caritas]
 
3D Scanning & Reconstruction with Kinect
3D Scanning & Reconstruction with Kinect3D Scanning & Reconstruction with Kinect
3D Scanning & Reconstruction with Kinect
 
GNU Image Manipulation Program
GNU Image Manipulation ProgramGNU Image Manipulation Program
GNU Image Manipulation Program
 
Image manipulation - Photoshop
Image manipulation - PhotoshopImage manipulation - Photoshop
Image manipulation - Photoshop
 
Making a Digital Layout with a Narrative Page using Adobe Photoshop Elements
Making a Digital Layout with a Narrative Page using Adobe Photoshop ElementsMaking a Digital Layout with a Narrative Page using Adobe Photoshop Elements
Making a Digital Layout with a Narrative Page using Adobe Photoshop Elements
 
NewTek Lightwave 3D: Working in 3D Space
NewTek Lightwave 3D:  Working in 3D SpaceNewTek Lightwave 3D:  Working in 3D Space
NewTek Lightwave 3D: Working in 3D Space
 
How to add a canvas to your image
How to add a canvas to your imageHow to add a canvas to your image
How to add a canvas to your image
 
How to Edit in Photoshop (Part 2): Adding Background and Using Adjustment Tools
How to Edit in Photoshop (Part 2): Adding Background and Using Adjustment ToolsHow to Edit in Photoshop (Part 2): Adding Background and Using Adjustment Tools
How to Edit in Photoshop (Part 2): Adding Background and Using Adjustment Tools
 
adobephotoshop_frerking
adobephotoshop_frerking adobephotoshop_frerking
adobephotoshop_frerking
 

Andere mochten auch (7)

Adrienne Gallagher Notes
Adrienne Gallagher NotesAdrienne Gallagher Notes
Adrienne Gallagher Notes
 
Martin Quinn Notes
Martin Quinn NotesMartin Quinn Notes
Martin Quinn Notes
 
John Murtagh Hetac Notes
John Murtagh Hetac NotesJohn Murtagh Hetac Notes
John Murtagh Hetac Notes
 
James O Connor Notes
James O Connor NotesJames O Connor Notes
James O Connor Notes
 
Helen Mc Glew Notes
Helen Mc Glew NotesHelen Mc Glew Notes
Helen Mc Glew Notes
 
Interview à Atlantico
Interview à AtlanticoInterview à Atlantico
Interview à Atlantico
 
Paul Lydon Notes Acca F9
Paul Lydon Notes Acca F9Paul Lydon Notes Acca F9
Paul Lydon Notes Acca F9
 

Ähnlich wie Morgan Campbell Advanced Dtp Notes

Presentation for posterising technique
Presentation for posterising techniquePresentation for posterising technique
Presentation for posterising technique
cedannatt
 
Using photoshop elements to create a logo
Using photoshop elements to create a logoUsing photoshop elements to create a logo
Using photoshop elements to create a logo
DB3igs
 
Presentation for posterising technique
Presentation for posterising techniquePresentation for posterising technique
Presentation for posterising technique
cedannatt
 
advanced%20corel%20draw
advanced%20corel%20drawadvanced%20corel%20draw
advanced%20corel%20draw
tutorialsruby
 
advanced%20corel%20draw
advanced%20corel%20drawadvanced%20corel%20draw
advanced%20corel%20draw
tutorialsruby
 
Paths, Masks And Blend Modes
Paths, Masks And Blend ModesPaths, Masks And Blend Modes
Paths, Masks And Blend Modes
Shan
 

Ähnlich wie Morgan Campbell Advanced Dtp Notes (20)

Corel Draw Tutorial: Florist Flyer
Corel Draw Tutorial: Florist FlyerCorel Draw Tutorial: Florist Flyer
Corel Draw Tutorial: Florist Flyer
 
MEMBUAT LOGO THE COFFEE SHOP
MEMBUAT LOGO THE COFFEE SHOPMEMBUAT LOGO THE COFFEE SHOP
MEMBUAT LOGO THE COFFEE SHOP
 
Cours photoshop
Cours photoshopCours photoshop
Cours photoshop
 
Presentation for posterising technique
Presentation for posterising techniquePresentation for posterising technique
Presentation for posterising technique
 
Image editing basics using PIXLR Editor
Image editing basics using PIXLR EditorImage editing basics using PIXLR Editor
Image editing basics using PIXLR Editor
 
Using photoshop elements to create a logo
Using photoshop elements to create a logoUsing photoshop elements to create a logo
Using photoshop elements to create a logo
 
How to create an animated infographic
How to create an animated infographicHow to create an animated infographic
How to create an animated infographic
 
Maya
MayaMaya
Maya
 
Presentation for posterising technique
Presentation for posterising techniquePresentation for posterising technique
Presentation for posterising technique
 
advanced%20corel%20draw
advanced%20corel%20drawadvanced%20corel%20draw
advanced%20corel%20draw
 
Dr 2
Dr 2Dr 2
Dr 2
 
advanced%20corel%20draw
advanced%20corel%20drawadvanced%20corel%20draw
advanced%20corel%20draw
 
Paths, Masks And Blend Modes
Paths, Masks And Blend ModesPaths, Masks And Blend Modes
Paths, Masks And Blend Modes
 
Photoshop basics
Photoshop basicsPhotoshop basics
Photoshop basics
 
Maya
MayaMaya
Maya
 
waagen-ecard
waagen-ecardwaagen-ecard
waagen-ecard
 
waagen-ecard
waagen-ecardwaagen-ecard
waagen-ecard
 
Photoshop basics
Photoshop basicsPhotoshop basics
Photoshop basics
 
Photoshop Tutorial Clipping path service, Photoshop clipping path. photo clip...
Photoshop Tutorial Clipping path service, Photoshop clipping path. photo clip...Photoshop Tutorial Clipping path service, Photoshop clipping path. photo clip...
Photoshop Tutorial Clipping path service, Photoshop clipping path. photo clip...
 
Adobe Illustrator CC 2018
Adobe Illustrator CC 2018 Adobe Illustrator CC 2018
Adobe Illustrator CC 2018
 

Mehr von IBAT College (9)

John Murtagh Grad Dip Notes
John Murtagh Grad Dip NotesJohn Murtagh Grad Dip Notes
John Murtagh Grad Dip Notes
 
John Murtagh Supervisory Mang Notes
John Murtagh Supervisory Mang NotesJohn Murtagh Supervisory Mang Notes
John Murtagh Supervisory Mang Notes
 
John Rowley Notes
John Rowley NotesJohn Rowley Notes
John Rowley Notes
 
Keith Whitford Notes
Keith Whitford NotesKeith Whitford Notes
Keith Whitford Notes
 
Lisa Donaldson Notes
Lisa Donaldson NotesLisa Donaldson Notes
Lisa Donaldson Notes
 
Lorraine Ryan Notes
Lorraine Ryan NotesLorraine Ryan Notes
Lorraine Ryan Notes
 
Mark Dean Notes
Mark Dean NotesMark Dean Notes
Mark Dean Notes
 
Morgan Campbell Notes Dtp
Morgan Campbell Notes DtpMorgan Campbell Notes Dtp
Morgan Campbell Notes Dtp
 
Olivia Edge Hr Notes
Olivia Edge Hr NotesOlivia Edge Hr Notes
Olivia Edge Hr Notes
 

Kürzlich hochgeladen

The basics of sentences session 2pptx copy.pptx
The basics of sentences session 2pptx copy.pptxThe basics of sentences session 2pptx copy.pptx
The basics of sentences session 2pptx copy.pptx
heathfieldcps1
 
Activity 01 - Artificial Culture (1).pdf
Activity 01 - Artificial Culture (1).pdfActivity 01 - Artificial Culture (1).pdf
Activity 01 - Artificial Culture (1).pdf
ciinovamais
 
Russian Escort Service in Delhi 11k Hotel Foreigner Russian Call Girls in Delhi
Russian Escort Service in Delhi 11k Hotel Foreigner Russian Call Girls in DelhiRussian Escort Service in Delhi 11k Hotel Foreigner Russian Call Girls in Delhi
Russian Escort Service in Delhi 11k Hotel Foreigner Russian Call Girls in Delhi
kauryashika82
 
Making and Justifying Mathematical Decisions.pdf
Making and Justifying Mathematical Decisions.pdfMaking and Justifying Mathematical Decisions.pdf
Making and Justifying Mathematical Decisions.pdf
Chris Hunter
 

Kürzlich hochgeladen (20)

Mixin Classes in Odoo 17 How to Extend Models Using Mixin Classes
Mixin Classes in Odoo 17  How to Extend Models Using Mixin ClassesMixin Classes in Odoo 17  How to Extend Models Using Mixin Classes
Mixin Classes in Odoo 17 How to Extend Models Using Mixin Classes
 
microwave assisted reaction. General introduction
microwave assisted reaction. General introductionmicrowave assisted reaction. General introduction
microwave assisted reaction. General introduction
 
Grant Readiness 101 TechSoup and Remy Consulting
Grant Readiness 101 TechSoup and Remy ConsultingGrant Readiness 101 TechSoup and Remy Consulting
Grant Readiness 101 TechSoup and Remy Consulting
 
ICT role in 21st century education and it's challenges.
ICT role in 21st century education and it's challenges.ICT role in 21st century education and it's challenges.
ICT role in 21st century education and it's challenges.
 
Asian American Pacific Islander Month DDSD 2024.pptx
Asian American Pacific Islander Month DDSD 2024.pptxAsian American Pacific Islander Month DDSD 2024.pptx
Asian American Pacific Islander Month DDSD 2024.pptx
 
The basics of sentences session 2pptx copy.pptx
The basics of sentences session 2pptx copy.pptxThe basics of sentences session 2pptx copy.pptx
The basics of sentences session 2pptx copy.pptx
 
Activity 01 - Artificial Culture (1).pdf
Activity 01 - Artificial Culture (1).pdfActivity 01 - Artificial Culture (1).pdf
Activity 01 - Artificial Culture (1).pdf
 
On National Teacher Day, meet the 2024-25 Kenan Fellows
On National Teacher Day, meet the 2024-25 Kenan FellowsOn National Teacher Day, meet the 2024-25 Kenan Fellows
On National Teacher Day, meet the 2024-25 Kenan Fellows
 
Russian Escort Service in Delhi 11k Hotel Foreigner Russian Call Girls in Delhi
Russian Escort Service in Delhi 11k Hotel Foreigner Russian Call Girls in DelhiRussian Escort Service in Delhi 11k Hotel Foreigner Russian Call Girls in Delhi
Russian Escort Service in Delhi 11k Hotel Foreigner Russian Call Girls in Delhi
 
ICT Role in 21st Century Education & its Challenges.pptx
ICT Role in 21st Century Education & its Challenges.pptxICT Role in 21st Century Education & its Challenges.pptx
ICT Role in 21st Century Education & its Challenges.pptx
 
ComPTIA Overview | Comptia Security+ Book SY0-701
ComPTIA Overview | Comptia Security+ Book SY0-701ComPTIA Overview | Comptia Security+ Book SY0-701
ComPTIA Overview | Comptia Security+ Book SY0-701
 
Unit-V; Pricing (Pharma Marketing Management).pptx
Unit-V; Pricing (Pharma Marketing Management).pptxUnit-V; Pricing (Pharma Marketing Management).pptx
Unit-V; Pricing (Pharma Marketing Management).pptx
 
Basic Civil Engineering first year Notes- Chapter 4 Building.pptx
Basic Civil Engineering first year Notes- Chapter 4 Building.pptxBasic Civil Engineering first year Notes- Chapter 4 Building.pptx
Basic Civil Engineering first year Notes- Chapter 4 Building.pptx
 
Making and Justifying Mathematical Decisions.pdf
Making and Justifying Mathematical Decisions.pdfMaking and Justifying Mathematical Decisions.pdf
Making and Justifying Mathematical Decisions.pdf
 
Z Score,T Score, Percential Rank and Box Plot Graph
Z Score,T Score, Percential Rank and Box Plot GraphZ Score,T Score, Percential Rank and Box Plot Graph
Z Score,T Score, Percential Rank and Box Plot Graph
 
2024-NATIONAL-LEARNING-CAMP-AND-OTHER.pptx
2024-NATIONAL-LEARNING-CAMP-AND-OTHER.pptx2024-NATIONAL-LEARNING-CAMP-AND-OTHER.pptx
2024-NATIONAL-LEARNING-CAMP-AND-OTHER.pptx
 
Unit-IV; Professional Sales Representative (PSR).pptx
Unit-IV; Professional Sales Representative (PSR).pptxUnit-IV; Professional Sales Representative (PSR).pptx
Unit-IV; Professional Sales Representative (PSR).pptx
 
Sociology 101 Demonstration of Learning Exhibit
Sociology 101 Demonstration of Learning ExhibitSociology 101 Demonstration of Learning Exhibit
Sociology 101 Demonstration of Learning Exhibit
 
Advanced Views - Calendar View in Odoo 17
Advanced Views - Calendar View in Odoo 17Advanced Views - Calendar View in Odoo 17
Advanced Views - Calendar View in Odoo 17
 
Introduction to Nonprofit Accounting: The Basics
Introduction to Nonprofit Accounting: The BasicsIntroduction to Nonprofit Accounting: The Basics
Introduction to Nonprofit Accounting: The Basics
 

Morgan Campbell Advanced Dtp Notes

  • 1. Lesson 4 (Part 1) Lesson Learning Outcomes: In this lesson students will:  Learn how to navigate through the Adobe Fireworks program  Produce computer generated imagery  Produce a basic form of graphic layout  Produce computer a generated illustration  Begin to realise some of their creative ability through the medium of computers  Begin to realise the potential of the Adobe Fireworks program Page | 1
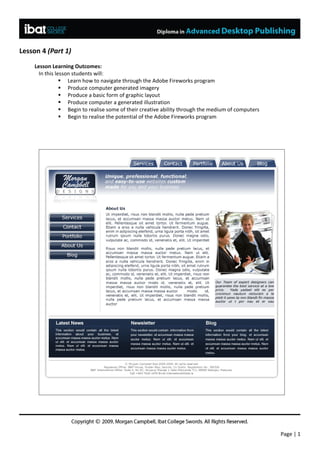
  • 2. Creating a New File 1. Choose > File > New 2. In the New Document dialogue box. a. Change the width to 760 pixels. b. Change the Height to 760 Pixels c. Change the resolution to 120 Pixels/Inch. d. Select White for the canvas colour 3. Click OK. Page | 2
  • 3. 4. From the tools panel select the Rounded Rectangle tool. 5. Use the Rounded Rectangle to draw a large rectangle in the centre of the screen. Don’t worry about the colours and dimensions as we will change them in a moment. 6. To change the fill options for our rectangle. Make sure that the rectangle is selected and go to the properties inspector and change the Fill category Solid. 7. Select the rectangle using the pointer tool. Notice how some of the blue squares next to the objects edge change to yellow diamonds. Page | 3
  • 4. 8. Drag the yellow diamonds extremely close to the objects edge to reduce their curvature. Your shape should now only have a few pixels curving off at the edge. 9. Your image should look something like the one below. (Don’t worry about the colour. We will change that in a few moments). 10. In the properties inspector a. Change the objects width to 715 b. Change the objects height to 650 c. The x coordinate to 23 d. The y coordinate to 40 11. Change the swatch next to the bucket to white (#FFFFFF) Page | 4
  • 5. 12. Change the stroke colour to white 13. In the properties inspector set a. Stoke category to one pixel soft. b. Edge to 0 c. Texture to Grain and 0 14. Click on the + icon in the Filters section of the Properties Inspector. 15. From the expanded menu choose > Shadow and Glow > Drop Shadow 16. In the pop up box change the a. Distance to 1 b. Colour to black c. Opacity to 65 d. Softness to 6 e. Angle to 268 f. Make sure that Knock out is NOT selected. Page | 5
  • 6. 17. Your background image should now look like the one below. 18. We want a tab button to fit flush against the right hand side. Like the image below. However, if we use the image as it is a gap will appear where the corner is rounded. Like the image below. To combat this we will straighten just this one corner. 19. Select the background image using the subselection tool. Page | 6
  • 7. 20. Click on the circled anchor point. 21. Move it up so that it is parallel to the nearest anchor point. 22. Select the same point again. 23. Then select the points direction handle and drag it t the left until it touches the neighbouring points direction line. 24. When you release the point you should be left with a straight edge on that corner. Page | 7
  • 8. 25. Notice that the rest of the corners are still curved. 26. In the Layers Panel rename the Layer 1 folder to Base_Layer 27. Still in the Layers panel, lock the layer by clicking on the white square to the right of the eye icon. A lock will appear to indicate that you’ve locked the layer. Page | 8
  • 9. 28. Choose File > Save as 29. Rename the file after your initials followed by website (eg. MCwebsite.png) Next to Save as type select Fireworks PNG and save it to the lesson 4 folder on the U drive. Page | 9
  • 10. Creating Tabs/Buttons 1. In the layers Panel click on the New/Duplicate Layers icon. (The little folder icon with the plus sign at the bottom of the panel.) 2. A new Layer appears. (Layer 1) 3. Rename the layer tab_buttons Page | 10