Lession 2 starting with mssqlserver
•
0 gefällt mir•814 views

- The document discusses starting Microsoft SQL Server and connecting to it using logins. - To start SQL Server, you must start the MSSQLSERVER service from the Services control panel. - You can then launch SQL Server Management Studio to connect to a server using a login with SQL authentication and password. - Logins are created in SQL Server security to authenticate users, and must match existing operating system or domain user accounts.

Empfohlen
Weitere ähnliche Inhalte
Was ist angesagt?
Was ist angesagt? (19)
Andere mochten auch
Andere mochten auch (16)
Ähnlich wie Lession 2 starting with mssqlserver
Ähnlich wie Lession 2 starting with mssqlserver (20)
Kürzlich hochgeladen
Kürzlich hochgeladen (20)
Lession 2 starting with mssqlserver
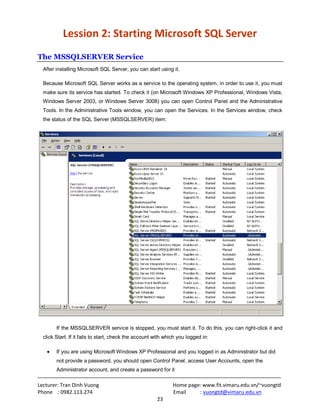
- 1. Lecturer: Tran Dinh Vuong Home page: www.fit.vimaru.edu.vn/~vuongtd Phone : 0982.113.274 Email : vuongtd@vimaru.edu.vn 23 Lession 2: Starting Microsoft SQL Server The MSSQLSERVER Service After installing Microsoft SQL Server, you can start using it. Because Microsoft SQL Server works as a service to the operating system, in order to use it, you must make sure its service has started. To check it (on Microsoft Windows XP Professional, Windows Vista, Windows Server 2003, or Windows Server 3008) you can open Control Panel and the Administrative Tools. In the Administrative Tools window, you can open the Services. In the Services window, check the status of the SQL Server (MSSQLSERVER) item: If the MSSQLSERVER service is stopped, you must start it. To do this, you can right-click it and click Start. If it fails to start, check the account with which you logged in: If you are using Microsoft Windows XP Professional and you logged in as Administrator but did not provide a password, you should open Control Panel, access User Accounts, open the Administrator account, and create a password for it
- 2. Lecturer: Tran Dinh Vuong Home page: www.fit.vimaru.edu.vn/~vuongtd Phone : 0982.113.274 Email : vuongtd@vimaru.edu.vn 24 If you are using a server (Microsoft Windows Server 2003 or Microsoft Windows Server 2008), make sure you logged in with an account that can start a service Once the service has started, it should be labeled Started: Opening Microsoft SQL Server To launch Microsoft SQL Server, you can click Start -> (All) Programs -> Microsoft SQL Server 2008 -> SQL Server Management Studio
- 3. Lecturer: Tran Dinh Vuong Home page: www.fit.vimaru.edu.vn/~vuongtd Phone : 0982.113.274 Email : vuongtd@vimaru.edu.vn 25 When it starts, it would present a dialog box that expects you to log in. Practical Learning: Launching Microsoft SQL Server 1. Start the computer 2. Log in with the account you used to install Microsoft SQL Server 3. To launch Microsoft SQL Server, click Start -> (All) Programs -> Microsoft SQL Server 2008 -> SQL Server Management Studio. A splash screen will appear: 4. On the Connect to Server dialog box, click Cancel The Microsoft SQL Server Management Studio Introduction
- 4. Lecturer: Tran Dinh Vuong Home page: www.fit.vimaru.edu.vn/~vuongtd Phone : 0982.113.274 Email : vuongtd@vimaru.edu.vn 26 There are many tools you will use in Microsoft SQL server. One of them is called Microsoft SQL Server Management Studio. To access it, you can click Start -> (All) Programs -> Microsoft SQL Server 2008 -> SQL Server Management Studio. A dialog box would come up but you can click Cancel on it: The top section of the SQL Server Management Studio displays the classic title bar of a regular window, with an icon on the left, followed by the title of the application, and the system buttons on the right side. The Main Menu Under the title bar, the menu bar displays categories of menus that you will use to perform the various necessary operations. The Standard Toolbar The Standard toolbar displays under the main menu: The Standard toolbar is just one of the available ones. Eventually, when you perform an action that would benefit from another toolbar, the Microsoft SQL Server Management Studio would display that toolbar. Still, if you want to show any toolbar, you can right- click any menu item on the main menu or any button on a toolbar. A menu would come up:
- 5. Lecturer: Tran Dinh Vuong Home page: www.fit.vimaru.edu.vn/~vuongtd Phone : 0982.113.274 Email : vuongtd@vimaru.edu.vn 27 The Object Explorer The left side of the interface displays, by default, the Object Explorer window, with its title bar labeled Object Explorer. If you don't see it, on the main menu, you can click View -> Object Explorer. The Object Explorer is a dockable window, meaning you can move it from the left side to another side on the interface. To do this, you can click and drag its title bar to a location of your choice. When you start dragging, small boxes that represent the possible placeholders would come up:
- 6. Lecturer: Tran Dinh Vuong Home page: www.fit.vimaru.edu.vn/~vuongtd Phone : 0982.113.274 Email : vuongtd@vimaru.edu.vn 28 You can drag and drop to one of those placeholders. The Object Explorer is also floatable, which means you can place it somewhere in the middle of the interface: To place the window back to its previous position, you can double-click its title bar. The window can also be tabbed. This means that the window can be positioned either vertically or horizontally. At any time, if you do not want the Object Explorer, you can close or hide it. To close the Object Explorer, click its close button. On the right side of the Object Explorer title, there are three buttons. If you click the first button that points down, a menu would appear:
- 7. Lecturer: Tran Dinh Vuong Home page: www.fit.vimaru.edu.vn/~vuongtd Phone : 0982.113.274 Email : vuongtd@vimaru.edu.vn 29 The menu allows you to specify whether you want the window to be floated, docked, or tabbed. The right side of the window is made of an empty window. This area will be used to display either the contents of what is selected in the Object Explorer, or to show a result of some operation. As you will see later on, many other windows will occupy the right section but they will share the same area. To make each known it will be represented with a tab and the tab shows the name (or caption) of a window. Connection to a Server Using Connect to Server In order to do anything significant in Microsoft SQL Server, you will have to log in. If you start Microsoft SQL Server Management Studio from the Start button, the Connect To Server dialog box would come up. If you had started from the Start button but clicked Cancel, to connect to a server: On the main menu, click File -> Connect Object Explorer On the Standard toolbar, click the New Query button In the Object Explorer, click the arrow of the Connect button and click one of the options, such as Database Engine... Any of these actions would display the Connect to Server dialog box:
- 8. Lecturer: Tran Dinh Vuong Home page: www.fit.vimaru.edu.vn/~vuongtd Phone : 0982.113.274 Email : vuongtd@vimaru.edu.vn 30 From there, select the name of the server and the type of authentication to use. Once you are ready, click Connect. If you log in successfully, the Object Explorer would appear with a few nodes: After using Microsoft SQL Server Management Studio, you can close it. To do this: Click the icon on the left side of Microsoft SQL Server Management Studio and click Close On the right side of the title bar, click the system Close button On the main menu, click File -> Exit Press Alt, F, X Using the Command Prompt
- 9. Lecturer: Tran Dinh Vuong Home page: www.fit.vimaru.edu.vn/~vuongtd Phone : 0982.113.274 Email : vuongtd@vimaru.edu.vn 31 Besides the SQL Server Management Studio, you can also work on Microsoft SQL Server from the DOS command prompt. This is done using an application or command named SQLCMD.EXE. To use it, open the Command Prompt, type SQLCMD (case-insensitive) and press Enter. After using Microsoft SQL Server from the command prompt, to close it, type Quit (case- insensitive) and press Enter. To close the DOS window: Type Exit (case-insensitive) and press Enter Click the system Close button Using the Windows PowerShell When Microsoft SQL Server 2008 is installed, it also installs the Windows PowerShell 1.0, which is a new command-based application from Microsoft. Besides the SQL Server Management Studio and the Command Prompt, you can use PowerShell to create and manage databases. To access it, you can click Start -> (All) Programs -> Windows PowerShell 1.0 -> Windows PowerShell. A DOS window would display: Notice that the title bar displays Windows PowerShell. To access Microsoft SQL Server from PowerShell, type SQLCMD and press Enter:
- 10. Lecturer: Tran Dinh Vuong Home page: www.fit.vimaru.edu.vn/~vuongtd Phone : 0982.113.274 Email : vuongtd@vimaru.edu.vn 32 Notice that, this time, the title bar displays SQLCMD, which indicates that the application is ready to receive commands that relate to Microsoft SQL Server. After using the PowerShell, to exit from Microsoft SQL Server, type Quit (case-insensitive) and press Enter: To close PowerShell and the DOS window, you can: Type Exit (case-insensitive) and press Enter Click the system Close button Microsoft SQL Server Logins Introduction In order to access something (such as a computer or a database), the object must be authenticated. Such an object can use a username and a password. In the adsence of this, a user would receive an error:
- 11. Lecturer: Tran Dinh Vuong Home page: www.fit.vimaru.edu.vn/~vuongtd Phone : 0982.113.274 Email : vuongtd@vimaru.edu.vn 33 An object can also take advantage of the group it belongs to. For this reason, the ability to be authenticated in order to access the database or resource is called a login. Creating a Login Before creating a login, the person for whom you want to create the account must have a user account on the computer. If you are using Microsoft Windows XP-7, the person must have a loca user account on the computer. If you are working on a server, the person must have an account in the domain. You can create a login either visually or with code. To visually create a login, in the Object Explorer, expand the Security node. Right-click Login and click New Login...
- 12. Lecturer: Tran Dinh Vuong Home page: www.fit.vimaru.edu.vn/~vuongtd Phone : 0982.113.274 Email : vuongtd@vimaru.edu.vn 34 This would display the Login - New dialog box. In the Login Name text box, type the user name of the person whose account you are creating. The account must have been created already in the computer (Microsoft Windows XP-7) or on the server. If you provide a user name that cannot be found in the system, when trying to finalize, you would receive an error: After entering the user name, you must specify how the user would be authenticated. You have a choice between the operating system and Microsoft SQL Server. The formula to programmatically create a login is: CREATE LOGIN loginName { WITH <option_list1> | FROM <sources> } <option_list1> ::= PASSWORD = { 'password' | hashed_password HASHED } [ MUST_CHANGE ] [ , <option_list2> [ ,... ] ] <option_list2> ::= SID = sid | DEFAULT_DATABASE =database | DEFAULT_LANGUAGE =language | CHECK_EXPIRATION = { ON | OFF}
- 13. Lecturer: Tran Dinh Vuong Home page: www.fit.vimaru.edu.vn/~vuongtd Phone : 0982.113.274 Email : vuongtd@vimaru.edu.vn 35 | CHECK_POLICY = { ON | OFF} | CREDENTIAL =credential_name <sources> ::= WINDOWS [ WITH <windows_options>[ ,... ] ] | CERTIFICATE certname | ASYMMETRIC KEY asym_key_name<windows_options> ::= DEFAULT_DATABASE =database | DEFAULT_LANGUAGE =language To let Microsoft SQL Server generate skeleton code for you, on the Standard toolbar, click New Query to get a text editor. in the Template Explorer, expand the Login node, drag Create SQL Login Must Change Password and drop it in the empty text editor: -- ================================================= -- Create SQL Login Must Change Password template -- ================================================= CREATE LOGIN <SQL_login_name, sysname, login_name> WITH PASSWORD = N'<password, sysname, Change_Password>' MUST_CHANGE, CHECK_POLICY = <check_policy,ON or OFF, ON>; GO You start with the CREATE LOGIN expression, followed by the user name. To specify a password after that, type PASSWORD = N' '. In the single-quotes, enter the desired password. When creating a login, you must specify a password. You can just set a temporary password. One of the options you can specify is to make the user change his or her password the next time he or she logs on. To apply this, after the password, add the MUST_CHANGE flag. Practical Learning: Creating a Login 1. In the Object Explorer, expand the server name if necessary and expand Security 2. Right-click Login and click New Login... 3. In the Login Name text box, type operez 4. Click SQL Server Authentication 5. In the Password text box, type Password1 and press Tab 6. In the Confirm Password text box, type Password1
- 14. Lecturer: Tran Dinh Vuong Home page: www.fit.vimaru.edu.vn/~vuongtd Phone : 0982.113.274 Email : vuongtd@vimaru.edu.vn 36 7. Accept the three check boxes and make sure User Must Change Password At Next Login is checked. Click OK 8. On the Standard toolbar, click the New Query button 9. To programmatically create a login, type the following: 10. CREATE LOGIN rkouma 11. WITH PASSWORD = N'Password1'; GO
- 15. Lecturer: Tran Dinh Vuong Home page: www.fit.vimaru.edu.vn/~vuongtd Phone : 0982.113.274 Email : vuongtd@vimaru.edu.vn 37 12.On the Standard toolbar, click the Execute button 13.Click inside the Query window and press Ctrl + A 14.To create two more accounts with three options, type the following: 15. CREATE LOGIN pkatts 16. WITH PASSWORD = N'Password1' 17. MUST_CHANGE, 18. CHECK_POLICY = ON, 19. CHECK_EXPIRATION = ON; 20. GO 21. CREATE LOGIN gdmonay 22. WITH PASSWORD = N'Password1' 23. MUST_CHANGE, 24. CHECK_POLICY = ON, 25. CHECK_EXPIRATION = ON; GO
- 16. Lecturer: Tran Dinh Vuong Home page: www.fit.vimaru.edu.vn/~vuongtd Phone : 0982.113.274 Email : vuongtd@vimaru.edu.vn 38 26.Press F5 to execute 27.In the Object Explorer, expand Login under Security if necessary. To refresh it, right- click Logins and click Refresh Make sure you have logins for the gdmonay, the pkatts, the operez, the rkouma, and the sa accounts
- 17. Lecturer: Tran Dinh Vuong Home page: www.fit.vimaru.edu.vn/~vuongtd Phone : 0982.113.274 Email : vuongtd@vimaru.edu.vn 39 28.Close Microsoft SQL Server 29.When asked whether you want to save something, click No Using a Login After creating a login, a person can use it to connect to the server. There are many options. After launching Microsoft SQL Server, in the Connect To Server dialog box, in the Authentication combo box, the person can (must) select SQL Server Authentication, then enter his/her login name and a password. Remember that when Microsoft SQL Server is installed, it creates a default account named sa. You can also use it as a login and provide its password: If the SQL Server Management Studio is already opened, to log in, on the Standard toolbar, a person can click Connect -> Database Engine... This would open the Connect to Server dialog box. The person must select SQL Server Authentication in the Authentication combo box, enter or select a login name in the Login combo box, and type a password:
- 18. Lecturer: Tran Dinh Vuong Home page: www.fit.vimaru.edu.vn/~vuongtd Phone : 0982.113.274 Email : vuongtd@vimaru.edu.vn 40 Then click Connect. In the same way, you can create as many connections as possible, using valid login accounts. Another alternative is to switch user (Start -> Switch User) and log in with a different account. In this case, if a person launches Microsoft SQL Server, the Authentication can be set as Windows Authentication: The person would not have to enter a password. Practical Learning: Using a Login 1. To start it again, click Start -> (All) Programs -> Microsoft SQL Server 2008 -> SQL Server Management Studio 2. In the Authentication combo box, select SQL Server Authentication
- 19. Lecturer: Tran Dinh Vuong Home page: www.fit.vimaru.edu.vn/~vuongtd Phone : 0982.113.274 Email : vuongtd@vimaru.edu.vn 41 3. In the Login combo box, type operez 4. In the Password text box, type Password1 5. Click Connect 6. In the dialog box that comes up, enter the password as P@ssword1 and press Tab 7. In the other text box, type P@ssword1 8. Click OK 9. In the Object Explorer, click Connect and click Database Engine... 10.In the Authentication combo box, select SQL Server Authentication 11.In the Login combo box, type rkouma 12.In the Password text box, type Password1 13.Click Connect 14.In the dialog box that comes up, enter the password as P@ssword1 and press Tab
- 20. Lecturer: Tran Dinh Vuong Home page: www.fit.vimaru.edu.vn/~vuongtd Phone : 0982.113.274 Email : vuongtd@vimaru.edu.vn 42 15.In the other text box, type P@ssword1 16.Click OK 17.In the same way, connect to the database engine using the pkatts and the gdmonay accounts Disconnecting From a Server After using a server or to take a break (such as stepping out from the computer), the person can disconnect from it. To do this: On the main menu, click File -> Disconnect Object Explorer In the Object Explorer, right-click the connection node and click Disconnect Disconnecting neither closes Microsoft SQL Server nor shuts down the server. It simply closes the connection to the server. If a persons wants to use the server again, she must connect. Using the Microsoft SQL Server Management Studio The Object Explorer The Object Explorer displays a list of items as a tree-style. One of the most regularly used items will be the name of the server you are using. If you are just starting to learn database development or you are a junior database developer, you may use or see only one server. In some cases, you may be dealing with many servers. Regardless, you should always know what server you are currently connecting to. This is easy to check with the first node of the Object Explorer. In the following example, the server is named Central: The name of the server is followed by parentheses. In the previous section, we saw that, to establish a connection to a server, you must authenticate yourself. In some cases you may use the same account over and over again. In some other cases you may have different accounts that you use for different scenarios,
- 21. Lecturer: Tran Dinh Vuong Home page: www.fit.vimaru.edu.vn/~vuongtd Phone : 0982.113.274 Email : vuongtd@vimaru.edu.vn 43 such as one account for database development, one account for database management, and/or one account for database testing. When many connections have been made, each connection is represented in the Object Explorer by its own node and each connection has its own objects (sub-nodes): As mentioned previously, to close a connection, you can right-click it and click Disconnect: Some operations cannot be performed by some accounts. When performing some operations, you should always know what account you are using. You can check this in the
- 22. Lecturer: Tran Dinh Vuong Home page: www.fit.vimaru.edu.vn/~vuongtd Phone : 0982.113.274 Email : vuongtd@vimaru.edu.vn 44 parentheses of the server name. In the following connection, an account called Administrator is currently logged in to a server named Central: Practical Learning: Disconnecting 1. In the Object Explorer, right-click ComputerName (SQL Server ... - operez) and click Disconnect 2. Right-click ComputerName (SQL Server ... - rkouma) and click Disconnect 3. Close Microsoft SQL Server 4. Start it again 5. Select Windows Authentication 6. Click Connect Object Explorer Details We saw that, by default, the right area of Microsoft SQL Server Management Studio displays an empty gray window. When you select something in the Object Explorer, you can use that right area to display more detailed information about the select item. To do this, on the main menu, you can click View -> Object Explorer Details. The main are on the right side would then be filled with information:
- 23. Lecturer: Tran Dinh Vuong Home page: www.fit.vimaru.edu.vn/~vuongtd Phone : 0982.113.274 Email : vuongtd@vimaru.edu.vn 45 Probably the most regular node you will be interested in, is labeled Databases. This node holds the names of databases on the server you are connected to. Also, from that node, you can perform almost any necessary operation of a database. To see most of the regularly available actions, you can expand the Databases node and some of its children. You can then right-click either Databases or one of its child nodes. For example, to start PowerShell, you can right-click the Databases node or the server name and click PowerShell:
- 24. Lecturer: Tran Dinh Vuong Home page: www.fit.vimaru.edu.vn/~vuongtd Phone : 0982.113.274 Email : vuongtd@vimaru.edu.vn 46 When the PowerShell comes up, what it displays depends on what you had right-clicked. Introduction to Code Although you will perform many of your database operations visually, some other operations will require that you write code. To assist with with this, Microsoft SQL Server provides a code editor and various code templates. To open the editor: On the main menu, you can click File -> New -> Query With Current Connection On the Standard toolbar, click the New Query button In the Object Explorer, right-click the name of the server and click New Query This would create a new window and position it on the right side of the interface. Whether you have already written code or not, you can save the document of the code editor at any time. To save it: You can press Ctrl + S On the main menu, you can click File -> Save SQLQueryX.sql... On the Standard toolbar, you can click the Save button You will be required to provide a name for the file. After saving the file, its name would appear on the tab of the document. The Structured Query Language Introduction
- 25. Lecturer: Tran Dinh Vuong Home page: www.fit.vimaru.edu.vn/~vuongtd Phone : 0982.113.274 Email : vuongtd@vimaru.edu.vn 47 After establishing a connection, you can take actions, such as creating a database and/or manipulating data. To provide the ability to create and manipulate a database, you use data manipulation language (DML). There are many of them on the market. The Structured Query Language, known as SQL, is a DML used on various computer systems to create and manage databases. SQL can be pronounced Sequel or S. Q. L. In our lessons, we will consider the Sequel pronunciation. For this reason, the abbreviation will always be considered as a word, which would result in “A SQL statement” instead of "An SQL statement". Also, we will regularly write, “The SQL” instead of “The SQL language, as the L already represents Language. Like other non-platform specific languages such as C/C++, Pascal, or Java, the SQL you learn can be applied to various database systems. To adapt the SQL to Microsoft SQL Server, the company developed Transact-SQL as Microsoft's implementation of SQL. Transact-SQL is the language used internally by Microsoft SQL Server and MSDE. Although SQL Server highly adheres to the SQL standards, it has some internal details that may not be applied to other database systems like MySQL, Oracle, or even Microsoft Access, etc; although they too fairly conform to the standard. The SQL we will learn and use here is Transact-SQL. In other words, we will assume that you are using Microsoft SQL Server as your platform for learning about databases. This means that, unless specified otherwise, most of the time, on this site, the word SQL refers to Transact-SQL or the way the language is implemented in Microsoft SQL Server. The SQL Interpreter As a computer language, the SQL is used to give instructions to an internal program called an interpreter. As we will learn in various sections, you must make sure you give precise instructions. SQL is not case-sensitive. This means that CREATE, create, and Create mean the same thing. It is a tradition to write SQL's own words in uppercase. This helps to distinguish SQL instructions with the words you use for your database. As we will learn in this and the other remaining lessons of this site, you use SQL by writing statements. To help you with this, Microsoft SQL Server provides a window, also referred to as the Query Window, that you can use to write your SQL code. To access it, on the left side of the window, you can right-click the name of the server and click New Query. In the same way, you can open as many instances as the New Query as you want. When the Query window comes up, it display a blank child window in which you can write your code. The code you write is a document and it can be saved as a file. The file would have the extension .sql. Every time you open a new query, it is represented with a tab. To switch from one code part to another, you can click its tab. To dismiss an instance of the query, first access it (by clicking its tab), then, on the right side, click the close button . If you had written code in the query window, when you close it, you would be asked to save your code. If you want to preserve your code, then save it. If you had already executed the code in the window (we will learn how to write and execute SQL code), you don't have to save the contents of the window. Executing a Statement In the next sections and lessons, we will learn various techniques of creating SQL statements with code. By default, when a new query window appears, it is made of a wide white area where you write your statements:
- 26. Lecturer: Tran Dinh Vuong Home page: www.fit.vimaru.edu.vn/~vuongtd Phone : 0982.113.274 Email : vuongtd@vimaru.edu.vn 48 After writing a statement, you can execute it, either to make it active or simply to test it. To execute a statement: You can press F5 On the main menu, you can click Query -> Execute On the SQL Editor toolbar, you can click the Execute button You can right-click somewhere in the code editor and click Execute When you execute code, code editor becomes divided into two horizontal sections:
- 27. Lecturer: Tran Dinh Vuong Home page: www.fit.vimaru.edu.vn/~vuongtd Phone : 0982.113.274 Email : vuongtd@vimaru.edu.vn 49 Also, when you execute code, the interpreter would first analyze it. If there is an error, it would display one or more red lines of text in its bottom section. Here is an example: If there is no error in the code, what happens when you execute a statement depends on the code and the type of statement. Accessories for SQL Code Writing Comments A comment is text that the SQL interpreter would not consider as code. As such, a comment is written any way you like. What ever it is made of would not be read. Transact-SQL supports two types of comments. The style of comment that starts with /*
- 28. Lecturer: Tran Dinh Vuong Home page: www.fit.vimaru.edu.vn/~vuongtd Phone : 0982.113.274 Email : vuongtd@vimaru.edu.vn 50 and ends with */ can be used. To apply it, start a line with /*, include any kind of text you like, on as many lines as you want. To close the commented section, type */. Here is an example of a line of comment: /* First find out if the database we want to create exists already */ A comment can also be spread on more than one line, like a paragraph. Here is an example: /* First find out if the MotorVehicleDivision database we want to create exists already. If that database exists, we don't want it anymore. So, delete it from the system. */ Transact-SQL also supports the double-dash comment. This comment applies to only one line of text. To use it, start the line with --. Anything on the right side of -- is part of a comment and would not be considered as code. Here is an example: -- ============================================= -- Database: MotorVehicleDivision -- ============================================= /* First find out if the MotorVehicleDivision database we want to create exists already. If that database exists, we don't want it anymore. So, delete it from the system. */ -- Now that the database is not in the system, create it The End of a Statement In SQL, after writing a statement, you can end it with a semi-colon. In fact, if you plan to use many statements in one block, you should end each with a semi-colon. When many statements are used, some of them must come after others. Time to GO To separate statements, that is, to indicate when a statement ends, you can use the GOkeyword (in reality and based on SQL standards, it is the semi-colon that would be required, but the Microsoft SQL Server interpreter accepts GO as the end of a statement). Practical Learning: Closing Microsoft SQL Server To close Microsoft SQL Server, on the main menu, click File Exit. If you are asked whether you want to save something, click No