Photoshop for Art/Design
•
0 gefällt mir•262 views

One of many workflows. Free stuff provided.

Empfohlen
Weitere ähnliche Inhalte
Was ist angesagt?
Was ist angesagt? (18)
Ähnlich wie Photoshop for Art/Design
Ähnlich wie Photoshop for Art/Design (20)
Kürzlich hochgeladen
Kürzlich hochgeladen (20)
Photoshop for Art/Design
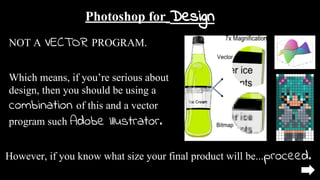
- 1. Photoshop for Design NOT A VECTOR PROGRAM. Which means, if you’re serious about design, then you should be using a combination of this and a vector program such Adobe Illustrator. However, if you know what size your final product will be...proceed.
- 2. To create a new blank document: File→ New Consider your final product size needs. Ie. Where will this live when you are done?
- 3. To Create Text: Click the T icon, adjust font, sizing, paragraph orientation, and color in the top menu. Text Use Groups to stay organized. Groups
- 4. 1. Browse the texture folder 2. Select a texture by clicking on it 3. Download with the three dots on the bottom right of the screen. 4. In Photoshop, File→ Place Embedded, and find the file you downloaded. (It will likely be in your download folder). 5. Click Place.
- 5. Use the links provided on slide 8, as well as my textures (also in the public domain), to find imagery for “compositing.”
- 6. Transform, Scale, Rotate the image as much as you desire (try not to warp it). Then press Enter or click the arrow at the top. You will be frozen at this screen if you do not click the arrow or press enter. This This Don’t worry, you can always transform it later. Press CTRL T to reactivate this.
- 7. The Following are archives that (mostly) allow the work contained to be free to use, modify, and distribute. Collaboration and the “remix” drive progress forward. To that end, These sites serve the Cultural Commons.
- 8. The Cultural Commons Click, Click, Click
- 9. 1. Reduce opacity of texture layer 2. Add a mask to the texture layer. 3. Paint out unnecessary texture. Paintbrush Mask Opacity
- 10. Blending options: Right click on a layer to access. In this, you can do a variety of additional effects to a layer. Try Color Overlay. Click on it. Then Click inside it. Change the color and reduce opacity.
- 11. Filter→ Render→ Lighting Effects (on a flattened copy)
- 12. Remember Masking? Look at the layers to see what masking was done. How was this masking accomplished? Based on the hard edges remaining in the image, how might we proceed?