8377087607, Door Step Call Girls In Gaur City (NOIDA) 24/7 Available
Arrowhrt
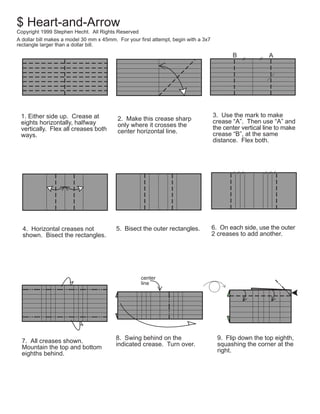
1. $ Heart-and-Arrow
Copyright 1999 Stephen Hecht. All Rights Reserved
A dollar bill makes a model 30 mm x 45mm. For your first attempt, begin with a 3x7
rectangle larger than a dollar bill.
1. Either side up. Crease at
eights horizontally, halfway
vertically. Flex all creases both
ways.
2. Make this crease sharp
only where it crosses the
center horizontal line.
B A
3. Use the mark to make
crease “A”. Then use “A” and
the center vertical line to make
crease “B”, at the same
distance. Flex both.
4. Horizontal creases not
shown. Bisect the rectangles.
5. Bisect the outer rectangles. 6. On each side, use the outer
2 creases to add another.
7. All creases shown.
Mountain the top and bottom
eighths behind.
center
line
8. Swing behind on the
indicated crease. Turn over.
9. Flip down the top eighth,
squashing the corner at the
right.
2. $ Heart-and-Arrow (cont.)
Copyright 1999 Stephen Hecht. All Rights Reserved
10. Pull out paper from under
the squash, flipping down the
long edge.
11. Swing over the long
flap, while pulling up the
triangle shown.
12. Swing flap back on
existing crease, while flipping
down the top eighth and
squashing a tiny diagonal.
13. Swing back. Both sides
of model will then look similar.
14. Crease.
15. Pleat and sink on
existing creases.
##-##
16. Undo last step. Turn
over and repeat 14-16.
17. Crease top flap.
Repeat behind.
18 . Reverse-fold on
existing crease. Turn over.
3. $ Heart-and-Arrow (cont.)
Copyright 1999 Stephen Hecht. All Rights Reserved
19. Reverse-fold on the
crease; rear-half is double
thickness.
20. Swing flap to left on
existing crease, squashing
only the tiny diagonal
indicated. The X-ray line is
a hidden valley fold.
C
21. Segment “C” is the new
crease. Swing back down on
existing crease, squashing the
diagonal shown. The X-ray line
is a hidden valley fold.
22. Fold the new flap to
the right.
23. Reverse-fold at the top,
closed-sink at the bottom. 24. Pull gently open at the
top, and reform the sink
from step 15 .
20-24
25. Repeat 20-24 behind. 26. Reverse-fold. At the left
end, only the embedded layer
is reverse-folded.
27. Swing flap to the left,
squashing the corner behind it.
4. $ Heart-and-Arrow (cont.)
Copyright 1999 Stephen Hecht. All Rights Reserved
28. Swivel again. Note the
tiny squash (mountain-fold).
29. Flip up an edge, opening
the triangular pocket. 30 . Closed-sink the small two-toned
trapezoid. Then swing
the pleated flap to the right.
2
26-31
31. Swing down 2 edges,
swiveling under the sunken
area. Repeat 26-31 behind.
32. Swing the large, hidden
triangular flap upwards,
reverse-folding the left side. 33. Reverse-fold the
middle triangle upwards.
34. Valley-fold it back down,
into the pocket immediately
in front of it (a tight fit, even
if accurate). Turn over.
35. Reverse-fold the top
point down, tucking the tip
into the pocket immediately
in front of it.
head tail
36. Like so. Now we begin
on the tail of the arrow.
5. $ Heart-and-Arrow (cont.)
Copyright 1999 Stephen Hecht. All Rights Reserved
37. Tail: notice pleats
are not perfectly
symmetric. Reverse-fold.
38. (Not all edges shown.)
Swing over. 39. Rotate.
40. Bring one layer to
surface (a closed-sink). 41. Thus. Turn model over
top-to-bottom.
37-40
42. Repeat 37-40, treating the
double-thickness as one layer.
Turn back over (top-to-bottom).
43. Tuck in the loose triangle. 44. Reverse-fold protruding
edges as if they were a single
edge.
45. Pull out paper and swivel
down the front edge. The X-ray
line is a horizontal valley-fold
that becomes a vertical
mountain-fold flush with the
right edge of the model.
46. Swing the middle triangle
down and behind, dragging
the upper triangle.
47. Tuck the loose triangle into the second
pocket (between pleats, not into the sink).
Tail complete. Turn over side-to-side.
6. $ Heart-and-Arrow (cont.)
Copyright 1999 Stephen Hecht. All Rights Reserved
48. Head of the arrow.
Pleats are symmetric.
Reverse-fold first 2 corners. 49. (Not all edges shown.)
Swing 2 flaps to the left.
50. Pull out corner.
51. Like so. Turn over top-to-
bottom.
52. Valley-fold top corner.
Reverse-fold next corner.
53. Reverse-fold the
remaining corner; its rear half
is smaller than its front.
49-50
54. Repeat 49-50.
55. Swing rear half of large
triangle to front.
56. Tuck new flap into pocket
behind. Front edges of
arrowhead are now both
closed.
57. Squash. Turn over top-to-
bottom and repeat on the
other side.
58. There are now 3 tiny
triangular flaps at the tip. Wrap
the top layer of the front triangle
to its back. Very hard! Unfold
point D and 3 pleats of the shaft
while executing.
D
7. $ Heart-and-Arrow (cont.)
Copyright 1999 Stephen Hecht. All Rights Reserved
tweezers
help
59. Tuck the middle and rear
points inside the front point
(sequentially or nested).
Arrowhead complete.
60. Left upper point of the heart.
Crease and flex. Then open
out the tip into a 3-sided
pyramid, the 2 front right edges
kept together.
61. Top view. Sink the tip on
the crease just made (keeping
the double-edge together).
62. Back to a front
view. Reverse-fold
nested corner down.
tweezers
help
63. Reverse-fold the corner back up, tucking
into the tiny pocket. These steps achieve a
closed sink more easily. Repeat 60-63 on
the right point of the heart.
64. Model complete. Bend arrow head and
tail outwards where they emerge from the heart.
There are unfortunately 2 separate points at the bottom of the heart, but this does help the model
stand up a little better. And though I regret the two-tone harlequin-esque finish, it’s not as glaring
with a real dollar bill as in these diagrams. (I regard these shortcomings as the price of achieving
my self-imposed goal: the arrow shaft emerges from under the planes of the heart.)