Replistor Resume
•
1 gefällt mir•1,976 views

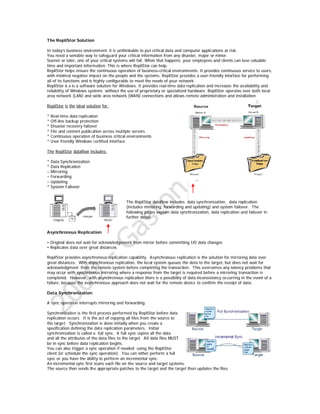
The RepliStor solution provides real-time data replication for continuous operation of business critical environments. It uses data synchronization to initially copy all files from the source to the target, and then performs data replication which includes mirroring, forwarding, and updating changes in real-time. In the event of a source system failure, RepliStor can automatically failover to the target system.

Empfohlen
Weitere ähnliche Inhalte
Was ist angesagt?
Was ist angesagt? (13)
Andere mochten auch
Ähnlich wie Replistor Resume
Ähnlich wie Replistor Resume (20)
Kürzlich hochgeladen
Kürzlich hochgeladen (20)
Replistor Resume
- 1. The RepliStor Solution In today’s business environment, it is unthinkable to put critical data and computer applications at risk. You need a sensible way to safeguard your critical information from any disaster, major or minor. Sooner or later, one of your critical systems will fail. When that happens, your employees and clients can lose valuable time and important information. This is where RepliStor can help. RepliStor helps ensure the continuous operation of business-critical environments. It provides continuous service to users, with minimal negative impact on the people and the systems. RepliStor provides a user-friendly interface for performing all of its functions and is highly configurable to meet the needs of your network. RepliStor 6.x is a software solution for Windows. It provides real-time data replication and increases the availability and reliability of Windows systems without the use of proprietary or specialized hardware. RepliStor operates over both local area network (LAN) and wide area network (WAN) connections and allows remote administration and installation. RepliStor is the ideal solution for: * Real-time data replication * Off-line backup protection * Disaster recovery failover * File and content publication across multiple servers * Continuous operation of business critical environments * User friendly Windows certified interface The RepliStor dataflow includes: * Data Synchronization * Data Replication – Mirroring – Forwarding – Updating * System Failover The RepliStor dataflow includes data synchronization, data replication (includes mirroring, forwarding and updating) and system failover. The following pages explain data synchronization, data replication and failover in further detail. Asynchronous Replication • Original does not wait for acknowledgement from mirror before committing I/O data changes • Replicates data over great distances RepliStor provides asynchronous replication capability. Asynchronous replication is the solution for mirroring data over great distances. With asynchronous replication, the local system queues the data to the target, but does not wait for acknowledgment from the remote system before completing the transaction. This overcomes any latency problems that may occur with synchronous mirroring where a response from the target is required before a mirroring transaction is completed. However, with asynchronous replication there is a possibility of data inconsistency occurring in the event of a failure, because the asynchronous approach does not wait for the remote device to confirm the receipt of data. Data Synchronization A sync operation interrupts mirroring and forwarding. Synchronization is the first process performed by RepliStor before data replication occurs. It is the act of copying all files from the source to the target. Synchronization is done initially when you create a specification defining the data replication parameters. Initial synchronization is called a full sync. A full sync copies all the data and all the attributes of the data files to the target. All data files MUST be in sync before data replication begins. You can also trigger a sync operation if needed using the RepliStor client (or schedule the sync operation). You can either perform a full sync or you have the ability to perform an incremental sync. An incremental sync first scans each file on the source and target systems. The source then sends the appropriate patches to the target and the target then updates the files.
- 2. Open File Synchronization allows you to synchronize files that are in use. This is especially useful when you are replicating databased that hold the database files open continuously. With previous versions of RepliStor, a specification had to exist before the files are opened for RepliStor to synchronize them. With version 6.x open file sync, you can create specifications and sync immediately without worrying if the files are held open. Data Replication Important: Do not use RepliStor to replicate Windows system files. If an entire system needs to be rebuilt (for example, when a bootable partition is lost), the restoration of the system might require either tape, Windows reinstallation from CD or use of the Emergency Repair Disk, depending on your local procedures. You can configure RepliStor to duplicate data from a source system (the system that contains the data to protect) to a target system (the system where the data is duplicated). This process is called data replication. RepliStor gives you complete control over data replication, allowing you to configure a specification that determines which files, directories, and shares to replicate. When you configure a specification, RepliStor initially replicates all data from the source system to the target system. RepliStor then replicates only the changes as they occur. This process greatly minimizes the impact on your network and processor. Data replication includes three RepliStor operations: * Mirroring * Forwarding * Updating Mirroring : Mirroring captures file operations and stores it in the kernel cache. RepliStor replicates data by performing a local mirror of specified application files to a temporary repository on the source system. This process is called mirroring. The mirroring process is triggered by an application file operation and is picked up by the RepliStor driver, which records all inputs and outputs (I/O data) of the specified application files and stores them in a shared memory buffer called kernel cache. The kernel cache is a fixed amount of shared RAM memory that is used for queuing data for mirroring. RepliStor attempts to send the I/O data from the kernel cache on the source to the target system as quickly as possible. If the kernel cache fills to capacity faster than the RepliStor sends the I/O data to the target system, the kernel cache overflows. When this happens, RepliStor stops writing the changes to the kernel cache, and the cache overflow is captured in OC$ files in the RepliStor Data directory. RepliStor allows you to enable and disable mirroring on the source system. When mirroring is: * Enabled—RepliStor captures I/O data in the kernel cache * Disabled—RepliStor does not capture I/O data. If mirroring is ever disabled and then re-enabled, a re-sync is necessary since file I/O data may have been missed. Forwarding : Forwarding routes file operations to the target files The next step in replication continues the process by sending the I/O data captured in the kernel cache on the source system to a specified target system. This process is called forwarding.
- 3. RepliStor controls the forwarding process by sending I/O data stored in kernel cache on the source system and signaling the target (using a heartbeat) to begin receiving the data. Heartbeats are only sent if there is nothing else to send. If there is data to send, it sends the data and that takes the place of the heartbeat. The idea is that the receiver should get some kind of signal from the source periodically. If there is data to send, then data gets sent. If there is an idle period where there is no data, then it sends a heartbeat to let the target know it is still alive and so it doesn't initiate a failover. RepliStor allows you to enable and disable forwarding on the source system. When forwarding is: * Enabled—RepliStor forwards I/O data from the kernel cache to the target site * Disabled—the heartbeat stops and RepliStor does not send I/O data to the target system. If you enable forwarding after it has been disabled, RepliStor automatically forwards I/O changes captured in the kernel cache to the target system. Updating : Updating applies file operations to the target files. The final step in replication routes the I/O data directly to the application files on the target system in a process called updating. RepliStor controls the update process by sending the I/O data and receiving it from the source system during forwarding. Then the program routes the captured data to the target system, and the updates are committed to the application files on the target system. The data goes to a RAM based queue on the target for updating. RepliStor allows you to enable and disable updating on a target system. When updating is: * Enabled—RepliStor updates data files with I/O data received from the source system * Disabled—RepliStor does not apply I/O data changes to the target system, but continues to capture the data in a RAM- based queue. If you enable updating after it has been disabled, RepliStor automatically updates all I/O changes on the target. System Failover In the event of a source system failure, RepliStor facilitates an automatic system failover. The failover methodology involves the assumption of client services and data requests hosted originally on a RepliStor source to be switched over to a designated RepliStor target. RepliStor implements the following steps for a system failover: * RepliStor detects a loss of heartbeat communication and determines that a site failure has occurred. * RepliStor performs a switchover of roles. Client requests and services are now hosted by the RepliStor target site that takes over as the production site. The target is now the source for data. * When the original production site recovers, RepliStor can synchronize the take-over production site back to the original or recovered site. * At the completion of synchronization, RepliStor can revert the site roles to the original production configuration. Mirroring continues as before. RepliStor Benefits * Easy to install and use * Supports Windows XP, 2000 and 2003 servers and workstations * Replicates open files and registry keys * Minimizes recovery time * Incorporates three levels of security * Works over LAN or WAN RepliStor provides real-time Windows data replication with no distance limitation. RepliStor is used for a variety of business purposes including disaster recovery protection and consolidated backups; distributing data across systems, departments, and sites; and the creation of secondary copies of data.
- 4. Efficient Use of Network Bandwidth * Depending on the file type, RepliStor uses data compression to maximize usage of available bandwidth. * Throttling and scheduling reduces the impact on available bandwidth during replication. The impact on existing network bandwidth is minimal. RepliStor has several network communication parameters that control the impact of replicated data. RepliStor uses data compression to reduce the size of replication packets. The greater the compression the less impact on available bandwidth but there is CPU penalty applied to the RepliStor source and target. RepliStor allows you to disable communications compression. This option should be used if the network bandwidth is such that compression would not be beneficial and if conserving CPU activity is important Throttling determines the amount of replication data that is routed from a RepliStor server. This value is particularly important where there is a large amount of replication data and a large number of RepliStor sources. There is the ability to designate specific NICs and the associated network segment for replication traffic. This solution maximizes replication throughput while having little if any effect on business critical bandwidth. RepliStor Compatibility with Microsoft Windows * RepliStor is certified for Windows Storage Server, Windows 2000 SP4, Windows Server 2003 and Windows XP SP2. * RepliStor supports resource groups in a Microsoft Cluster Service (MSCS). RepliStor 6.x is certified for the following Windows versions: y Windows Storage Server y Windows 2000 SP4 y Windows Server 2003 y Windows XP SP2 RepliStor supports data protection in a Microsoft Cluster. This works by associating file replication specifications with RepliStor resources in the Cluster Server. These resources are placed into resource groups that define the use of data that is being replicated. When a resource is brought off-line, the associated specification is disabled. When the resource is brought on-line the associated specification is enabled and a synchronization operation is triggered. If a resource group fails, then the Cluster Server takes all resources off-line. This disables all specifications associated with the failed resource group. The Cluster Server brings the resource group up on the other node. This enables the corresponding specifications on the other node and triggers a synchronization operation. You must have RepliStor running on all clustered nodes. RepliStor Compatibility with Microsoft Windows : RepliStor supports Active Directory
- 5. If the RepliStor server is a member of an active directory domain, setup registers it in the domain by default. Registering in Active Directory (AD) provides the following benefits: * There is one common site list for all RepliStor installations in the domain. If any one server makes a change to the site list, all servers see that change immediately. * There is one common user list for all installations in the domain. * The site list is available immediately. Manually adding a site is only necessary if the site is outside the domain. When any RepliStor server or client modifies any entry in the Active Directory, all servers and clients are immediately notified that a change has occurred and they will all refresh their site list from the Active Directory. The Site List window with an Active Directory configured does not have a get list button because the list of all servers in the domain is immediately available to any client or server. This is illustrated on the example on this page. If Active Directory is not available, or if the installer specifies that RepliStor should not be registered in the Active Directory, the site list is kept in the registry in each server. All connections between the Administrative client and the RepliStor service and also between the RepliStor source and target need to authenticated. RepliStor release 6.x supports Kerberos in addition to NTLM. Kerberos provides the following advantages: y Both the source and target RepliStor services are authenticated. In NTLM, the target can validate the identity of the source, but the source is not sure that it connected to the intended target. y A service running in the System context can be authenticated using Kerberos. In NTLM, a process running in the System authenticates as any other process running System in the domain. This can pose a security risk. y Authentication takes fewer challenge-response cycles. y Kerberos provides a higher level of security over NTLM and NTLM version 2. There are restrictions in using Kerberos. If a system cannot authenticate using Kerberos, it will then attempt to use NTLM. The following conditions must be met to use Kerberos: y Both the source and target systems must be in the same Windows 2000 or later domain. y The computer name that the client is connecting to needs to be the actual name of the target computer. For example, it will fail when connecting to a virtual computer name in a cluster. RepliStor and VSS: Overview RepliStor allows you to create and manage Exchange Server 2003 and file system shadow copy backups via the Volume Shadow Copy Service (VSS) framework provided by Microsoft. VSS is a framework that integrates user applications, backup applications, and storage systems to produce consistent point-in-time data in the form of VSS shadow copies. Specifically in RepliStor, VSS enables the integration of Exchange and RepliStor along with third-party hardware to provide shadow copy functionality. Shadow copies allow you to obtain a consistent, restartable copy of the Exchange database or file system. This copy is available on the target side. If you want to perform a recovery, take the copy from the target and either use it locally or copy it back to the source server and start it.
- 6. Determining Data to Replicate * How much disk space is needed on the Source and Target systems? * What data needs to be included for replication? * What data needs to be excluded from replication? Consider the following factors when determining the disk space needed for data replication for the source system: * Ensure that you have plenty of space for the kernel cache in the RepliStor Data directory. The kernel cache size defaults to 5% of physical memory and can be configured in the Options dialog box on the Advanced tab. * Ensure that you have ample storage to store any OC$ overflow files if they should build up. Note: Be aware that if forwarding is off, or the target goes down, the kernel cache continues to build up and take up disk space. Consider the following for the target system: * 5 MB of disk space in addition to the amount of data being replicated, plus 10%. * If you turn off updating, the BLOCK.rdf file on the target stores all the data forwarded from the source and continues to build up taking up disk space until updating is resumed. Data to Include for Replication Determine the data you plan to replicate. For example: files, a database, an application, a share or registry keys. Then, create specifications that tell RepliStor which data to replicate. A specification identifies the path and file information that RepliStor software requires to replicate data from a source system to a target system. Data to Exclude from Replication RepliStor allows you to exclude files, directories, shared directories or specific file types that you do not want replicated from the source system. You create a Global Exclude to define the data to exclude. RepliStor automatically creates several global excludes upon installation. Processes to Exclude from Replication A process list can be created that will cause RepliStor to ignore operations based on the process that is performing it. This is typically used with anti-virus scans, backup programs and DiskXtender. On the target side, the process list is an exception list for the Protect Target Files function. This is used when you want to enable Protect Target Files but allow some applications, such as DiskXtender to access the files. Determining Failover Usage RepliStor provides failover capabilities to help keep your business running 24x7. There are many reasons for using RepliStor’s failover capability. Ask yourself the following questions when determining failover usage. * What is the purpose for failing over the source system? For example: − Server outages and maintenance − Disaster recovery * Do you plan to use failover capability across a WAN? If so, how reliable is your connection? Is there a third server close to the source that can be used as an arbitrator in a failover situation? * If a failover occurs, how do you plan to recover the failed source server? For example: −When the source server is ready for operation, do you plan to make the production server (previously the target server) become the main source server, replicating data to the recovered source server? −When the source server is ready for operation, do you want to revert it back to being the production server?
- 7. Identifying Security Issues * System or Administrator Service * User Access * RepliStor Security Levels RepliStor is a service-based application. There are several ways to set up security as listed in this slide. RepliStor is installed as a service that runs under the System account by default. The System account is not an authenticated account and there is no way for RepliStor to distinguish one System account from another. For increased security, RepliStor can be run under an authenticated ccount instead of under the System account; however, the authenticated account must be a member of the Administrators group. If all RepliStor servers are running under an authenticated Administrators account, then they should be configured to not accept connections from System accounts. All connections must originate from authenticated administrators. User Access RepliStor provides a range of administrative permissions which enable RepliStor to delegate administration to a variety of users and groups. Following is a description of the user and group administrative permissions. RepliStor Security Levels * Connection—Authenticates who is connecting to the server so that not any user can get in. * Integrity—All messages are signed, which adds a 16-byte signature to each message (digital signatures). * Encrypted—All messages are fully encrypted, in addition to being digitally signed. RepliStor software offers three levels of security: The connection security level authenticates who is connecting the server so that not just any user can get in. It is the default security level when RepliStor software is installed. It uses a challenge-response algorithm that encrypts the account, password, and domain information before passing it between the servers. A third party cannot record the exchange and replay it at a later time. The integrity security level adds an additional element of security over the connection level by adding digital signatures. The contents of the signature depend on the contents of the data. While a signature does not add privacy, it guards against tampering. Encrypted is the highest security level. It performs all the same functions as the connection and integrity levels, plus it adds privacy for the RepliStor client. Encryption is appropriate when sensitive data travels over a public network, such as the Internet. The default security level for all sites is set in the Client Options dialog box and is set for each site in the Site Properties dialog box. When a client or server attempts to connect to a site, the target site properties determine the security level requested. If the target site does not support the requested security level, it reverts to the highest common security level. To verify the security level of all connections, check the Connection list by clicking Status | Client Connections or Status | Site Connections.
- 8. RepliStor Operating System and Hardware Requirements RepliStor has specific operating system and hardware requirements which you should understand before installing RepliStor. RepliStor provides a data replication solution for these Windows operating systems: • Windows XP SP2 • Windows 2000 SP4 • Windows Server 2003 • Windows Storage Server 2003 Note: RepliStor 5.x is the last version to support the Windows NT operating system. RepliStor uses the same system requirements that Windows uses. This slide lists minimum and recommended CPU and RAM requirements for Windows Server 2003. RepliStor version 6.x supports both 32 and 64 bit processors. RepliStor is fully ported to native 64 bit components. It is interoperable with all supported platforms so that you can have any combination of 64 and 32 bit components in the RepliStor environment. There are separate installation builds for each platform. The 64 bit processors supported include: • Intel Itanium (ia64) • AMD Opteron (x64) • Intel EM64T (x64) RepliStor Software Components • RepliStor client: This is RepliStor’s graphical interface. Use the RepliStor client to configure RepliStor software, start the RepliStor server and administer the RepliStor solution. You can also use the client to administer RepliStor software remotely. • RepliStor server: Provides capabilities for data replication. When a Windows server runs the RepliStor server, it is known as a RepliStor site. • RepliStor driver: Works with the RepliStor server to provide data replication. • RepliStor Control service: Provides functions such as remote starting and stopping of a RepliStor server. • RepliStor installation program: Installs and removes RepliStor software on supported Windows platforms. • SNMP Agent Extension dynamic link library (DLL): Extends the standard Windows Simple Network Management Protocol (SNMP) service to allow RepliStor software to send messages as SNMP events, enabling the RepliStor software to work with system management software. • Performance Monitor DLL: Provides performance statistics on RepliStor software in the Windows Performance Monitor. Installing RepliStor * RepliStor runs as a service under the SYSTEM or Administrators account. * Use a local administrator or domain administrator account for installation. Installing RepliStor from the RepliStor CD or CD image launches the RepliStor Wizard Installation method. If installing RepliStor on a stand-alone server, you must belong to the Administrator’s Group. If the server is participating in a Windows 2000 or 2003 Domain, ensure that the logon is a member of the Domain Administrator’s Group. RepliStor runs as a service under the System or Administrators account. Change this service account through Windows Administrative Tools to limit access to RepliStor for specific groups or users. During installation, you have the option of selecting the security level and the account under which RepliStor will run. The default security level is Connection and the default account is Local System.
- 9. With version 6.x, when installing RepliStor on a Windows XP system, RepliStor is automatically registered as an application for the Windows firewall. The SetupWizard displays a Register RepliStor with the Windows Firewall option that is checked by default. When this box is checked, the RepliStor service and RepliStor control service are automatically registered with the firewall. Installing RepliStor with Active Directory During the installation process you can choose to register the RepliStor source or target server in the Windows 2000 or 2003 domain. Selecting the Register Server in A ctive Directory check box appends RepliStor containers to the existing RepliStor schema. All RepliStor site information is stored in a central repository available to all member servers of the domain. To register in the Active Directory, the user performing the installation must belong to the Domain Admin group. After RepliStor is installed, the Domain Admin can assign administration rights to any other user or group (using the Options dialog, Users tab). If Domain Admin credentials are not available, install RepliStor so that it does not register itself in the Active Directory. Installing a RepliStor MSCS Resource Type * RepliStor has the ability to replicate data on the shared disk to either a third server or another cluster. * Install RepliStor on each of the clustered servers. * Enable Register RepliStor as a MS Cluster Resource to add RepliStor resources to a Microsoft Cluster Server (MSCS). When installing RepliStor on a server in a Microsoft Cluster, it registers itself into the cluster and then creates a new RepliStor resource type. The typical use of this configuration is to replicate data on the shared disk to either a third server or another cluster, possibly over a WAN. The benefit is that this replication survives the resource group failing over to another node. You can place an application, such as SQL 2000, in a resource group and configure it to fail between the two (or more) nodes in the cluster. To replicate the data outside the cluster, create the appropriate specification on the node that currently owns the data. After creating the specification, create the RepliStor cluster resource and then associate the cluster resource with the cluster group. By associating the resource with a cluster group, the resource is managed by Microsoft Cluster Server and moved node-to-node within the resource group. You can create as many specifications as necessary to replicate the data for that application. For each specification, create an associated RepliStor resource. y If the target is a Resource Group in another Cluster, then ensure that the target site name in the specification is the virtual computer name associated with that Resource Group. y When creating the RepliStor resource, list the physical disk the specification references as a dependency. When you first install RepliStor software, you can select Request Evaluation License for a trial version. Before you install a non-evaluation copy of RepliStor, however, you must obtain a license key from EMC for each computer on which the product runs. When you obtain a license key, you automatically register the software and activate support for RepliStor software. If you are installing RepliStor from a CD-ROM, you must contact EMC and supply the serial number listed on the software package to obtain a license key. Installing the RepliStor Client If you plan to only install the RepliStor client software on a particular computer, select the Customsetup type from the installation wizard and deselect the RepliStor Server so that only the RepliStor Client installs. Note: This feature requires 8336 KB of hard drive space. Upgrading RepliStor The RepliStor installer detects previous versions of LEGATO Octopus, LEGATO Replication and LEGATO RepliStor. During the installation process you may be prompted to reboot, which allows RepliStor to stop the kernel driver, save settings and preferences, and remove the legacy version. After rebooting, the RepliStor installation process continues.
- 10. Note: RepliStor 6.x supports Microsoft filter manager. When upgrading or uninstalling on an OS where filter manager is available a reboot will not be necessary. If upgrading to a new dot version, you must obtain a new license. If upgrading from the single file executable, the installation may not continue after rebooting. This is typical when using Terminal Services to access the machine. You must manually re-execute the setup file. Uninstalling RepliStor Use Windows Control Panel ADD/REMOVE PROGRAMS to uninstall RepliStor. The uninstall process removes all RepliStor executables, data files, and Windows Registry entries. You must manually delete any user scripts and log files. A reboot may be necessary to complete the uninstall procedure. Note: RepliStor 6.x supports Microsoft filter manager. When upgrading or uninstalling on an OS where filter manager is available a reboot will not be necessary. Viewing the RepliStor GUI The RepliStor graphical user interface (GUI) is divided into a tool bar and four viewing panes. The viewing panes provide the following information. Site Pane - This view provides a list of sites to which you can attach. You can view all servers in the domain. To monitor a specific site, double-click the site in this pane. Switching from machine to machine doesn’t create another window. Tree Pane - This view displays RepliStor site information including data specifications and synchronization status. List Pane -This view displays list of files and directories included in or excluded from RepliStor data specifications. It also provides more details about the item that is highlighted in the tree pane. It may show the graph or file and directory information or sync status information. Message Pane -This view displays messages providing information, warnings and error status for the RepliStor environment. Monitor Bar - This view displays the status of several RepliStor processes and whether they are functioning properly or if there are issues to address. Customizing the RepliStor GUI Workspace You can customize the RepliStor GUI workspace window in various ways. You can resize a pane by clicking the pane divider and dragging it. To view more than one window, select New Window from the Window menu. You can then monitor a different site in each window. To display information from the directory tree, highlight an item in the directory tree, for example, Aliases, then right-click the item in the directory tree. This will bring up a submenu of available functions, as shown in the slide.
- 11. Viewing the RepliStor GUI Toolbar Icons 1. Attach: Launch the RepliStor site list to attach to a RepliStor server 2. Detach from the current RepliStor server 3 & 4. Start and stop the RepliStor server 5. Start or stop forwarding on the source system 6. Mirroring: Start or stop replicating on the source system 7. Create a specification 8. Modify an existing specification 9. Delete the selected specification 10. Synchronize a data specification 11. Synchronize all specifications 12. Take a VSS shadow copy 13. Maintain Alias list 14. Select RepliStor general options 15. Select options for the RepliStor client 16. Select scheduling options for synchronization and replication 17. Delete the data directory 18. Search and view RepliStor online help Customize the Toolbar The RepliStor toolbar can be customized to include additional buttons, remove a button or change the order of the buttons on the toolbar. You customize the RepliStor client window toolbar by selecting Modify Tool Bar from the View menu. The RepliStor Process Flow Before RepliStor can be used to replicate files, it must be configured to identify the source data to be replicated and the target destination for the replicated files. This information is brought together in RepliStor specifications. There are various options that you can choose or you can just go with the default settings. After creating specifications, an initial synchronization of the data from the source to the target is performed. The RepliStor GUI Add Specification wizard will take you through these steps. Creating RepliStor Specifications RepliStor is a highly configurable application. Data replication parameters are defined in RepliStor specifications. In this section we will review various types of RepliStor specifications. For more detailed information about the options available when creating specifications, please see the EMC RepliStor for Microsoft Windows Administrator’s Guide and RepliStor Online Help. When configuring RepliStor, consider the following: * Create global exclude specifications first. * Do not create specifications for these types of files/directories: − Virtual drives or redirected drives − RepliStor files −Windows System files − Executable files and memory mapped files * Compressed files on the source are replicated as compressed files on the target.
- 12. Global Exclude Specifications Global exclude specifications identify files, directories, and shared directories that you do not want replicated from the source system. RepliStor automatically creates several default global exclude specifications. The following global exclude specifications are automatically defined, where applicable: * Swap file for each drive * RepliStor program directory * RepliStor Data directory * All system volume directories * All recycler directories * All $EXTEND directories on file systems To display a list of the exclude specifications that have been defined, click the Global Excludes folder in the tree pane (the upper-middle pane) of the client window. Creating a Global Exclude Specification To create a Global Exclude specification, select Add Specification | Global Exclude from the Maintenance menu. Then select a drive or a single file or directory to exclude from replication. When the Include Subdirectories checkbox is selected, all subdirectories in the selected drive or directory are also excluded. The files that you select to exclude appear in the text box in the lower left portion of the window. You can also enter a filepath in this text box. For example, to exclude all files of type .tmp in the WINWORD directory, enter the following: C:WINWORD*.TMP. Process Excludes Use the Processes tab on the Options dialog box to define process exclusions for both source and target servers. On the source server, specify operations to be ignored by process. A list of processes to exclude is typically used on the source server in the following situations: ** Anti-virus scans – During a file scan an anti-virus program typically makes attribute changes and then sets the attributes back to the initial state. RepliStor will replicate these files but this is an inefficient use of time and resources since the files are not changed. Check Ignore Only Attribute Operations for these processes. ** Backup programs – A backup program will set the archive bit for each backed-up file. This causes RepliStor to replicate the activity even though it may not be required on the target. Check Ignore Only Attribute Operations for these processes. ** DiskXtender – A fter migrating a file to backend storage, DiskXtender may only leave a stub of the migrated file on the source storage. This operation should not be replicated by RepliStor since it may result in a truncation of file data on the RepliStor target. On the target server the process list is an exception list for the Protect Target Files function. This allows you to enable Protect Target Files while giving file read/write access to specific processes only. File and Directory Specifications File and directory specifications identify files, directories and shared directories to replicate to the target system. Create your global exclusion specifications prior to the creation of file/directory specifications. Global exclude specifications are given precedence over a file/directory specification. When creating a file or directory specification, all target servers registered in Active Directory (AD) are listed for selection. If the installation did not register in AD, you must add the RepliStor target server to the site list before selecting it for replication. After creating a file/directory specification, perform an initial synchronization of the specification. RepliStor displays the status of the synchronization on the list pane. Important: Before creating a file/directory specification, determine the exact directory and/or files you plan to include and replicate to the target. If you select a specific directory, and deselect specific files in that directory, you have now excluded them from the specification. Use a global exclude to exclude files from replication and a file/directory specification to include files or directories for replication. Creating File and Directory Specifications To create a File/Directory specification, select Add Specification | File/Directory from the Maintenance menu. Then select a drive or a single file or directory to include in the specification. When the Include Subdirectories checkbox is selected, all subdirectories in the selected drive or directory are also included. The files that you select for replication appear in the text box in the lower left portion of the window. You can also enter a filepath in this text box. For example, to include all files of type .doc in the WINWORD directory, enter the following: C:WINWORD*.DOC.
- 13. Next you will select the target sites to use for this specification from the Select Target window as shown in the slide. Select Show A ll Sites to show the sites in your site list. This is normally selected if you need to add additional target sites to the specification. This is the default when creating a new specification. If the desired target site is not listed, click Sites to open the Site Select dialog box. Select Show Selected Sites Only to only show the sites that are targets to the specification. This is the default when editing an existing specification. All known RepliStor sites are selectable. If a site is not selectable, either the RepliStor server is not running at that site or it is not recognized as an active site in the network. When you select a target site, a drop-down list appears in the Target Path column, as shown in the slide. The following target path options are available: * Same As Source — RepliStor automatically replicates the data selected in the Select Source tab to the target machine using exactly the same path as the source. * Default Target Directory — RepliStor automatically replicates the data selected in the Select Source tab to the default directory you selected on the target machine on the Maintenance, Options, Directories tab. * Browse — RepliStor replicates the data selected in the Select Source tab to the folder that you select in the Select Target Path dialog box. If Browse is selected, do one of the following: select the folder on the target system where you want to replicate the data or type the file path where you wish to replicate in the field below the main window. (Optional) The Delete Directory option is used on the target system to store files that have been deleted on the source. Click in the Delete Directory column and a drop-down list appears, as shown in the slide. Select Browse to open the Select Target Path dialog box where you can select the target directory or type the target path. When you create a file or directory specification there are several options available to you. The table below describes the defaults on the Options panel when creating a file and directory specification. If the Disabled option is selected in the Options panel, the synchronization options are disabled and the specification will not be synchronized. To exclude files of a particular type from the specification, enter the file type you want to exclude in the Exclude Files box. For example: *.tmp To specify more than one file type, enter a semicolon (;) between each type. For example: *.tmp;*.dot;*.exe You can also exclude subdirectories in this way in the Exclude Subdirs box. When excluding subdirectories of a particular type from the specification, you may use the special characters * and ?, where * matches any number of any characters and ? matches any single character. Multiple subdirectories can be separated by a semicolon (;). This feature is useful when you want to exclude certain files on a specification basis. RepliStor version 6.1 now allows you to create and manage Exchange Server 2003 and file system shadow copy backups via the Volume Shadow Copy Service (VSS) framework provided by Microsoft. The VSS Parameters panel allows you to configure a VSS-compliant remote shadow copy for a particular specification on Windows 2003 systems. When the Enable VSS checkbox in the VSS Parameters dialog box is enabled, you can request to take a shadow copy at any time on a particular specification. In Module 6, Using RepliStor VSS Shadow Copies we will discuss configuring the RepliStor VSS parameters in greater detail. Configuring Shares Specifications A Shares specification replicates the folder name and the share information, not the files contained in the share. Therefore, the folder structure and the files within the share on the source and target must be the same if users will be expecting the target share name to contain the same data. To create a Shares specification, select Add Specification | Share from the Maintenance menu. Perform an initial synchronization after configuring the shares specification to allow the RepliStor software to replicate the shares. The following restrictions apply to the creation of shares specifications: * Shares specifications are not allowed if the source system is part of a Microsoft Cluster server environment. * You cannot replicate network printer shares. * Shares specifications mirror all shares on the machine to the same target location. * Shares specifications should not be used if they are mirroring shares as part of a spec. Shares specifications should only be used if all drives and directories with shares are exactly the same on source and target. * If there is a directory with a share on the source that doesn’t exist on the target and the data within the share is not being mirrored, then there is no need for that share to be on the target. Mirroring shares as part of the specification is more useful because the source path does not have to be the same as the target path.
- 14. Creating Registry Specifications Registry specifications identify application configuration information to replicate. Registry key permissions are based on security identifiers (SIDs). When creating registry specifications, you must declare the type of permissions to apply to the specification. If permissions are not set, parent key permissions are applied to the specification. To create a Registry specification, select Add Specification | Registry from the Maintenance menu. Important: When selecting the Source Key, do not select an entire key, such as Software. Select only a specific application’s key. For example, SoftwareCompany NameApp Name. To stage the Registry replication, specify a different Registry key on the target system than on the source. Running an Initial Synchronization Most specifications you create are file and directory specifications. When creating a specification, you can select to run an initial synchronization. An initial synchronization runs a full sync. If you want to keep operations going without a potential impact on network traffic, schedule the initial sync at a time when network traffic is not an issue. Running Subsequent Synchronizations After performing an initial synchronization, it may be necessary to run a sync operation to keep the source and target systems in sync. To run a subsequent synchronization, highlight the specification that you want to synchronize, then select Synchronize. From the Sync Options panel, select Sync Now. Enable Delete Orphans. Orphans are files and folders on the target that are not on the source. When this option is enabled, orphaned files and folders on the target are deleted when a synchronize target command is initiated. Important: As a general practice, do not create identical file specifications on both the source and target system. This creates circular mirroring as shown above. With circular mirroring, if a file is modified at the same time on both systems, files may become corrupt. Verifying the Synchronization To verify a synchronization, watch the tree pane for synchronization status. A tilted sync status icon and yellow light indicate that synchronization is in progress or did not complete. A green light indicates synchronization is complete as shown on the slide. Click Sync Status in the tree pane to see information about the synchronization in the list pane. You can also view information about the sync while it is in progress. It will show the files it is working on. In the list pane, right-click the sync information and select Details to access detailed information. Also, if there are problems with the synchronization, error messages will appear in the message pane. RepliStor Alias Failover RepliStor provides the Alias failover option which allows a designated target system to take over for a source system when the source system fails. A lias failover takes advantage of the features of Windows that allow the target system to take over for a source while maintaining its own identity and processing. Aliases allow failover between two Windows 2000 or later servers with Active Directory configured. Client connections continue uninterrupted after a source failure and during recovery. Also Aliases help avoid computer name conflicts in the Active Directory that can occur when a failover takes place. Alias failover enables you to: *Failover multiple aliases or virtual machine names. * Associate a list of IP addresses with each alias, and optionally, register the IP addresses with the dynamic DNS server. The aliases are added to the target system at failover. * Failover between two Windows 2000 or later servers hosting Active Directory. * Recover from a failover faster and easier, with minimal disruption of client connections. * Implement WAN failover where the source and target are in different subnets preventing forwarding of IP addresses. * Specify a specific target system to take over for the source when defining the alias. No other target is sent the alias.
- 15. Understanding Alias Failover During normal operation, RepliStor regularly sends a heartbeat signal from the source system to the target system to let the target system know that the source is available and functioning normally. If the target system does not receive the heartbeat signal within an expected period of time RepliStor begins the failover process. First, RepliStor attempts to ping the source system to ensure that the source system has actually failed. If the ping is unsuccessful, the alias information is sent to the target system. Clients connected to the alias on the source before failover continue to be connected to the alias on the target after a failover. All specifications that replicated to the target are sent to the target and are modified so that they replicate back to the source system. Recovery from an alias failover occurs with minimal disruption to clients accessing the alias. The source system can be repaired and brought up, and the data synchronized back to the old source without having to bring down the target system and disconnect any clients using the target system. When the source is restored, the alias is added back to the source system and specifications are re-enabled on the source. Client connections to the alias are interrupted only as long as it takes to transfer the alias. Configuring Alias Failover Configuring source and target options using Alias failover allows you to determine when and how the failover occurs. With Alias failover you can define any number of source system aliases to use during failover along with IP address and DNS server information. A number of parameters are required to ensure a successful failover. Configuration of failover includes: * Define one of more source system aliases * Define IP addresses (except for WAN failover) and optional DNS information * Define the alias for Manual Activation in environments where there are too many variables to allow an automatic failover, such as WAN failover * Determine which, if any, services need to be started * Select Transfer Specifications to Target if you want the specifications on the source to be recreated on the target during a failover * Select Auto-Synchronize if you want to do an incremental synchronization of data when the source is available again. * Determine the systems that are notified of the failover * Commands or batch files to execute on the target system, both before and after the failover. * The time it takes RepliStor software to fail over. You can do this by changing the value in the I’m Alive Recv (secs) field in the Time Limits tab of the Options dialog box. * After configuration, the last step is to activate the alias. Checking the Source IP and NetBios Name Before performing a failover perform the following checks. * Use ipconfig /all to verify the IP address of the source system. Verify that the address is unique and accessible by the clients * Validate the registered NetBios name on the source with the following command: nbtstat –n Verifying a Failover * Shutdown the source system or execute manual failover – Target assumes source system alias * Use ipconfig /all to verify target address assignment * Use nbtstat –n to verify node name assignment After you have configured failover, verify its success by: 1. Testing the failover with one of the following methods: − Execute manual failover − Execute source shutdown 2. Checking for the IP address on the target (ipconfig /all) 3. Checking the NetBIOS name on the target (nbtstat -n) 4. Verifying that the alias and IP address are not on the source.
- 16. Restoring Original Config After Failover After an alias failover occurs, you can either restore the original configuration or leave the alias on the target system and set the alias to failover to the original source system. After bringing up the recovered source system, steps to restore the original configuration include synchronizing the target to source specifications, removing the alias from the target system, re-enabling the specifications on the source and then synchronizing the specifications that were re-enabled. Failover Across a WAN When failing over between two servers across a WAN there are special considerations to take into account. There are more failure modes that can occur besides a source system failure. For example, a failure in the WAN connection could occur as opposed to a source server failure. This could possibly cause a situation where some clients are connected to the source and others are connected to the target resulting in a split brain condition. To prevent a split brain condition from occurring, RepliStor allows you to configure a Failover Agent. This is a third server that is local to the source system that has either RepliStor server or client running on it. If the target notices that the heartbeats from the source system have stopped, it pings the source. If the ping is not successful, it attempts to connect to the Failover Agent. It will then instruct the Failover Agent to ping the source. If the target can connect to the Failover Agent and the Failover Agent can ping the source, the failover is aborted. If the target can connect to the Failover Agent and the Failover Agent cannot ping the source, the failover continues. If the target cannot connect to the Failover Agent, the failover is converted to a Manual Activate failover. For failover across a WAN, you must have a DNS server configured. Define one or more aliases that clients can continue to connect to during a failure and specify that the aliases be added to the DNS server. Do not define associated IP addresses. For WAN failover, you may also wish to enable Manual A ctivation on Target for each alias. Modifying and Deleting a Specification RepliStor displays existing specifications in the RepliStor tree pane. Specifications are located below their respective target sites. Right-click on a specification to access modification and deletion selections. Additional specification tasks include: * Add—Allows you to add another specification. * Delete—Deletes the specification. * Synchronize—Tells RepliStor to synchronize the data applied to the specification. * Abort Synchronization—Tells RepliStor to abort the synchronization. * Enable—Allows you to enable a specification that has been disabled. * Disable—Allows you to disable a specification for system maintenance or other issues. * Flush and Disable—All operations associated with a spec are forwarded and then the spec is disabled. * Refresh—A llows you to refresh the specification information. Warning: You cannot recover a deleted specification.
- 17. Using RepliStor Options • RepliStor is highly configurable, giving you the ability to control how RepliStor replicates data. • RepliStor allows you to customize your environment and define how you replicate data. Several options are available: * Synchronize options * General options * Schedule options * Client options * Simulation/Reporting Synchronize Options Following is a description of the RepliStor Incremental Sync option. Incremental Sync-Normal: Analyzes and scans each file at the source and target. The source then sends the appropriate patches to the target and the target updates the file. All aspects of the file are updated, includingalternate streams, attributes, and permissions. If the source decides that the file is sufficiently different from the file on the target, it performs a full sync. Incremental Sync-Log Differences Enabling this option causes the source to log messages that describe which files are different between the source and the target. Incremental Sync Option—Check Only Use this option in conjunction with Log Differences. Enabling this means that the synchronization does not update the target if differences are found. These messages are informational messages that can be viewed in the message pane or in the file called message.rdf Incremental Sync-Attribute Compare Only Analyzes the last modified date and file size from the source. If this information matches the corresponding last modified date and file size on the target, there is no synchronization. If they do not match, then it performs a full sync. Delete Orphans Deletes all files on the target that do not exist on the source after copying or comparing the files to the target. Sub-path Sync Copies a single file or subdirectory within the original specification from the source system to the target system. Scheduled Sync Performs the selected synchronization at the time and date specified. Using RepliStor General Options Start-up • Enables auto-start for the RepliStor service. If you disable this option and reboot, it disables the RepliStor driver and server, and RepliStor discontinues replication. • Enables RepliStor forwarding and mirroring behavior when the system is booted. Last State leaves mirroring and forwarding in its most recent setting. This option is for the source system only. Disk Space Monitor • Enables or disables disk space monitoring. • Sets the warning, stop and interval sizes used by the disk space monitor. • Enables automatic recovery of disk full condition. This option is discussed in more detail in Module 7. Log • Configures message logging, message display, and e-mail notification. Time Limits • Amount of time that the RepliStor service waits before trying tounblock a target site or file. • Amount of time RepliStor waits on the source if a share violation is encountered. • Establishes the number of days that sync retry entries are held in the RepliStor log. • Interval source sends a hearbeat and interval target must receive a heartbeat before initiating failover, if configured Users • Configures users/groups for the computer/domain, and sets permissions using this interface. • The system account can be disabled to harden security. E-mail • Configures e-mail, e-mail log, and SMTP server settings using this interface. The email log file helps to debug e-mail problems.
- 18. Directories • Sets the default target directory, data directory and script directories. Account • Sets domain administrator credentials. Advanced • Configures the size of the kernel cache. • Sets the TCP/IP settings for heartbeat and heartbeat time-out. • Sets the expiration time for open files on the target system. • Enable target file logging. This is done on the target system only. • Short File Name Translation-default is Automatically Generated • Selecting the Boot Load Driver option causes the RepliStor filter driver to beloaded at boot time allowing replication of all OS activity, including all system files. Note: When this option is selected, the RepliStor Data directory must be on the system disk. Use this feature with great care! Performance • TCP/IP Buffer Size controls the sizes of the send and receive buffers within RepliStor and the TCP/IP driver. A higher buffer size may provide better performance for high speed networks but uses greater system memory. • Full Sync Buffer Size is the amount of data that is read and sent to the target in a single unit during a full synchronization. A higher number will have less overhead. Fast networks may benefit from a bigger buffer. • Sync Target Connection is the number of connections that the source will connect to the target during a sync operation. • Disable Communications Compression: when selected, all outgoing connections will not be compressed. • Optimize settings are sample settings for WAN, LAN and Fast LAN. NAS Admin • This tab opens the Network Attached Storage Properties dialog box where you can add, delete or modify a UNC path. Note: General Options also include two tabs discussed in previous chapters: Processes (Module 3) and Failover (Module 4). Using RepliStor Scheduling Options * Specify schedules for forwarding and updating functions and to turn throttling on and off RepliStor software allows you to schedule updating and forwarding. Updating is a function on the target system during which updates from the source are applied to data files on the target system. Forwarding is a function on the source system during which changes to data are forwarded from the source to the target system. Forwarding and updating are always on by default. You can schedule forwarding or site forwarding. Turning off forwarding not only discontinues forwarding, but also discontinues the heartbeat signal sent from the source system to the target system. Throttling determines the maximum data rate, in kilobytes per second, for your replicated data. By setting this rate, you ensure the amount of replicated data transferred across the network from the current source system will never exceed the maximum data rate as long as throttling is enabled. When the Automatically Recover option is enabled, the throttle rate is automatically disabled if the free disk space goes below the Warning level. It is re-enabled automatically when the free disk space goes above the Warning level. To configure updating and forwarding options, select Schedule Options from the Maintenance menu. Use the Pause Updates, Site Forwarding Off, Forwarding Off and Throttling tabs to configure updating, forwarding and throttling options. If the Disable Schedule option is selected, clear it to enable you to set the options. Using RepliStor Client Options The GUI workspace is divided into four main sections: site pane, tree pane, list pane, and messagepane. How these sections are arranged depends on the Display settings you choose in Client Options To configure client options, select Client Options from the Maintenance menu. Use the Display and Comm tabs to configure display and communications options. Display • Configures appearance and tiling of the Main Window, message pane; configures monitor bar appearance; configures Add-Specification wizard. • Disables automatic site list merge unless this is an Active Directory installation. Communications • Configures the RepliStor server port setting used by the RepliStor client. • Configures the RepliStor control port setting used to establish site communication between the server and client interface. • Configures security settings for authentication and encryption.
- 19. Targeting a Remote Share Hosted by a NAS Device With RepliStor software, you can target a remote share hosted by a Network Attached Storage (NAS) device. Targeting a NAS device is identical to normal RepliStor operation except that the UNC path to the share needs to be registered with RepliStor software. Once registered, it can be used as any local drive. Before targeting a remote share hosted by a NA S device the UNC path should be registered. To register the UNC path in RepliStor, create a new specification or modify an existing specification for which you want to register a UNC path. In the Select Target tab, select Browse from the drop-down Target Path options. Then click the Network Attached Storage Admin button shown in the slide. Registering a UNC Path: The Network Attached Storage Admin dialog box opens showing all registered UNC Paths. Clicking Add or Properties (for an existing path) brings up the Network Attached Storage Properties dialog box where you can enter or change information about the UNC path to the NA S share. Click the Disable checkbox to register and add the UNC path to the UNC Paths box, but disable it. A UNC path can be enabled later by clicking the checkbox next to the path in UNC Paths in the Network A ttached Storage Admin dialog box. Click OK and RepliStor software attaches to all enabled UNC paths. Monitoring RepliStor There are several ways to monitor RepliStor: * Sync status * Messages * Monitor Bar * Client and site connections * Performance Monitor * Bandwidth Simulation / Reporting Sync Status The tree pane displays the synchronization status for existing specifications. A n icon resembling a balanced scale indicates that the file specification is synchronized. The computer icon adjacent to the target site yields additional specification status. This status is shown in the table below. Messages Detailed site and specification messages are displayed in the message pane. The contents are filtered by selecting one or more of the following message types: * Info—normal RepliStor operation * Warning—require attention * Severe—any event that terminates a RepliStor service process, such as forwarding or mirroring
- 20. RepliStor messages appear in the following locations: * RepliStor Client Main Window * Pop-up within the RepliStor Client Window * Windows Event Viewer * SNMP Event Log * Email account Traffic Lights in the Site Pane Traffic light icons are used in the workspace to display the status of RepliStor sites. The meaning of the color of the lights depends upon the pane that is displaying the lights. Traffic lights in the Site Pane display the current overall status of RepliStor sites. A traffic light with no lights on (that is, a solid black traffic light not showing either a green, yellow, or red light) means the site is not running, but RepliStor software is installed and the control service is running at that site. A dimmed light (that is, a traffic light that is grayed out) means no RepliStor process is running on the site or the site does not exist. A red light means one or more of the following is true: − at least one unread Severe log message is at the site − the Disk Space Monitor is on and the amount of free space has dropped below the Stop level − at least one target site is blocked − at least one file is blocked A yellow light means one or more of the following is true: − at least one unread Warning log message is at the site − the Disk Space Monitor is on and the amount of free space has dropped below the Notify level A green light means all systems are functioning normally. Following are the definitions for traffic lights in the Tree pane: A traffic light with no lights on (that is, a black traffic light not showing either a green, yellow, or red light) means the RepliStor server is not running at the attached site. A green light means all systems are functioning normally. A yellow light means systems are functioning and currently working, but may have encountered problems that require attention. A red light means systems have stopped and are not functioning. The monitor bar is displayed at the bottom of the client window. RepliStor operational status is determined by interpreting the condition of the traffic signals as listed in the slide. A green light means systems are functioning; a yellow light means systems are functioning and working, but require attention; a red light means systems have stopped and are not functioning. Connections Use the client connection list to identify RepliStor client activity. Use the site connection list to identify RepliStor site activity. Site, principal name, security type, account name, buffer size and OS type are displayed.
- 21. Performance Monitor RepliStor works with the Windows Performance Monitor to provide statistics on RepliStor performance. The Performance Monitor functionality is incorporated into the RepliStor main window and can be viewed in the List pane. The Windows Performance Monitor tool can be launched from the RepliStor Help menu. Use the Performance Monitor to view information about such things as how many hits occurred on the source system and how many input/output (I/O data) changes were sent to the target system. Following is a description of the most common counters used for RepliStor monitoring. Defining Custom Management * RepliStor allows scripting to customize management of RepliStor servers. * RepliStor creates a default script directory which you can populate with scripts. * Scripts are copied from the script repository, executed and deleted. * Files outside the script repository need to be enclosed in parentheses. RepliStor Commands RepliStor includes commands that can be run from the DOS command line and from scripts. Many of the functions available through the Console can also be run via RepliStor commands. There are also commands for functions that are not available through the Console GUI, such as the ability to export and import RepliStor configuration and specifications, and the capability of issuing a checkpoint to mark a consistent point for backup. The example above illustrates running several RepliStor commands. To learn more about the RepliStor commands, please refer to the RepliStor Online Help and the EMC RepliStor for Microsoft Windows Administrator's Guide. Bandwidth Simulation / Reporting The Simulation/Reporting feature allows you to simulate and report data bandwidth between the source and target systems. You can configure simulation and/or reporting on either the source or the target. For example, you can report on the source system and suppress updates on the target system. It is important to note that the local RepliStor server can be either a source or a target. You can specify the sample interval in minutes at which you want to generate the source or target reports (for example, every 5 minutes, every 45 minutes, and so on). You can set the sample interval to generate source or target reports between 1 and 60 minutes. Note: The simulation is for the system on which it is performed. If the source or target simulation/reporting is done on a source system, the output is for the source system. If a bandwidth simulation for the target system is required then the simulation should be done on the target system. Bandwidth Simulation RepliStor allows you to simulate data replication where data is not actually sent to the target system. If used in conjunction with the reporting function, the simulation function is useful for determining the volume of data that is to be replicated as well as peak activity times, without loading the network or having a target system capable of handling the data from the source. If you don’t want to use real data for the source configuration, you can simulate the source bandwidth by selecting the Do Not Send Data to the Targets checkbox. If this option is selected, any data that is to be sent to the targets will be lost. If the Do Not Send Data to the Targets checkbox is not selected, the data is sent to the target (this is the default). For the target configuration, selecting the Suppress Update on Target checkbox means that the local RepliStor server will not be updated with incoming data (that is, any data received from the source system will be ignored). All incoming data will be lost. This option is recommended if you want to run a simulation where the target system does not have the disk capacity to handle all of the source data. If the Suppress Update on Target checkbox is not selected, then data will be written to the local server. Bandwidth Simulation Reporting The source and target reports are generated as text files in a comma-separated variable (CSV) file format. Each row in the report is for a particular time period. The reports are stored in the RepliSto Data directory. The report file name is of the form: {SourceReport | TargetReport}.year.month.day.hour.minute.csv.
- 22. VSS Framework Overview “The Volume Shadow Copy Service (VSS) is a set of COM interfaces that implements a framework to allow volume backups to be performed while applications on a system continue to write to the volumes. VSS provides a consistent interface that allows coordination between user applications that update data on disk (writers) and those that back up applications (requestors). The actual work of creating and representing shadow copies is conducted by system-level applications known as providers.” * VSS provides fast capture of the state of a volume at one instant in time, i.e. a snapshot (“shadow copy” in MS). “Snapshot sets” cover multiple volumes and treat them as a single snapshot. * VSS interacts with applications to Freeze and Thaw I/O using the VSS Writer to gain a data consistency point. * Some applications implement VSS Writers that use “Components”, groups of files that must be treated as a unit. A n example of this is Exchange that has both database and log files. * Shadow copy requests and shadow copy maintenance functions are initiated via a VSS Requestor. VSS Framework Components There are three main VSS components: Requestors, Writers, and Providers. VSS acts as the coordinator between the activities of all the VSS Providers, Writers, and Requestors in the creation and use of shadow copies. The components of VSS are described below and their relationship in the VSS architecture is shown in the slide. VSS Requestor — is a replication application; it requests a shadow copy. RepliStor software is a VSS Requestor. The RepliStor Requestor has interfaces to the RepliStor console to associate it with a specification. VSS Writer — is the application-specific logic needed in the shadow copy creation and restore/recovery process. The VSS Writer is provided by Exchange Server 2003 and other applications. VSS Provider —is third-party hardware control software that actually creates the shadow copy.
- 23. VSS Framework – Shadow Copy Sequence VSS Requestor *Initiates “Backup Session” interface to VSS. This is a handle to communicate all requests and actions to the VSS Framework. * If using Components, the Requestor gathers “Writer Metadata”, the listing of the components that a particular writer is responsible for. VSS interrogates all VSS Writers for their Metadata and returns this to the Requestor. * The Requestor then analyzes the components and determines what volumes to add to the shadow copy set. * The Requestor then initiates a shadow copy request. VSS Framework * VSS interfaces to appropriate VSS Writers and “freezes” application I/O. * VSS performs snapshot on selected volumes. * VSS then interfaces to appropriate VSS Writers and “thaws” the application I/O. * VSS then indicates to Requestor that the shadow copy has completed. Snapshot Revert * Reverts Volume to a previous shadow copy. * Revert for a shadow copy set must be performed on all volumes in the set. * Revert deletes the shadow copy set after completion. Important: Revert also deletes any shadow copies that are “newer” than the one being reverted. RepliStor Source Shadow Copy Sequence 1. To take shadow copies of a RepliStor specification, highlight the specification and select Shadow Copy from the Maintenance menu. From the Confirm Shadow Copy window select the shadow copy type (Full or Copy). The user can also configure scheduling of the shadow copy at this point. 2. When confirmed, the RepliStor VSS Requestor (hereafter the Requestor) primes the RepliStor Kernel to set up “Snapshot Marker”. The marker denotes a “consistency point” that the RepliStor Kernel Buffer contains the quiesced data for the RepliStor specifications involved in the shadow copy. It is sent to the RepliStor target and allows the Target Requestor to initiate a shadow copy with exactly the same data as the Source.
- 24. 3. Requestor initializes a VSS Backup Interface, gathers Writer Metadata and determines which volumes and/or components to add to the shadow copy set. 4. The Requestor then initiates the VSS Shadow Copy. This step can be verified by “Info” level messages in the RepliStor message pane, as well as selecting the “Shadow Copy” icon under the Source Group Specifications tree. 5. The Source RepliStor Kernel then determines that the shadow copy has been completed, and that all the specs have been quiesced (synced). The RepliStor Kernel then sends the “Snapshot Marker” to the target RepliStor. This triggers the Target Requestor to proceed with its shadow copy. 6. The Source RepliStor Requestor then waits for the Target RepliStor Requestor to complete its shadow copy and post operations. This can be confirmed on the Source machine by viewing the Shadow Copy status and message pane. 7. The Target RepliStor Requestor returns a completion status to the Source RepliStor Requestor. If there are any error conditions, the user is notified at this point. This can be confirmed with messages on the Source RepliStor. Detailed RepliStor Source Shadow Copy Sequence
- 25. RepliStor Target Shadow Copy Sequence 1. The Target Requestor is initiated by the RepliStor target after the “Snapshot Marker” is received. 2. The Target Requestor pauses updates to be made to the specification so that no changes to specification files can occur while the VSS Shadow Copy takes place. 3. Similar to the Source Requestor, the Target Requestor initializes a VSS Backup Interface, gathers Writer Metadata and determines which volumes to add to the shadow copy set. 4. The Target Requestor initiates the VSS shadow copy request. 5. The existing shadow copies are counted to determine if the number per specification exceeds the config value. If so, the oldest shadow copy sets are deleted. Note: You should always configure the maximum shadow copy limit to 1 less than any physical limit. For example, on CLARiiON were there is a limit of 8 shadow copies, the maximum should be set to 7. 6. The Target Requestor determines that the shadow copy has been completed successfully. If no post shadow copy scripts are configured, the Updates are resumed and the completion status is returned to the Source Requestor. 7. If there is a Script configured, then perform the following post shadow copy operations as part of the Script execution, configured via the specification: * Mount the shadow copy * Resume Updates (during script execution – updates are paused during shadow copies). Note: If the script is operating on a mounted shadow copy, then it does not need to keep the updates paused during script execution. In the case where the script is operating directly on the target files, Pause Updates during Script Execution should be checked. * Execute the script
- 26. Detailed RepliStor Target Shadow Copy Sequence Allocating Shadow Storage Prior to configuring any shadow copies, you will need to allocate shadow storage. The vssadmin command line interface is the interface to the Microsoft System Provider. This command line is used to allocate storage for shadow copies and view the status of the Exchange writer when troubleshooting shadow copy creation problems. For a list of vssadmin commands, type vssadmin /? at a command line prompt. It is important to be sure that sufficient shadow storage is allocated on the target server as this is where the permanent shadow copies will be stored. The amount of storage necessary will vary depending on the size of the Exchange Storage Group(s), amount of data changed during the retention period and the number of shadow copies which are being maintained before recycling. Depending on the available resources, allocating multiple drives to increase performance and eliminate a single point of failure is optimal. Once the storage has been presented, formatted and mounted on the target server, use the vssadmin add shadowstorage command to allocate shadow copy space. In the example below E: is the target drive on the RepliStor target server and G: is the shadow copy storage location: vssadmin add shadowstorage /for=E: /on=G: Additionally, allocating some storage for the temporary shadow copies that are created on the source can be helpful. This shadow storage can be minimal, as the shadow copies are deleted automatically by a VSS cleanup routine.
- 27. Configuring for Shadow Copies If your system is running on a Windows 2003 platform, you can configure shadow copies for a specification via the VSS Parameters dialog box. This dialog box can be accessed in one of two ways: * When you add a specification, the VSS Parameters panel displays after the Options dialog boxy When you right-click a specification in the tree pane, select Modify and then click the VSS Parameters tab in the Specifications dialog box When the Enable VSS checkbox in the VSS Parameters panel is enabled, RepliStor can take a shadow copy of the drives associated with this specification. Enabling this option means you can request to take a shadow copy at any time on a particular specification. The Backup Type option specifies the type of shadow copy that is performed on the source. This option is application/writer dependent; that is, it depends on what you want your specific application to do. For example, if you are taking a shadow copy of an Exchange database and select Full, the log files will be truncated. If you are taking an Exchange shadow copy and select Copy for the backup type, the log files would not be truncated. The backup types are: * Full — All files, regardless of whether they have been marked as backed up, are saved. Each file's backup history is updated to reflect that it was backed up. * Copy — Files are copied to a backup medium regardless of the state of each file's backup history and the backup history is not updated. Shadow copy on Target — Taking a target shadow copy is optional. The user may not require a shadow copy at the target and may instead run a script that, for example, starts a backup or only copies files. When checked, a persistent shadow copy is created on the target; the shadow copy will exist until you delete it. Select VSS Provider — The target system is contacted and a list of all VSS providers on that system is presented to the user. This option allows you to select the VSS provider to use when taking a shadow copy on the target such as CLARiiON SnapView or Windows system.
- 28. Script To Run On Target — This option allows you to select a script to run on the target after the shadow copy is on the target. For example, you can run eseutil.exe on the target to make sure the target shadow copy is valid or a backup can be performed. Mount Shadow Copy — When checked, the target shadow copy is mounted to a volume to become visible to the local host during execution of the script. It is unmounted when the script terminates. Pause Update during Script Execution — Updates are always paused during the target shadow copy operations to ensure that the shadow copy taken on the target is identical to the state of the source. Check this option if you need updates to remain paused during execution of the script. This option may also be used if no shadow copy was taken on the target and the script operation is relatively short. VSS Schedule—Click this button if you want to schedule shadow copies for specification(s). Taking Shadow Copies A shadow copy is associated with one or more specifications. Typically, a group specification is created that specifies all the related data. For example, a group specification may specify an Exchange Storage Group. You can take a shadow copy of one specification or one group specification, or of multiple specifications or group specifications by doing either of the following: * right-click the specification(s) in the tree pane of the RepliStor client and select Shadow Copy or select the shadow copy button from the toolbar * manually issue the ShadowCopy CLI command. From the Confirm Shadow Copy window select the shadow copy type. You can also select the Schedule option to schedule shadow copies for specification(s). When you click Schedule in the confirmation window, the Shadow Copy Schedule dialog box opens. You can set a repeating schedule to take shadow copies by specifying a starting time and repeat intervals. Source Shadow Copy Characteristics While the shadow copy is in progress, a Shadow Copy icon will appear in the RepliStor window workspace in the upper part of the tree pane. The Shadow Copy in Progress status will display in the right list pane. Once a shadow copy is initiated, the source shadow copy shows up in the tree pane as the Shadow Copy icon and is highlighted in gray. You can cancel a shadow copy in progress by right-clicking the shadow copy in progress in the right list pane and selecting Cancel. A Warning log message is created indicating that the shadow copy was cancelled by the user. During the shadow copy process, a temporary shadow copy is created on the source system. A source shadow copy has the following characteristics: * It is not complete until the target shadow copy is complete and successful, and the target script (if any) has run and returns a SUCCESS error code. * It is immediately marked complete if the target is not configured to take a shadow copy and there is no script to run. * The source shadow copy allows RepliStor to determine the consistency point of the specification’s files. * Source shadow copy is “auto-release”, meaning it has a finite lifetime.
- 29. Target Shadow Copy Characteristics Target shadow copies are listed in the RepliStor window workspace under the source on which they were taken, indicating Shadow Copy creation time, source and target volumes snapped and mount points. A target shadow copy has the following characteristics: * It uses the consistency point to generate a recoverable data set. * It is “persistent”, meaning it will exist until explicitly deleted. * Target shadow copies are exposed or mounted to a volume to become visible to the local host. You can delete a shadow copy by right-clicking the shadow copy in the right list pane and selecting Delete. A warning log message is displayed asking the user to confirm the delete. You can use the Mount command to mount a shadow copy on a specified drive and folder. From there, the data in the shadow copy can be available for user access and even for replication back to the original source, if needed. Unmount the shadow copy when it is no longer needed. To revert the shadow copy, right-click the shadow copy in the right list pane and select Revert. A warning log message is displayed asking the user to confirm the action. Force unmount of volume is not required if the volume is not in use by any process. Normally it is not needed, since the user would typically verify that all applications have all their “fingers” in a volume closed before doing a revert operation. Note: RepliStor does not support reverting shadow copies made using the CLARiiON provider. To display the properties of a shadow copy, right-click the shadow copy in the right list pane and select Properties. The Shadow Copy Properties window lists details about the shadow copy.
- 30. RepliStor Exchange Support Utility RepliStor Exchange Support facilitates creating and managing Exchange Server 2003 shadow copy backups via the Volume Shadow Copy Service (VSS) framework provided by Microsoft. Shadow copies are consistent, point-in-time data copies stored on the target system. Shadow copies allow you to obtain a consistent, restartable copy of the Exchange database. The installation of RepliStor Exchange Support is required if you are going to take Exchange Server 2003 shadow copy backups. Before creating Exchange shadow copies, you must install the RepliStor Exchange Support utility. The VSS- compliant shadow copy functionality is only supported on Windows 2003 systems. The RepliStor Exchange Support utility performs the following tasks during the install process: * Validates that RepliStor Version 6.1 or later is installed * Validates that Exchange 2003 is installed * Installs the latest Exchange 2003 .dll into the RepliStor directory * Prompts the user for failover parameters * Prompt the users for VSS parameters * Performs any configuration required. (Optionally) configures your system for failover. RepliStor Exchange Support can be configured to set up failover. In a failover configuration, you must validate that the source and target paths are identical. This is a requirement for RepliStor Exchange Support to provide failover functionality. Exchange Module Specifications A shadow copy is associated with one or more specifications. Typically, a group specification is created that specifies all the related data. For example, a group specification may specify an Exchange Storage Group. The slide shows the specifications created by exchange module from source to target (First Storage Group). Exchange module takes the Transaction log and Database path from the Microsoft exchange and creates specifications.
- 31. The RepliStor Troubleshooting Methodology Successful RepliStor troubleshooting requires a methodology that includes several elements. Because RepliStor is certified on Microsoft Windows and communicates with a target system, follow the methodology listed on the slide when troubleshooting a RepliStor environment. When errors or problems occur, it is important to review the errors in the RepliStor message log and the Windows Event log (Event Viewer). These help you identify the problem. After you know what the problem is, you can begin working on solutions. This chapter discusses solutions to problems in further detail. Using the Data Directory Files in the RepliStor Data directory have a .rdf extension. There are also log files in the Data directory. Deleting the RepliStor Data directory destroys replicated data and should be done only in certain circumstances such as when recovering the original environment. The tables below and on the following pages describe files in the Data directory. ActiveFile.rdf: Tracks all files open on the source. Displays log messages that list all files open during a failover. Block.rdf: Logs file operations for all files on the target that are blocked. Stores file operations for all file updates if Pause Updates is active. KernelCache.rdf: Contains file update, delete, rename and copy commands recorded by the kernel driver for files being mirrored. This is a memory mapped file and shows exactly what RepliStor is replicating. The file is written to only during shutdown. If a file operation cannot be queued because it is full, it then creates OC$xxxxx files. OC$xxxxx: Contains file update/delete/rename/copy commands recorded by the Kernel driver for files being mirrored. These files are written only if the KernelCache is full. When all the data in the file has been sent to and ack’d by the target, the file is marked as complete and deleted. SEND.targetsite.ACK: Contains an entry for each target machine receiving file updates. Each entry contains the last Kernel Cache entry offset or OC$ file and offset into the file that the target machine has acknowledged receiving. If you get a Kernel Cache Corrupt error, the most likely cause is that this file and the KernelCache were not updated together. To correct the problem, delete the data directory on the source and synchronize all specifications.
- 32. SEND.LID.rdf: Contains the latest load ID for the sender thread (in the RepliStor service). Whenever the sender starts or sends a new configuration to a remote site, the value in this file is updated by one. This ensures that if RepliStor goes down and restarts, all targets know their configuration is out of date and request another one. Send.rdf: Holds all Pending Sync entries. These are created during a synchronization if the sender could not open the file because it is in use. sharedmem.datrdf: Contains all Performance Monitor counters and is a memory mapped file. Smtp.rdf: Holds all messages queued to be sent as email. SnapshotSet.rdf: Contains information relating to the RepliStor VSS snapshots. SourceReport.year.month.day.hour.minute.csv & TargetReport.year.month.day.hour.minute.csv: Bandwidth simulation reports SyncStatus.rdf: Holds the Sync Status entries. Identifying Blocked Sites Occasionally, RepliStor exhibits specific issues by displaying information in the RepliStor GUI for blocked sites and files. A target site or replicated file on the target system can sometimes become blocked because of a connection problem or a communication error. These situations happen when the target site is down, a cable is unplugged or a replicated file is in use. When a target site or file becomes blocked, RepliStor no longer forwards or updates data from the source system to the target system. RepliStor provides several ways to help you identify a blocked site or file by displaying icons, messages, and other information to help you identify and resolve the issue. If a site is blocked, the target site’s light is red and the site’s computer icon displays one or more red Xs. If you see that a site is blocked, you must correct the problem. A blocked site displays a B status code next to the name of the site in the List area. If RepliStor also encounters a communications error for the site, a C status code also appears. To unblock the site, click the name of the blocked target site and select Unblock. RepliStor tries to establish a connection to the target system. If the connection is established successfully, RepliStor applies all updates that were stored for the target system.
- 33. If RepliStor successfully unblocks the site, the light is green and the red X is removed. If the blocked site error could last for an indefinite period of time, turn off mirroring and forwarding until the connection problem is resolved, rather than allowing file changes to accumulate on the source machine in the Data directory. Important: When the site becomes unblocked, RepliStor won’t automatically restart mirroring and forwarding if they are turned off. You must first turn mirroring and forwarding on and then resynchronize the specifications. Resolving Blocked Site Problems A site becomes blocked when its connection is broken or if it cannot be contacted at all. The most typical reasons for a blocked site are basic TCP/ IP connectivity problems. If a site cannot connect to a target site, try the following: 1. Ping the target site by name. 2. Ping the target site by IP address. 3. If you can ping the target site but it still won’t connect, look at the error given in the message log. − Is the error an authentication problem? − If the target computer is in another domain, you will need to provide credentials for the other domain in the site list entry. 4. Telnet into the target system with the following command: telnet target.company.com 7144 − If it does not connect, but ping works, there are several possibilities: RepliStor is not running on the target or there is a firewall between the two that is blocking that port. 5. On the target system make sure that RepliStor is running and that the client can connect to it. Use the following command to make sure that port 7144 and 7145 are in LISTEN mode. netstat –a 6. If the above steps do not yield any clues, turn on the debug logs and try to reconnect to the target.
- 34. Identifying Blocked Files A file becomes blocked when a file operation that has been received on the target cannot be applied to the target file. The blocked site displays a B status code next to the name of the site in the right pane of the workspace. This means the RepliStor server has lost its connection to the target server. A status code of C indicates a communication error, which means the RepliStor client has lost communication with that server. When a file becomes blocked, RepliStor displays a Blocked Files icon under the specification for the file and displays Warning log messages that detail the reason that it has been blocked. Listed below are some typical reasons that a file becomes blocked: y The disk is full on the target. y A file is open by another application on the target and cannot be updated. When a file is blocked, all further file operations for that file are queued in the block.rdf file and are NOT applied to the file. To unblock the file, click the Blocked Files icon in the tree pane and select Unblock. RepliStor tries to unblock the file. If it is successful, the name no longer appears in the list. If the name is still listed, make sure the problem is corrected and then try again to unblock the file. Note: RepliStor periodically reattempts to apply the first operation in the queue for that file. The default time period is 60 seconds. Using Performance Monitor Use the Windows Performance Monitor to view statistics on the performance of RepliStor software. The RepliStor Performance Monitor helps you: * Determine current activity * Check internal data structure − Identify target logs − Identify number of files open * Identify scaling or bandwidth issues * Identify bottlenecks * Optimize kernel cache size