
Empfohlen
Weitere ähnliche Inhalte
Was ist angesagt?
Was ist angesagt? (18)
Andere mochten auch
Andere mochten auch (16)
Ähnlich wie Digipak printscreens
Ähnlich wie Digipak printscreens (20)
Mehr von g3mmasmith
Kürzlich hochgeladen
Kürzlich hochgeladen (20)
Digipak printscreens
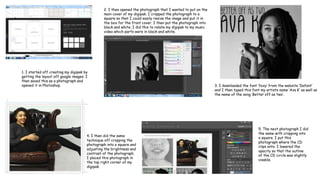
- 1. 1. I started off creating my digipak by getting the layout off google images. I then saved this as a photograph and opened it in Photoshop. 2. I then opened the photograph that I wanted to put on the main cover of my digipak. I cropped the photograph to a square so that I could easily resize the image and put it in the box for the front cover. I then put the photograph into black and white, I did this to relate my digipak to my music video which parts were in black and white. 3. I downloaded the font ‘foxy’ from the website ‘Dafont’ and I then typed this font my artists name ‘Ava K’ as well as the name of the song ‘Better off as two’. 4. I then did the same technique off cropping the photograph into a square and adjusting the brightness and contrast of the photograph. I placed this photograph in the top right corner of my digipak. 5. The next photograph I did the same with cropping into a square. I put this photograph where the CD clips onto. I lowered the opacity so that the outline of the CD circle was slightly visable.
- 2. 6. I cropped this photograph to a square to put in the top left hand corner of my digipak. I played around with the brightness and contrast of the photograph as well as the ‘Levels’ tab. 7. To create the bottom left hand square on the digipak I went onto google and typed in ‘white background with black boarder’ and put it onto Photoshop. I plan to use this to add the lyrics to one of the songs. 9. I cropped this photograph into a square. I went onto google and chose a barcode to place on the bottom left hand corner. 8. I copied the lyrics off ‘lyrics.com’ and centred them. I then chose the font which I felt was clear and easy to read. 10. I placed my Production Company logo which I created in the top right hand corner. My production company logo ‘R.A.G’ stands for Robyn, Amy and Gemma. 11. I then lastly, added the song names onto the back. I positioned the song names to the side of Ella so that the layout was clear and easy to read.