1. Thank you for purchasing a Bulletproof PCV Revamp. The kit should include the following components. Please
make sure they are all in the box before continuing. If you bought any additional upgrades their specific parts list
will be included separately. Required tools are not included.
A. PCV Nipple 1. 3/32 Allen Wrench
B. PCV Guidance Block 2. Flat Head Screw Driver
C. Manifold Block Off Plug 3. T25 Torx
D. 3 Set screws for Block Off Plug 4. Blue Loctite
E. One O-Ring for Block Off Plug
Step 1: Remove factory accordion hose that leads from the Intake manifold to the Front PCV
assembly. This is done by pinching the connectors on both sides.
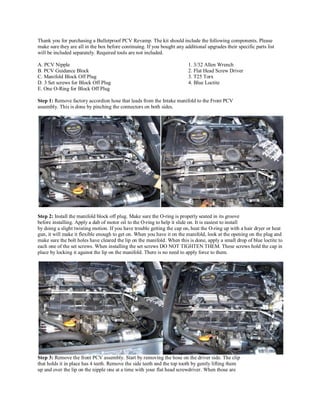
Step 2: Install the manifold block off plug. Make sure the O-ring is properly seated in its groove
before installing. Apply a dab of motor oil to the O-ring to help it slide on. It is easiest to install
by doing a slight twisting motion. If you have trouble getting the cap on, heat the O-ring up with a hair dryer or heat
gun, it will make it flexible enough to get on. When you have it on the manifold, look at the opening on the plug and
make sure the bolt holes have cleared the lip on the manifold. When this is done, apply a small drop of blue loctite to
each one of the set screws. When installing the set screws DO NOT TIGHTEN THEM. These screws hold the cap in
place by locking it against the lip on the manifold. There is no need to apply force to them.
Step 3: Remove the front PCV assembly. Start by removing the hose on the driver side. The clip
that holds it in place has 4 teeth. Remove the side teeth and the top tooth by gently lifting them
up and over the lip on the nipple one at a time with your flat head screwdriver. When those are
2. free of the lip, slide it off. Be patient with it, don’t break the clip. When the hose is removed,
then remove the 4 T25 torx screws holding the front PCV in place. Make sure to keep the screws
as they will be re-used. With the screws removed the front assembly will come off.
Step 4: Install the PCV Nipple and the PCV Guidance Block. First install the PCV Nipple. Line
it up using and re-install the factory screws. Start with the top corner of the nipple, tighten it as far as you can, then
re-install the lower screw. Double check that both screws are tight once done. Move on to the guidance block and
repeat this process. Start with the top screw, then move onto the lower one. Once installed and sitting flush reinstall
the factory PCV hose. This is a tight fit and you will want to guide the O-rings into the hole with the tip of your flat
head screwdriver.
Step 5: Start the car up and check for leaks. If the engine bucks or surges then you have a leak
and will need to make sure everything is seated properly. If you notice a putting sound coming
from your intake it is caused by the check valve in the PCV port on the rear of the valve cover.
This check valve is sealed at rest and when pressure builds up behind it the valve will open
creating a putt sound. This is not harmful and if found to be an annoyance the check valve can be
removed from the rear port.