SlideShare ist ein Scribd-Unternehmen logo
1 von 6
Downloaden Sie, um offline zu lesen
Step 0: Concept
This week I decided to create a "political topography" map. The map
shows the county by county results of the 2008 presidential election.
Higher areas on the map correspond to areas that voted more democratic.
The map data itself comes from a reprocessed version of the purple map.
Step 1: Reprocessing
In order to comvert the purple map into a mold I made a few
modifications. To get the "democraticness", I extracted the blue
channel from the image and converted it to greyscale. I then removed
all of the more spindly map features that might break off (sorry, New
Orleans) and added a thick black border around the image to serve as a
perimeter wall on the negative mold. After processing, the image looked
like this:
General Theory
For any molding and casting the process almost always is one of casting a
rigid (or soon to be rigid) material into a flexible material. This is so that the
casting (the part you want) can be easily removed from the mold. In our case
we add an extra step by cutting a rigid mold for the mold (kind-of confusing)
out of wax. If the part you want to make is made from a flexible material
(rubber or similar) you can simply cast into the wax mold. If, however, you
want a rigid part, you will need to design your wax mold so that you can pour
rubber into it to make the mold for your part. Think positive and negative
space.For a great description of a possible workflow see David Carr's page.
Step 1: Creating the Mold
There are several ways to create a mold, and your decision will mostly be
based upon the scale of your desired final piece.
Modella:
This is most appropriate for table-top sized pieces, such as chess pieces or a
gasket for an espresso maker.
You will carve into a piece of hard wax, usually purple or green.
The modella only really reads .png files if you're not creating something in
cad.py, unless the machine has been hooked up to its actual software.
*** Don't forget to design a wall onto your mold so that you have something
to pour your final cast INTO!
*** Make sure that the wax is stuck well in the Modella. If it moves in the
middle of carving, it is a huge pain!
Important things to know when setting it up:
• dark is far, white is near
• set height: xmin: 1 ymin: 1 --> do this to start at 1,1 the way we did for
the pcb boards
• xwidth: value (usually in inches)
• yheight: value (usually in inches)
• z min: set how deep you want the last cut to be. ie 1 = 1 inch.
• z max: set to .005 so that the tool comes back up above the material
between cuts
• nz: number of steps between the top of the material and the deepest cut
- definitely make it more than one if your cut has significant depth. 3-5
worked for me, but you should play around with this number.
• tool diameter - usually 1/8" so .125
• xy speed = 10, z speed = 10
Sample work flows:
• look into the program that you can get at deskproto.com(shopbot
pr960nSBP)
• photoshop/autocad->3dmax->render->.png
• photograph->.png image
Shopbot:
This is most appropriate for larger scale pieces.
You can work with soft foam on the shopbot, which is very easy to work with
but requires a lot of sealing. To seal it:
1. sand the piece with fine (120 -200 grit) sandpaper.
2. coat it with a thin layer of epoxy-- this is most easily done by brushing
on a layer, waiting a few minuets until it has set up a bit and gotten
sticky, and then brushing on another layer.
3. let cure then sand and repeat
4. do this until all the pores in the foam are well sealed.
Step 2: Rubber Mold
Here are some general notes for the rubber mold
o wear gloves, it's messy!
o shake the blue bottle well before using
o mix the blue and yellow in a 1:1 ratio, but it's not an exact
science so eyeballing is ok
o mixing: avoid getting air into the mix. either pour back and forth
between cups until you have a solid color (no lines) or stir in a
figure eight (8) motion with the wooden end of an ear swab
o tap cup gently to get the final bubbles out
o pour with a skinny neck to avoid bubbles
o over fill mold, the extra parts make it easier to remove the mold
later
o cure at 150F for 1hr (convection oven on convection mode) or
overnight at room temperature
Step 3: Casting
The Process:
o mix your material according to the directions. Note how long the
pot life (how long it stays liquid before it starts to cure) on the
instructions to see how long you have to work with the material.
o ** Don't Rush if you don't have to! **
o avoid air bubbles (see instructions in the rubber section above)
o if you have a two part mold, make sure your mold has a pour
spout and an air hole on the other end.
o clamp the two parts of the mold together (often heavy duty
rubber bands work for this)
o pour into mold through one hole until material begins to come
out air hole
o Tap mold gently to get all the trapped air out
o Leave to cure according to the material's instructions
o ** Don't pour down sink, it will set & clog pipes
o ** Don't eat, it will clog you!
Materials:
For making the mold (after you've cut the wax):
o Rubbers: there are two kinds of rubbers--Urethane and Silicone.
Depending on the composition these rubbers can be very similar
or very different. They can be strong or weak, need a variety of
releases, or none at all etc. The rubbers that are stocked in the lab
are:
o Smooth On PMC121 This is a durable urethane rubber that takes
16 hrs at room temperature to cure or 1 hr at 150 degrees F in the
oven.
o Smooth On Oomoo 25 This is silicone rubber that is a bit weaker
than the PMC121 but cures at room temperature in 75 min and is
great for quick trys.
For casting the part
o There are a huge host of materials you can use to cast your part.
Everything from plastics to metals to plaster to waxes.
Theoretically anything you can get into liquid, or semi-liquid
form can be cast into a mold. Materials that are stocked for this
class are:
o - thermoplastic, thermoset polymers - PDMS-- This is a clear,
very high resolution strong rubber. - polyurethane - plaster,
calcium sulfate - portland cement, calcium silicates - metal,
ceramic powder - waxes - gels - Additives: change properties
like density, conductivity, flexibility, color (eg. fibers, rebar,
dye) In addition to these <Smooth On carries a wide range of
materials and it's worth perusing their website. Or find some
other great material of your own!

Weitere ähnliche Inhalte

Mehr von Fab Lab LIMA

Tutorial scanner projector_I
Tutorial scanner projector_ITutorial scanner projector_I
Tutorial scanner projector_IFab Lab LIMA
 
3D Scanning & Printing
3D Scanning & Printing3D Scanning & Printing
3D Scanning & PrintingFab Lab LIMA
 
Manual grasshopper español
Manual grasshopper españolManual grasshopper español
Manual grasshopper españolFab Lab LIMA
 
Moulds and casting
Moulds and castingMoulds and casting
Moulds and castingFab Lab LIMA
 
Molding and Casting part2
Molding and Casting part2Molding and Casting part2
Molding and Casting part2Fab Lab LIMA
 
3 d molding and casting5
3 d molding and casting53 d molding and casting5
3 d molding and casting5Fab Lab LIMA
 
3 d molding and casting4
3 d molding and casting43 d molding and casting4
3 d molding and casting4Fab Lab LIMA
 

Mehr von Fab Lab LIMA (11)

Prefab1200
Prefab1200Prefab1200
Prefab1200
 
Tutorial scanner projector_I
Tutorial scanner projector_ITutorial scanner projector_I
Tutorial scanner projector_I
 
3D Scanning & Printing
3D Scanning & Printing3D Scanning & Printing
3D Scanning & Printing
 
Manual grasshopper español
Manual grasshopper españolManual grasshopper español
Manual grasshopper español
 
Moulds and casting
Moulds and castingMoulds and casting
Moulds and casting
 
Molding and Casting part2
Molding and Casting part2Molding and Casting part2
Molding and Casting part2
 
Fab lablima 3-5
Fab lablima 3-5Fab lablima 3-5
Fab lablima 3-5
 
3 d molding and casting5
3 d molding and casting53 d molding and casting5
3 d molding and casting5
 
3 d molding and casting4
3 d molding and casting43 d molding and casting4
3 d molding and casting4
 
Algoritmos
AlgoritmosAlgoritmos
Algoritmos
 
Cad cam cae
Cad cam caeCad cam cae
Cad cam cae
 

Molding and casting 1David Carr

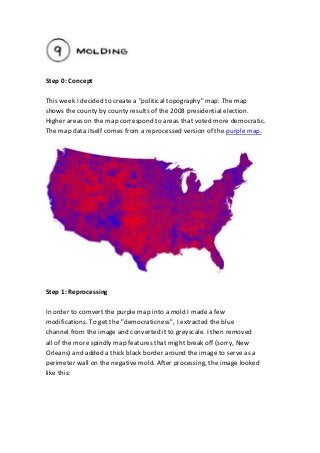
  • 1. Step 0: Concept This week I decided to create a "political topography" map. The map shows the county by county results of the 2008 presidential election. Higher areas on the map correspond to areas that voted more democratic. The map data itself comes from a reprocessed version of the purple map. Step 1: Reprocessing In order to comvert the purple map into a mold I made a few modifications. To get the "democraticness", I extracted the blue channel from the image and converted it to greyscale. I then removed all of the more spindly map features that might break off (sorry, New Orleans) and added a thick black border around the image to serve as a perimeter wall on the negative mold. After processing, the image looked like this:
  • 2. General Theory For any molding and casting the process almost always is one of casting a rigid (or soon to be rigid) material into a flexible material. This is so that the casting (the part you want) can be easily removed from the mold. In our case we add an extra step by cutting a rigid mold for the mold (kind-of confusing) out of wax. If the part you want to make is made from a flexible material (rubber or similar) you can simply cast into the wax mold. If, however, you want a rigid part, you will need to design your wax mold so that you can pour rubber into it to make the mold for your part. Think positive and negative space.For a great description of a possible workflow see David Carr's page. Step 1: Creating the Mold
  • 3. There are several ways to create a mold, and your decision will mostly be based upon the scale of your desired final piece. Modella: This is most appropriate for table-top sized pieces, such as chess pieces or a gasket for an espresso maker. You will carve into a piece of hard wax, usually purple or green. The modella only really reads .png files if you're not creating something in cad.py, unless the machine has been hooked up to its actual software. *** Don't forget to design a wall onto your mold so that you have something to pour your final cast INTO! *** Make sure that the wax is stuck well in the Modella. If it moves in the middle of carving, it is a huge pain! Important things to know when setting it up: • dark is far, white is near • set height: xmin: 1 ymin: 1 --> do this to start at 1,1 the way we did for the pcb boards • xwidth: value (usually in inches) • yheight: value (usually in inches) • z min: set how deep you want the last cut to be. ie 1 = 1 inch. • z max: set to .005 so that the tool comes back up above the material between cuts • nz: number of steps between the top of the material and the deepest cut - definitely make it more than one if your cut has significant depth. 3-5 worked for me, but you should play around with this number. • tool diameter - usually 1/8" so .125 • xy speed = 10, z speed = 10
  • 4. Sample work flows: • look into the program that you can get at deskproto.com(shopbot pr960nSBP) • photoshop/autocad->3dmax->render->.png • photograph->.png image Shopbot: This is most appropriate for larger scale pieces. You can work with soft foam on the shopbot, which is very easy to work with but requires a lot of sealing. To seal it: 1. sand the piece with fine (120 -200 grit) sandpaper. 2. coat it with a thin layer of epoxy-- this is most easily done by brushing on a layer, waiting a few minuets until it has set up a bit and gotten sticky, and then brushing on another layer. 3. let cure then sand and repeat 4. do this until all the pores in the foam are well sealed. Step 2: Rubber Mold Here are some general notes for the rubber mold o wear gloves, it's messy! o shake the blue bottle well before using o mix the blue and yellow in a 1:1 ratio, but it's not an exact science so eyeballing is ok o mixing: avoid getting air into the mix. either pour back and forth between cups until you have a solid color (no lines) or stir in a figure eight (8) motion with the wooden end of an ear swab
  • 5. o tap cup gently to get the final bubbles out o pour with a skinny neck to avoid bubbles o over fill mold, the extra parts make it easier to remove the mold later o cure at 150F for 1hr (convection oven on convection mode) or overnight at room temperature Step 3: Casting The Process: o mix your material according to the directions. Note how long the pot life (how long it stays liquid before it starts to cure) on the instructions to see how long you have to work with the material. o ** Don't Rush if you don't have to! ** o avoid air bubbles (see instructions in the rubber section above) o if you have a two part mold, make sure your mold has a pour spout and an air hole on the other end. o clamp the two parts of the mold together (often heavy duty rubber bands work for this) o pour into mold through one hole until material begins to come out air hole o Tap mold gently to get all the trapped air out o Leave to cure according to the material's instructions o ** Don't pour down sink, it will set & clog pipes o ** Don't eat, it will clog you!
  • 6. Materials: For making the mold (after you've cut the wax): o Rubbers: there are two kinds of rubbers--Urethane and Silicone. Depending on the composition these rubbers can be very similar or very different. They can be strong or weak, need a variety of releases, or none at all etc. The rubbers that are stocked in the lab are: o Smooth On PMC121 This is a durable urethane rubber that takes 16 hrs at room temperature to cure or 1 hr at 150 degrees F in the oven. o Smooth On Oomoo 25 This is silicone rubber that is a bit weaker than the PMC121 but cures at room temperature in 75 min and is great for quick trys. For casting the part o There are a huge host of materials you can use to cast your part. Everything from plastics to metals to plaster to waxes. Theoretically anything you can get into liquid, or semi-liquid form can be cast into a mold. Materials that are stocked for this class are: o - thermoplastic, thermoset polymers - PDMS-- This is a clear, very high resolution strong rubber. - polyurethane - plaster, calcium sulfate - portland cement, calcium silicates - metal, ceramic powder - waxes - gels - Additives: change properties like density, conductivity, flexibility, color (eg. fibers, rebar, dye) In addition to these <Smooth On carries a wide range of materials and it's worth perusing their website. Or find some other great material of your own!