1. Dragon In Flight (Version 2.5)
By Charles Esseltine.
I suggest that you should use a large (9 inch or larger) piece of foil (Florist foil is the best in my opinion.), for your first model. You can make the model from just
about any paper (Kami, Washi, waxed, plain, etc...), but the model will tend of suffer paper spread. So foil is the best. And Florist foil is very forgiving. If you
make a mistke, I mean mistake, it can be undone, and most creases can be pressed out. Begin the model white side up.
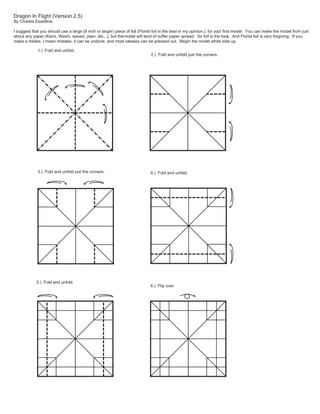
1.) Fold and unfold.
2.) Fold and unfold just the corners.
3.) Fold and unfold just the corners. 4.) Fold and unfold.
5.) Fold and unfold.
6.) Flip over
2. 8.) Fold the sides in. The corners will
7.) Fold and unfold. Then flip over. form mini-preliminary bases.
9a.) Choose one corner for 10.) Fold into the 11.) Unfold one flap.
the head. center line.
9b.) Fold the flap
to the tip.
14.) Repeat steps
11 - 13 on the other
12.) Squash fold. 13.) Fold it back. 15. Petal fold.
side.
17.) Unwrap the outer
16.) Fold the flap back layers. You will have to 18.) Squash fold. 19.) Petal fold. Now you
and forth. partially unfold it to do have a small Bird Base.
so. Refold the bottom.
3. X
20.) Fold the other three corners as shown. 21.) Fold into
a preliminary
base. Watch
the X.
22.) With the X
layers in front, fold 23.) Fold the point down to meet
the sides to the the edges formed in the last step.
center line. Repeat
behind.
24.) Sink the tip on the 25.) Open up the sides.
line created by the last
fold. If you partially
unfold it, it will be
much easier.
X
X
X X
X 28.) Repeat on
the back, but
27.) Pull out the inner
unfold the tail as
edges. Taking care not
26.) Petal Fold well. Flip over.
to unfold the head (X)
Front and Back
Press flat.
4. 29.) The tail should look 30.) Fold the layers of 31.) Fold the top layers 32.) Squash fold
like this. Flip over. the head together. to the center. Then
unfold.
33.) Flip this layer back. 34.) Flip all of the layers 35.) Repeat steps 31 36.) Open the
of the head, to the other through 33 on the other layers of the head,
side. side.
5. 37a.) Fold the edges into 37b.) The completed 39.) Squash fold.
38.) Using the other side
rabbit ears. folds. Now flip over.
as a guide for these
folds. Make a rabbit ear.
40.) Petal fold the tail.
41.) Inside reverse fold the wing outward.
Opening the wingtips as you do. The leading
edges will line up with line AB
42.) Fold the inner layer up on the front and back
of each wing.
A B
6. 43.) Fold down the front and back layers.
44.) Do a combination fold. Bring the top edge into
the centerline. This will lift up the top layer of the
wing. When the fold is complete, this edge will lie along
the leading edge of the wing. Repeat this on the other
three sides.
45.) Now open one side.
7. 46.) Now we get to the fun part! First bring the Far edge (A) to meet the unfolded edge (B). This will bring the first bisector fold (C) to the
center line (D). This will bring the wing's leading edges up as well. Fold the same as with the body, bringing the valey fold (c) to meet the
l
leading edge (d). When the folds are complete the model will not lie flat. In fact the two edges will be at right angles to the rest of the model.
D
C
A B
d
c
47.) Now fold the standing layers down.
48.) Compound fold the remaining layers along the same lines as in step 43. The model will now lie flat.
8. 49a.) Now repeat steps 45 - 48 on the other sides.
49b.) The model should look like this. This is also a good
time to flatten the dragon as much as possible. Make all of
the creases as sharp as you can. Here is where a hard flat
surface comes in handy. You can also use a rolling pin, ifone
is handy.
50.) Open out the model. Pulling the head and tail sections out, so that they lie flat, with the center section above the
wings standing perpendicular to the rest of the model. This easier done than said. You'll see what I mean, by lookingat
the next step.
9. 51a.) The next few steps deal
with the center section. First
open the middle. Spreading as 51b.) As the bottom spreads out it will 51c.) Finished. The edges don't have to be
you go. form a square box. sharp, but it helps.
10. 52a.) Bring in the sides, while you pull the front
and back outwards. Flatten the model.
52b.) It will look like this when done.
53.) Flip over.
11. 54.) Fold the head and tail sections to one side. 55.) Fold the edge into the center, shaping the
wing as you go.
56.) Flip both layers of the wing forward. 57.) Repeat step 55 on the back.
58.) Flip the wing, head, and tail over. 59.) Repeat 55-57. And return the
wing to its' starting position
12. 60.) It's starting to look like a dragon, isn't it?
61a.) Fun Time! No we fold the model ALMOST in half. The
Rotate 90 degrees.
center section is rather THICK. So we fold the head and tail in
half (a), but the bottom is to be folded in a U shape (b) with the
90 0 bottom almost flat.
a. b.
61b.) The wings should be between 30 and 90
degrees depending on what pose you want the dragon
to have. For the next steps we zoom in to the legs.
62.) Roll the leg down as far
as it will go.
64a.) Repeat steps 62 & 63 64b.) The legs are done.
for the other legs. Let's move on to the wings.
63.) Pinch the tip.
13. 65.) Fold the leading edge back. This will
cause the wings to move forward. The model
will not lie flat.
66a.) From the marker
fold, unfold all the layers.
This causes the wing to
take on a curve. You can
adjust this fold to reflect
different wing positions.
Then curve the
wingtip along the existing
lines.
Repeat on the other
wing. Shaping them to
taste.
66b.) The wings are done.
67.) Wrap the sides of the tail fin over
the tail.
68.) With a soft crease, curve the tail fin.
14. 69.) Outside reverse fold all layers of 70.) Fold the first layer to the top to
the head as shown. make the eyes.
71.) Inside reverse fold down the 72.) Inside reverse fold the teeth.
mouth. You don't have to pull it all the
way down. Do the mouth to taste.
73.) With a pencil, or a similarly pointed object, 74.) Spread the ears slightly.
open the eyes.
75.) Daragon done!