1. Minimalism, Photorealism 3D Interior
Form modeling to finish rendering
By Guning Deng
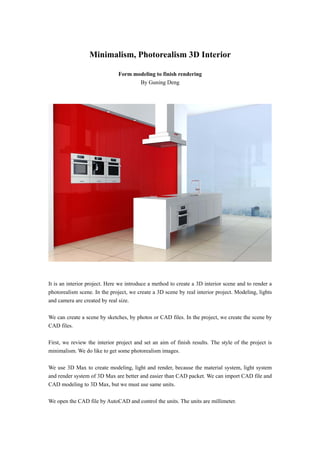
It is an interior project. Here we introduce a method to create a 3D interior scene and to render a
photorealism scene. In the project, we create a 3D scene by real interior project. Modeling, lights
and camera are created by real size.
We can create a scene by sketches, by photos or CAD files. In the project, we create the scene by
CAD files.
First, we review the interior project and set an aim of finish results. The style of the project is
minimalism. We do like to get some photorealism images.
We use 3D Max to create modeling, light and render, because the material system, light system
and render system of 3D Max are better and easier than CAD packet. We can import CAD file and
CAD modeling to 3D Max, but we must use same units.
We open the CAD file by AutoCAD and control the units. The units are millimeter.
2. Open 3D Max and set the units to millimeter.
Import the CAD file of the floor plan or the CAD modeling.
We create the scene and render the scene white modeling.
3. Create lights. In this scene we use skylight and mr Sky Portal. In any scene, we create lights by
skylight system and art light system. In an outside scene, we can use skylights to present nature
light effect. In an inside scene, only skylight is not enough. We use skylight system and art light
system. In the project we use skylight as a light source and mr Sky Portal to present the light from
windows and a light full space.
The parameters of mr Sky Portal are not complex.
If the scene is too dark, you can add ‘On Multiplier’ of ‘Energy’ in ‘Mental ray Indirect
Illumination’
‘mr Sky Portal’ can visible to renderer. You can select a color or/and Bitmap to ‘mr Sky Portal’.
One of the parameters of mr Sky Portal is ‘Shadow Samples’. Sometimes, the quality of the white
modeling is low, because they have black spots. We can set the ‘Shadow Samples’ to 32 or higher.
Now, we can render the white modeling and check the resultant of the effect. If it is right, we can
add materials.
We render images with high resolution 300 dip. We can adjust the color by Photoshop.