SlideShare ist ein Scribd-Unternehmen logo
1 von 10
Downloaden Sie, um offline zu lesen
The Aspen Mini Orange
pumps is designed to
be installed:
• above the false ceiling
where possible
• behind wall mounted
evaporators
• in plastic conduit
By connecting the drain hose to the
reservoir and placing the pump drive
unit within the evaporator, condensate
water can be pumped away to a
suitable drain.
Within the Orange kit there are two
reservoirs to choose from, which must
sit flat and horizontal. One allows you
to connect directly to the drain hose
of the evaporator and the second
reservoir can be placed directly into
a condensate tray.
Dimensions:
Height: 51mm
Width: 107mm
Depth: 39mm
Weight: 0.25kg
Power Supply:
• 230V AC, 16W
• 1PH 50 Hz
• 3A volt-free alarm wires, N.O.,
N.C. contacts rated @ 5A
inductive at 230V
In The Box:
• Mini Orange pump
• Reservoir
• Submersible reservoir
• Inlet tube
• Orange inlet tube and vinyl tube
• 6-pin socket lead assembly
• Cable ties and self-adhesive
velcro strips
• Drain tray connector
Other Features:
• Hall effect semi conductor level
sensors, with high level safety
• Fully potted
• Thermally protected
• CE marked
Performance:
• Water flow rate:
12ltrs/hour at zero head
• Maximum recommended
head: 10 metres
• 23dB(A) @ 1 metre
Technical Specification l Mini Pumps
Mini Orange
Part No: FP2212
ASPEN-5/09
CONDENSATE DRAIN TRAY
CONDUIT
VINYL TUBE
EXAMPLE
POSITIONS
1 ABOVE CEILING
2 INSIDE CONDUIT
3 BEHIND
EVAPORATOR
FALSE CEILING
EVAPORATOR COIL
15
12
9
6
3
0
0 3 6 9 12 15
LITRES PER HOUR
METRESHEAD
WE RECOMMEND USING THIS PUMP FOR
NO GREATER THAN 10m HEAD
(WITH 1m SUCTION LIFT)
System Location:
HORIZONTAL
30m 60m 90m
3m 7.2 7.0 6.6 Ltr/Hr
2m 7.3 7.1 7.1 Ltr/Hr
100m Max
VERTICAL
SUCTION
15
12
9
6
3
0
0 3 6 9 12 15
LITRES PER HOUR
METRESHEAD
WE RECOMMEND USING THIS PUMP FOR
NO GREATER THAN 10m HEAD
(WITH 0m SUCTION LIFT)
PROVEEDORATERMICADELNORTE,SADECV
Nardo#911Ote.,Col.Cementos,Monterrey,NL64520
Tel(81)8125-7300,(800)837-6300/Fax(81)8125-7308,(800)837-6300
www.proveedoratermica.com
Serial No. / Nº de Série / Serien Nummer
Nº de Serie / N. di Serie
Date installed / Date d’installation / Installationsdatum
Fecha de Instalación / Data installazione
Location of pump / Situation de la pompe / Installationsort
Ubicación de la bomba / Luogo installazione
GB
F
D
E
I
Thank you for buying your new Mini/Maxi Orange Pump.
This manual gives instructions on the correct installation, so it is important
that you follow these instructions carefully. Please record the following
information for your future reference:
Merci pour l'achat de votre nouvelle pompe Mini/Maxi Orange.
Cette notice donne les instructions pour une installation correcte qu'il est
important de suivre pour un bon fonctionnement de la pompe. Merci de
noter ci-après les références pour vos futurs suivis:
Vielen Dank für den Kauf einer neuen Mini/Maxi Orange
Kondensatpumpe. Diese Bedienungsanleitung gibt Ihnen Anweisungen
zur korrekten Installation, lesen Sie bitte diese Anweisungen sorgfältig. Bitte
tragen Sie folgende Informationen für spätere Rückfragen ein:
Gracias por haber seleccionado la nueva Bomba Mini/Maxi Orange.
Este manual le proporcionamos las instrucciones para una correcta
instalación, por lo que le recomendamos lo lea atentamente. Cumplimente
la siguiente información para cualquier futura consulta:
Vi ringraziamo per l’acquisto della vostra nuova pompa Mini/Maxi
Orange. Questo manuale fornisce le istruzioni per la sua corretta
installazione pertanto è importante che esse vengano seguite attentamente.
Vogliate scrivere i seguenti dati per future esigenze:
mini & maxi orange pump
PROVEEDORA TERMICA DEL NORTE, SA DE CV
Nardo #911 Ote., Col. Cementos, Monterrey, NL 64520
Tel (81) 8125-7300, (800) 837-6300 / Fax (81) 8125-7308, (800) 837-6300
www.proveedoratermica.com
1. Assembled Orange pump
2. Assembled inline reservoir, including:
a. lid & sensor cable
b. float
c. filter
d. reservoir
3. Submersible reservoir
4. 150mm / 6” length of 6mm / 1/4” i/d
vinyl tube
5. Orange inlet tube
6. 1.5m / 5’ length of 6mm / 1/4” i/d vinyl tube
7. 6-pin socket lead assembly (1.5m / 5’)
8. (4 x) 300 x 3.6mm / 12” x 1/8” cable ties
9. (2 x) 140 x 3.6mm / 5.5” x 1/8” cable ties
10. (2 x) self adhesive velcro strips
11. Drain tray connector
*NOTE:
You will need several metres of 6 x 9mm / 1/4”
x 3/8” i/d vinyl tube.
1. Corpo pompa pre assemblato
2. Serbatoio composto da :
a. coperchio con cavo sensore (1.5 m / 5’)
pre assemblato e spinotto terminale ad
innesto rapido
b. galleggiante con magnete
c. filtro
d. serbatoio standard
3. Serbatoio sommergibile
4. Tubo vinilico di sfiato
(150 mm / 6” x 6 mm / 1/4” d/i)
5. Connettore in gomma di colore arancio
(220 mm / 8.7” x 14 mm / 1/2” d/i)
6. Tubo vinilico (1.5 m / 5’ x 6 mm / 1/4” d/i)
7. Spinotto elettrico a 6 terminali completo di
1.5 m / 5’ di cavo elettrico e cavo allarme
Accessori inclusi nella confezione:
8. 4 x fascette ferma cavo
(300 x 3.6 mm / 12” x 1/8”)
9. 2 x fascette ferma cavo
(140 x 3.6 mm / 5.5” x 1/8”)
10. 2 x strisce di velcro adesive
11. 1 x connettore opzionale per manicotto
di scarico dell'unità evaporante
*NOTA:
Occorreranno, in uscita dalla pompa, metri
aggiuntivi di tubo vinilico da 6 mm / 1/4” d/i.
I
1. Conjunto bomba Orange
2. Conjunto depósito incluyendo:
a. tapa y cable del sensor
b. flotador
c. filtro
d. depósito
3. Depósito sumergible
4. 150 mm / 6” de tubo de vinilo øi de
6 mm / 1/4”
5. Tubo de entrada
6. 1,5m / 5’ de tubo de vinilo øi de 6 mm / 1/4”
7. Conjunto clavija de 6 pins (1.5 m / 5’)
8. 4 bridas de 4 x 300 x 3.6 mm / 12” x 1/8”
9. 2 bridas de 2 x 140 x 3.6 mm / 5.5” x 1/8”
10. 2 x cintas velcro autoadhesivas
11. Conector a la bandeja condensados
*NOTA IMPORTANTE:
Necesitará también varios metros de tubería de
plástico de 6 x 9 mm / 1/4” x 3/8”.
E
1. 1 x Pumpeneinheit mit Steuerung
2. 1 x Schwimmermodul (40 x 80 x 40 mm)
(Anschluss an den Kondensatablass)
a. Deckel mit Sensorkabel
b. Schwimmer
c. Filter
d. Schwimmergehäuse
3. 1 x Schwimmermodul (40 x 68 x 40 mm)
(Aufstellung in der Kondensatwanne)
4. 1 x 150 mm / 6” Entlüftungsschlauch
6 mm / 1/4” ø
5. 1 x Elastisches Anschlussstück (orange)
6. 1 x 1,5 m / 5’ Saugschlauch 6 mm / 1/4” ø
7. 1 x ca. 1.5 m / 5’ Anschlusskabel mit Stecker
8. (4 x) 300 x 3.6 mm / 12” x 1/8” Kabelbinder
9. (2 x) 140 x 3.6 mm / 5.5” x 1/8” Kabelbinder
10. (2 x) Velcro – Klettstreifen
11. Anschlußstück Kondensatwanne
*BEMERKUNG:
Es werden einige Meter Vinylschlauch 6 x 9 mm /
1/4” x 3/8” ø benötigt.
D
3
In the box / DANS LA BOITE / LIEFERUMFANG / EN LA CAJA / NELLA CONFEZIONE
1. Unité de pompage
2. l'ensemble réservoir monté comprend :
a. couvercle et cable de détection
b. flotteur
c. filtre
d. réservoir
3. Réservoir submersible
4. 150 mm / 6” de longueur du cristal de
6x9 mm / 1/4”x 3/8”
5. Tube Orange d'arrivée des condensats
6. 1,5 m / 5’ tube cristal 6x9 mm / 1/4” x 3/8”
7. Prise electrique 6 fiches (1.5 m / 5’)
8. (4 x) 300 x 3.6 mm / 12” x 1/8” collier
9. (2 x) 140 x 3.6 mm / 5.5” x 1/8” collier
10. (2 x) velcro auto adhésif
11. Raccord 16 mm vers 14-16-18
*PRIÈRE DE NOTER:
Vous aurez aussi besoin de plusieurs mètres de
tubes vinyles diamètre intérieur 6 mm / 1/4”
diamètre extérieur 9 mm / 3/8”.
F
2
GB
1
4
6
2a
2b2c
2d
7
*
5
3
11
5
Technical Data / DONÉES TÉCHNIQUES /
TECHNISCHE DATEN / DATOS TÉCNICOS /
DATI TECNICI
4
GB
Mini Orange 120V / 60Hz 230V / 50Hz
Power supply 0.29A / 15W 0.17A / 16W
Max. water flow rate / hr @ 0m / ft 12L / 3.2 US Gal 12L / 3.2 US Gal
Max. recommended head 10m / 33ft 10m / 33ft
Sound level @ 1m 24 dB(A) 23 dB(A)
Continuously rated
Class l appliance
Maxi Orange 120V / 60Hz 230V / 50Hz
Power supply 0.43A / 20W 0.15A / 15W
Max. water flow rate / hr@ 0m / ft 40L / 10.6 US Gal 26L / 6.9 US Gal
Max. recommended head 15m / 49ft 20m / 66ft
Sound level @ 1m 36 dB(A) 35 dB(A)
Non-continuously rated: 5 mins on / 5 mins off
Class ll appliance
Mini & Maxi Orange
• 3A volt-free alarm wires, N.O.,
N.C. contacts rated @ 5A
inductive at 230V
• Hall effect semi conductor level
sensors, with high level safety
• Maximum water temperature:
40ºC / 104ºF
• Discharge tube: 6mm / 1/4” i/d
• CE Marked
• Thermally protected
• Fully potted
• Suction lift: 1m / 3.3ft
F
Mini Orange 120V / 60Hz 230V / 50Hz
Tension mono 0.29 A / 15 W 0.17 A / 16 W
Débit maximum / hr @ 0 m / ft 12 L / 3.2 US Gal 12 L / 3.2 US Gal
Hauteur de relevage recommandée 10 m / 33 ft 10 m / 33 ft
1 m et point de fonctionnement 24 dB(A) 23 dB(A)
Pas de fonctionnement continu
Produit Class l
Maxi Orange 120V / 60Hz 230V / 50Hz
Tension mono 0.43 A / 20 W 0.15 A / 15 W
Débit maximum /hr @ 0 m / ft 40 L / 10.6 US Gal 26 L / 6.9 US Gal
Hauteur de relevage recommandée 15 m / 49 ft 20 m / 66 ft
1 m et point de fonctionnement 36 dB(A) 35 dB(A)
Pas de fonctionnement continu : Marche 5 minutes / Arrêt 5 minutes
Produit Class ll
Mini & Maxi Orange
• Contact d’alarme, N.O, N.C 3A
• Detection par semi conducteur
avec un niveau haut d’alarme
• Température maximum des
condensats : 40ºC / 104ºF
• Tube d’évacuation 6 x 9 mm /
1/4” x 3/8”
• Produit CE
• Protection thermique
• Moulée dans de la résine
• Auto amorçante à 1 m / 3.3 ft
D
Mini Orange 120V / 60Hz 230V / 50Hz
Leistungsaufnahme 0.29 A / 15 W 0.17 A / 16 W
Fördermenge max. bei 0 m / ft 12 L / 3.2 US Gal 12 L / 3.2 US Gal
Förderhöhe: max. 10 m / 33 ft 10 m / 33 ft
Geräuschpegel in 1 m Abstand 24 dB(A) 23 dB(A)
Betriebsart S1: Deuerbetrieb
Schutzklasse l
Maxi Orange 120V / 60Hz 230V / 50Hz
Leistungsaufnahme 0.43 A / 20 W 0.15 A / 15 W
Fördermenge max. @ 0 m / ft 40 L / 10.6 US Gal 26 L / 6.9 US Gal
Förderhöhe: max. 15 m / 49 ft 20 m / 66 ft
Geräuschpegel in 1 m Abstand 36 dB(A) 35 dB(A)
Betriebsart S3: 5 min ein / 5 min aus
Schutzklasse ll
Mini & Maxi Orange
• Sicherheitsschaltung 3 A
• Schaltung durch “Hall-Effekt”
• Maximale Wassertemperatur:
40ºC / 104ºF
• Entladung Schlauch:
6 mm / 1/4” i/d
• CE-Kennzeichnung
• Integrierter
Thermoschutzschalter
• Komplett vergossen
• Saughöhe: 1 m / 3.3 ft
E
Mini Orange 120V / 60Hz 230V / 50Hz
Alimentación eléctrica 0.29 A / 15 W 0.17 A / 16 W
Caudal máximo a 0 m / ft de altura 12 L / 3.2 US Gal 12 L / 3.2 US Gal
Máxima altura recomendada 10 m / 33 ft 10 m / 33 ft
Nivel sonoro @ 1m 24 dB(A) 23 dB(A)
Funcionamiento continuo
Clase l
Maxi Orange 120V / 60Hz 230V / 50Hz
Alimentación eléctrica 0.43 A / 20 W 0.15 A / 15 W
Caudal máximo a 0 m / ft de altura 40 L / 10.6 US Gal 26 L / 6.9 US Gal
Máxima altura recomendada 15 m / 49 ft 20 m / 66 ft
Nivel sonoro @ 1m 36 dB(A) 35 dB(A)
Funcionamiento discontinuo: Marcha 5 minutos / Paro 5 minutos
Clase ll
Mini & Maxi Orange
• Contactos de alarma N/O N/C 3A
• Sensor de nivel con
semi-conductor efecto Hall
• Temperatura máxima del agua:
40ºC / 104ºF
• Tubo de descarga: 6 mm / 1/4” øi
• Normas CE
• Protección térmica
• Sistema totalmente
encapsulado
• Autocebante a 1m / 3.3 ft
I
Mini Orange 120V / 60Hz 230V / 50Hz
Tensione di alimentazione 0.29 A / 15 W 0.17 A / 16 W
Portata d’acqua/ora @ 0m / ft 12 L / 3.2 US Gal 12 L / 3.2 US Gal
Prevalenza massima consigliata 10 m / 33 ft 10 m / 33 ft
Livello di rumorosità @ 1 metro 24 dB(A) 23 dB(A)
La pompa può funzionare in continuo
Apparecchiatura in Classe l
Maxi Orange 120V / 60Hz 230V / 50Hz
Tensione di alimentazione 0.43 A / 20 W 0.15 A / 15 W
Portata d’acqua/ora @ 0m / ft 40 L / 10.6 US Gal 26 L / 6.9 US Gal
Prevalenza massima consigliata 15 m / 49 ft 20 m / 66 ft
Livello di rumorosità @ 1 metro 36 dB(A) 35 dB(A)
La pompa non può funzionare di continuo:
5 minuti on / 5 minuti off
Apparecchiatura in Classe ll
Mini & Maxi Orange
• Cavi allarme liberi da tensione
3A Contatti disponibili N/O N/C
• Sensore di livello dell'acqua a
semiconduttori con effetto Hall
• Temperatura massima dell’acqua di
scarico: 40ºC / 104ºF
• Tubo di scarico: 6 mm / 1/4” d/i
• Omologata CE
• Protezione d’arresto per
surriscaldamento
• Motore pompa rivestito in resina:
per riduzione rumorosità e
protezione infiltrazioni acqua
• Altezza massima di aspirazione:
1 metro / 3.3 ft
76
WE RECOMMEND USING THIS PUMP FOR NO GREATER THAN 10m / 33ft HEAD
NOUS RECOMMANDONS DE LIMITER L'UTILISATION DE LA POMPE À 10 MÈTRES / 33 ft
WIR EMPFEHLEN, DIE PUMPE NICHTE BEI FÖRDERHÖHEN ÜBER 10 m / 33 ft ZU BETREIBEN
SE RECOMIENDA NO USAR ESTA BOMBA EN ALTURAS SUPERIORES A 10 m / 33 ft
CONSIGLIAMO DI NON USARE QUESTA POMPA CON PREVALENZE SUPERIORI
A 10 METRI / 33 ft
WE RECOMMEND USING THIS PUMP FOR NO GREATER THAN 20m / 66ft HEAD
NOUS RECOMMANDONS DE LIMITER L'UTILISATION DE LA POMPE À 20 MÈTRES / 66 ft
WIR EMPFEHLEN, DIE PUMPE NICHT BEI FÖRDERHÖHEN ÜBER 20 m / 66 ft ZU BETREIBEN
SE RECOMIENDA NO USAR ESTA BOMBA EN ALTURAS SUPERIORES A 20 m / 66 ft
CONSIGLIAMO DI NON USARE QUESTA POMPA CON PREVALENZE SUPERIORI
A 20 METRI / 66 ft
Typical Performance (230V) PERFORMANCE /
KENNLINIE / FUNCIONAMIENTO HABITUAL /
PRESTAZIONI TIPICHE
LITRES PER HOUR / LITRES PAR HEURES / FÖRDERMENGE
(l/h) / CAUDAL EN LITROS/HORA / LITRI PER ORA
15
12
9
6
3
0
0 3 6 9 12 15
25
20
15
10
5
0
0 5 10 15 20 25
METRESHEAD/HAUTEUREN
MÈTRE/FÖRDERHÖHE(m)/
ALTURAENMETROS/
PREVALENZAINMETRI
MINI ORANGE – 1m / 3.3ft SUCTION LIFT /
1 m / 3.3 ft DE HAUTEUR D’ASPIRATION /
SAUGHÖHE 1 m / 3.3 ft / ALTURA DE ASPIRACIÓN:
1 m / 3.3 ft / ASPIRAZIONE VERTICALE DI 1 m / 3.3 ft
LITRES PER HOUR / LITRES PAR HEURE / FÖRDERMENGE
(l/h) / CAUDAL EN LITROS/HORA / LITRI PER ORA
15
12
9
6
3
0
0 3 6 9 12 15
25
20
15
10
5
0
0 5 10 15 20 25
METRESHEAD/HAUTEUREN
MÈTRE/FÖRDERHÖHE(m)/
ALTURAENMETROS/
PREVALENZAINMETRI
MINI ORANGE – NO SUCTION LIFT / POMPE EN
CHARGE (SANS DEPRESSION) / KEINE SAUGHÖHE /
NO TIENE ALTURA DE ASPIRACIÓN / SIN ASPIRACIÓN
US GALLONS PER HOUR / US GALLONS PAR HEURES /
US GALLONEN PRO STUNDE / US GALONES POR HORA /
US GALLONS PER ORA
50
40
30
20
10
0
0 1 2 3 4
80
60
40
20
0
0 1 2 3 4 5 6
FEETHEAD/HAUTEURENFT/
FÖRDERHÖEINFUSS/ALTURA
ENPIES/PREVALENZAINFT
US GALLONS PER HOUR / US GALON PAR HEURES /
US GALLONEN PRO STUNDE / US GALONES POR HORA /
US GALLONS PER ORA
50
40
30
20
10
0
0 1 2 3 4
80
60
40
20
0
0 1 2 3 4 5 6
FEETHEAD/HAUTEURENFT/
FÖRDERHÖEINFUSS/ALTURA
ENPIES/PREVALENZAINFT
LITRES PER HOUR / LITRES PAR HEURES / FÖRDERMENGE
(l/h) / CAUDAL EN LITROS/HORA / LITRI PER ORA
METRESHEAD/HAUTEUREN
MÈTRE/FÖRDERHÖHE(m)/
ALTURAENMETROS/
PREVALENZAINMETRI
MAXI ORANGE – 1m / 3.3ft SUCTION LIFT /
1 m / 3.3 ft DE HAUTEUR D’ASPIRATION /
SAUGHÖHE 1 m / 3.3 ft / ALTURA DE ASPIRACIÓN:
1 m / 3.3 ft / ASPIRAZIONE VERTICALE DI 1 m / 3.3 ft
LITRES PER HOUR / LITRES PAR HEURE / FÖRDERMENGE
(l/h) / CAUDAL EN LITROS/HORA / LITRI PER ORA
METRESHEAD/HAUTEUREN
MÈTRE/FÖRDERHÖHE(m)/
ALTURAENMETROS/
PREVALENZAINMETRI
MAXI ORANGE – NO SUCTION LIFT / POMPE EN
CHARGE (SANS DEPRESSION) / KEINE SAUGHÖHE /
NO TIENE ALTURA DE ASPIRACIÓN / SIN ASPIRACIÓN
US GALLONS PER HOUR / US GALLONS PAR HEURES /
US GALLONEN PRO STUNDE / US GALONES POR HORA /
US GALLONS PER ORA
FEETHEAD/HAUTEURENFT/
FÖRDERHÖEINFUSS/ALTURA
ENPIES/PREVALENZAINFT
US GALLONS PER HOUR / US GALON PAR HEURE /
US GALLONEN PRO STUNDE / US GALONES POR HORA /
US GALLONS PER ORA
FEETHEAD/HAUTEURENFT/
FÖRDERHÖEINFUSS/ALTURA
ENPIES/PREVALENZAINFT
Preventing Siphoning advice / EMPECHER
LE SIPHONAGE: CONSEILS / “HEBER – EFFEKT”: LÖSUNG /
RECOMENDACIONES PARA EVITER EL EFECTO SIFON /
CONSIGLI PER LA PREVENZIONE DELL’EFFETTO SIFONE
D
F
Cut discharge tube above water level of evaporator tray and direct end into large pipe,
allowing air break.
Couper le tuyau de refoulement au dessus du niveau d'eau de l'évaporateur et introduire le
tuyau directement à l'intérieur d'un tuyau plus large.
Das Ende der Druckleitung darf nicht tiefer enden als der Wasserstand in der
Kondensatwanne. Der Druckschlauch kann danach in ein größeres Ablaufrohr eingeführt
werden.
Mantenga el extremo final del tubo de descarga por encima del nivel de la bandeja
de condensados.
Tagliare il tubo di scarico sopra il livello dell'acqua della vaschetta del condizionatore come
rappresentato nella figura sottostante. ATTENZIONE: assicurarsi sempre che la lunghezza del
tratto orizzontale sia superiore a quella del tratto verticale per caduta
e che l’uscita superiore del tubo di sfiato del serbatoio superi il livello dell’acqua
della vaschetta.
GB
I
E
D
F
GB 1. FALSE CEILING
2. END OF DISCHARGE TUBE
3. WATER LEVEL IN DRAIN TRAY
4. AIR BREAK
5. TOP OF BREATHER TUBE
1. FAUX PLAFOND
2. FIN DU TUYAU DE REFOULEMENT
3. NIVEAU D'EAU DANS LE PLATEAU
4. PRISE D’AIR
5. NIVEAU HAUT DU TUBE D’ÉVENT
1. ZWISCHENDECKE
2. ENDE DER DRUCKLEITUNG
3. WASSERSTAND DER KONDENSATWANNE
4. ATMOSPHÄRE
5. ENDE DES ENTLÜFTUNGS-SCHLAUCHS
1. FALSO TECHO
2. EXTREMO DEL TUBO DE DESCARGA
3. NIVEL DE AGUA EN LA BANDEJA
4. TOMA DE AIRE
5. NIVEL SUPERIOR DEL TUBO DE
RESPIRACIÓN
1. CONTRO-SOFFITTO
2. FINE TUBO VINILICO DI SCARICO
3. LIVELLO DELL'ACQUA NELLA
VASCHETTA
4. PUNTO DI INNESTO NEL CONDOTTO
DI SCARICO
5. USCITA SUPERIORE TUBO DI SFIATO
E
I
5
2
3
4
1
* *
*
*
*
*
*
*
*
*
98
• ATTENZIONE: La pompa Orange è stata
progettata per il solo impiego con acqua.
• AVVERTENZA: Rischio di scossa elettrica.
Questa pompa non è stata testata per l'uso
all'interno di piscine o in aree marine.
• Accertarsi che la pompa sia scollegata dalla
tensione di rete prima di effettuare qualsiasi
messa a punto o manutenzione.
• L’isolamento dei collegamenti elettrici deve
essere fatto a regola d’arte e realizzato in
conformità con le normative vigenti.
• Se il cavo di alimentazione fornito in
confezione fosse danneggiato, dovrà essere
sostituito con un nuovo cablaggio originale
fornito dal produttore.
• Non azionare la pompa in assenza di acqua.
• Assicurarsi sempre che il magnete del
galleggiante sia rivolto verso l’alto.
• Assicurarsi sempre che il serbatoio sia in
posizione piana e orizzontale.
• La pompa è adatta per la maggior parte
degli ambienti. E’ però sconsigliato il suo
impiego in ambienti oleosi o particolarmente
polverosi.
• Da utilizzare solo per uso interno.
• Pompa non sommergibile.
I
• ATENCION: La bomba Orange ha sido
diseñada para funcionar solo con agua.
• CUIDADO: Riesgo de descargas eléctricas.
Esta bomba no ha sido diseñada para ser
utilizada en piscinas ni aplicaciones marinas.
• La instalación eléctrica y el aislamiento de
la bomba debe efectuarse según las normas
eléctricas vigentes.
• Desconectar la alimentación eléctrica de la
bomba antes de efectuar cualquier
intervención en la misma.
• Si el cable de alimentación está estropeado,
debe ser reemplazado por un cable especial
suministrado por el fabricante o su proveedor.
• No hacer funcionar esta bomba en vacío.
• Asegurarse que el imán del flotador está
colocado en la parte superior.
• Asegurarse que el depósito está colocado
plano y horizontal.
• La bomba está adaptada a la mayoría de
los ambientes. No está recomendada
cuando el ambiente es particularmente
polvoriento u oleoso.
• Instalación únicamente en el interior.
• Esta bomba no es sumergible.
E
Product Safety / PRÉCAUTIONS D’INSTALLATION / PRODUKTSICHERHEIT / GARANTIA DE PRODUCTO /
NORME DI SICUREZZA
• ACHTUNG: Die Orange Systempumpe
ist nur für die Wasserförderung entwickelt
worden.
• WARNUNG: Gefahr eines Stromschlags. Die
Orange Pumpe ist nicht für den Einsatz in
oder an Schwimmbädern oder
Hafenanlagen entwickelt worden.
• Die Pumpe darf nur durch autorisiertes
Fachpersonal angeschlossen werden.
• Die Stromzufuhr ist vor jeglicher Arbeit an
der Orange Pumpe zu unterbrechen.
• Sollte das Stromkabel beschädigt sein, so ist
es mit einem als Zubehör erhältlichen Kabel
zu ersetzen.
• Verhindern Sie Trockenlauf.
• Vergewissern Sie sich, dass der Schwimmermagnet
nach oben zeigend eingebaut ist.
• Vergewissern Sie sich, dass das
Schwimmergehäuse waagerecht steht.
• Die Orange Pumpe ist vielfältig einsetzbar.
Wenn die Umgebung ölig oder stark
verschmutzt ist der Einsatz der Orange Pumpe
nicht zu empfehlen.
• Die Pumpe nur im Innenbereich verwenden.
• Nicht als Tauchpumpe einsetzbar.
D
• ATTENTION : La pompe d'Orange a été
évaluée pour l'usage avec de l'eau seulement.
• AVERTISSEMENT : Risque de décharge
électrique. Cette pompe n'a pas été étudiée
pour l'usage dans une piscine, un aquarium
ou en fonctionnement immergé.
• L’isolement électrique de la pompe doit
être réalisé dans les règles de l’art.
• S’assuré que la pompe est débranchée
électriquement avant toute opération de
maintenance ou entretien.
• Si le cordon en emdommagé, il est indispensable
de le changé par un nouveau cordon.
• Ne pas faire fonctionner cette pompe à sec.
• S’assurer que l’aimant du flotteur est
toujours positionner vers le haut.
• S’assurer que le réservoir est toujours
positionné à l’horizontal et à plat.
• La pompe est adaptée à la plupart des
environnements. Elle n’est pas recomman dé
dans les environnements sales, poussiéreux,
huileux.
• Installation uniquement à l’intérieur.
• Cette pompe n’est pas ne pompe submersible.
F
• CAUTION: The Orange Pump has been
evaluated for use with water only.
• WARNING: Risk of electric shock. This pump
has not been investigated for use in
swimming pool or marine areas.
• The means for isolation must be
incorporated in the fixed wiring in
accordance with wiring regulations.
• Ensure the pump is disconnected from the
mains supply before carrying out any
adjustments or servicing.
• If the cord is damaged, it must be replaced
with a special cord or assembly available
from the manufacturer or it’s service agent.
• Do not run this pump dry.
• Always ensure the metal magnet in the
float is facing upwards.
• Always ensure the reservoir is sitting flat
and horizontal.
• The Pump is ideal for most working and
living environments. It is not recommended
where the environment is oily or
particularly dusty.
• Acceptable for indoor use only.
• Non-submersible pump.
GB
4
D
F
Fit breather tube to reservoir lid.
Tube d’évent.
Entlüftungsschlauch am Stutzen
des Schwimmerdeckels befestigen.
Coloque el tubo de purga en la
entrada del depósito.
Innestare il tubo di sfiato al
coperchio del serbatoio.
GB
I
E
5
D
F
Install pump drive unit above the
ceiling where possible.
Installer la pompe dans l'unité, dans
la goulotte ou dans le faux plafond.
Installieren Sie die Pumpe, wenn
möglich, oberhalb der Zwischendecke.
GB
I
E
10
150mm / 6”
(6x9mm / 1/4” x 3/8”)
vinyl tube
tube cristal
Vinylschlauch
tubo vinilico
D
F
GB 1 FALSE CEILING
2 EVAPORATOR COIL
3 CONDENSATE DRAIN TRAY
4 VINYL TUBE
5 CONDUIT
1 FAUX PLAFOND
2 SERPENTIN
D’ÉVAPORATION
3 BAC DE RÉCUPÉRATION DES
CONDENSATS
4 TUBE CRISTAL
5 GOULOTTE
E I
1
4
2
3
5
EXAMPLE POSITIONS /
EXEMPLE DE POSITIONNEMENT /
EINBAUBEISPIELE /
EJEMPLOS DE UBICACIÓN /
ESEMPI D'INSTALLAZIONE
ABOVE CEILING / AU-DESSUS D PLAFOND /
IN DER ZWISCHENDECKE / SOBRE EL TECHO /
SOPRA IL CONTRO-SOFFITTO
INSIDE CONDUIT / DANS LE GOULOTTE /
IM KABELKANAL / INTERIOR DE LA CANALETA /
DENTRO LA CANALINA
BEHIND EVAPORATOR /
DERRIÈRE L’ÉVAPORATEUR /
HINTER DEM KLIMASPLITGERÄT /
DETRÁS DEL EVAPORADOR /
ALL’INTERNO DELL’UNITA’ EVAPORANTE
11
6
8
F
Push the 6 x 9mm / 1/4” x 3/8” i/d
tube onto the reservoir and the
pump. Secure with cable-ties.
Ensure length is under
2 metres / 6.6ft.
Insérer le tube cristal 6 x 9 mm /
1/4” x 3/8” dans l’orifice du bac à
condensats et le relier à
l‘aspiration de la pompe.
S’assurer que le longueur du
tube cristal est inférieur à
2 mètre / 6.6 ft.
GB
I
E
7
D
F
Note direction of water flow.
Sens de pompage.
Beachten der Durchflussrichtung.
Observar la dirección de la corriente.
Notare il senso dello scorrimento
dell'acqua.
GB
I
E
Verbinden Sie den Saugschlauch
(6 x 9 mm / 1/4” x 3/8”) mit dem
Schwimmergehäuse und der Saugseite
der Pumpe und sichern Sie beide
Abschlüsse mit Kabelbindern. Die
Gesamtlänge der Saugseite darf 2 m /
6.6 ft nicht überschreiten.
Empuje el tubo de diámetro 9x6 / 3/8”
x 1/4” hacia el depósito y la bomba.
Asegúrese de que queda bien
conectado. Compruebe que la longitud
sea inferior a los 2 metros / 6.6 ft.
Inserire il tubo vinilico da 6 mm / 1/4”
d/i (in dotazione) tra il serbatoio ed il
corpo pompa. Fissarlo con fascette.
Assicurarsi che la lunghezza non superi i
2 metri / 6.6 ft. Collegare sempre al
corpo pompa il cavo del sensore fissato
al coperchio del serbatoio.
D
ANTI-VIBRATION MATERIAL /
RUBAN ANTI VIBRATION /
VIBRATIONSDÄMMENDES
MATERIAL /
MATERIAL ANTIVIBRATORIO /
MATERIALI ANTIVIBRANTI E
FONO ASSORBENTE
FROM RESERVOIR /
ARRIVÉE DU RÉSERVOIR /
VOM SCHWIMMERSCHALTER /
DE DEPÓSITO /
DAL SERBATOIO
TO DRAIN /
ÉVACUATION /
ZUM ABLAUF /
PARA DRENAR /
ALLO SCARICO
A
B
C
2m / 6.6ft
A
B
C
1 ZWISCHENDECKE
2 KLIMAGERÄT
3 KONDENSATWANNE
4 SAUGSCHLAUCH
5 KABELKANAL
1 FALSO TECHO
2 BATERÍA DEL EVAPORADOR
3 BANDEJA DE DESAGÜE DE
CONDENSADOS
4 TUBO DE PLÁSTICO
5 CANALETA
1 CONTRO-SOFFITTO
2 EVAPORATORE
3 VASCHETTA
SCARICO CONDENSA
4 TUBO VINILICO
5 CANALINA
3
D
F
GB
I
E
Secure reservoir horizontally using velcro strips and for the inline
reservoir use the inlet hose to connect firmly to drainage pipe.
S’assurer que le flotteur est bien positionné à plat, à
l’horizontal et bien connecter de façon étanche à l’arrivée
des condensats.
Waagerechter Einbau des Schwimmergehäuses. Verbinden Sie
den Einlauf mit dem Auslauf der Kondensatwanne mittels
elastischen Anschlussstücks.
Asegurarse que el depósito esta fijo en una superficie plana y
horizontal. Utilizar las tiras de velcro. Conectar firmemente el
tubo de llegada de condensados.
Assicurare orizzontalmente il serbatoio usando le strisce di velcro.
Per il serbatoio interno utilizzare il connettore in gomma di
colore arancio (in dotazione) per collegarlo saldamente alla
tubazione di scarico dell’unità evaporante.
2
D
F
Ensure float is positioned in reservoir with magnet uppermost, the filter is in
place and the lid is clipped firmly onto reservoir.
S’assurer que le flotteur est bien positionné dans le bac avec l’aimant
vers le haut, que le filtre est en place et le couvercle est bien refermé.
Der Schwimmer muss mit dem Magnet nach oben zeigend
eingebaut werden. Achten Sie auf den korrekten Sitz des Filters.
Der Deckel rastet auf demSchwimmergehäuse ein.
Coloque el flotador en el depósito con el imán magnético lo más alto
posible, y ponga la tapa sobre el depósito.
Assicurarsi che il galleggiante sia
posizionato nel serbatoio con il magnete
rivolto verso l'alto, che il filtro sia inserito
e che il coperchio sia agganciato
saldamente sul serbatoio.
GB
I
E
Installation / INSTALACION / INSTALLAZIONE
1
D
F
Select reservoir type.
Choisir le type de réservoir.
Vorratsbehälterart vorwählen.
Seleccionar el tipo del depósito.
Selezionare il tipo del serbatoio.
GB
I
E
Instalar la bomba en el falso techo
cuando sea posible.
Installare il corpo pompa sopra il
contro-soffitto dove possibile.
In alternativa all’interno dell’unità
evaporante o nella canalina.
Horizontal Distance
30m 60m 90m
3m 7.2 7.0 6.6
2m 7.3 7.1 7.1
Head
F
GB
Installation / INSTALACION / INSTALLAZIONE
9
D
F
GB
I
E
12
10
11
13
APPROPRIATE DRAIN /
L’ÉCOULEMENT DES CONDENSATS /
ABFLUSSLEITUNG /
DESAGÜE APROPIADO /
SCARICO APPROPRIATO
D
F
GB
I
E
PUMP UNIT / POMPE / PUMPE / BOMBA /
POMPA
INDOOR UNIT / UNITÉ D'INTÉRIEUR /
INNENEINHEIT / UNIDAD DE INTERIOR /
UNITA' INTERNA
INTERCONNECTING CABLES / CÂBLES
STEUERKABEL / AUSSEN-EINHEIT /
CABLES DE INTERCONEXIÓN / CAVI DI
COLLEGAMENTO
OUTDOOR UNIT / UNITÉ EXTÉRIEURE /
ASSENEINHEIT / UNIDAD AL AIRE LIBRE /
UNITA' ESTERNA
1
2
3
4
3
42
1
Install a 1 amp inline fuse. A high-level alarm switch should be wired into the cooling
signal wire, to prevent the continued operation of the air conditioning unit in the event
of the pump failing. IMPORTANT: This diagram is an example of how the pump could
be installed and is therefore for reference only. All pump units must be installed by
qualified engineers, who have assessed the set-up of the individual a/c unit.
Installer un fusible d’1 Amp. Le contact de niveau haut d'alarme doit être câblé au signal de
refroidissement, pour ne plus faire fonctionner l'appareil en mode froid si la pompe est
défaillante. IMPORTANT: Ce diagramme est un exemple de la façon dont la pompe
pourrait être installée. Toutes les unités de pompe doivent être installées par les téchniciens
qualifiés, qui maitrisent l'installation et les branchements électriques du climatiseur.
Installieren Sie zum Schutz der Pumpe eine 1 A-Sicherung (flink) in der Zuleitung
(siehe Anschlussplan). Der Alarmschalter sollte angeschlossen werden um die
Klimaanlage, im Falle eines Ausfalls der Pumpe, auszuschalten. WICHTIG: Der
nebenstehende Anschlussplan ist nur ein Beispiel wie die Pumpe angeschlossen
werden kann. Alle Pumpen müssen von qualifizierten Fachkräften installiert werden.
Instale un fusible de 1 A en línea. El interruptor de alarma de nivel alto de agua debe
ser conectado a la señal del sistema de enfriamiento, para evitar que este continúe
funcionando en caso de avería de la bomba. IMPORTANTE: Este diagrama es un
ejemplo de cómo la bomba debería ser instalada, solo como referencia. Todas las
bombas deben ser instaladas por personal cualificado.
Installare sempre un fusible da 1 Amp. Il cavo di allarme per l'alto livello fornito in
dotazione deve essere collegato alla linea della funzione raffreddamento del
condizionatore, allo scopo di prevenirne il continuo funzionamento in caso di disservizio
della pompa. IMPORTANTE: Questo diagramma è un esempio di come la pompa
potrebbe essere installata ed è perciò solo un riferimento. Tutte le pompe devono essere
installate da addetti qualificati, che abbiano verificato le impostazioni di ciascuna
fattispecie di climatizzatore.
Test pump operation by pouring water into evaporator tray. CHECK FOR LEAKS.
Verser de l’eau dans le bac à condensats, vérifier le bon fonctionnement de la
pompe et l’absence de fuite d’eau.
Die Pumpe muss nach der Installation mit Wasser in Betrieb genommen werden.
Dabei ist auf Dichtigkeit zu achten.
Compruebe el funcionamiento
de la bomba, vertiendo agua
sobre la bandeja de
condensados y controle
posibles fugas.
Testare il funzionamento della pompa
versando acqua nella vaschetta
dell’unità evaporante. CONTROLLARE
CHE NON CI SIANO PERDITE prima di
chiudere ed avviare l’impianto.
GB (N.C.) NORMALLY CLOSED: Purple
(COM)COMMON: Grey
(N.O.) NORMALLY OPEN: Orange
F (L) PHASE: Marron
(N)NEUTRE: Bleu
(E) TERRE: Vert/Jaune
(N.C.) NORMALEMENT BRANCHE: Violet
(COM)COMMUN: Gris
(N.O.) NORMALEMENT OUVERT: Orange
D (L) PHASE: Braun
(N)NEUTRAL: Blau
(E) SCHUTZLEITER: Grün-gelb
(N.C.) ÖFFNER: Lila
(COM)PHASE: Grau
(N.O.) SCHLIESSER: Orange
E (L) TOMA: Marrón
(N)NEUTRO: Azul
(E) TIERRA: Verde/Amarillo
(N.C.) NORMALMENTE CERRADO: Morado
(COM)COMUN: Gris
(N.O.) NORMALMENTE ABIERTO: Naranja
I (L) FASE: Marrone
(N)NEUTRO: Blu
(E) TERRA: Verde/Giallo
(N.C.) NORMALMENTE CHIUSO: Porpora
(COM)COMUNE: Grigio
(N.O.) NORMALMENTE APERTO: Arancio
(L) LIVE: Brown
(N)NEUTRAL: Blue
(E) EARTH: Green/Yellow
POWER / PUISSANCE / STROMVERSORGUNG /
ALIMENTACION / ALIMENTAZIONE:
ALARM/VOLT FREE / ALARME/CONTACT /
SICHERHEITSEINRICHTUNG /
RELÉ ALARMA SIN RIESGO ELECTRICO /
ALLARME/CONTATTI LIBERI DA TENSIONE:European 230V: US 230V: US 120V:
(L) LINE 1: Noir
(N)LINE 2: Rouge
(E) TERRE: Vert
(L) LINE 1: Schwarz
(N)LINE 2: Rot
(E) GRUND: Grün
(L) LINE 1: Negro
(N)LINE 2: Rojo
(E) TERRENO: Verde
(L) LINE 1: Nero
(N)LINE 2: Rosso
(E) TERRENO: Verde
(L) LINE 1: Black
(N)LINE 2: Red
(E) GROUND: Green
(L) LINE 1: Noir
(N)LINE 2: Blanche
(E) TERRE: Vert
(L) LINE 1: Schwarz
(N)LINE 2: Weiß
(E) GRUND: Grün
(L) LINE 1: Negro
(N)LINE 2: Blanco
(E) TERRENO: Verde
(L) LINE 1: Nero
(N)LINE 2: Bianco
(E) TERRENO: Verde
(L) LINE 1: Black
(N)LINE 2: White
(E) GROUND: Green
D
I
E
Schliessen Sie einen Schlauch mit
6 mm / 1/4” Innen-ø an die Druckseite
der Pumpe an und sichern Sie ihn mit
dem mitgelieferten Kabelbinder. Führen
Sie den Druckschlauch in einen
geeigneten Abfluss. Vermeiden Sie
Einschnürungen.
Conecte un tubo de plástico de 6 x
9 mm / 1/4” x 3/8” en la descarga de la
bomba y asegurarlo con la brida. Dirigir
el tubo a un desagüe evitando
restricciones y dobleces.
Collegare il tubo vinilico di scarico da
6 mm / 1/4” d/i al raccordo d’uscita del
corpo pompa ed fermarlo con una fascetta.
Indirizzare la tubazione verso uno scarico
appropriato, evitandone strozzature.
Mini Orange
Horizontal Distance
30m 60m 90m
3m 20 18 17
2m 20 18 17
Head
Maxi Orange
MINI ORANGE:
10m / 33ft
MAXI ORANGE:
20m / 66ft
(100m max) (100m max)
Horizontal Losses (L/hr):
Connect your 6 x 9mm / 1/4 x 3/8” vinyl
discharge tube to the outlet barb on
the Mini Orange and secure with a
cable tie. Channel discharge tube to an
appropriate drain, avoiding restrictions.
Connecter votre tube cristal 6 x 9mm /
1/4” / 3/8” au refoulement de la
pompe vers l’écoulement des
condensats, évitant des restrictions.
15
Troubleshooting / PANNES/DEFAILLANCES /
FEHLERBEHEBUNG / LOCALIZACION DE AVERIAS /
SOLUZIONE DEI PROBLEMI – FAQ
Fault: Pump runs all the time
1. Is float positioned with the magnet uppermost?
2. Is the reservoir lid (sensor) located firmly onto
the reservoir, with the float located inside the
reservoir, around the sensor column?
3. Is there sludge inside the reservoir, preventing float
from resting on the bottom? (This may occur if
pump has been in operation for some time with-
out cleaning. Clean using an anti-bacterial wash.)
Please note:
• After installation and during operation, if you
notice air in the pipe between the reservoir and
the pump, you have a siphoning problem. (Follow
advice in ‘Preventing Siphoning’ section on page 7).
• The pump will only switch off when the float is
at the bottom of the reservoir.
Fault: Pump stops and starts and makes
a loud noise.
1. The water is siphoning back through the pump.
Follow advice in ‘Preventing Siphoning’ section.
Fault: Pump runs but does not pump any water.
1. Are there any air-leaks in the pipe running to
the pump?
2. Check that reservoir, filter and inlet tube are free
of sludge and debris.
Fault: Pump isn’t operating at all.
1. Is power reaching the pump?
Is it correctly wired? Is the voltage correct?
2. Is pump very hot? A thermal cut-out may have
been activated to protect pump. This will
automatically reset once pump has cooled down.
GB
La pompe fonctionne sans interruption !
1. L'aimant du flotteur est-il en position haute ?
2. Le couvercle du bac / réservoir est bien fermé
avec le flotteur à l’intérieur (face de l’aimant
vers la haut).
3. Y-a-t-il des impuretés à l'intérieur du réservoir,
bloquant le flotteur en position basse ? (ceci
peut être le cas si la pompe n'a pas fonctionné
depuis quelques temps. Nettoyer en utilisant un
produit anti-bactériologique).
Merci de noter :
• S’il y a de l’air dans le tube cristal d’aspiration de
la pompe (entre le bac/réservoir et l’aspiration de
la pompe), après l’installation et lors du
fonctionnement de la pompe : IL Y A UN
PROBLEME DE SIPHONAGE (Voir page 7).
• La pompe sera uniquement déconnectée quand
le flotteur sera en position basse dans le réservoir.
La pompe arrête et redémarre et fait un
bruit sourd !
1. L'eau est siphonnée à travers la pompe. Suivre
les conseils en page 7 pour éviter le siphonage.
La pompe fonctionne et ne débite pas d'eau !
1. N'y a t-il pas une prise d'air avant la pompe ?
(utiliser des raccords assurant l'étanchéité à l'air).
2. Assurez-vous que le réservoir, le filtre et le tube
soient propres.
La pompe ne fonctionne pas du tout !
1. La pompe est-elle branchée ? l'est-elle
correctement ? Le réseau électrique est-il correct ?
2. La pompe est-elle chaude ? Une sécurité
thermique a du être activée qui remettra
automatiquement la pompe en route dès que
la température sera descendue.
F
! Die Pumpe läuft ständig.
1. Ist der Schwimmer falsch eingebaut?
2. Ist der Deckel des Schwimmergehäuses richtig
eingerastet?
3. Ist im Schwimmergehäuse Schmutz und Schleim,
der den Schwimmer am Boden festhält? (Dieses
kann nach einiger Betriebszeit der Grund sein.
Bei der Reinigung bitte ein anti-bakterielles
Mittel verwenden).
Zu Beachten!
• Haben Sie während der Kondensatförderung Luft
in der Saugleitung, obwohl keine Fremdluft in die
Saugleitung gelangen kann, dann handelt es sich
um den sogenannten “Heber-Effekt” (siehe Seite 7).
• Die Pumpe schaltet nur dann ab, wenn der
Schwimmer waagerecht auf dem Boden des
Schwimmergehäuses liegt.
D
14
Servicing / MAINTENANCE / WARTUNG /
SERVICIO / MANUTENZIONE
• Diese Pumpe muss wie alle mechanischen Geräte gewartet werden.
• Alle 6 Monate sollte das Schwimmergehäuse sowie der Filter gereinigt werden. Wir
empfehlen vor und nach der Saison die Reinigung vorzunehmen.
• Besonders muss darauf geachtet werden, dass das Schwimmergehäuse waagerecht justiert
wird und der Schwimmer mit dem Magnet nach oben zeigend eingebaut wird.*
• Zusätzliche Vorfilter sind auf Anfrage erhältlich.
D
• Esta bomba, como todo equipamiento mecánico, requiere de un mantenimiento.
• Cada seis meses, el depósito debería ser extraido, a fin de limpiar los filtros y el depósito
por completo. Recomendamos se realice esta operación en primavera y en otoño, haciendo
uso de un bactericida.
• Tenga extremo cuidado al reemplazar la boya, colocando el imán hacia arriba.*
• Filtros adicionales en línea están disponibles si es necesario.
E
• Questa pompa, come tutte le apparecchiature elettromeccaniche, richiede manutenzione.
• Se la pompa funziona tutto l’anno, ogni sei mesi il serbatoio dovrebbe essere rimosso al fine di
pulire bene il filtro, il galleggiante ed il serbatoio prima del riassemblaggio. Si consiglia di
effettuare la manutenzione in Primavera ed Autunno, usando una soluzione di lavaggio battericida.
• Fare la massima attenzione nel risistemare il galleggiante con il magnete rivolto verso l'alto.*
• Ulteriori filtri in linea sono disponibili su richiesta.
I
• Cette pompe, comme tous équipements mécaniques, exige une maintenance.
• Tous les six mois le réservoir doit être démonté, en prenant soin de nettoyer les filtres et le
réservoir. Nous recommandons de le faire au printemps et à l'automne, en utilisant un
nettoyant anti-bactériologique.
• Prendre particulièrement soin de replacer le flotteur avec l'aimant vers le haut.*
• Filtres en ligne disponibles si nécessaire.
F
• This Pump, like all mechanical equipment, requires maintenance.
• Every six months the reservoir should be removed, taking care
to clean the filter, float and reservoir thoroughly prior to
reassembly. We recommend this is done in the Spring and the
Autumn, using an anti-bacterial wash.
• Take great care to replace the float with the magnet facing upwards.*
• Additional inline filters are available if required.
GB *
fortsetzen...
Troubleshooting / PANNES/DEFAILLANCES /
FEHLERBEHEBUNG / LOCALIZACION DE AVERIAS /
SOLUZIONE DEI PROBLEMI – FAQ
Avería: La bomba está en continuo
funcionamiento
1. Compruebe que la boya esté situada en la parte
más alta.
2. Verifique que el sensor está bien ajustado al
depósito, con el flotador en su interior.
3. Realice una limpieza con bactericida si hay restos
de suciedad en el interior del depósito, ya que
impediría el libre movimiento de la boya.
ATENCION
• Si hay aire en la tubería entre el depósito y la
bomba, tras su instalación y durante su
funcionamiento, se deberá por un problema de
sifón (ver página 7).
• La bomba sólo se parará si la boya se encuentra
en el fondo del depósito.
Avería: La bomba se para y reinicia y emite
mucho ruido
1. El agua produce un efecto sifón en la bomba.
Siga las recomendaciones especificadas para
evitar el efecto sifón.
Avería: La bomba funciona pero no aspira el agua
1. Compruebe si existen fugas de aire en la tubería
que va hacia la bomba.
2. Verifique que el depósito de la bomba, filtro,
y el tubo de descarga no presente restos
de suciedad.
Avería: La bomba no funciona
1. Compruebe que llega la tensión a la bomba, que
los cables estén bien conectados y que la
alimentación sea la correcta.
2. Si la bomba está muy caliente, podría deberse a
que se hubiera activado el protector térmico.
De ser así, la bomba se pondrá en marcha una
vez se haya enfriado.
E
! Die Pumpe arbeitet normal, macht aber hin
und wieder sehr starke Geräusche.
1. Es entsteht durch den "Heber-Effekt"
Trockenlauf. Sehen Sie dazu Seite 7 oder melden
sich bei uns.
! Die Pumpe schaltet zwar ein, aber es wird
kein Kondensat gefördert.
1. Sind Undichtigkeiten saugseitig vorhanden, so
dass Luft in die Pumpe gelangt?
2. Profen sie, ob das Schwimmergehäuse, der filrer
und der Saugschlauch frei von Ablagerungen
und Schlamm sind.
! Die Pumpe arbeitet nicht.
1. Liegt Strom an? Ist die Pumpe richtig verkabelt?
Ist die Spannung richtig?
2. Ist die Pumpe sehr heiss? Dann hat der
Thermoschutzschalter die Pumpe abgeschaltet.
Nach der Abkühlung wird die Pumpe wieder
automatisch angeschaltet.
I
Difetto: La pompa funziona di continuo
1. Il magnete del galleggiante è rivolto verso l'alto ?
2. Il coperchio è posizionato saldamente sul
serbatoio, con il galleggiante inserito al suo
interno nell’apposita colonna (sensore) ?
3. C'è per caso del deposito sul fondo del
serbatoio, che impedisce al galleggiante di
depositarsi sul fondo correttamente? (Ciò può
avvenire se la pompa ha lavorato per un certo
periodo di tempo senza aver pulito regolarmente
il serbatoio. Eliminare tale deposito mediante
lavaggio con una soluzione battericida).
Nota Bene:
La pompa si arresta solo quando il galleggiante
è sul fondo del serbatoio.
Difetto: La pompa attacca e stacca ed è molto rumorosa
1. L'acqua di ritorno che attraversa il corpo pompa
contiene aria ? Se dopo l'installazione e durante
l'utilizzo notate dell’aria nel tubo vinilico trasparente
posto tra il serbatoio e la pompa, in tal caso avete un
problema di effetto sifone (Per risolverlo seguite i
consigli indicati nell’apposita sezione a pag. 7).
Difetto: La pompa lavora ma non pompa acqua
1. C'è qualche infiltrazione d'aria nella tubazione
che porta alla pompa ?
2. Controllate che il serbatoio, il filtro e la
tubazione di scarico siano liberi da detriti
e fanghiglia.
Difetto: La pompa non lavora affatto !
1. Arriva corrente alla pompa ? L'allacciamento
è corretto ? Il voltaggio è quello adeguato ?
2. La pompa è molto calda ? Il dispositivo
anti-surriscaldamento può essersi attivato per
proteggere la pompa. Il dispositivo si
disattiverà automaticamente appena la pompa
si sarà raffreddata.
ASPEN/4/09 1491 This brochure was produced from sustainable stock.

Weitere ähnliche Inhalte

Empfohlen

2024 State of Marketing Report – by Hubspot
2024 State of Marketing Report – by Hubspot2024 State of Marketing Report – by Hubspot
2024 State of Marketing Report – by HubspotMarius Sescu
 
Everything You Need To Know About ChatGPT
Everything You Need To Know About ChatGPTEverything You Need To Know About ChatGPT
Everything You Need To Know About ChatGPTExpeed Software
 
Product Design Trends in 2024 | Teenage Engineerings
Product Design Trends in 2024 | Teenage EngineeringsProduct Design Trends in 2024 | Teenage Engineerings
Product Design Trends in 2024 | Teenage EngineeringsPixeldarts
 
How Race, Age and Gender Shape Attitudes Towards Mental Health
How Race, Age and Gender Shape Attitudes Towards Mental HealthHow Race, Age and Gender Shape Attitudes Towards Mental Health
How Race, Age and Gender Shape Attitudes Towards Mental HealthThinkNow
 
AI Trends in Creative Operations 2024 by Artwork Flow.pdf
AI Trends in Creative Operations 2024 by Artwork Flow.pdfAI Trends in Creative Operations 2024 by Artwork Flow.pdf
AI Trends in Creative Operations 2024 by Artwork Flow.pdfmarketingartwork
 
PEPSICO Presentation to CAGNY Conference Feb 2024
PEPSICO Presentation to CAGNY Conference Feb 2024PEPSICO Presentation to CAGNY Conference Feb 2024
PEPSICO Presentation to CAGNY Conference Feb 2024Neil Kimberley
 
Content Methodology: A Best Practices Report (Webinar)
Content Methodology: A Best Practices Report (Webinar)Content Methodology: A Best Practices Report (Webinar)
Content Methodology: A Best Practices Report (Webinar)contently
 
How to Prepare For a Successful Job Search for 2024
How to Prepare For a Successful Job Search for 2024How to Prepare For a Successful Job Search for 2024
How to Prepare For a Successful Job Search for 2024Albert Qian
 
Social Media Marketing Trends 2024 // The Global Indie Insights
Social Media Marketing Trends 2024 // The Global Indie InsightsSocial Media Marketing Trends 2024 // The Global Indie Insights
Social Media Marketing Trends 2024 // The Global Indie InsightsKurio // The Social Media Age(ncy)
 
Trends In Paid Search: Navigating The Digital Landscape In 2024
Trends In Paid Search: Navigating The Digital Landscape In 2024Trends In Paid Search: Navigating The Digital Landscape In 2024
Trends In Paid Search: Navigating The Digital Landscape In 2024Search Engine Journal
 
5 Public speaking tips from TED - Visualized summary
5 Public speaking tips from TED - Visualized summary5 Public speaking tips from TED - Visualized summary
5 Public speaking tips from TED - Visualized summarySpeakerHub
 
ChatGPT and the Future of Work - Clark Boyd
ChatGPT and the Future of Work - Clark Boyd ChatGPT and the Future of Work - Clark Boyd
ChatGPT and the Future of Work - Clark Boyd Clark Boyd
 
Getting into the tech field. what next
Getting into the tech field. what next Getting into the tech field. what next
Getting into the tech field. what next Tessa Mero
 
Google's Just Not That Into You: Understanding Core Updates & Search Intent
Google's Just Not That Into You: Understanding Core Updates & Search IntentGoogle's Just Not That Into You: Understanding Core Updates & Search Intent
Google's Just Not That Into You: Understanding Core Updates & Search IntentLily Ray
 
Time Management & Productivity - Best Practices
Time Management & Productivity -  Best PracticesTime Management & Productivity -  Best Practices
Time Management & Productivity - Best PracticesVit Horky
 
The six step guide to practical project management
The six step guide to practical project managementThe six step guide to practical project management
The six step guide to practical project managementMindGenius
 
Beginners Guide to TikTok for Search - Rachel Pearson - We are Tilt __ Bright...
Beginners Guide to TikTok for Search - Rachel Pearson - We are Tilt __ Bright...Beginners Guide to TikTok for Search - Rachel Pearson - We are Tilt __ Bright...
Beginners Guide to TikTok for Search - Rachel Pearson - We are Tilt __ Bright...RachelPearson36
 

Empfohlen (20)

2024 State of Marketing Report – by Hubspot
2024 State of Marketing Report – by Hubspot2024 State of Marketing Report – by Hubspot
2024 State of Marketing Report – by Hubspot
 
Everything You Need To Know About ChatGPT
Everything You Need To Know About ChatGPTEverything You Need To Know About ChatGPT
Everything You Need To Know About ChatGPT
 
Product Design Trends in 2024 | Teenage Engineerings
Product Design Trends in 2024 | Teenage EngineeringsProduct Design Trends in 2024 | Teenage Engineerings
Product Design Trends in 2024 | Teenage Engineerings
 
How Race, Age and Gender Shape Attitudes Towards Mental Health
How Race, Age and Gender Shape Attitudes Towards Mental HealthHow Race, Age and Gender Shape Attitudes Towards Mental Health
How Race, Age and Gender Shape Attitudes Towards Mental Health
 
AI Trends in Creative Operations 2024 by Artwork Flow.pdf
AI Trends in Creative Operations 2024 by Artwork Flow.pdfAI Trends in Creative Operations 2024 by Artwork Flow.pdf
AI Trends in Creative Operations 2024 by Artwork Flow.pdf
 
Skeleton Culture Code
Skeleton Culture CodeSkeleton Culture Code
Skeleton Culture Code
 
PEPSICO Presentation to CAGNY Conference Feb 2024
PEPSICO Presentation to CAGNY Conference Feb 2024PEPSICO Presentation to CAGNY Conference Feb 2024
PEPSICO Presentation to CAGNY Conference Feb 2024
 
Content Methodology: A Best Practices Report (Webinar)
Content Methodology: A Best Practices Report (Webinar)Content Methodology: A Best Practices Report (Webinar)
Content Methodology: A Best Practices Report (Webinar)
 
How to Prepare For a Successful Job Search for 2024
How to Prepare For a Successful Job Search for 2024How to Prepare For a Successful Job Search for 2024
How to Prepare For a Successful Job Search for 2024
 
Social Media Marketing Trends 2024 // The Global Indie Insights
Social Media Marketing Trends 2024 // The Global Indie InsightsSocial Media Marketing Trends 2024 // The Global Indie Insights
Social Media Marketing Trends 2024 // The Global Indie Insights
 
Trends In Paid Search: Navigating The Digital Landscape In 2024
Trends In Paid Search: Navigating The Digital Landscape In 2024Trends In Paid Search: Navigating The Digital Landscape In 2024
Trends In Paid Search: Navigating The Digital Landscape In 2024
 
5 Public speaking tips from TED - Visualized summary
5 Public speaking tips from TED - Visualized summary5 Public speaking tips from TED - Visualized summary
5 Public speaking tips from TED - Visualized summary
 
ChatGPT and the Future of Work - Clark Boyd
ChatGPT and the Future of Work - Clark Boyd ChatGPT and the Future of Work - Clark Boyd
ChatGPT and the Future of Work - Clark Boyd
 
Getting into the tech field. what next
Getting into the tech field. what next Getting into the tech field. what next
Getting into the tech field. what next
 
Google's Just Not That Into You: Understanding Core Updates & Search Intent
Google's Just Not That Into You: Understanding Core Updates & Search IntentGoogle's Just Not That Into You: Understanding Core Updates & Search Intent
Google's Just Not That Into You: Understanding Core Updates & Search Intent
 
How to have difficult conversations
How to have difficult conversations How to have difficult conversations
How to have difficult conversations
 
Introduction to Data Science
Introduction to Data ScienceIntroduction to Data Science
Introduction to Data Science
 
Time Management & Productivity - Best Practices
Time Management & Productivity -  Best PracticesTime Management & Productivity -  Best Practices
Time Management & Productivity - Best Practices
 
The six step guide to practical project management
The six step guide to practical project managementThe six step guide to practical project management
The six step guide to practical project management
 
Beginners Guide to TikTok for Search - Rachel Pearson - We are Tilt __ Bright...
Beginners Guide to TikTok for Search - Rachel Pearson - We are Tilt __ Bright...Beginners Guide to TikTok for Search - Rachel Pearson - We are Tilt __ Bright...
Beginners Guide to TikTok for Search - Rachel Pearson - We are Tilt __ Bright...
 

Aspen miniorangemsds

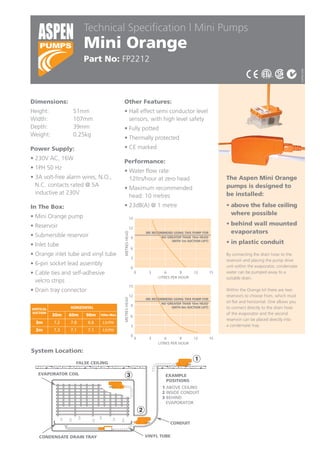
  • 1. The Aspen Mini Orange pumps is designed to be installed: • above the false ceiling where possible • behind wall mounted evaporators • in plastic conduit By connecting the drain hose to the reservoir and placing the pump drive unit within the evaporator, condensate water can be pumped away to a suitable drain. Within the Orange kit there are two reservoirs to choose from, which must sit flat and horizontal. One allows you to connect directly to the drain hose of the evaporator and the second reservoir can be placed directly into a condensate tray. Dimensions: Height: 51mm Width: 107mm Depth: 39mm Weight: 0.25kg Power Supply: • 230V AC, 16W • 1PH 50 Hz • 3A volt-free alarm wires, N.O., N.C. contacts rated @ 5A inductive at 230V In The Box: • Mini Orange pump • Reservoir • Submersible reservoir • Inlet tube • Orange inlet tube and vinyl tube • 6-pin socket lead assembly • Cable ties and self-adhesive velcro strips • Drain tray connector Other Features: • Hall effect semi conductor level sensors, with high level safety • Fully potted • Thermally protected • CE marked Performance: • Water flow rate: 12ltrs/hour at zero head • Maximum recommended head: 10 metres • 23dB(A) @ 1 metre Technical Specification l Mini Pumps Mini Orange Part No: FP2212 ASPEN-5/09 CONDENSATE DRAIN TRAY CONDUIT VINYL TUBE EXAMPLE POSITIONS 1 ABOVE CEILING 2 INSIDE CONDUIT 3 BEHIND EVAPORATOR FALSE CEILING EVAPORATOR COIL 15 12 9 6 3 0 0 3 6 9 12 15 LITRES PER HOUR METRESHEAD WE RECOMMEND USING THIS PUMP FOR NO GREATER THAN 10m HEAD (WITH 1m SUCTION LIFT) System Location: HORIZONTAL 30m 60m 90m 3m 7.2 7.0 6.6 Ltr/Hr 2m 7.3 7.1 7.1 Ltr/Hr 100m Max VERTICAL SUCTION 15 12 9 6 3 0 0 3 6 9 12 15 LITRES PER HOUR METRESHEAD WE RECOMMEND USING THIS PUMP FOR NO GREATER THAN 10m HEAD (WITH 0m SUCTION LIFT) PROVEEDORATERMICADELNORTE,SADECV Nardo#911Ote.,Col.Cementos,Monterrey,NL64520 Tel(81)8125-7300,(800)837-6300/Fax(81)8125-7308,(800)837-6300 www.proveedoratermica.com
  • 2. Serial No. / Nº de Série / Serien Nummer Nº de Serie / N. di Serie Date installed / Date d’installation / Installationsdatum Fecha de Instalación / Data installazione Location of pump / Situation de la pompe / Installationsort Ubicación de la bomba / Luogo installazione GB F D E I Thank you for buying your new Mini/Maxi Orange Pump. This manual gives instructions on the correct installation, so it is important that you follow these instructions carefully. Please record the following information for your future reference: Merci pour l'achat de votre nouvelle pompe Mini/Maxi Orange. Cette notice donne les instructions pour une installation correcte qu'il est important de suivre pour un bon fonctionnement de la pompe. Merci de noter ci-après les références pour vos futurs suivis: Vielen Dank für den Kauf einer neuen Mini/Maxi Orange Kondensatpumpe. Diese Bedienungsanleitung gibt Ihnen Anweisungen zur korrekten Installation, lesen Sie bitte diese Anweisungen sorgfältig. Bitte tragen Sie folgende Informationen für spätere Rückfragen ein: Gracias por haber seleccionado la nueva Bomba Mini/Maxi Orange. Este manual le proporcionamos las instrucciones para una correcta instalación, por lo que le recomendamos lo lea atentamente. Cumplimente la siguiente información para cualquier futura consulta: Vi ringraziamo per l’acquisto della vostra nuova pompa Mini/Maxi Orange. Questo manuale fornisce le istruzioni per la sua corretta installazione pertanto è importante che esse vengano seguite attentamente. Vogliate scrivere i seguenti dati per future esigenze: mini & maxi orange pump PROVEEDORA TERMICA DEL NORTE, SA DE CV Nardo #911 Ote., Col. Cementos, Monterrey, NL 64520 Tel (81) 8125-7300, (800) 837-6300 / Fax (81) 8125-7308, (800) 837-6300 www.proveedoratermica.com
  • 3. 1. Assembled Orange pump 2. Assembled inline reservoir, including: a. lid & sensor cable b. float c. filter d. reservoir 3. Submersible reservoir 4. 150mm / 6” length of 6mm / 1/4” i/d vinyl tube 5. Orange inlet tube 6. 1.5m / 5’ length of 6mm / 1/4” i/d vinyl tube 7. 6-pin socket lead assembly (1.5m / 5’) 8. (4 x) 300 x 3.6mm / 12” x 1/8” cable ties 9. (2 x) 140 x 3.6mm / 5.5” x 1/8” cable ties 10. (2 x) self adhesive velcro strips 11. Drain tray connector *NOTE: You will need several metres of 6 x 9mm / 1/4” x 3/8” i/d vinyl tube. 1. Corpo pompa pre assemblato 2. Serbatoio composto da : a. coperchio con cavo sensore (1.5 m / 5’) pre assemblato e spinotto terminale ad innesto rapido b. galleggiante con magnete c. filtro d. serbatoio standard 3. Serbatoio sommergibile 4. Tubo vinilico di sfiato (150 mm / 6” x 6 mm / 1/4” d/i) 5. Connettore in gomma di colore arancio (220 mm / 8.7” x 14 mm / 1/2” d/i) 6. Tubo vinilico (1.5 m / 5’ x 6 mm / 1/4” d/i) 7. Spinotto elettrico a 6 terminali completo di 1.5 m / 5’ di cavo elettrico e cavo allarme Accessori inclusi nella confezione: 8. 4 x fascette ferma cavo (300 x 3.6 mm / 12” x 1/8”) 9. 2 x fascette ferma cavo (140 x 3.6 mm / 5.5” x 1/8”) 10. 2 x strisce di velcro adesive 11. 1 x connettore opzionale per manicotto di scarico dell'unità evaporante *NOTA: Occorreranno, in uscita dalla pompa, metri aggiuntivi di tubo vinilico da 6 mm / 1/4” d/i. I 1. Conjunto bomba Orange 2. Conjunto depósito incluyendo: a. tapa y cable del sensor b. flotador c. filtro d. depósito 3. Depósito sumergible 4. 150 mm / 6” de tubo de vinilo øi de 6 mm / 1/4” 5. Tubo de entrada 6. 1,5m / 5’ de tubo de vinilo øi de 6 mm / 1/4” 7. Conjunto clavija de 6 pins (1.5 m / 5’) 8. 4 bridas de 4 x 300 x 3.6 mm / 12” x 1/8” 9. 2 bridas de 2 x 140 x 3.6 mm / 5.5” x 1/8” 10. 2 x cintas velcro autoadhesivas 11. Conector a la bandeja condensados *NOTA IMPORTANTE: Necesitará también varios metros de tubería de plástico de 6 x 9 mm / 1/4” x 3/8”. E 1. 1 x Pumpeneinheit mit Steuerung 2. 1 x Schwimmermodul (40 x 80 x 40 mm) (Anschluss an den Kondensatablass) a. Deckel mit Sensorkabel b. Schwimmer c. Filter d. Schwimmergehäuse 3. 1 x Schwimmermodul (40 x 68 x 40 mm) (Aufstellung in der Kondensatwanne) 4. 1 x 150 mm / 6” Entlüftungsschlauch 6 mm / 1/4” ø 5. 1 x Elastisches Anschlussstück (orange) 6. 1 x 1,5 m / 5’ Saugschlauch 6 mm / 1/4” ø 7. 1 x ca. 1.5 m / 5’ Anschlusskabel mit Stecker 8. (4 x) 300 x 3.6 mm / 12” x 1/8” Kabelbinder 9. (2 x) 140 x 3.6 mm / 5.5” x 1/8” Kabelbinder 10. (2 x) Velcro – Klettstreifen 11. Anschlußstück Kondensatwanne *BEMERKUNG: Es werden einige Meter Vinylschlauch 6 x 9 mm / 1/4” x 3/8” ø benötigt. D 3 In the box / DANS LA BOITE / LIEFERUMFANG / EN LA CAJA / NELLA CONFEZIONE 1. Unité de pompage 2. l'ensemble réservoir monté comprend : a. couvercle et cable de détection b. flotteur c. filtre d. réservoir 3. Réservoir submersible 4. 150 mm / 6” de longueur du cristal de 6x9 mm / 1/4”x 3/8” 5. Tube Orange d'arrivée des condensats 6. 1,5 m / 5’ tube cristal 6x9 mm / 1/4” x 3/8” 7. Prise electrique 6 fiches (1.5 m / 5’) 8. (4 x) 300 x 3.6 mm / 12” x 1/8” collier 9. (2 x) 140 x 3.6 mm / 5.5” x 1/8” collier 10. (2 x) velcro auto adhésif 11. Raccord 16 mm vers 14-16-18 *PRIÈRE DE NOTER: Vous aurez aussi besoin de plusieurs mètres de tubes vinyles diamètre intérieur 6 mm / 1/4” diamètre extérieur 9 mm / 3/8”. F 2 GB 1 4 6 2a 2b2c 2d 7 * 5 3 11
  • 4. 5 Technical Data / DONÉES TÉCHNIQUES / TECHNISCHE DATEN / DATOS TÉCNICOS / DATI TECNICI 4 GB Mini Orange 120V / 60Hz 230V / 50Hz Power supply 0.29A / 15W 0.17A / 16W Max. water flow rate / hr @ 0m / ft 12L / 3.2 US Gal 12L / 3.2 US Gal Max. recommended head 10m / 33ft 10m / 33ft Sound level @ 1m 24 dB(A) 23 dB(A) Continuously rated Class l appliance Maxi Orange 120V / 60Hz 230V / 50Hz Power supply 0.43A / 20W 0.15A / 15W Max. water flow rate / hr@ 0m / ft 40L / 10.6 US Gal 26L / 6.9 US Gal Max. recommended head 15m / 49ft 20m / 66ft Sound level @ 1m 36 dB(A) 35 dB(A) Non-continuously rated: 5 mins on / 5 mins off Class ll appliance Mini & Maxi Orange • 3A volt-free alarm wires, N.O., N.C. contacts rated @ 5A inductive at 230V • Hall effect semi conductor level sensors, with high level safety • Maximum water temperature: 40ºC / 104ºF • Discharge tube: 6mm / 1/4” i/d • CE Marked • Thermally protected • Fully potted • Suction lift: 1m / 3.3ft F Mini Orange 120V / 60Hz 230V / 50Hz Tension mono 0.29 A / 15 W 0.17 A / 16 W Débit maximum / hr @ 0 m / ft 12 L / 3.2 US Gal 12 L / 3.2 US Gal Hauteur de relevage recommandée 10 m / 33 ft 10 m / 33 ft 1 m et point de fonctionnement 24 dB(A) 23 dB(A) Pas de fonctionnement continu Produit Class l Maxi Orange 120V / 60Hz 230V / 50Hz Tension mono 0.43 A / 20 W 0.15 A / 15 W Débit maximum /hr @ 0 m / ft 40 L / 10.6 US Gal 26 L / 6.9 US Gal Hauteur de relevage recommandée 15 m / 49 ft 20 m / 66 ft 1 m et point de fonctionnement 36 dB(A) 35 dB(A) Pas de fonctionnement continu : Marche 5 minutes / Arrêt 5 minutes Produit Class ll Mini & Maxi Orange • Contact d’alarme, N.O, N.C 3A • Detection par semi conducteur avec un niveau haut d’alarme • Température maximum des condensats : 40ºC / 104ºF • Tube d’évacuation 6 x 9 mm / 1/4” x 3/8” • Produit CE • Protection thermique • Moulée dans de la résine • Auto amorçante à 1 m / 3.3 ft D Mini Orange 120V / 60Hz 230V / 50Hz Leistungsaufnahme 0.29 A / 15 W 0.17 A / 16 W Fördermenge max. bei 0 m / ft 12 L / 3.2 US Gal 12 L / 3.2 US Gal Förderhöhe: max. 10 m / 33 ft 10 m / 33 ft Geräuschpegel in 1 m Abstand 24 dB(A) 23 dB(A) Betriebsart S1: Deuerbetrieb Schutzklasse l Maxi Orange 120V / 60Hz 230V / 50Hz Leistungsaufnahme 0.43 A / 20 W 0.15 A / 15 W Fördermenge max. @ 0 m / ft 40 L / 10.6 US Gal 26 L / 6.9 US Gal Förderhöhe: max. 15 m / 49 ft 20 m / 66 ft Geräuschpegel in 1 m Abstand 36 dB(A) 35 dB(A) Betriebsart S3: 5 min ein / 5 min aus Schutzklasse ll Mini & Maxi Orange • Sicherheitsschaltung 3 A • Schaltung durch “Hall-Effekt” • Maximale Wassertemperatur: 40ºC / 104ºF • Entladung Schlauch: 6 mm / 1/4” i/d • CE-Kennzeichnung • Integrierter Thermoschutzschalter • Komplett vergossen • Saughöhe: 1 m / 3.3 ft E Mini Orange 120V / 60Hz 230V / 50Hz Alimentación eléctrica 0.29 A / 15 W 0.17 A / 16 W Caudal máximo a 0 m / ft de altura 12 L / 3.2 US Gal 12 L / 3.2 US Gal Máxima altura recomendada 10 m / 33 ft 10 m / 33 ft Nivel sonoro @ 1m 24 dB(A) 23 dB(A) Funcionamiento continuo Clase l Maxi Orange 120V / 60Hz 230V / 50Hz Alimentación eléctrica 0.43 A / 20 W 0.15 A / 15 W Caudal máximo a 0 m / ft de altura 40 L / 10.6 US Gal 26 L / 6.9 US Gal Máxima altura recomendada 15 m / 49 ft 20 m / 66 ft Nivel sonoro @ 1m 36 dB(A) 35 dB(A) Funcionamiento discontinuo: Marcha 5 minutos / Paro 5 minutos Clase ll Mini & Maxi Orange • Contactos de alarma N/O N/C 3A • Sensor de nivel con semi-conductor efecto Hall • Temperatura máxima del agua: 40ºC / 104ºF • Tubo de descarga: 6 mm / 1/4” øi • Normas CE • Protección térmica • Sistema totalmente encapsulado • Autocebante a 1m / 3.3 ft I Mini Orange 120V / 60Hz 230V / 50Hz Tensione di alimentazione 0.29 A / 15 W 0.17 A / 16 W Portata d’acqua/ora @ 0m / ft 12 L / 3.2 US Gal 12 L / 3.2 US Gal Prevalenza massima consigliata 10 m / 33 ft 10 m / 33 ft Livello di rumorosità @ 1 metro 24 dB(A) 23 dB(A) La pompa può funzionare in continuo Apparecchiatura in Classe l Maxi Orange 120V / 60Hz 230V / 50Hz Tensione di alimentazione 0.43 A / 20 W 0.15 A / 15 W Portata d’acqua/ora @ 0m / ft 40 L / 10.6 US Gal 26 L / 6.9 US Gal Prevalenza massima consigliata 15 m / 49 ft 20 m / 66 ft Livello di rumorosità @ 1 metro 36 dB(A) 35 dB(A) La pompa non può funzionare di continuo: 5 minuti on / 5 minuti off Apparecchiatura in Classe ll Mini & Maxi Orange • Cavi allarme liberi da tensione 3A Contatti disponibili N/O N/C • Sensore di livello dell'acqua a semiconduttori con effetto Hall • Temperatura massima dell’acqua di scarico: 40ºC / 104ºF • Tubo di scarico: 6 mm / 1/4” d/i • Omologata CE • Protezione d’arresto per surriscaldamento • Motore pompa rivestito in resina: per riduzione rumorosità e protezione infiltrazioni acqua • Altezza massima di aspirazione: 1 metro / 3.3 ft
  • 5. 76 WE RECOMMEND USING THIS PUMP FOR NO GREATER THAN 10m / 33ft HEAD NOUS RECOMMANDONS DE LIMITER L'UTILISATION DE LA POMPE À 10 MÈTRES / 33 ft WIR EMPFEHLEN, DIE PUMPE NICHTE BEI FÖRDERHÖHEN ÜBER 10 m / 33 ft ZU BETREIBEN SE RECOMIENDA NO USAR ESTA BOMBA EN ALTURAS SUPERIORES A 10 m / 33 ft CONSIGLIAMO DI NON USARE QUESTA POMPA CON PREVALENZE SUPERIORI A 10 METRI / 33 ft WE RECOMMEND USING THIS PUMP FOR NO GREATER THAN 20m / 66ft HEAD NOUS RECOMMANDONS DE LIMITER L'UTILISATION DE LA POMPE À 20 MÈTRES / 66 ft WIR EMPFEHLEN, DIE PUMPE NICHT BEI FÖRDERHÖHEN ÜBER 20 m / 66 ft ZU BETREIBEN SE RECOMIENDA NO USAR ESTA BOMBA EN ALTURAS SUPERIORES A 20 m / 66 ft CONSIGLIAMO DI NON USARE QUESTA POMPA CON PREVALENZE SUPERIORI A 20 METRI / 66 ft Typical Performance (230V) PERFORMANCE / KENNLINIE / FUNCIONAMIENTO HABITUAL / PRESTAZIONI TIPICHE LITRES PER HOUR / LITRES PAR HEURES / FÖRDERMENGE (l/h) / CAUDAL EN LITROS/HORA / LITRI PER ORA 15 12 9 6 3 0 0 3 6 9 12 15 25 20 15 10 5 0 0 5 10 15 20 25 METRESHEAD/HAUTEUREN MÈTRE/FÖRDERHÖHE(m)/ ALTURAENMETROS/ PREVALENZAINMETRI MINI ORANGE – 1m / 3.3ft SUCTION LIFT / 1 m / 3.3 ft DE HAUTEUR D’ASPIRATION / SAUGHÖHE 1 m / 3.3 ft / ALTURA DE ASPIRACIÓN: 1 m / 3.3 ft / ASPIRAZIONE VERTICALE DI 1 m / 3.3 ft LITRES PER HOUR / LITRES PAR HEURE / FÖRDERMENGE (l/h) / CAUDAL EN LITROS/HORA / LITRI PER ORA 15 12 9 6 3 0 0 3 6 9 12 15 25 20 15 10 5 0 0 5 10 15 20 25 METRESHEAD/HAUTEUREN MÈTRE/FÖRDERHÖHE(m)/ ALTURAENMETROS/ PREVALENZAINMETRI MINI ORANGE – NO SUCTION LIFT / POMPE EN CHARGE (SANS DEPRESSION) / KEINE SAUGHÖHE / NO TIENE ALTURA DE ASPIRACIÓN / SIN ASPIRACIÓN US GALLONS PER HOUR / US GALLONS PAR HEURES / US GALLONEN PRO STUNDE / US GALONES POR HORA / US GALLONS PER ORA 50 40 30 20 10 0 0 1 2 3 4 80 60 40 20 0 0 1 2 3 4 5 6 FEETHEAD/HAUTEURENFT/ FÖRDERHÖEINFUSS/ALTURA ENPIES/PREVALENZAINFT US GALLONS PER HOUR / US GALON PAR HEURES / US GALLONEN PRO STUNDE / US GALONES POR HORA / US GALLONS PER ORA 50 40 30 20 10 0 0 1 2 3 4 80 60 40 20 0 0 1 2 3 4 5 6 FEETHEAD/HAUTEURENFT/ FÖRDERHÖEINFUSS/ALTURA ENPIES/PREVALENZAINFT LITRES PER HOUR / LITRES PAR HEURES / FÖRDERMENGE (l/h) / CAUDAL EN LITROS/HORA / LITRI PER ORA METRESHEAD/HAUTEUREN MÈTRE/FÖRDERHÖHE(m)/ ALTURAENMETROS/ PREVALENZAINMETRI MAXI ORANGE – 1m / 3.3ft SUCTION LIFT / 1 m / 3.3 ft DE HAUTEUR D’ASPIRATION / SAUGHÖHE 1 m / 3.3 ft / ALTURA DE ASPIRACIÓN: 1 m / 3.3 ft / ASPIRAZIONE VERTICALE DI 1 m / 3.3 ft LITRES PER HOUR / LITRES PAR HEURE / FÖRDERMENGE (l/h) / CAUDAL EN LITROS/HORA / LITRI PER ORA METRESHEAD/HAUTEUREN MÈTRE/FÖRDERHÖHE(m)/ ALTURAENMETROS/ PREVALENZAINMETRI MAXI ORANGE – NO SUCTION LIFT / POMPE EN CHARGE (SANS DEPRESSION) / KEINE SAUGHÖHE / NO TIENE ALTURA DE ASPIRACIÓN / SIN ASPIRACIÓN US GALLONS PER HOUR / US GALLONS PAR HEURES / US GALLONEN PRO STUNDE / US GALONES POR HORA / US GALLONS PER ORA FEETHEAD/HAUTEURENFT/ FÖRDERHÖEINFUSS/ALTURA ENPIES/PREVALENZAINFT US GALLONS PER HOUR / US GALON PAR HEURE / US GALLONEN PRO STUNDE / US GALONES POR HORA / US GALLONS PER ORA FEETHEAD/HAUTEURENFT/ FÖRDERHÖEINFUSS/ALTURA ENPIES/PREVALENZAINFT Preventing Siphoning advice / EMPECHER LE SIPHONAGE: CONSEILS / “HEBER – EFFEKT”: LÖSUNG / RECOMENDACIONES PARA EVITER EL EFECTO SIFON / CONSIGLI PER LA PREVENZIONE DELL’EFFETTO SIFONE D F Cut discharge tube above water level of evaporator tray and direct end into large pipe, allowing air break. Couper le tuyau de refoulement au dessus du niveau d'eau de l'évaporateur et introduire le tuyau directement à l'intérieur d'un tuyau plus large. Das Ende der Druckleitung darf nicht tiefer enden als der Wasserstand in der Kondensatwanne. Der Druckschlauch kann danach in ein größeres Ablaufrohr eingeführt werden. Mantenga el extremo final del tubo de descarga por encima del nivel de la bandeja de condensados. Tagliare il tubo di scarico sopra il livello dell'acqua della vaschetta del condizionatore come rappresentato nella figura sottostante. ATTENZIONE: assicurarsi sempre che la lunghezza del tratto orizzontale sia superiore a quella del tratto verticale per caduta e che l’uscita superiore del tubo di sfiato del serbatoio superi il livello dell’acqua della vaschetta. GB I E D F GB 1. FALSE CEILING 2. END OF DISCHARGE TUBE 3. WATER LEVEL IN DRAIN TRAY 4. AIR BREAK 5. TOP OF BREATHER TUBE 1. FAUX PLAFOND 2. FIN DU TUYAU DE REFOULEMENT 3. NIVEAU D'EAU DANS LE PLATEAU 4. PRISE D’AIR 5. NIVEAU HAUT DU TUBE D’ÉVENT 1. ZWISCHENDECKE 2. ENDE DER DRUCKLEITUNG 3. WASSERSTAND DER KONDENSATWANNE 4. ATMOSPHÄRE 5. ENDE DES ENTLÜFTUNGS-SCHLAUCHS 1. FALSO TECHO 2. EXTREMO DEL TUBO DE DESCARGA 3. NIVEL DE AGUA EN LA BANDEJA 4. TOMA DE AIRE 5. NIVEL SUPERIOR DEL TUBO DE RESPIRACIÓN 1. CONTRO-SOFFITTO 2. FINE TUBO VINILICO DI SCARICO 3. LIVELLO DELL'ACQUA NELLA VASCHETTA 4. PUNTO DI INNESTO NEL CONDOTTO DI SCARICO 5. USCITA SUPERIORE TUBO DI SFIATO E I 5 2 3 4 1 * * * * * * * * * *
  • 6. 98 • ATTENZIONE: La pompa Orange è stata progettata per il solo impiego con acqua. • AVVERTENZA: Rischio di scossa elettrica. Questa pompa non è stata testata per l'uso all'interno di piscine o in aree marine. • Accertarsi che la pompa sia scollegata dalla tensione di rete prima di effettuare qualsiasi messa a punto o manutenzione. • L’isolamento dei collegamenti elettrici deve essere fatto a regola d’arte e realizzato in conformità con le normative vigenti. • Se il cavo di alimentazione fornito in confezione fosse danneggiato, dovrà essere sostituito con un nuovo cablaggio originale fornito dal produttore. • Non azionare la pompa in assenza di acqua. • Assicurarsi sempre che il magnete del galleggiante sia rivolto verso l’alto. • Assicurarsi sempre che il serbatoio sia in posizione piana e orizzontale. • La pompa è adatta per la maggior parte degli ambienti. E’ però sconsigliato il suo impiego in ambienti oleosi o particolarmente polverosi. • Da utilizzare solo per uso interno. • Pompa non sommergibile. I • ATENCION: La bomba Orange ha sido diseñada para funcionar solo con agua. • CUIDADO: Riesgo de descargas eléctricas. Esta bomba no ha sido diseñada para ser utilizada en piscinas ni aplicaciones marinas. • La instalación eléctrica y el aislamiento de la bomba debe efectuarse según las normas eléctricas vigentes. • Desconectar la alimentación eléctrica de la bomba antes de efectuar cualquier intervención en la misma. • Si el cable de alimentación está estropeado, debe ser reemplazado por un cable especial suministrado por el fabricante o su proveedor. • No hacer funcionar esta bomba en vacío. • Asegurarse que el imán del flotador está colocado en la parte superior. • Asegurarse que el depósito está colocado plano y horizontal. • La bomba está adaptada a la mayoría de los ambientes. No está recomendada cuando el ambiente es particularmente polvoriento u oleoso. • Instalación únicamente en el interior. • Esta bomba no es sumergible. E Product Safety / PRÉCAUTIONS D’INSTALLATION / PRODUKTSICHERHEIT / GARANTIA DE PRODUCTO / NORME DI SICUREZZA • ACHTUNG: Die Orange Systempumpe ist nur für die Wasserförderung entwickelt worden. • WARNUNG: Gefahr eines Stromschlags. Die Orange Pumpe ist nicht für den Einsatz in oder an Schwimmbädern oder Hafenanlagen entwickelt worden. • Die Pumpe darf nur durch autorisiertes Fachpersonal angeschlossen werden. • Die Stromzufuhr ist vor jeglicher Arbeit an der Orange Pumpe zu unterbrechen. • Sollte das Stromkabel beschädigt sein, so ist es mit einem als Zubehör erhältlichen Kabel zu ersetzen. • Verhindern Sie Trockenlauf. • Vergewissern Sie sich, dass der Schwimmermagnet nach oben zeigend eingebaut ist. • Vergewissern Sie sich, dass das Schwimmergehäuse waagerecht steht. • Die Orange Pumpe ist vielfältig einsetzbar. Wenn die Umgebung ölig oder stark verschmutzt ist der Einsatz der Orange Pumpe nicht zu empfehlen. • Die Pumpe nur im Innenbereich verwenden. • Nicht als Tauchpumpe einsetzbar. D • ATTENTION : La pompe d'Orange a été évaluée pour l'usage avec de l'eau seulement. • AVERTISSEMENT : Risque de décharge électrique. Cette pompe n'a pas été étudiée pour l'usage dans une piscine, un aquarium ou en fonctionnement immergé. • L’isolement électrique de la pompe doit être réalisé dans les règles de l’art. • S’assuré que la pompe est débranchée électriquement avant toute opération de maintenance ou entretien. • Si le cordon en emdommagé, il est indispensable de le changé par un nouveau cordon. • Ne pas faire fonctionner cette pompe à sec. • S’assurer que l’aimant du flotteur est toujours positionner vers le haut. • S’assurer que le réservoir est toujours positionné à l’horizontal et à plat. • La pompe est adaptée à la plupart des environnements. Elle n’est pas recomman dé dans les environnements sales, poussiéreux, huileux. • Installation uniquement à l’intérieur. • Cette pompe n’est pas ne pompe submersible. F • CAUTION: The Orange Pump has been evaluated for use with water only. • WARNING: Risk of electric shock. This pump has not been investigated for use in swimming pool or marine areas. • The means for isolation must be incorporated in the fixed wiring in accordance with wiring regulations. • Ensure the pump is disconnected from the mains supply before carrying out any adjustments or servicing. • If the cord is damaged, it must be replaced with a special cord or assembly available from the manufacturer or it’s service agent. • Do not run this pump dry. • Always ensure the metal magnet in the float is facing upwards. • Always ensure the reservoir is sitting flat and horizontal. • The Pump is ideal for most working and living environments. It is not recommended where the environment is oily or particularly dusty. • Acceptable for indoor use only. • Non-submersible pump. GB
  • 7. 4 D F Fit breather tube to reservoir lid. Tube d’évent. Entlüftungsschlauch am Stutzen des Schwimmerdeckels befestigen. Coloque el tubo de purga en la entrada del depósito. Innestare il tubo di sfiato al coperchio del serbatoio. GB I E 5 D F Install pump drive unit above the ceiling where possible. Installer la pompe dans l'unité, dans la goulotte ou dans le faux plafond. Installieren Sie die Pumpe, wenn möglich, oberhalb der Zwischendecke. GB I E 10 150mm / 6” (6x9mm / 1/4” x 3/8”) vinyl tube tube cristal Vinylschlauch tubo vinilico D F GB 1 FALSE CEILING 2 EVAPORATOR COIL 3 CONDENSATE DRAIN TRAY 4 VINYL TUBE 5 CONDUIT 1 FAUX PLAFOND 2 SERPENTIN D’ÉVAPORATION 3 BAC DE RÉCUPÉRATION DES CONDENSATS 4 TUBE CRISTAL 5 GOULOTTE E I 1 4 2 3 5 EXAMPLE POSITIONS / EXEMPLE DE POSITIONNEMENT / EINBAUBEISPIELE / EJEMPLOS DE UBICACIÓN / ESEMPI D'INSTALLAZIONE ABOVE CEILING / AU-DESSUS D PLAFOND / IN DER ZWISCHENDECKE / SOBRE EL TECHO / SOPRA IL CONTRO-SOFFITTO INSIDE CONDUIT / DANS LE GOULOTTE / IM KABELKANAL / INTERIOR DE LA CANALETA / DENTRO LA CANALINA BEHIND EVAPORATOR / DERRIÈRE L’ÉVAPORATEUR / HINTER DEM KLIMASPLITGERÄT / DETRÁS DEL EVAPORADOR / ALL’INTERNO DELL’UNITA’ EVAPORANTE 11 6 8 F Push the 6 x 9mm / 1/4” x 3/8” i/d tube onto the reservoir and the pump. Secure with cable-ties. Ensure length is under 2 metres / 6.6ft. Insérer le tube cristal 6 x 9 mm / 1/4” x 3/8” dans l’orifice du bac à condensats et le relier à l‘aspiration de la pompe. S’assurer que le longueur du tube cristal est inférieur à 2 mètre / 6.6 ft. GB I E 7 D F Note direction of water flow. Sens de pompage. Beachten der Durchflussrichtung. Observar la dirección de la corriente. Notare il senso dello scorrimento dell'acqua. GB I E Verbinden Sie den Saugschlauch (6 x 9 mm / 1/4” x 3/8”) mit dem Schwimmergehäuse und der Saugseite der Pumpe und sichern Sie beide Abschlüsse mit Kabelbindern. Die Gesamtlänge der Saugseite darf 2 m / 6.6 ft nicht überschreiten. Empuje el tubo de diámetro 9x6 / 3/8” x 1/4” hacia el depósito y la bomba. Asegúrese de que queda bien conectado. Compruebe que la longitud sea inferior a los 2 metros / 6.6 ft. Inserire il tubo vinilico da 6 mm / 1/4” d/i (in dotazione) tra il serbatoio ed il corpo pompa. Fissarlo con fascette. Assicurarsi che la lunghezza non superi i 2 metri / 6.6 ft. Collegare sempre al corpo pompa il cavo del sensore fissato al coperchio del serbatoio. D ANTI-VIBRATION MATERIAL / RUBAN ANTI VIBRATION / VIBRATIONSDÄMMENDES MATERIAL / MATERIAL ANTIVIBRATORIO / MATERIALI ANTIVIBRANTI E FONO ASSORBENTE FROM RESERVOIR / ARRIVÉE DU RÉSERVOIR / VOM SCHWIMMERSCHALTER / DE DEPÓSITO / DAL SERBATOIO TO DRAIN / ÉVACUATION / ZUM ABLAUF / PARA DRENAR / ALLO SCARICO A B C 2m / 6.6ft A B C 1 ZWISCHENDECKE 2 KLIMAGERÄT 3 KONDENSATWANNE 4 SAUGSCHLAUCH 5 KABELKANAL 1 FALSO TECHO 2 BATERÍA DEL EVAPORADOR 3 BANDEJA DE DESAGÜE DE CONDENSADOS 4 TUBO DE PLÁSTICO 5 CANALETA 1 CONTRO-SOFFITTO 2 EVAPORATORE 3 VASCHETTA SCARICO CONDENSA 4 TUBO VINILICO 5 CANALINA 3 D F GB I E Secure reservoir horizontally using velcro strips and for the inline reservoir use the inlet hose to connect firmly to drainage pipe. S’assurer que le flotteur est bien positionné à plat, à l’horizontal et bien connecter de façon étanche à l’arrivée des condensats. Waagerechter Einbau des Schwimmergehäuses. Verbinden Sie den Einlauf mit dem Auslauf der Kondensatwanne mittels elastischen Anschlussstücks. Asegurarse que el depósito esta fijo en una superficie plana y horizontal. Utilizar las tiras de velcro. Conectar firmemente el tubo de llegada de condensados. Assicurare orizzontalmente il serbatoio usando le strisce di velcro. Per il serbatoio interno utilizzare il connettore in gomma di colore arancio (in dotazione) per collegarlo saldamente alla tubazione di scarico dell’unità evaporante. 2 D F Ensure float is positioned in reservoir with magnet uppermost, the filter is in place and the lid is clipped firmly onto reservoir. S’assurer que le flotteur est bien positionné dans le bac avec l’aimant vers le haut, que le filtre est en place et le couvercle est bien refermé. Der Schwimmer muss mit dem Magnet nach oben zeigend eingebaut werden. Achten Sie auf den korrekten Sitz des Filters. Der Deckel rastet auf demSchwimmergehäuse ein. Coloque el flotador en el depósito con el imán magnético lo más alto posible, y ponga la tapa sobre el depósito. Assicurarsi che il galleggiante sia posizionato nel serbatoio con il magnete rivolto verso l'alto, che il filtro sia inserito e che il coperchio sia agganciato saldamente sul serbatoio. GB I E Installation / INSTALACION / INSTALLAZIONE 1 D F Select reservoir type. Choisir le type de réservoir. Vorratsbehälterart vorwählen. Seleccionar el tipo del depósito. Selezionare il tipo del serbatoio. GB I E Instalar la bomba en el falso techo cuando sea posible. Installare il corpo pompa sopra il contro-soffitto dove possibile. In alternativa all’interno dell’unità evaporante o nella canalina.
  • 8. Horizontal Distance 30m 60m 90m 3m 7.2 7.0 6.6 2m 7.3 7.1 7.1 Head F GB Installation / INSTALACION / INSTALLAZIONE 9 D F GB I E 12 10 11 13 APPROPRIATE DRAIN / L’ÉCOULEMENT DES CONDENSATS / ABFLUSSLEITUNG / DESAGÜE APROPIADO / SCARICO APPROPRIATO D F GB I E PUMP UNIT / POMPE / PUMPE / BOMBA / POMPA INDOOR UNIT / UNITÉ D'INTÉRIEUR / INNENEINHEIT / UNIDAD DE INTERIOR / UNITA' INTERNA INTERCONNECTING CABLES / CÂBLES STEUERKABEL / AUSSEN-EINHEIT / CABLES DE INTERCONEXIÓN / CAVI DI COLLEGAMENTO OUTDOOR UNIT / UNITÉ EXTÉRIEURE / ASSENEINHEIT / UNIDAD AL AIRE LIBRE / UNITA' ESTERNA 1 2 3 4 3 42 1 Install a 1 amp inline fuse. A high-level alarm switch should be wired into the cooling signal wire, to prevent the continued operation of the air conditioning unit in the event of the pump failing. IMPORTANT: This diagram is an example of how the pump could be installed and is therefore for reference only. All pump units must be installed by qualified engineers, who have assessed the set-up of the individual a/c unit. Installer un fusible d’1 Amp. Le contact de niveau haut d'alarme doit être câblé au signal de refroidissement, pour ne plus faire fonctionner l'appareil en mode froid si la pompe est défaillante. IMPORTANT: Ce diagramme est un exemple de la façon dont la pompe pourrait être installée. Toutes les unités de pompe doivent être installées par les téchniciens qualifiés, qui maitrisent l'installation et les branchements électriques du climatiseur. Installieren Sie zum Schutz der Pumpe eine 1 A-Sicherung (flink) in der Zuleitung (siehe Anschlussplan). Der Alarmschalter sollte angeschlossen werden um die Klimaanlage, im Falle eines Ausfalls der Pumpe, auszuschalten. WICHTIG: Der nebenstehende Anschlussplan ist nur ein Beispiel wie die Pumpe angeschlossen werden kann. Alle Pumpen müssen von qualifizierten Fachkräften installiert werden. Instale un fusible de 1 A en línea. El interruptor de alarma de nivel alto de agua debe ser conectado a la señal del sistema de enfriamiento, para evitar que este continúe funcionando en caso de avería de la bomba. IMPORTANTE: Este diagrama es un ejemplo de cómo la bomba debería ser instalada, solo como referencia. Todas las bombas deben ser instaladas por personal cualificado. Installare sempre un fusible da 1 Amp. Il cavo di allarme per l'alto livello fornito in dotazione deve essere collegato alla linea della funzione raffreddamento del condizionatore, allo scopo di prevenirne il continuo funzionamento in caso di disservizio della pompa. IMPORTANTE: Questo diagramma è un esempio di come la pompa potrebbe essere installata ed è perciò solo un riferimento. Tutte le pompe devono essere installate da addetti qualificati, che abbiano verificato le impostazioni di ciascuna fattispecie di climatizzatore. Test pump operation by pouring water into evaporator tray. CHECK FOR LEAKS. Verser de l’eau dans le bac à condensats, vérifier le bon fonctionnement de la pompe et l’absence de fuite d’eau. Die Pumpe muss nach der Installation mit Wasser in Betrieb genommen werden. Dabei ist auf Dichtigkeit zu achten. Compruebe el funcionamiento de la bomba, vertiendo agua sobre la bandeja de condensados y controle posibles fugas. Testare il funzionamento della pompa versando acqua nella vaschetta dell’unità evaporante. CONTROLLARE CHE NON CI SIANO PERDITE prima di chiudere ed avviare l’impianto. GB (N.C.) NORMALLY CLOSED: Purple (COM)COMMON: Grey (N.O.) NORMALLY OPEN: Orange F (L) PHASE: Marron (N)NEUTRE: Bleu (E) TERRE: Vert/Jaune (N.C.) NORMALEMENT BRANCHE: Violet (COM)COMMUN: Gris (N.O.) NORMALEMENT OUVERT: Orange D (L) PHASE: Braun (N)NEUTRAL: Blau (E) SCHUTZLEITER: Grün-gelb (N.C.) ÖFFNER: Lila (COM)PHASE: Grau (N.O.) SCHLIESSER: Orange E (L) TOMA: Marrón (N)NEUTRO: Azul (E) TIERRA: Verde/Amarillo (N.C.) NORMALMENTE CERRADO: Morado (COM)COMUN: Gris (N.O.) NORMALMENTE ABIERTO: Naranja I (L) FASE: Marrone (N)NEUTRO: Blu (E) TERRA: Verde/Giallo (N.C.) NORMALMENTE CHIUSO: Porpora (COM)COMUNE: Grigio (N.O.) NORMALMENTE APERTO: Arancio (L) LIVE: Brown (N)NEUTRAL: Blue (E) EARTH: Green/Yellow POWER / PUISSANCE / STROMVERSORGUNG / ALIMENTACION / ALIMENTAZIONE: ALARM/VOLT FREE / ALARME/CONTACT / SICHERHEITSEINRICHTUNG / RELÉ ALARMA SIN RIESGO ELECTRICO / ALLARME/CONTATTI LIBERI DA TENSIONE:European 230V: US 230V: US 120V: (L) LINE 1: Noir (N)LINE 2: Rouge (E) TERRE: Vert (L) LINE 1: Schwarz (N)LINE 2: Rot (E) GRUND: Grün (L) LINE 1: Negro (N)LINE 2: Rojo (E) TERRENO: Verde (L) LINE 1: Nero (N)LINE 2: Rosso (E) TERRENO: Verde (L) LINE 1: Black (N)LINE 2: Red (E) GROUND: Green (L) LINE 1: Noir (N)LINE 2: Blanche (E) TERRE: Vert (L) LINE 1: Schwarz (N)LINE 2: Weiß (E) GRUND: Grün (L) LINE 1: Negro (N)LINE 2: Blanco (E) TERRENO: Verde (L) LINE 1: Nero (N)LINE 2: Bianco (E) TERRENO: Verde (L) LINE 1: Black (N)LINE 2: White (E) GROUND: Green D I E Schliessen Sie einen Schlauch mit 6 mm / 1/4” Innen-ø an die Druckseite der Pumpe an und sichern Sie ihn mit dem mitgelieferten Kabelbinder. Führen Sie den Druckschlauch in einen geeigneten Abfluss. Vermeiden Sie Einschnürungen. Conecte un tubo de plástico de 6 x 9 mm / 1/4” x 3/8” en la descarga de la bomba y asegurarlo con la brida. Dirigir el tubo a un desagüe evitando restricciones y dobleces. Collegare il tubo vinilico di scarico da 6 mm / 1/4” d/i al raccordo d’uscita del corpo pompa ed fermarlo con una fascetta. Indirizzare la tubazione verso uno scarico appropriato, evitandone strozzature. Mini Orange Horizontal Distance 30m 60m 90m 3m 20 18 17 2m 20 18 17 Head Maxi Orange MINI ORANGE: 10m / 33ft MAXI ORANGE: 20m / 66ft (100m max) (100m max) Horizontal Losses (L/hr): Connect your 6 x 9mm / 1/4 x 3/8” vinyl discharge tube to the outlet barb on the Mini Orange and secure with a cable tie. Channel discharge tube to an appropriate drain, avoiding restrictions. Connecter votre tube cristal 6 x 9mm / 1/4” / 3/8” au refoulement de la pompe vers l’écoulement des condensats, évitant des restrictions.
  • 9. 15 Troubleshooting / PANNES/DEFAILLANCES / FEHLERBEHEBUNG / LOCALIZACION DE AVERIAS / SOLUZIONE DEI PROBLEMI – FAQ Fault: Pump runs all the time 1. Is float positioned with the magnet uppermost? 2. Is the reservoir lid (sensor) located firmly onto the reservoir, with the float located inside the reservoir, around the sensor column? 3. Is there sludge inside the reservoir, preventing float from resting on the bottom? (This may occur if pump has been in operation for some time with- out cleaning. Clean using an anti-bacterial wash.) Please note: • After installation and during operation, if you notice air in the pipe between the reservoir and the pump, you have a siphoning problem. (Follow advice in ‘Preventing Siphoning’ section on page 7). • The pump will only switch off when the float is at the bottom of the reservoir. Fault: Pump stops and starts and makes a loud noise. 1. The water is siphoning back through the pump. Follow advice in ‘Preventing Siphoning’ section. Fault: Pump runs but does not pump any water. 1. Are there any air-leaks in the pipe running to the pump? 2. Check that reservoir, filter and inlet tube are free of sludge and debris. Fault: Pump isn’t operating at all. 1. Is power reaching the pump? Is it correctly wired? Is the voltage correct? 2. Is pump very hot? A thermal cut-out may have been activated to protect pump. This will automatically reset once pump has cooled down. GB La pompe fonctionne sans interruption ! 1. L'aimant du flotteur est-il en position haute ? 2. Le couvercle du bac / réservoir est bien fermé avec le flotteur à l’intérieur (face de l’aimant vers la haut). 3. Y-a-t-il des impuretés à l'intérieur du réservoir, bloquant le flotteur en position basse ? (ceci peut être le cas si la pompe n'a pas fonctionné depuis quelques temps. Nettoyer en utilisant un produit anti-bactériologique). Merci de noter : • S’il y a de l’air dans le tube cristal d’aspiration de la pompe (entre le bac/réservoir et l’aspiration de la pompe), après l’installation et lors du fonctionnement de la pompe : IL Y A UN PROBLEME DE SIPHONAGE (Voir page 7). • La pompe sera uniquement déconnectée quand le flotteur sera en position basse dans le réservoir. La pompe arrête et redémarre et fait un bruit sourd ! 1. L'eau est siphonnée à travers la pompe. Suivre les conseils en page 7 pour éviter le siphonage. La pompe fonctionne et ne débite pas d'eau ! 1. N'y a t-il pas une prise d'air avant la pompe ? (utiliser des raccords assurant l'étanchéité à l'air). 2. Assurez-vous que le réservoir, le filtre et le tube soient propres. La pompe ne fonctionne pas du tout ! 1. La pompe est-elle branchée ? l'est-elle correctement ? Le réseau électrique est-il correct ? 2. La pompe est-elle chaude ? Une sécurité thermique a du être activée qui remettra automatiquement la pompe en route dès que la température sera descendue. F ! Die Pumpe läuft ständig. 1. Ist der Schwimmer falsch eingebaut? 2. Ist der Deckel des Schwimmergehäuses richtig eingerastet? 3. Ist im Schwimmergehäuse Schmutz und Schleim, der den Schwimmer am Boden festhält? (Dieses kann nach einiger Betriebszeit der Grund sein. Bei der Reinigung bitte ein anti-bakterielles Mittel verwenden). Zu Beachten! • Haben Sie während der Kondensatförderung Luft in der Saugleitung, obwohl keine Fremdluft in die Saugleitung gelangen kann, dann handelt es sich um den sogenannten “Heber-Effekt” (siehe Seite 7). • Die Pumpe schaltet nur dann ab, wenn der Schwimmer waagerecht auf dem Boden des Schwimmergehäuses liegt. D 14 Servicing / MAINTENANCE / WARTUNG / SERVICIO / MANUTENZIONE • Diese Pumpe muss wie alle mechanischen Geräte gewartet werden. • Alle 6 Monate sollte das Schwimmergehäuse sowie der Filter gereinigt werden. Wir empfehlen vor und nach der Saison die Reinigung vorzunehmen. • Besonders muss darauf geachtet werden, dass das Schwimmergehäuse waagerecht justiert wird und der Schwimmer mit dem Magnet nach oben zeigend eingebaut wird.* • Zusätzliche Vorfilter sind auf Anfrage erhältlich. D • Esta bomba, como todo equipamiento mecánico, requiere de un mantenimiento. • Cada seis meses, el depósito debería ser extraido, a fin de limpiar los filtros y el depósito por completo. Recomendamos se realice esta operación en primavera y en otoño, haciendo uso de un bactericida. • Tenga extremo cuidado al reemplazar la boya, colocando el imán hacia arriba.* • Filtros adicionales en línea están disponibles si es necesario. E • Questa pompa, come tutte le apparecchiature elettromeccaniche, richiede manutenzione. • Se la pompa funziona tutto l’anno, ogni sei mesi il serbatoio dovrebbe essere rimosso al fine di pulire bene il filtro, il galleggiante ed il serbatoio prima del riassemblaggio. Si consiglia di effettuare la manutenzione in Primavera ed Autunno, usando una soluzione di lavaggio battericida. • Fare la massima attenzione nel risistemare il galleggiante con il magnete rivolto verso l'alto.* • Ulteriori filtri in linea sono disponibili su richiesta. I • Cette pompe, comme tous équipements mécaniques, exige une maintenance. • Tous les six mois le réservoir doit être démonté, en prenant soin de nettoyer les filtres et le réservoir. Nous recommandons de le faire au printemps et à l'automne, en utilisant un nettoyant anti-bactériologique. • Prendre particulièrement soin de replacer le flotteur avec l'aimant vers le haut.* • Filtres en ligne disponibles si nécessaire. F • This Pump, like all mechanical equipment, requires maintenance. • Every six months the reservoir should be removed, taking care to clean the filter, float and reservoir thoroughly prior to reassembly. We recommend this is done in the Spring and the Autumn, using an anti-bacterial wash. • Take great care to replace the float with the magnet facing upwards.* • Additional inline filters are available if required. GB * fortsetzen...
  • 10. Troubleshooting / PANNES/DEFAILLANCES / FEHLERBEHEBUNG / LOCALIZACION DE AVERIAS / SOLUZIONE DEI PROBLEMI – FAQ Avería: La bomba está en continuo funcionamiento 1. Compruebe que la boya esté situada en la parte más alta. 2. Verifique que el sensor está bien ajustado al depósito, con el flotador en su interior. 3. Realice una limpieza con bactericida si hay restos de suciedad en el interior del depósito, ya que impediría el libre movimiento de la boya. ATENCION • Si hay aire en la tubería entre el depósito y la bomba, tras su instalación y durante su funcionamiento, se deberá por un problema de sifón (ver página 7). • La bomba sólo se parará si la boya se encuentra en el fondo del depósito. Avería: La bomba se para y reinicia y emite mucho ruido 1. El agua produce un efecto sifón en la bomba. Siga las recomendaciones especificadas para evitar el efecto sifón. Avería: La bomba funciona pero no aspira el agua 1. Compruebe si existen fugas de aire en la tubería que va hacia la bomba. 2. Verifique que el depósito de la bomba, filtro, y el tubo de descarga no presente restos de suciedad. Avería: La bomba no funciona 1. Compruebe que llega la tensión a la bomba, que los cables estén bien conectados y que la alimentación sea la correcta. 2. Si la bomba está muy caliente, podría deberse a que se hubiera activado el protector térmico. De ser así, la bomba se pondrá en marcha una vez se haya enfriado. E ! Die Pumpe arbeitet normal, macht aber hin und wieder sehr starke Geräusche. 1. Es entsteht durch den "Heber-Effekt" Trockenlauf. Sehen Sie dazu Seite 7 oder melden sich bei uns. ! Die Pumpe schaltet zwar ein, aber es wird kein Kondensat gefördert. 1. Sind Undichtigkeiten saugseitig vorhanden, so dass Luft in die Pumpe gelangt? 2. Profen sie, ob das Schwimmergehäuse, der filrer und der Saugschlauch frei von Ablagerungen und Schlamm sind. ! Die Pumpe arbeitet nicht. 1. Liegt Strom an? Ist die Pumpe richtig verkabelt? Ist die Spannung richtig? 2. Ist die Pumpe sehr heiss? Dann hat der Thermoschutzschalter die Pumpe abgeschaltet. Nach der Abkühlung wird die Pumpe wieder automatisch angeschaltet. I Difetto: La pompa funziona di continuo 1. Il magnete del galleggiante è rivolto verso l'alto ? 2. Il coperchio è posizionato saldamente sul serbatoio, con il galleggiante inserito al suo interno nell’apposita colonna (sensore) ? 3. C'è per caso del deposito sul fondo del serbatoio, che impedisce al galleggiante di depositarsi sul fondo correttamente? (Ciò può avvenire se la pompa ha lavorato per un certo periodo di tempo senza aver pulito regolarmente il serbatoio. Eliminare tale deposito mediante lavaggio con una soluzione battericida). Nota Bene: La pompa si arresta solo quando il galleggiante è sul fondo del serbatoio. Difetto: La pompa attacca e stacca ed è molto rumorosa 1. L'acqua di ritorno che attraversa il corpo pompa contiene aria ? Se dopo l'installazione e durante l'utilizzo notate dell’aria nel tubo vinilico trasparente posto tra il serbatoio e la pompa, in tal caso avete un problema di effetto sifone (Per risolverlo seguite i consigli indicati nell’apposita sezione a pag. 7). Difetto: La pompa lavora ma non pompa acqua 1. C'è qualche infiltrazione d'aria nella tubazione che porta alla pompa ? 2. Controllate che il serbatoio, il filtro e la tubazione di scarico siano liberi da detriti e fanghiglia. Difetto: La pompa non lavora affatto ! 1. Arriva corrente alla pompa ? L'allacciamento è corretto ? Il voltaggio è quello adeguato ? 2. La pompa è molto calda ? Il dispositivo anti-surriscaldamento può essersi attivato per proteggere la pompa. Il dispositivo si disattiverà automaticamente appena la pompa si sarà raffreddata. ASPEN/4/09 1491 This brochure was produced from sustainable stock.