
Empfohlen
Weitere ähnliche Inhalte
Was ist angesagt?
Was ist angesagt? (12)
Andere mochten auch
Ähnlich wie Glogster Directions
Ähnlich wie Glogster Directions (20)
Mehr von chsmediacenter
Mehr von chsmediacenter (20)
Kürzlich hochgeladen
Kürzlich hochgeladen (20)
Glogster Directions
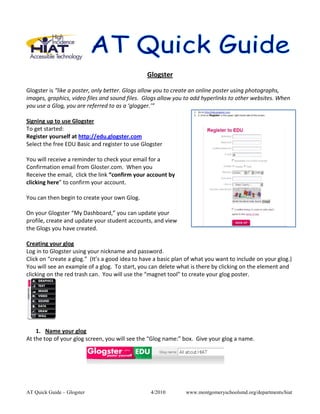
- 1. Glogster Glogster is “like a poster, only better. Glogs allow you to create an online poster using photographs, images, graphics, video files and sound files. Glogs allow you to add hyperlinks to other websites. When you use a Glog, you are referred to as a ‘glogger.’” Signing up to use Glogster To get started: Register yourself at http://edu.glogster.com Select the free EDU Basic and register to use Glogster You will receive a reminder to check your email for a Confirmation email from Gloster.com. When you Receive the email, click the link “confirm your account by clicking here” to confirm your account. You can then begin to create your own Glog. On your Glogster “My Dashboard,” you can update your profile, create and update your student accounts, and view the Glogs you have created. Creating your glog Log in to Glogster using your nickname and password. Click on “create a glog.” (It’s a good idea to have a basic plan of what you want to include on your glog.) You will see an example of a glog. To start, you can delete what is there by clicking on the element and clicking on the red trash can. You will use the “magnet tool” to create your glog poster. 1. Name your glog At the top of your glog screen, you will see the “Glog name:” box. Give your glog a name. AT Quick Guide – Glogster 4/2010 www.montgomeryschoolsmd.org/departments/hiat
- 2. 2. Add a background “wall” Select “wall” from the magnet toolbox. Be sure you are in the Glog Wall tab. Select a wall and click “USE IT.” This will place a background on the actual glog. The Page Wall changes the color or pattern of the border outside the glog wall. 3. Add graphics Select “graphics” on the magnet toolbar. Explore the many decorative graphics and click once to select your graphic and click “USE IT” to add it to your glog. Select as many graphics as you like. You can always delete them. 4. Add images Select the ‘Image” button on the magnet toolbar to upload photos and pictures. Use the “Upload” button to browse to image files on your computer or flash drive. Select the image you want and click “Open” to add it to your glog library. Then select your image and click “USE IT” to add it to your glog. (It will be added to the bottom of your screen. Click and drag it to the desired location.) You can also add a frame using the “Add a Frame” button. 5. Add text Select “Text” on the magnet toolbar. You can add text as a bubble, as a title or as a sticker, then click “USE IT.” When the text box appears on your screen, click “Edit” to type text. Click on the “Ab1” button to change the font size an style. Change the font size to make all of your text visible. Click on the “fx” button to change text color. You can also add a hyperlink. AT Quick Guide – Glogster 4/2010 www.montgomeryschoolsmd.org/departments/hiat
- 3. 6. Adding sounds and videos You can also select the “Sound” or “Video” buttons on the magnet bar if you want to add sound files or video files. 7. Save and publish your glog Click on the “Save and Publish” button to save your glog. Be sure you have given it a unique name (refer to step 1). Select a category and add tags to help locate your glog. Be sure to choose whether you want the glog to be public or private. You can click on “Unfinished” if you want to return later to work on this. Then Click on the “SAVE” button. You will see a unique URL for your glog. AT Quick Guide – Glogster 4/2010 www.montgomeryschoolsmd.org/departments/hiat
- 4. Note: If you made your glog private, you need to copy the URL now and save it in a safe place. You won’t be able to find your glog again, otherwise! Click on “View this Glog” to see what it looks like online. 8. Share your glog Share the link to your glog with anyone you like so that they can see your glog, even it if is private. You can find your public glogs later from your Profile. Log into your glogster account and then click on “View my profile” or just click on your nickname. Click on “Glogs” in your profile to see your glogs. Then click on the glog you want to share. The URL will be in the address bar of your Internet Explorer window. Simply copy that URL and share it with your viewers. You can even embed your blog on a website. Find the share button at the bottom of your public blog to see more sharing options. 9. Print your glog To print out a copy of your glog, right click on your glog and select “Print Glog.” If you have a poster making machine at your school, turn your 8” x 11” copy into a poster and create a bulletin board display. AT Quick Guide – Glogster 4/2010 www.montgomeryschoolsmd.org/departments/hiat
- 5. Examples: AT Quick Guide – Glogster 4/2010 www.montgomeryschoolsmd.org/departments/hiat
- 6. The HIAT Glog: http://dcdecoste.edu.glogster.com/all-about-hiat/ AT Quick Guide – Glogster 4/2010 www.montgomeryschoolsmd.org/departments/hiat